

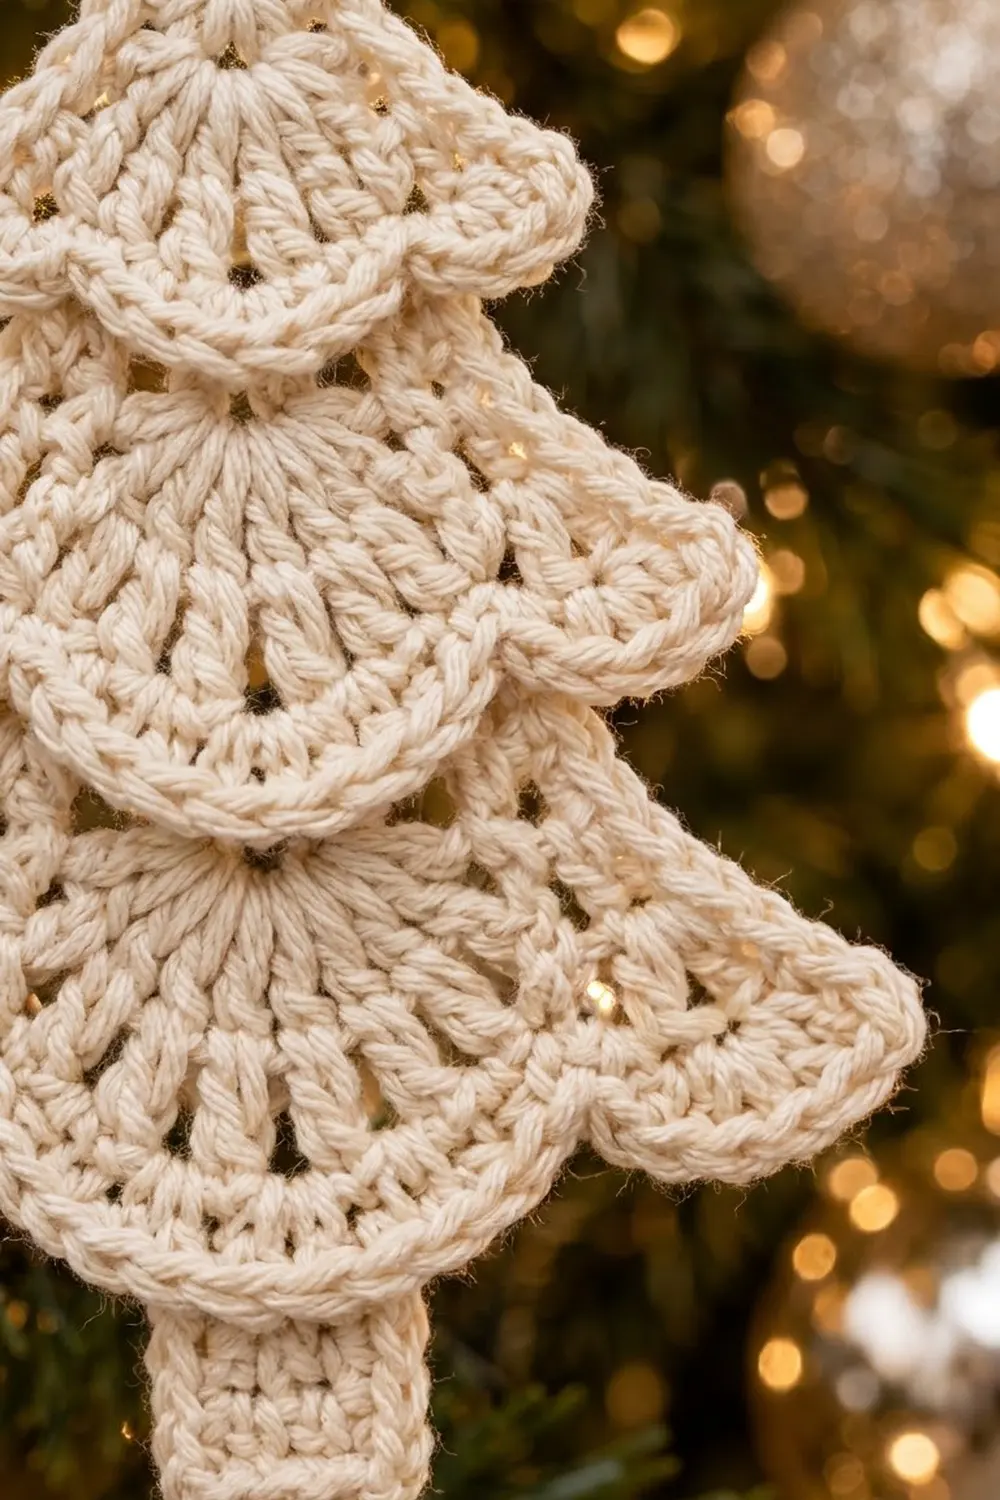
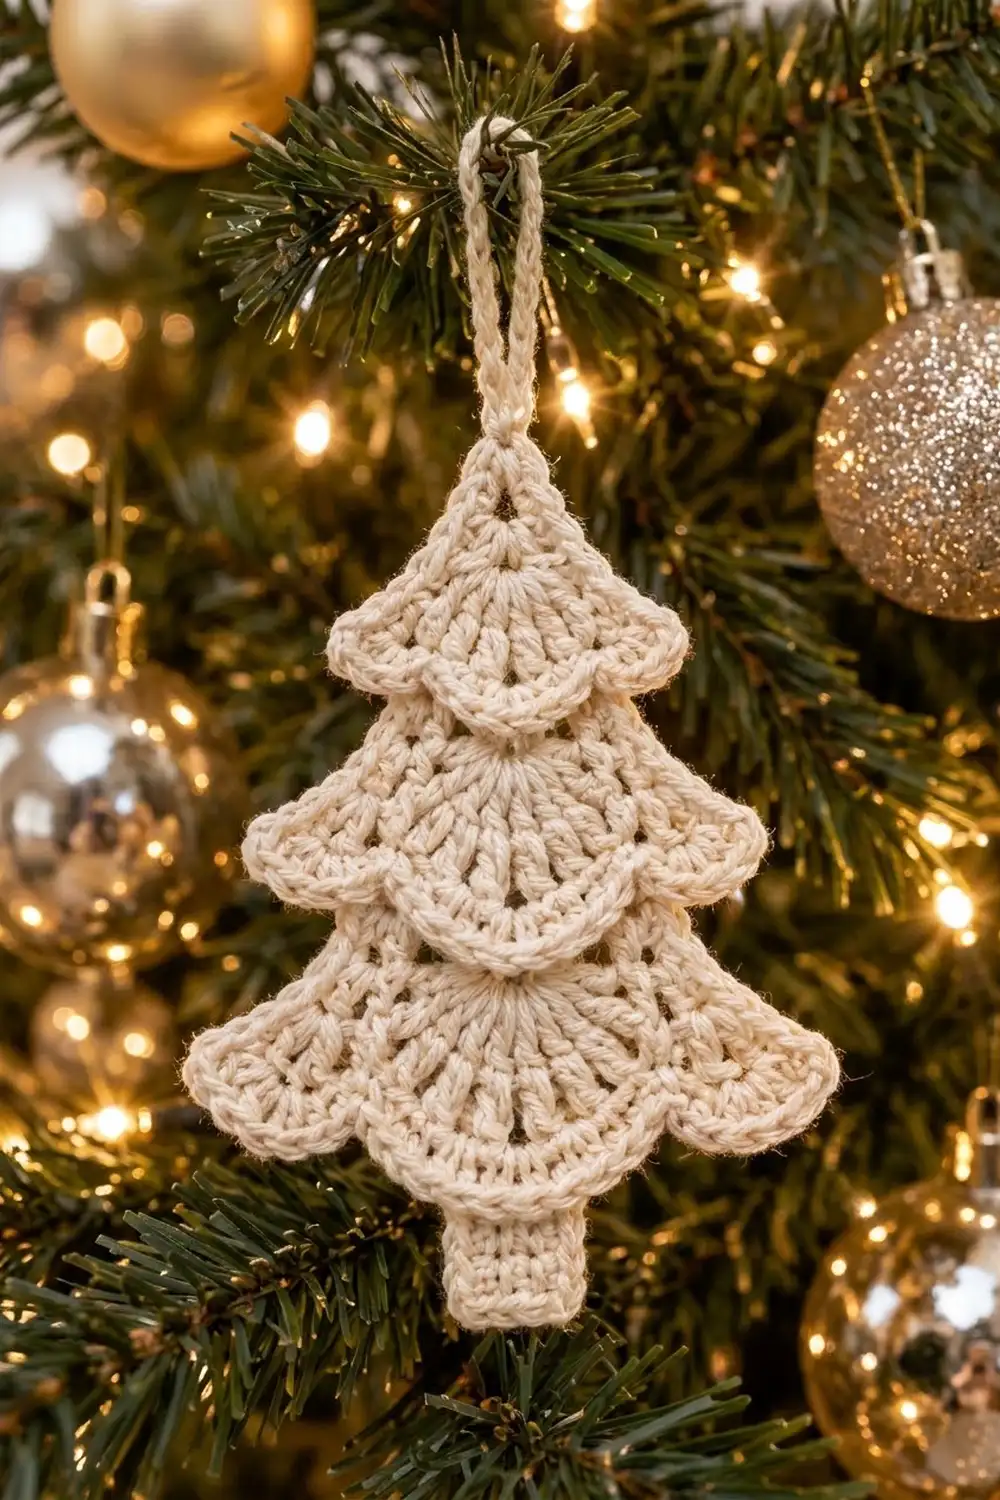
The Ivory Cascade tree is a small, layered Christmas ornament made of three fan-shaped tiers stacked like overlapping skirts, finished with a short trunk and a sturdy hanging loop. Each tier radiates from its own little center, with solid double crochet near the top and an airy band of spoke stitches below on the larger tiers.
Everything is worked in one soft cream cotton, so the texture does the talking. A rope-like reverse single crochet rim outlines the curved hem of every tier and gives each layer a gentle, wavy edge that catches the light on the tree.
This pattern uses US crochet terms. The finished tree measures 3.3 in (8.4 cm) wide and 3.75 in (9.5 cm) tall from the top of the smallest tier to the bottom of the trunk, or about 5.25 in (13.3 cm) tall including the hanging loop.
Construction is simple: you crochet three fans in turned rows from a magic ring, plus a tiny single crochet trunk. Then you stack and sew the parts, add the rim to each tier’s curved edge, and finish with the loop.
Finished Size and Construction
- Finished size: 3.3 in (8.4 cm) wide x 3.75 in (9.5 cm) tall; about 5.25 in (13.3 cm) with loop
- Skill level: Easy (advanced beginner)
- Terminology: US crochet terms
- Yarn weight: Sport weight (#2 fine) cotton
- Hook: 3.25 mm (US D-3)
- Number of pieces: 4 (Tier A, Tier B, Tier C, trunk), joined into one ornament
- Layout: One vertical stack: Tier A on top, Tier B in the middle, Tier C at the bottom, trunk below
- Piece size before border (radius from ring center to center of hem): Tier A 0.8 in (2.0 cm), Tier B 1.15 in (2.9 cm), Tier C 1.5 in (3.8 cm)
- Piece width before border: Tier A 1.5 in (3.8 cm), Tier B 2.2 in (5.6 cm), Tier C 2.9 in (7.4 cm)
- Border depth: 0.2 in (0.5 cm), bringing the radii to 1.0 in (2.5 cm), 1.35 in (3.4 cm) and 1.7 in (4.3 cm)
Materials
Choose a smooth, matte sport-weight cotton or cotton blend. Cotton holds the fan shape crisply and shows the spoke texture clearly. Avoid fuzzy or very splitty yarns, because the crab stitch rim needs clean loops.
- Cream / ivory: 12 g, about 37 m
Tools:
- 3.25 mm (US D-3) crochet hook
- Tapestry needle
- Scissors
- 1 stitch marker
- Rustproof pins and a small blocking mat
- Spray bottle with water
- Optional: light fabric stiffener
The yarn quantity includes a margin of roughly 30 percent for your gauge check, sewing tails and any frogging.
Abbreviations (US Terms)
- ch – chain
- sl st – slip stitch
- sc – single crochet
- dc – double crochet
- st(s) – stitch(es)
- sp – space
- RS – right side
- rev sc – reverse single crochet (crab stitch)
Special stitches:
- Standing sc: With a slipknot on the hook, insert the hook into the indicated stitch, yarn over, pull up a loop, yarn over and pull through both loops.
- Rev sc: Working from left to right (right-handed), insert the hook into the next stitch to the right, pull up a loop, yarn over and pull through both loops. This twists the stitches into a raised cord.
Gauge and Checkpoints
Gauge: 6 sts = 1 in (2.5 cm) in sc or dc. One dc row = 0.35 in (0.9 cm). One sc row = 0.2 in (0.5 cm).
Instead of a flat swatch, make Tier C first. It is the largest piece, so any gauge problem shows clearly there.
Measure each tier from the center of the ring straight down to the top of the last row:
- After Row 1: 0.45 in (1.1 cm)
- After Row 2: 0.8 in (2.0 cm) – this is the finished Tier A size before border
- After Row 3: 1.15 in (2.9 cm) – the finished Tier B size before border
- After Row 4: 1.5 in (3.8 cm) – the finished Tier C size before border
The trunk should measure 0.67 in (1.7 cm) wide and 1.2 in (3.0 cm) long.
If Tier C is more than 0.1 in (0.3 cm) too big, go down to a 3.0 mm hook. If it is too small, go up to a 3.5 mm (US E-4) hook. Row height matters more than width here, because it sets how far each tier hangs over the one below.
Tier Pattern
All three tiers start the same way. Each one is a 150-degree fan worked in turned rows from a magic ring. Every new row adds about 5 stitches’ worth of width, which keeps the fan flat.
The dc fabric looks nearly identical on both sides. When a tier is finished, pick the neater side as the RS.
Rows 1–2 (All Tiers)
Row 1: Make a magic ring, ch 3 (counts as dc), 4 dc in ring. Pull the tail until the ring leaves a hole about 0.1 in (0.3 cm) across. Turn. (5 dc)
Row 2: Ch 3 (counts as dc), dc in the st at the base of the ch, 2 dc in each of next 3 dc, 2 dc in top of turning ch. Turn. (10 dc)
The ring sits at the top point of the fan. The two row-end edges form the sloping shoulders, and the last row forms the curved hem.
Tier A (Top)
Work Rows 1–2. Fasten off and weave in the tails. Tier A ends with 10 dc and measures 0.8 in (2.0 cm) from ring to hem and 1.5 in (3.8 cm) across the tips.
Tier B (Middle)
Work Rows 1–2, then:
Row 3 (spoke row): Ch 4 (counts as dc + ch 1), dc in next st, ch 1 8 times, dc in top of turning ch. (10 dc, 9 ch-1 sps)
The chain spaces open the fabric into separate spokes and provide this row’s growth. Fasten off, leaving a 10 in (25.4 cm) tail for sewing. Tier B measures 1.15 in (2.9 cm) from ring to hem and 2.2 in (5.6 cm) across.
Tier C (Bottom)
Work Rows 1–2, then:
Row 3: Ch 3 (counts as dc), dc in the st at the base of the ch, dc in next st, 2 dc in next st 4 times, dc in top of turning ch. Turn. (15 dc)
Check: 2 + (4 x 3) + 1 = 15.
Row 4 (spoke row): Ch 4 (counts as dc + ch 1), dc in next st, ch 1 13 times, dc in top of turning ch. (15 dc, 14 ch-1 sps)
Fasten off, leaving a 10 in (25.4 cm) tail. Tier C measures 1.5 in (3.8 cm) from ring to hem and 2.9 in (7.4 cm) across.
Trunk
Row 1: Ch 5, sc in 2nd ch from hook and in each ch across. Turn. (4 sc)
Rows 2–6: Ch 1, sc in each st across. Turn. (4 sc)
Fasten off, leaving an 8 in (20.3 cm) tail. The trunk measures 0.67 in (1.7 cm) wide and 1.2 in (3.0 cm) long.
Make All Pieces
All pieces are cream. You need:
- Tier A: 1
- Tier B: 1
- Tier C: 1
- Trunk: 1
Layout (front view, top to bottom):
        [ Tier A ]
      [   Tier B   ]
    [     Tier C     ]
          [trunk]
Each tier lies in front of the tier below it. The trunk sits behind Tier C.
Joining
Lay the pieces RS up and measure all positions from the center of Tier A’s ring:
- Tier B’s ring: 0.6 in (1.5 cm) below Tier A’s ring
- Tier C’s ring: 1.3 in (3.3 cm) below Tier A’s ring, which is 0.7 in (1.8 cm) below Tier B’s ring
- Trunk top edge: 1.25 in (3.2 cm) below Tier C’s ring
Center everything on one vertical line and pin.
Method: Use the sewing tails and a tapestry needle. Work from the back, joining one pair at a time.
- Trunk to Tier C: The top 0.25 in (0.6 cm) of the trunk sits behind Tier C’s Row 4. Whipstitch each of the 4 trunk top sts to the back of the 4 center dc posts of Row 4, one trunk stitch to one dc.
- Tier C to Tier B: Tier C’s Row 1 sits behind Tier B’s Row 3. Running-stitch through the post of each of Tier C’s 5 Row 1 dc, then through the back of the Tier B stitch directly in front of it. That’s 5 stitches, worked stitch to stitch.
- Tier B to Tier A: Join these the same way. The 5 dc of Tier B’s Row 1 sit behind Tier A’s Row 2.
Tension: Sew snugly but not tightly. If the front tier puckers or its hem lifts, your stitches are too firm. Never pass the needle all the way to the front, and never sew through a hem row. The hems must stay free for the border.
Size checkpoint: The joined tree should now measure 3.75 in (9.5 cm) from the top of Tier A to the bottom of the trunk. The widest point is Tier C at 2.9 in (7.4 cm).
Border
Border gauge: 6 sc = 1 in (2.5 cm). The two border rows add 0.2 in (0.5 cm) to each tier’s radius.
Work the border on each tier’s curved hem only, from tip to tip, with RS facing. Start with Tier C and work upward. Each hem hangs free over the tier below, so just lift it slightly as you work.
Row 1: Join with a standing sc in the first st at the right-hand tip.
- Tier A: The standing sc counts as the first sc. Work 2 sc in next st, then sc in next st, 2 sc in next st 4 times. (15 sc = 10 sts worked once + 5 extra)
- Tier B: Work 1 more sc in the same first dc. Then sc in next ch-1 sp, sc in next dc 8 times, sc in next ch-1 sp, 2 sc in last dc. (21 sc = 19 sts and sps worked once + 2 extra)
- Tier C: The standing sc counts as the first sc. Work sc in next ch-1 sp, sc in next dc 14 times. (29 sc = 29 sts and sps worked once + 0 extra)
Row 2: Do not turn. Ch 1, then rev sc in each sc back across the hem. (Tier A: 15, Tier B: 21, Tier C: 29)
Fasten off and weave the tails into the back of the same tier.
Why the math works: A 150-degree arc is about 2.6 times its radius. At the middle of the border row, the hems are about 2.4 in (6.1 cm), 3.3 in (8.4 cm) and 4.2 in (10.7 cm) long. At 6 sc per inch, that calls for roughly 14, 20 and 25 sc. The counts of 15, 21 and 29 are a little generous on purpose. The crab stitch row pulls the edge in, and the small extra fullness on Tier C becomes the soft, wavy hem that makes the bottom tier look full.
After the border, the tiers measure 1.9 in (4.8 cm), 2.6 in (6.6 cm) and 3.3 in (8.4 cm) across.
Hanging Loop
Join yarn with a sl st into the top of Tier A’s ring. Ch 22, then sl st into the same spot. Turn and work 22 sc over the chain loop. Sl st into the ring, fasten off and weave in the tails. The loop stands about 1.5 in (3.8 cm) tall.
Final Blocking
- Weave in any remaining tails, keeping each one inside the tier it belongs to.
- Mist the ornament evenly with water until it is damp but not soaked.
- Lay it face up on the blocking mat.
- Pin the center line straight from the loop to the trunk.
- Pin each tier’s tips so the widths read 1.9 in (4.8 cm), 2.6 in (6.6 cm) and 3.3 in (8.4 cm).
- Ease each hem into a smooth curve, and let Tier C’s gentle waves sit evenly.
- Square the trunk to 0.67 in (1.7 cm) wide.
- Let it dry fully. For a crisper hanging ornament, brush on a light coat of fabric stiffener and let it dry again.
Final Quality-Control Checklist
- Tier stitch counts: A 10 dc, B 10 dc + 9 sps, C 15 dc + 14 sps
- Border counts: 15, 21 and 29 sc, with matching rev sc
- The rings sit 0.6 in (1.5 cm) and 1.3 in (3.3 cm) below Tier A’s ring
- No sewing stitches show on the front
- Every hem lies free and smooth
- The trunk is centered, with 0.75 in (1.9 cm) showing below the hem
- Total height is 3.75 in (9.5 cm), or 5.25 in (13.3 cm) with the loop
- The loop is centered and firm
Troubleshooting
- Fan cups upward: The rows are too tight. Loosen your tension or go up a hook size.
- Fan ruffles before the border: Recheck the stitch counts. Rows 2 and 3 must have exactly 10 and 15 dc.
- Spoke row looks crowded: Make sure each ch-1 really is a single chain, not two.
- Rim flips forward: The rev sc is too tight. Work it slightly looser than the sc row.
- Lower tier’s ring shows: Move the lower tier down by 0.1 in (0.3 cm) and sew it again.
- Ornament tilts on the tree: The loop is off-center. Remove it and rejoin it exactly at the ring.
Care
Hand wash in cool water with mild soap, press out the water in a towel, and reshape the ornament flat to dry. Store it flat or hanging so the tiers keep their shape.
Final Notes
The measurement chain is short and easy to follow. Your gauge of 6 sts per inch and 0.35 in (0.9 cm) per dc row gives tier radii of 0.8 in (2.0 cm), 1.15 in (2.9 cm) and 1.5 in (3.8 cm). Stacking the tiers at 0.6 in (1.5 cm) and 1.3 in (3.3 cm) and adding the 1.2 in (3.0 cm) trunk gives a height of 3.75 in (9.5 cm). The 0.2 in (0.5 cm) border brings the tree to its finished width of 3.3 in (8.4 cm). If each checkpoint matches, the finished ornament will too.
Happy crocheting!