

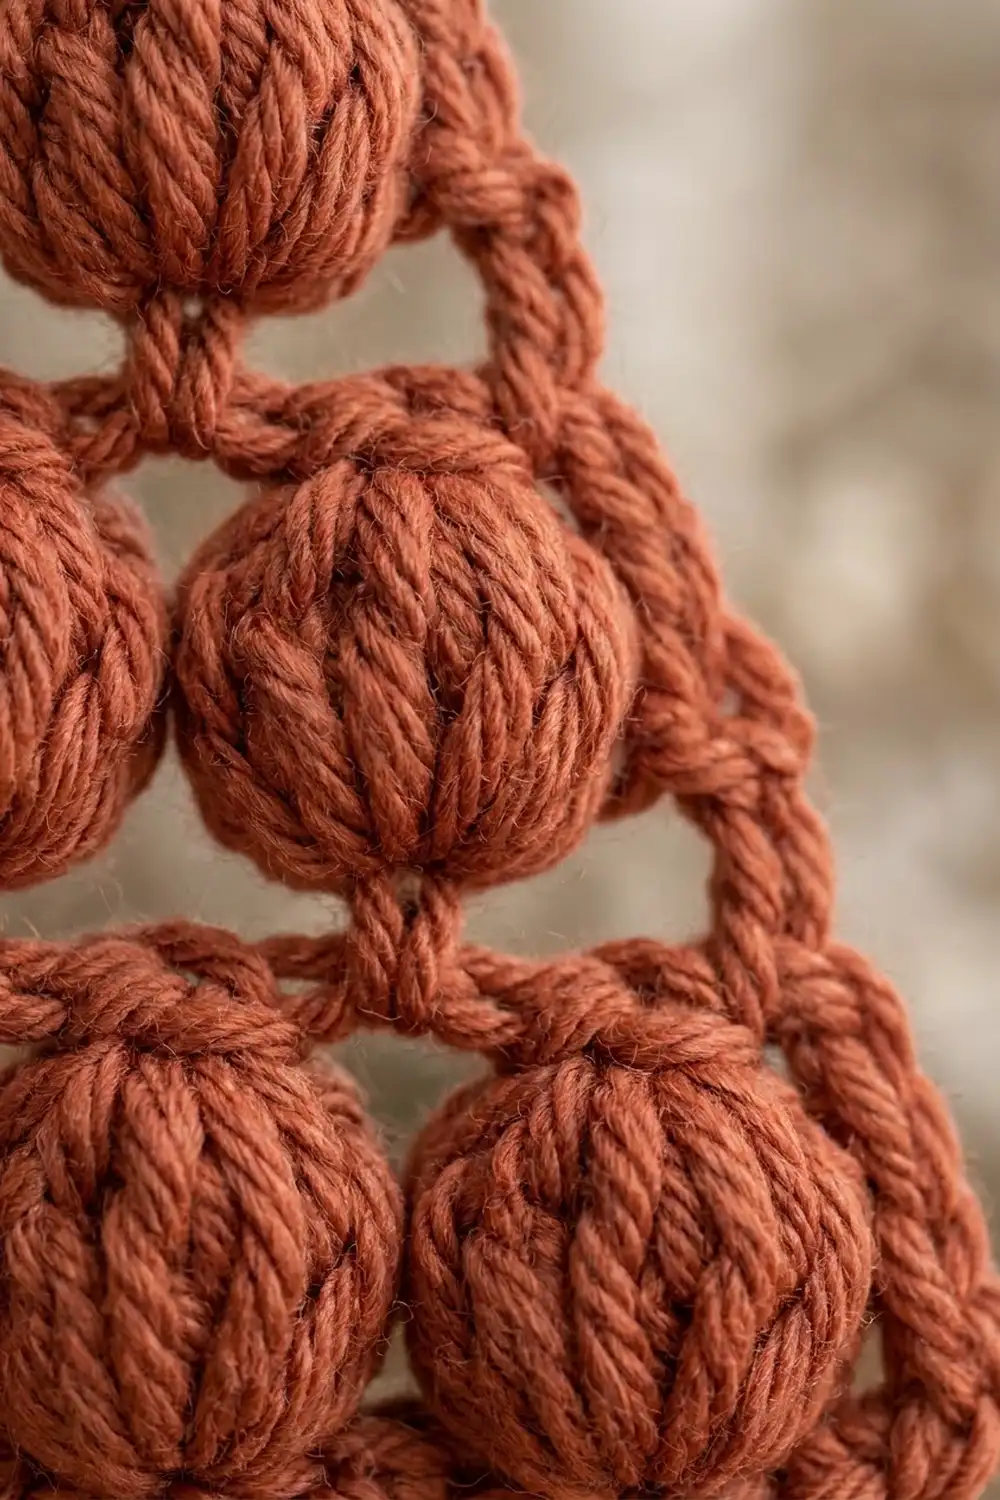
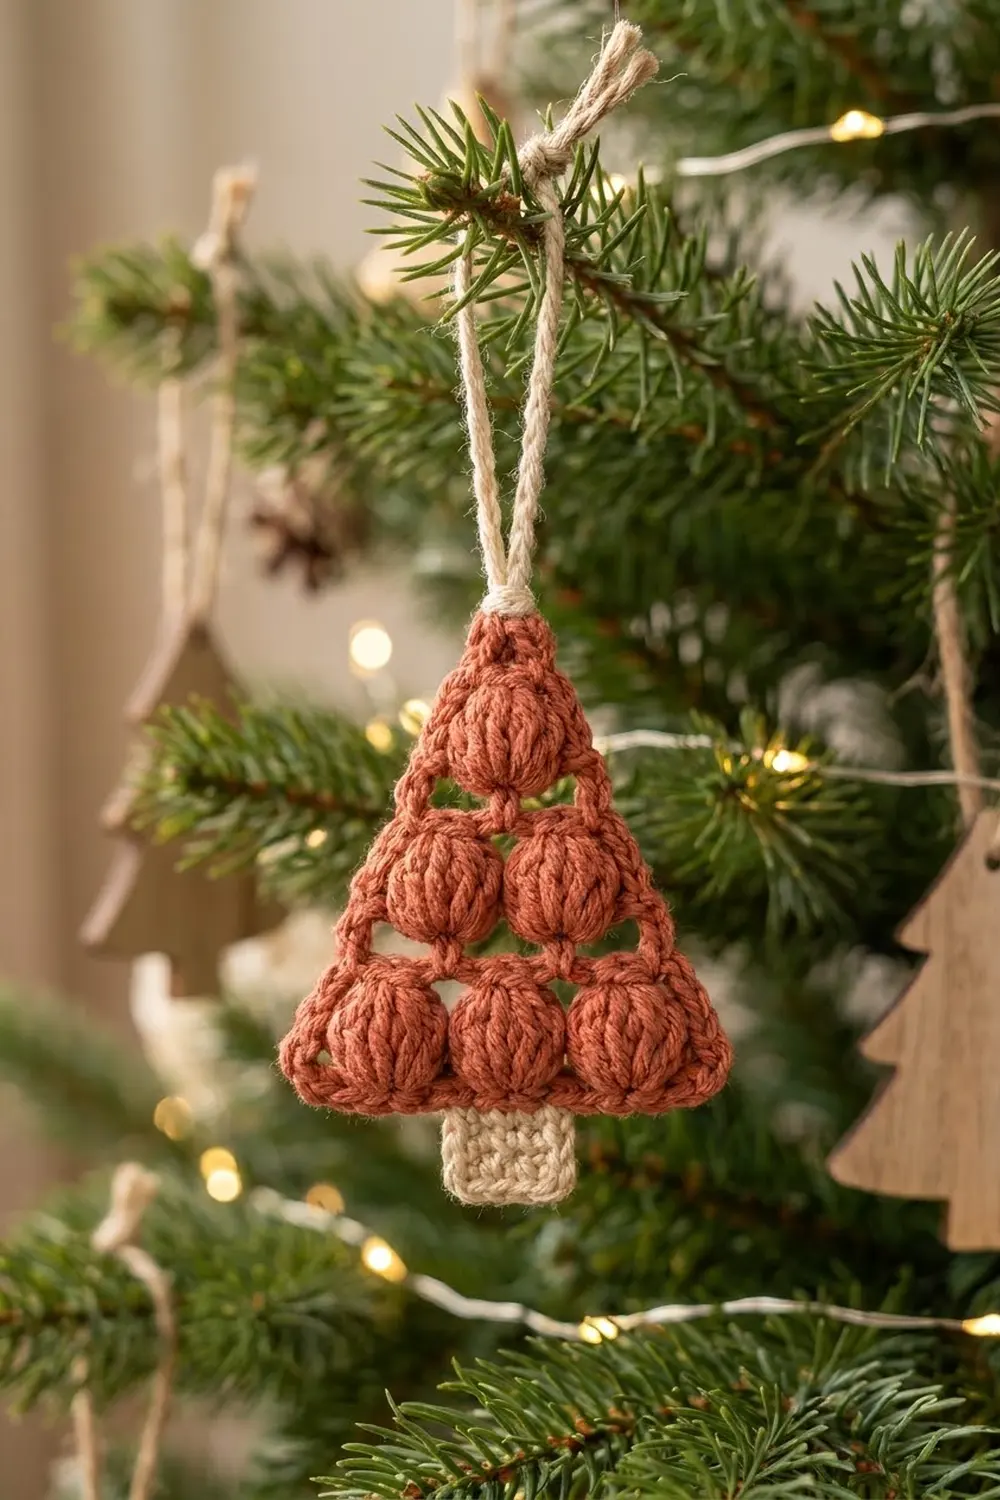
The Cinnamon Puff Tree is a small, chunky Christmas tree ornament with a lot of texture. Six plump puff stitches sit in three neat tiers: three across the bottom, two in the middle and one at the top. A crisp single-crochet outline turns them into a clean triangle.
The tree is warm rust, like cinnamon or terracotta, and the trunk and hanging loop are soft cream. Together they give a cozy, rustic look. It works on a tree branch, a gift tag, a doorknob or a car’s rearview mirror.
This pattern uses US crochet terms. The finished ornament measures about 3.75 in (9.5 cm) wide at the base and 3.9 in (9.9 cm) tall from the tip to the bottom of the trunk. The loop adds about 1.25 in (3.2 cm).
Construction is simple. You work the tree body flat in rows from the bottom up, then add one round of single crochet around the triangle. Next you work the trunk in rows straight off the bottom edge. Last, you chain the hanging loop at the top point. There is no sewing apart from weaving in ends.
Finished Size and Construction
- Finished size: 3.75 in (9.5 cm) wide × 3.9 in (9.9 cm) tall, not counting the loop
- Skill level: Easy / advanced beginner
- Terminology: US crochet terms
- Yarn weight: Worsted (#4), cotton or cotton blend
- Hook: 4.0 mm (G-6)
- Number of pieces: 1 (the trunk and loop are worked onto the tree, not sewn on)
- Layout: One triangle with a trunk at the bottom center and a loop at the top point
- Tree body before border: 3.25 in (8.3 cm) wide × 2.5 in (6.4 cm) tall
- Border depth: 1 round of sc, about 0.25 in (0.6 cm)
- Trunk: 1.25 in (3.2 cm) wide × 0.9 in (2.3 cm) tall
Materials
Yarn: Use a smooth worsted-weight cotton or cotton blend. Cotton shows off the round shape of the puffs and keeps the edges crisp. A tightly plied yarn gives the neatest stitches. Fuzzy or loosely spun yarns make puffs that look blurry.
- Rust / terracotta (tree): 10 g, about 17 m (19 yd)
- Cream (trunk and loop): 3 g, about 5 m (5 yd)
These amounts include a small safety margin. Puff stitches use more yarn than you might expect, so don’t cut your rust yarn short.
Tools:
- 4.0 mm (G-6) crochet hook
- Tapestry needle
- Scissors
- 2 locking stitch markers
- Ruler or tape measure
- Spray bottle and pins for blocking
Abbreviations (US Terms)
- ch – chain
- sc – single crochet
- sl st – slip stitch
- sk – skip
- sp – space
- st(s) – stitch(es)
- yo – yarn over
- RS – right side
Special stitch: Puff stitch (puff)
Yo, insert your hook in the stitch named, yo and pull up a loop about 0.5 in (1.3 cm) tall. Repeat this 3 more times in the same stitch, so you have 9 loops on the hook. Yo and pull through all 9 loops, then ch 1 to close.
The closing ch 1 is the top of the puff. It is not counted as a separate stitch. When a later row says “sc in top of puff,” work into that closing chain.
Gauge and Checkpoints
Gauge: 16 sc and 18 rows = 4 in (10.2 cm) in single crochet, which is 4 sts per 1 in (2.5 cm).
Because this is a small piece, the ornament is its own gauge swatch. Make one tree and check it at these points:
- After Row 1: 13 sc measure 3.25 in (8.3 cm) across.
- After Row 2: the piece is about 0.75 in (1.9 cm) tall, and each puff is about 0.5 in (1.3 cm) tall.
- After Row 7: the tree body is 2.5 in (6.4 cm) tall.
- After the border: the base is 3.75 in (9.5 cm) wide and the tree is 3 in (7.6 cm) tall.
- After the trunk: the total height is 3.9 in (9.9 cm).
If Row 1 is wider than 3.25 in (8.3 cm): go down to a 3.5 mm hook.
If Row 1 is narrower: go up to a 4.5 mm hook.
Keep the puff loops even. If your puffs are much taller than 0.5 in (1.3 cm), the tree gets tall and narrow.
Tree Body
Use rust yarn. Work in rows, turning at the end of each row. The turning ch 1 never counts as a stitch.
Row 1 (RS): Ch 14. Sc in 2nd ch from hook and in each ch across. (13 sc)
Row 2 (puff row, 3 puffs): Ch 1, turn. Sc in first sc, ch 1, sk 1, puff in next sc, ch 1, sk 1, sc in next sc; repeat from * 2 more times.
(3 puffs, 4 sc = 7 sts, plus 6 ch-1 sps)*
Check: 1 sc + 3 repeats × 4 sts used = 13 sts, so this row uses all of Row 1 exactly.
Row 3 (chain-bar row): Ch 1, turn. Sc in first sc, ch 2, sc in top of next puff, ch 2, sc in next sc; repeat from * 2 more times.
(7 sc, 6 ch-2 sps)*
Skip every ch-1 sp from Row 2. The ch-2 bars stretch over the puffs and make the small open gaps you see between tiers.
Row 4 (puff row, 2 puffs): Turn. Sl st in first sc, sl st in each of next 2 ch, sl st in next sc. You are now on the 2nd sc, which sits on top of a puff. Ch 1, sc in the same sc. Ch 1, puff in next sc (skip the ch-2 sp), ch 1, sc in next sc, ch 1, puff in next sc, ch 1, sc in next sc. Leave the last ch-2 sp and the last sc unworked.
(2 puffs, 3 sc = 5 sts, plus 4 ch-1 sps)
Each puff sits on a “between” sc from Row 3. That places it in the dip between two bottom puffs, which creates the staggered tiers.
Row 5 (chain-bar row): Ch 1, turn. Sc in first sc, ch 2, sc in next st; repeat from * 3 more times. Work into the tops of puffs and into sc, skipping the ch-1 sps.
(5 sc, 4 ch-2 sps)*
Row 6 (puff row, 1 puff): Turn. Sl st in first sc, sl st in each of next 2 ch, sl st in next sc. Ch 1, sc in the same sc, ch 1, puff in next sc, ch 1, sc in next sc. Leave the last ch-2 sp and the last sc unworked.
(1 puff, 2 sc = 3 sts, plus 2 ch-1 sps)
Row 7 (top point): Turn. Sl st in first sc and in next ch-1 sp, ch 1, sc in top of puff. Leave the last ch-1 sp and sc unworked.
(1 sc)
Do not fasten off. The tree body should measure about 3.25 in (8.3 cm) wide and 2.5 in (6.4 cm) tall.
Border
Border gauge: the same as the body, 4 sc per 1 in (2.5 cm).
Each corner is a group of 3 sc. The middle sc of each group is the corner stitch. Each side’s count below includes both of its corner stitches.
Border Round: Do not turn. Ch 1, sc in the Row 7 sc. This is the first sc of the top corner group.
First slanted side (working down):
1 sc in the end ch-1 sp of Row 6, 2 sc in the row-end of Row 6, 1 sc in the end ch-2 sp of Row 5, 1 sc in the row-end of Row 5, 2 sc in the row-end of Row 4, 1 sc in the end ch-2 sp of Row 3, 1 sc in the row-end of Row 3, 2 sc in the row-end of Row 2. (11 sc)
On the side where you slipped across, work the sc into the sp underneath the sl sts.
Bottom-left corner: 3 sc in the first foundation ch (the base of Row 1’s end stitch).
Bottom: Work along the underside of the foundation chain. Sc in each of the next 11 ch. (11 sc)
Bottom-right corner: 3 sc in the last foundation ch.
Second slanted side (working up):
2 sc in the row-end of Row 2, 1 sc in the row-end of Row 3, 1 sc in the end ch-2 sp of Row 3, 2 sc in the row-end of Row 4, 1 sc in the row-end of Row 5, 1 sc in the end ch-2 sp of Row 5, 2 sc in the row-end of Row 6, 1 sc in the end ch-1 sp of Row 6. (11 sc)
Top corner: 2 sc in the same Row 7 sc where the round began. This completes the 3-sc top group. Sl st to the first sc and fasten off.
Round total: 42 sc
- Each side: 1 corner stitch + 11 sc + 1 corner stitch = 13 sts
- 3 sides × 13 = 39, minus 3 shared corner stitches = 36, plus 2 extra sc at each of the 3 corners (6) = 42
- Another way to count: 11 + 11 + 11 + (3 × 3) = 42
Why the math works: The bottom edge sits on Row 1’s 13 foundation stitches, so its 13 border sts match 3.25 in (8.3 cm) exactly. Each slanted side between corners is about 2.75 in (7.0 cm) long. At 4 sts per 1 in (2.5 cm), that comes to 11 sts.
The 2-1-1 rhythm puts 2 sc beside each tall puff row and 1 sc beside each short chain-bar row. This matches the row heights, so the edges stay flat instead of rippling or pulling in. The 3-sc corner groups let the border turn each point sharply.
Checkpoint: 3.75 in (9.5 cm) wide at the base and 3 in (7.6 cm) tall.
Trunk
Use cream yarn. Hold the tree with the bottom edge on top and the RS facing you.
The bottom border has 13 sts counting both corner stitches. Count in from the right-hand corner stitch: skip the corner stitch and the next 3 sts, which is 4 sts in total. Place a marker in the 5th st. Count 5 sts from the marker and place a second marker in the 9th st. That leaves 4 sts beyond it (4 + 5 + 4 = 13).
Row 1: Join cream with a sl st in the first marked st. Ch 1, sc in the same st and in each of the next 4 sts, ending in the second marked st. (5 sc)
Rows 2–4: Ch 1, turn, sc in each sc across. (5 sc)
Fasten off. The trunk measures 1.25 in (3.2 cm) wide and about 0.9 in (2.3 cm) tall, and it sits centered under the tree.
Hanging Loop
Use cream yarn. With the RS facing, join cream with a sl st in the top corner stitch, which is the middle sc of the top 3-sc group.
Ch 16, then sl st in the same corner stitch to form a loop. Sl st into the back bump of each of the 16 chains to make a firmer cord, then sl st into the corner stitch again.
Fasten off and leave a 6 in (15.2 cm) tail. Wrap the tail tightly 3 times around the base of the loop to make the small bound “knot” at the tip. Thread the tail under the wraps and weave it in down the back.
The loop stands about 1.25 in (3.2 cm) tall. The full ornament, loop included, measures about 5.15 in (13.1 cm) from end to end.
Final Blocking
- Weave in all ends on the wrong side. Hide cream tails in the trunk and rust tails in the border.
- Lay the ornament RS up on a foam mat or folded towel.
- Pin the three corners so the base measures 3.75 in (9.5 cm) and the tip sits 3 in (7.6 cm) above the base.
- Pin the trunk straight down from the center, 0.9 in (2.3 cm) long.
- Mist lightly with water. Don’t flatten the puffs; gently push them back into a round shape with your fingertips.
- Let it dry completely, at least 2 hours.
- Unpin and shape the loop upright.
Final Quality-Control Checklist
- Three tiers of puffs: 3, 2 and 1, with each tier centered between the puffs below
- Open chain-bar gaps visible between the tiers
- Border round has exactly 42 sc, with 3-sc groups at all three corners
- Each side counts 13 sts including its corner stitches
- Trunk is 5 sts wide with 4 sts free on each side
- Base is 3.75 in (9.5 cm) wide, tree is 3 in (7.6 cm) tall, total height without the loop is 3.9 in (9.9 cm)
- Loop is firmly bound at the tip, with no loose tails
- Piece lies flat with no curling at the corners
Troubleshooting
Puffs look flat or stringy: Pull each loop up to the same height before the final yo. Add a 5th loop pair if your yarn is thin.
Gaps between puffs are too wide: Your chain bars are loose. Chain more tightly, or replace the ch 2 with ch 1 in Rows 3 and 5. Note that ch 1 changes the border placement into those sps but not the border count.
Tree leans to one side: You may have worked into the last ch-2 sp in Row 4 or Row 6. Each of those rows should leave the final sp and sc unworked.
Border ruffles: You added extra sc along the slanted sides. Recount to 11 sts per side.
Border pulls the sides inward: Your border tension is tight. Go up half a hook size for the border round only.
Trunk is off-center: Recount the 13 bottom border sts and place the markers on the 5th and 9th sts.
Ornament curls: Block again with more pins along each side.
Care
Hand wash in cool water with mild soap, press out the water in a towel, and dry flat. Reshape the puffs while the ornament is damp. Store it flat so the loop and corners keep their shape.
Final Notes
Here is the measurement chain from start to finish:
- Row 1 sets the base at 13 sc, or 3.25 in (8.3 cm).
- Seven rows build three tiers of puffs to a height of 2.5 in (6.4 cm).
- One 42-stitch border round, with 13 sts per side, brings the tree to 3.75 in (9.5 cm) wide and 3 in (7.6 cm) tall.
- A 5-stitch cream trunk adds 0.9 in (2.3 cm), for a total height of 3.9 in (9.9 cm).
- A bound chain loop finishes the top.
Check your gauge at each stage and the tree will come out the right size, sitting flat and square on its trunk. Make a few in different colors for gifts, or hang one from the mirror for a little holiday cheer on every drive.
Happy crocheting!