

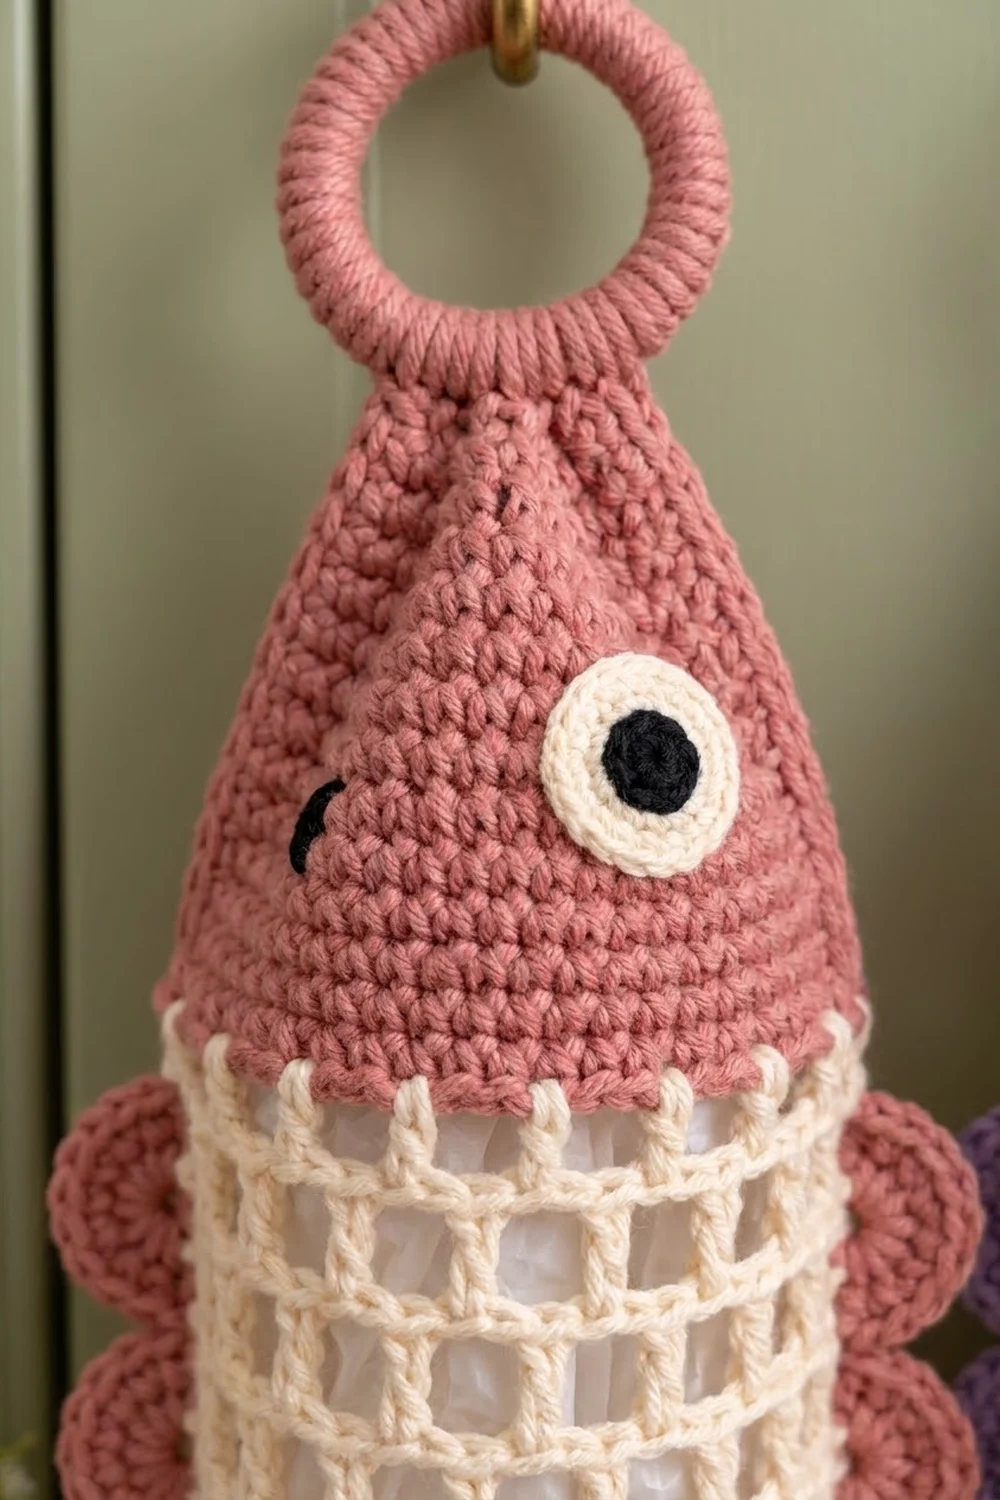
This fish bag holder turns a pile of plastic grocery bags into something nice to look at. The solid cone-shaped head and the forked tail frame an open cream mesh body. You can see the bags through the grid, and a scalloped fin runs down each side.
The sample uses dusty rose for the head, fins, trim, and tail, with cream for the mesh. Lavender works just as well as the main color. A round cream eye with a black center and a small stitched mouth finish the face. The style is cottage-kitchen cute without much fuss.
The pattern uses US crochet terms. The finished holder is about 19.75 in (50.2 cm) tall, including the ring and tail, and 7.5 in (19.1 cm) wide laid flat. The fins bring the total width to about 9.5 in (24.1 cm).
The head is worked from the top down in joined single crochet rounds. The cream mesh continues straight off the head, and a solid trim band closes it down to a bottom opening. You make the tail, fins, eyes, and covered ring separately and sew them on.
Finished Size and Construction
- Finished size: 19.75 in (50.2 cm) tall x 7.5 in (19.1 cm) wide flat; 9.5 in (24.1 cm) wide including fins
- Skill level: Easy-intermediate
- Terminology: US crochet terms
- Yarn weight: Worsted weight (#4) cotton
- Hook: 5.0 mm (H-8)
- Number of pieces: 1 finished holder. The head, mesh body, and trim are one continuous piece. The tail, 2 fins, 2 eyes, and covered ring are made separately and sewn on.
- Layout: Vertical fish. The ring is at the top, then the head, mesh body, trim band, and tail.
- Piece size: Body tube 15 in (38.1 cm) around, 7.5 in (19.1 cm) wide flat
- Size before border: Head plus mesh is 13.9 in (35.3 cm) tall
- Border depth: The bottom trim band is about 0.9 in (2.3 cm)
Materials
Use a smooth worsted weight cotton or cotton blend. Cotton holds its shape when the holder is full of bags and gives clear mesh holes. Avoid fuzzy or very stretchy acrylics, because the body can sag under the weight.
- Main color (dusty rose or lavender): 90 g / about 144 m. Used for the head, trim, tail, fins, and ring cover.
- Cream: 55 g / about 88 m. Used for the mesh body and eye rims.
- Black: 3 g / about 5 m. Used for the eye centers and mouths.
Tools:
- 5.0 mm (H-8) crochet hook
- 2.5 in (6.4 cm) plastic or wooden ring
- Tapestry needle
- Stitch markers
- Scissors
- Measuring tape
- Pins and a spray bottle for blocking
These quantities include a margin of about 15 percent for your gauge swatch and tension differences.
Abbreviations (US Terms)
- ch – chain
- sl st – slip stitch
- sc – single crochet
- dc – double crochet
- sk – skip
- sp – space
- st(s) – stitch(es)
- inc – 2 sc in the same st
- sc2tog – single crochet 2 together: (insert hook in next st, yo, pull up a loop) twice, yo, pull through all 3 loops
- MR – magic ring
Special stitch – mesh square: one dc plus the ch-2 sp beside it. Each mesh square sits over 3 sts, or over one dc and one ch-2 sp from the round below.
Gauge and Checkpoints
- Solid sc: 16 sc and 18 rows or rounds = 4 in (10.2 cm)
- Mesh: 4 mesh squares wide and 4 mesh rounds tall = 3 in (7.6 cm)
Test one piece before you make the whole holder: work the head through Rnd 12. It should be a flared cone about 15 in (38.1 cm) around the bottom edge. If it is, your gauge is right for the rest of the holder.
Checkpoints:
- After the head (Rnd 22): 60 sts, about 15 in (38.1 cm) around and 4.9 in (12.4 cm) tall
- After mesh Rnd 4: about 3 in (7.6 cm) of mesh
- After mesh Rnd 12: about 9 in (22.9 cm) of mesh, 7.5 in (19.1 cm) wide flat
- After the trim: an opening about 9 in (22.9 cm) around, or 2.9 in (7.4 cm) across
- Tail: 5 in (12.7 cm) wide and 3.1 in (7.9 cm) tall
- Fin: 7.75 in (19.7 cm) long
If your piece is too big, go down half a hook size. If it is too small, go up half a hook size. Don’t add or remove stitches, because the 60-stitch count is what makes the mesh repeat work out.
Head
Work the head from the top down in the main color, in joined rounds. Join every round with a sl st to the first sc. Start every round with ch 1, which does not count as a stitch. Keep the joins lined up; that line is the center back.
Foundation: Ch 24 and sl st to the first ch to form a ring, without twisting the chain.
Rnd 1: Ch 1, sc in each ch around, join. (24 sts)
Rnd 2: Sc 3, inc 6 times. (30 sts)
Rnd 3: Sc around. (30 sts)
Rnd 4: Sc 4, inc 6 times. (36 sts)
Rnd 5: Sc around. (36 sts)
Rnd 6: Sc 5, inc 6 times. (42 sts)
Rnd 7: Sc around. (42 sts)
Rnd 8: Sc 6, inc 6 times. (48 sts)
Rnd 9: Sc around. (48 sts)
Rnd 10: Sc 7, inc 6 times. (54 sts)
Rnd 11: Sc around. (54 sts)
Rnd 12: Sc 8, inc 6 times. (60 sts)
Rnds 13–22: Sc around. (60 sts each round)
The head is now 22 rounds, or about 4.9 in (12.4 cm) tall. Increasing only every other round makes a cone instead of a flat circle. The top opening is about 6 in (15.2 cm) around, or 1.9 in (4.8 cm) across, and this is where you load the bags. Fasten off the main color.
Mesh Body
Join cream with a sl st in the center back st of Rnd 22.
Mesh Rnd 1: Ch 5 (counts as dc + ch 2), sk 2 sts, dc in next st, ch 2, sk 2 sts 19 times, sl st in 3rd ch of beg ch-5. (20 dc, 20 ch-2 sps = 20 mesh squares)
Check the math: the starting dc uses 1 st and skips 2, and the 19 repeats use 57 sts. That is 60 sts in total, so the mesh fits the head exactly.
Mesh Rnds 2–12: Ch 5 (counts as dc + ch 2), dc in next dc, ch 2 19 times, sl st in 3rd ch of beg ch-5. (20 mesh squares each round)
Each dc goes straight on top of the dc below it, which keeps the grid square. After 12 rounds, the mesh is about 9 in (22.9 cm) tall. On the final sl st of Rnd 12, pull the main color through, then fasten off cream.
Tail
Work the tail flat in the main color, in rows. Ch 1 at the start of each row; it does not count as a stitch.
Foundation: Ch 7.
Row 1: Sc in 2nd ch from hook and in each ch across, turn. (6 sts)
Row 2: Inc in first st, sc to last st, inc in last st, turn. (8 sts)
Rows 3–8: Repeat Row 2. (10, 12, 14, 16, 18, 20 sts)
The tail is now 5 in (12.7 cm) wide.
First lobe, Row 9: Sc 10, turn, leaving the other 10 sts unworked. (10 sts)
Row 10: Sc2tog, sc to last 2 sts, sc2tog, turn. (8 sts)
Rows 11–13: Repeat Row 10. (6, 4, 2 sts)
Row 14: Sc2tog. (1 st) Fasten off.
Second lobe: Join the main color in the next unworked st of Row 8, then repeat Rows 9–14.
The forked tail is 14 rows, or about 3.1 in (7.9 cm) tall.
Fins (Make 2)
Work the fins in the main color.
Foundation: Ch 32.
Row 1: Sc in 2nd ch from hook and in each ch across, turn. (31 sts)
Row 2: Ch 1, sc in first st, sk 2, 7 dc in next st, sk 2, sc in next st 5 times. (5 scallops; 35 dc + 6 sc = 41 sts) Fasten off.
Each repeat uses 6 sts, so 5 repeats use 30 sts. Add the first sc and you have 31 sts. Each fin is 7.75 in (19.7 cm) long and about 1 in (2.5 cm) deep.
Eyes (Make 2)
Rnd 1: With black, 6 sc in MR, join. (6 sts) Change to cream.
Rnd 2: Inc in each st around, join. (12 sts)
Rnd 3: Sc 1, inc 6 times, join. (18 sts)
Fasten off, leaving a long tail for sewing. Each eye is about 1.25 in (3.2 cm) across.
Hanging Ring
Join the main color around the 2.5 in (6.4 cm) ring. Work 40 sc over it, packed tightly so no part of the ring shows. Sl st to the first sc and fasten off, leaving a long tail. If you see gaps, add 1–2 sc.
Border: Bottom Trim Band
The trim band closes the bottom of the mesh into an opening. The opening holds the bags in but still lets you pull them out one at a time.
Border gauge: The trim uses the same gauge as the head: 16 sc = 4 in (10.2 cm).
To keep track of counts, picture the tube flattened, with the center back join at one fold. Each side (front and back) then holds half of the stitches.
Trim Rnd 1 (conversion): Ch 1, sc in the same st as the join (top of the beg ch-5), 2 sc in next ch-2 sp, sc in next dc, 2 sc in next ch-2 sp 19 times, join. Count: 20 sc (one per dc) + 40 sc (two per ch-2 sp) = 60 sc, or 30 per side.
Trim Rnd 2: Sc 3, sc2tog 12 times, join. (48 sts; 24 per side)
Trim Rnd 3: Sc 2, sc2tog 12 times, join. (36 sts; 18 per side)
Trim Rnd 4: Sc around, join. (36 sts; 18 per side)
Fasten off.
Why the math works: The mesh has 20 squares worth 3 sc each, so it converts to 60 sc. That matches the head’s count, so the tube hangs straight without ruffling or pulling in. Each decrease round removes 12 sts evenly, or 6 per side, so the bottom draws in evenly. The final 36 sts at 4 sts per inch give a 9 in (22.9 cm) opening. The 4 rounds of the band measure about 0.9 in (2.3 cm) deep.
Assembly
- Tail: Lay the holder flat with the join line at center back. Center the tail’s foundation edge on the inside back of Trim Rnd 4, overlapping Tail Rows 1–2 by about 0.4 in (1.0 cm), and whipstitch firmly. The tail hangs about 2.7 in (6.9 cm) below the opening, and the opening stays clear in front of it.
- Fins: Flatten the tube so the side folds fall at the 5th and 15th mesh columns from center back. Starting about 0.6 in (1.5 cm) below the head, pin the straight Row 1 edge of a fin along one fold. Whipstitch it to the dc posts, then repeat on the other side.
- Eyes: Sew one eye on the front of the head and one on the back, centered over Rnds 14–18.
- Mouth: On each face, embroider a 0.5 in (1.3 cm) black straight stitch between the eye and the top opening.
- Ring: Set the covered ring above the top opening. Sew its lower 3 sts to Head Rnd 1 at the front center (sts 12–14), then at the back center (sts 23, 24, and 1). Both halves of the opening stay free for loading bags.
Final Blocking
- Weave in all ends securely, especially at the color changes.
- Mist the holder lightly until it is damp, not soaked.
- Fill the tube with a rolled towel until it measures 7.5 in (19.1 cm) wide flat.
- Straighten the mesh so the dc columns run vertically.
- Pin the tail lobes and fin scallops into smooth curves and points.
- Let it dry completely, then remove the towel.
Final Quality-Control Checklist
- [ ] Head: 60 sts at Rnd 22, about 4.9 in (12.4 cm) tall
- [ ] Mesh: 20 squares in every round, 12 rounds
- [ ] Trim: ends at 36 sts, with a 9 in (22.9 cm) opening
- [ ] Tail: 5 in (12.7 cm) wide, with matching lobes
- [ ] Fins: 5 even scallops each, 7.75 in (19.7 cm) long
- [ ] Eyes mirrored and mouths matching
- [ ] Ring sewn securely at both points
- [ ] Total height about 19.75 in (50.2 cm)
Troubleshooting
- The mesh leans into a spiral: Work each dc into the dc below it, not into the ch-2 sp.
- The head ruffles: Your tension is too loose for the increases. Go down a hook size for the head only.
- The head cups too tightly: Check that you worked every other round plain.
- The opening is too tight: Skip Trim Rnd 3. That leaves 48 sts and an opening 12 in (30.5 cm) around.
- The fins flop: Whipstitch along the full straight edge, not just at points.
- The holder sags when full: Use 100% cotton and don’t overfill it.
Care
Hand wash in cool water and lay flat to dry, reshaping the mesh while it is damp. Don’t hang it while it is wet, because it can stretch.

Final Notes
The measurements build on each other. The 60-st head is 15 in (38.1 cm) around, and the 20 mesh squares keep that same width. The trim turns those squares back into 60 sc, then decreases to a 36-st opening 9 in (22.9 cm) around. Check each stage as you go, and the finished fish will be about 19.75 in (50.2 cm) tall.
Happy crocheting!