

The Cobalt Cascade Door Curtain is made of seven narrow lace strips that hang side by side from a rod. Each strip is an open chevron mesh. Double crochet posts and chain-1 spaces make stacked V shapes that point down the length of the strip, and the bottom of each strip ends in a crisp point.
The palette is cobalt blue and cream, alternating blue, cream, blue across the doorway. This gives a clean, slightly coastal look. The curtain lets light and air through but still marks the doorway, and you can push strips aside to walk through.
This pattern uses US crochet terms. Each finished strip measures 5.0 in (12.7 cm) wide by 76.25 in (193.7 cm) long, plus a 2 in (5.1 cm) hanging loop. With 0.5 in (1.3 cm) gaps between strips, the curtain spreads about 38 in (96.5 cm) across the rod, which fits a standard 36 in (91.4 cm) doorway.
Construction is simple. You work each strip flat in rows from the bottom point up, add a tab to the top center and fold it into a loop, then edge the long sides and bottom with single crochet. The strips are never sewn to each other. They are only connected by the rod.
Finished Size and Construction
- Finished curtain: about 38 in (96.5 cm) wide on the rod × 78.25 in (198.8 cm) drop, including the loop
- Skill level: Easy / Intermediate
- Terminology: US crochet terms
- Yarn weight: Worsted (#4), cotton or cotton blend
- Hook: 5.0 mm (H-8)
- Number of pieces: 7 strips (4 in Color A, 3 in Color B)
- Layout: 1 row of 7 strips, A-B-A-B-A-B-A, unjoined, each on its own tab
- Piece size (bordered): 5.0 in × 76.25 in (12.7 cm × 193.7 cm)
- Size before border: 4.6 in × 76 in (11.7 cm × 193.0 cm)
- Border depth: 0.2 in (0.5 cm) on the long sides, 0.25 in (0.6 cm) at the bottom
Materials
Choose a smooth worsted-weight cotton or cotton blend of about 190 m per 100 g. Cotton hangs straight and shows the stitches clearly, and it stretches less than acrylic over this long drop.
- Color A, cobalt blue: 800 g (about 1,520 m), enough for 4 strips
- Color B, cream: 600 g (about 1,140 m), enough for 3 strips
Each strip uses about 340 m. These quantities include a margin of about 10–15% for your gauge swatch and any length adjustments.
Tools:
- 5.0 mm (H-8) crochet hook
- Tapestry needle
- Stitch markers (at least 2 per strip)
- Measuring tape
- Rust-proof pins and a large blocking surface
- Spray bottle or steamer
- Curtain rod up to 1 in (2.5 cm) in diameter
Abbreviations (US Terms)
- ch – chain
- sc – single crochet
- dc – double crochet
- sk – skip
- st(s) – stitch(es)
- sp – space
- RS / WS – right side / wrong side
Special stitch – dc3tog (double crochet 3 together): Yarn over, insert hook in the indicated st or sp, yarn over and pull up a loop, yarn over and pull through 2 loops. Repeat from * to * in the next 2 indicated places (4 loops on hook). Yarn over and pull through all 4 loops. This counts as 1 st.
Stitch counting: Every dc, every dc3tog and every ch-1 sp counts as 1 st. The beginning ch-3 counts as 1 dc.
Gauge and Checkpoints
Gauge in pattern: 20 sts × 8 rows = 4 in (10.2 cm), measured flat. Each row is 0.5 in (1.3 cm) tall.
Test one piece first. Chain 26 and work Rows 1–8 of the strip. Lay it flat without stretching. It should measure 4.6 in (11.7 cm) wide and 4 in (10.2 cm) tall from the bottom point. This swatch counts as the start of your first strip, so you can keep going if it’s on gauge.
Length checkpoints (measured along a side edge, unstretched):
- After Row 8: 4 in (10.2 cm)
- After Row 40: 20 in (50.8 cm)
- After Row 80: 40 in (101.6 cm)
- After Row 120: 60 in (152.4 cm)
- After Row 152: 76 in (193.0 cm)
If your swatch is too big, change to a 4.5 mm hook. If it’s too small, change to a 5.5 mm hook. If your width is right but your length is off, adjust the row count instead. Each row adds or removes 0.5 in (1.3 cm). Make every strip with the same number of rows.
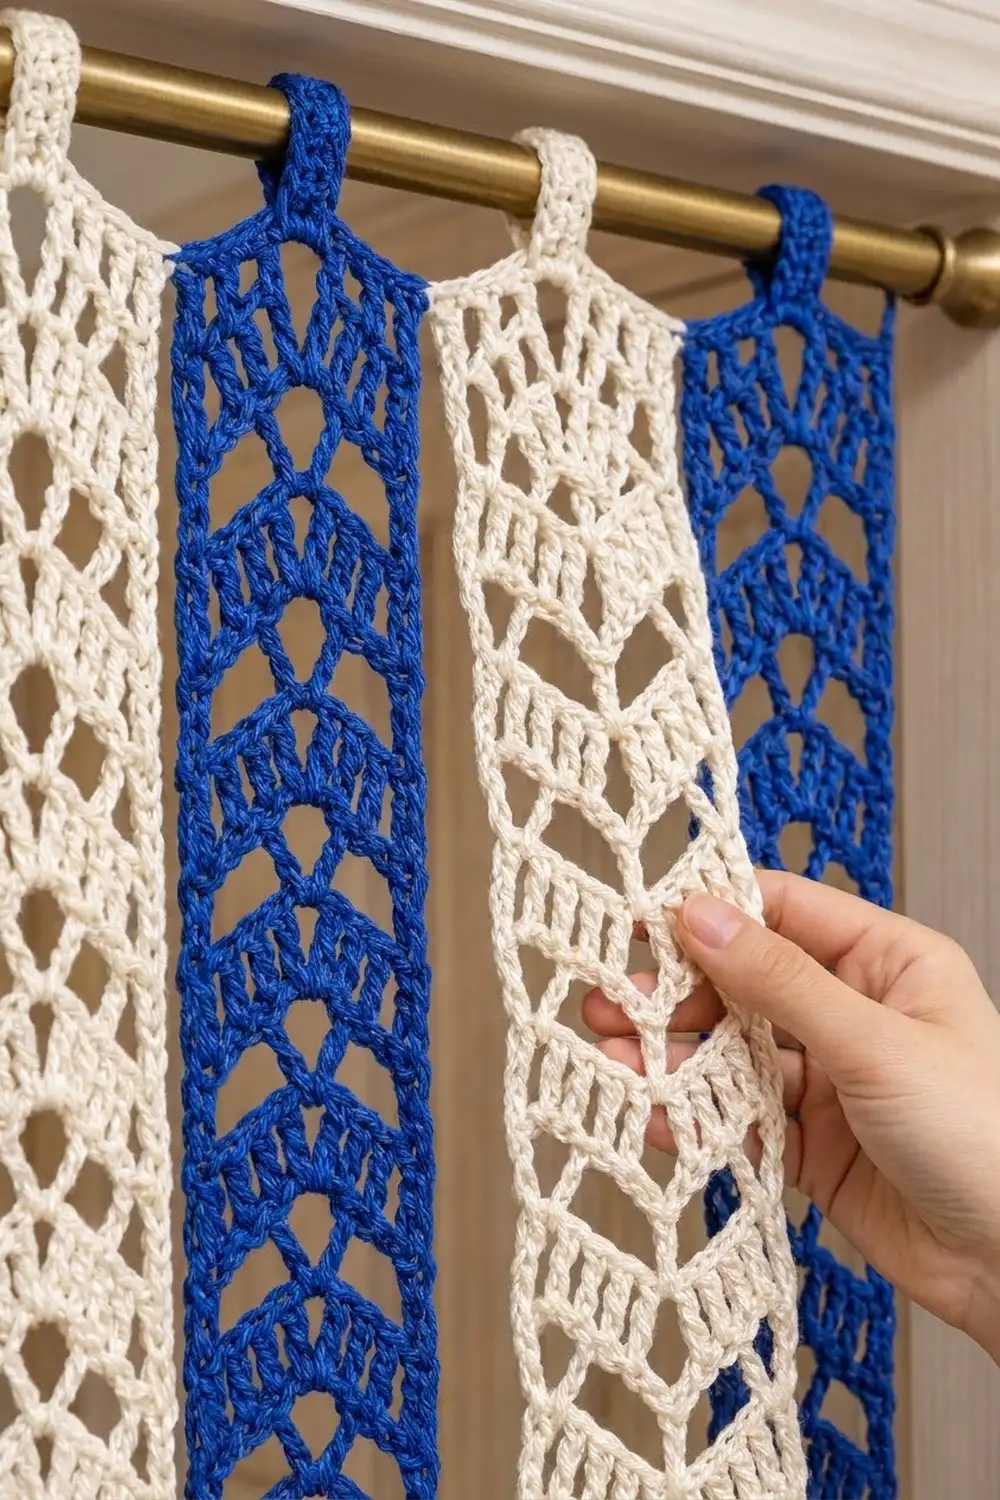
Strip Pattern
Make 4 strips in Color A and 3 in Color B. Each strip is worked in rows from the bottom point up.
Foundation and Row 1
Foundation: Ch 26.
Row 1 (RS): Dc in 4th ch from hook (the skipped 3 ch count as the first dc, giving 2 dc in one st). Ch 1, sk next 2 ch, dc in next ch, [ch 1, sk next ch, dc in next ch] 3 times. Ch 1, dc3tog over next 3 ch. Ch 1, dc in next ch, [ch 1, sk next ch, dc in next ch] 3 times. Ch 1, sk next 2 ch, 2 dc in last ch. Turn.
Row 1 count: 23 sts (12 dc, 1 dc3tog, 10 ch-1 sps).
Row 1 already has the chevron shape. The dc3tog pulls the center down into the bottom point, and the 2 dc at each end lift the edges. Place a marker in the dc3tog.
Rows 2–152
Row 2: Ch 3 (counts as dc), dc in first st (at the base of the ch). Ch 1, sk next dc, dc in next dc. [Ch 1, dc in next dc] 3 times. Ch 1, dc3tog, working the first leg in the next ch-1 sp, the second leg in the dc3tog and the third leg in the following ch-1 sp. Ch 1, [dc in next dc, ch 1] 4 times. Sk next dc, 2 dc in top of turning ch. Turn.
Row 2 count: 23 sts (12 dc, 1 dc3tog, 10 ch-1 sps).
Rows 3–152: Repeat Row 2. Each row has 23 sts.
Move your marker up every 10 rows. Each dc3tog should sit directly above the one below, forming a straight center spine. The dc posts on either side stack into ladder columns, and the chain spaces open into the V-shaped windows.
At Row 152, the strip should measure 4.6 in × 76 in (11.7 cm × 193.0 cm). Fasten off.
Hanging Tab
The tab is worked over the center 7 sts of Row 152. These are, in order: ch-1 sp, dc, ch-1 sp, dc3tog, ch-1 sp, dc, ch-1 sp.
Tab Row 1: With the same color, join yarn in the 4th ch-1 sp from the right edge. This is the second sp to the right of the dc3tog. Ch 1, sc in same sp, then sc in each of the next 6 sts (dc, sp, dc3tog, sp, dc, sp). 7 sc. Turn.
Tab Rows 2–16: Ch 1, sc in each sc across. Turn. 7 sc each row.
The tab measures 1.75 in (4.4 cm) wide × 4 in (10.2 cm) long. Fasten off and leave a 12 in (30.5 cm) tail.
Fold the tab to the WS so that Row 16 meets the base of Row 1. Whipstitch each of the 7 sts of Row 16 to the matching st at the base of Row 1, one to one. This makes a loop 2 in (5.1 cm) deep, which fits a rod up to 1 in (2.5 cm) in diameter.
Make All Pieces
- Color A (cobalt blue): 4 strips
- Color B (cream): 3 strips
Each strip has 152 rows, a 16-row tab and a side-and-bottom border (see Border). The layout across the rod, as seen from the front, is:
|  A  |  B  |  A  |  B  |  A  |  B  |  A  |
| 1   | 2   | 3   | 4   | 5   | 6   | 7   |
Joining (Hanging the Strips)
The strips are not seamed together. Leaving them separate lets the curtain move, and people can walk through it. The only crocheted join on each strip is the tab fold, which is stitch to stitch: 7 sts of Tab Row 16 to 7 sts of Tab Row 1, so the loop sits flat without puckering.
Method:
- Slide the strips onto the rod in order A-B-A-B-A-B-A, with every RS facing the room.
- Space them 0.5 in (1.3 cm) apart, center to center 5.5 in (14.0 cm).
- Keep the tabs even, so all 7 top edges hang level.
Tension advice: Don’t stretch a strip to make it match its neighbors. Lace grows when it hangs. Let all 7 strips hang for 24 hours before you judge the lengths.
Size checkpoint: 7 strips × 5.0 in (12.7 cm) + 6 gaps × 0.5 in (1.3 cm) = 38 in (96.5 cm) across the rod.
Border
Work the border on each strip in its own color. The border runs down the left side, around the bottom point, and up the right side. The top edge stays plain because the tab covers its center.
Border gauge: 16 sc = 4 in (10.2 cm) along the edge, or 4 sc per inch.
Border Row (RS): With RS facing, join yarn at the top-left corner of Row 152.
- Left side: Ch 1. Working into the row ends, work 2 sc around each dc post or turning ch. 304 sc (152 rows × 2).
- Bottom edge: Working into the free loops of the foundation chain: 3 sc in the corner ch, sc in next 10 ch, 3 sc in the center ch (at the base of the Row 1 dc3tog), sc in next 10 ch, 3 sc in the corner ch. 29 sc (23 ch worked 1 per ch + 2 extra at each corner + 2 extra at the point).
- Right side: Working into the row ends, work 2 sc around each dc post or turning ch. 304 sc.
Total: 637 sc (304 + 29 + 304). The 3-sc corner groups belong to the bottom-edge count, so the side counts are row-end stitches only. Fasten off and weave in the end.
Why the math works: One dc row is 0.5 in (1.3 cm) tall. At 4 sc per inch, 2 sc per row end covers exactly 0.5 in (1.3 cm). So 304 sc over 76 in (193.0 cm) lies flat without ruffling or pulling in. On the bottom edge, the 3-sc groups add fullness at the two corners and at the point, so the V keeps its sharp angle.
After the border, the strip measures 5.0 in × 76.25 in (12.7 cm × 193.7 cm).
Final Blocking
- Weave in all ends, working along the dc posts so the tails don’t show in the open spaces.
- Mist each strip lightly with water, or hold a steamer 1 in (2.5 cm) above it. Never press an iron onto the lace.
- Lay the strip flat on a blocking surface. Block it in two or three sections if needed.
- Pin the long sides straight at 5.0 in (12.7 cm) apart.
- Pin the bottom point so the center spine is centered and the two bottom edges are equal.
- Open each V window gently with your fingers, keeping the dc3tog spine in a straight line.
- Check the length: 76.25 in (193.7 cm). Let the strip dry completely before you unpin it.
- Hang all 7 strips for 24 hours, then check that their lengths match.
Final Quality-Control Checklist
- [ ] Every row has 23 sts.
- [ ] The dc3tog spine runs straight up the center of every strip.
- [ ] Each strip has 152 rows and measures 76 in (193.0 cm) before the border.
- [ ] The border has 304 sc on each side and 29 sc across the bottom.
- [ ] The bottom point is sharp and centered.
- [ ] The tab is 7 sc wide, 16 rows long, and centered at the top notch.
- [ ] The tab loop is sewn stitch to stitch and lies flat.
- [ ] You have 4 Color A strips and 3 Color B strips, hung A-B-A-B-A-B-A.
- [ ] All strips hang level, with 0.5 in (1.3 cm) gaps.
Troubleshooting
The center spine wanders left or right. You probably skipped a dc or missed a sp next to the dc3tog. Count the dc on each side of the spine: there should be 6, including the edge pair.
The edges are wavy. Your turning ch-3 may be too loose, or you missed the “sk next dc” before the last 2 dc. Tighten the chain and recount to 23 sts.
The strip is narrower at the top than the bottom. This is usually tension drift over a long project. Check the width every 20 rows against 4.6 in (11.7 cm).
The side border ruffles. You’re working more than 2 sc per row end. Take it out and rework at exactly 2 sc per row.
The strips hang at different lengths. Count the rows on each strip. If the counts match, re-block the longer strips and let them dry flat.
The tab twists on the rod. Make sure the loop is folded to the WS and sewn 7 sts to 7 sts, with none skipped.
Care
Hand wash in cool water with mild soap, roll in a towel, and dry flat, pinning if needed. Re-hang only when completely dry so the strips don’t stretch.
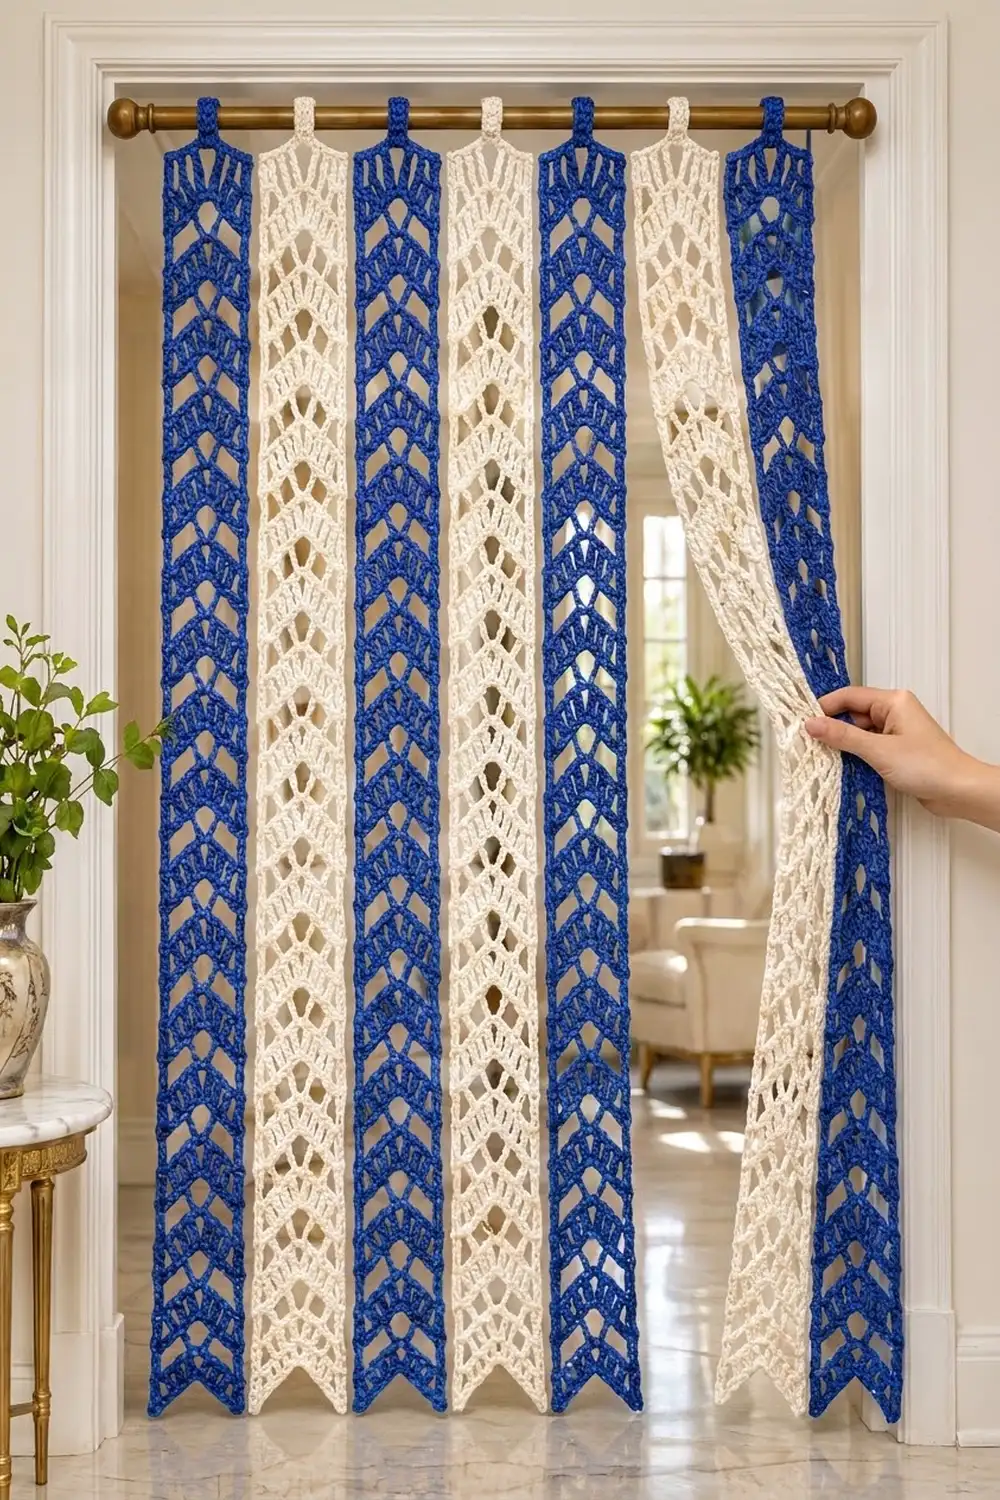
Final Notes
The measurement chain is simple. Your gauge of 20 sts and 8 rows = 4 in (10.2 cm) gives 23 sts = 4.6 in (11.7 cm) across a strip. 152 rows = 76 in (193.0 cm). The border adds 0.2 in (0.5 cm) per side and 0.25 in (0.6 cm) at the bottom, for 5.0 in × 76.25 in (12.7 cm × 193.7 cm). The tab adds a 2 in (5.1 cm) loop, for a 78.25 in (198.8 cm) drop. Seven strips with six 0.5 in (1.3 cm) gaps make 38 in (96.5 cm) across the doorway. If you check each link in that chain as you go, the finished curtain will hang straight and even.
Happy crocheting!