

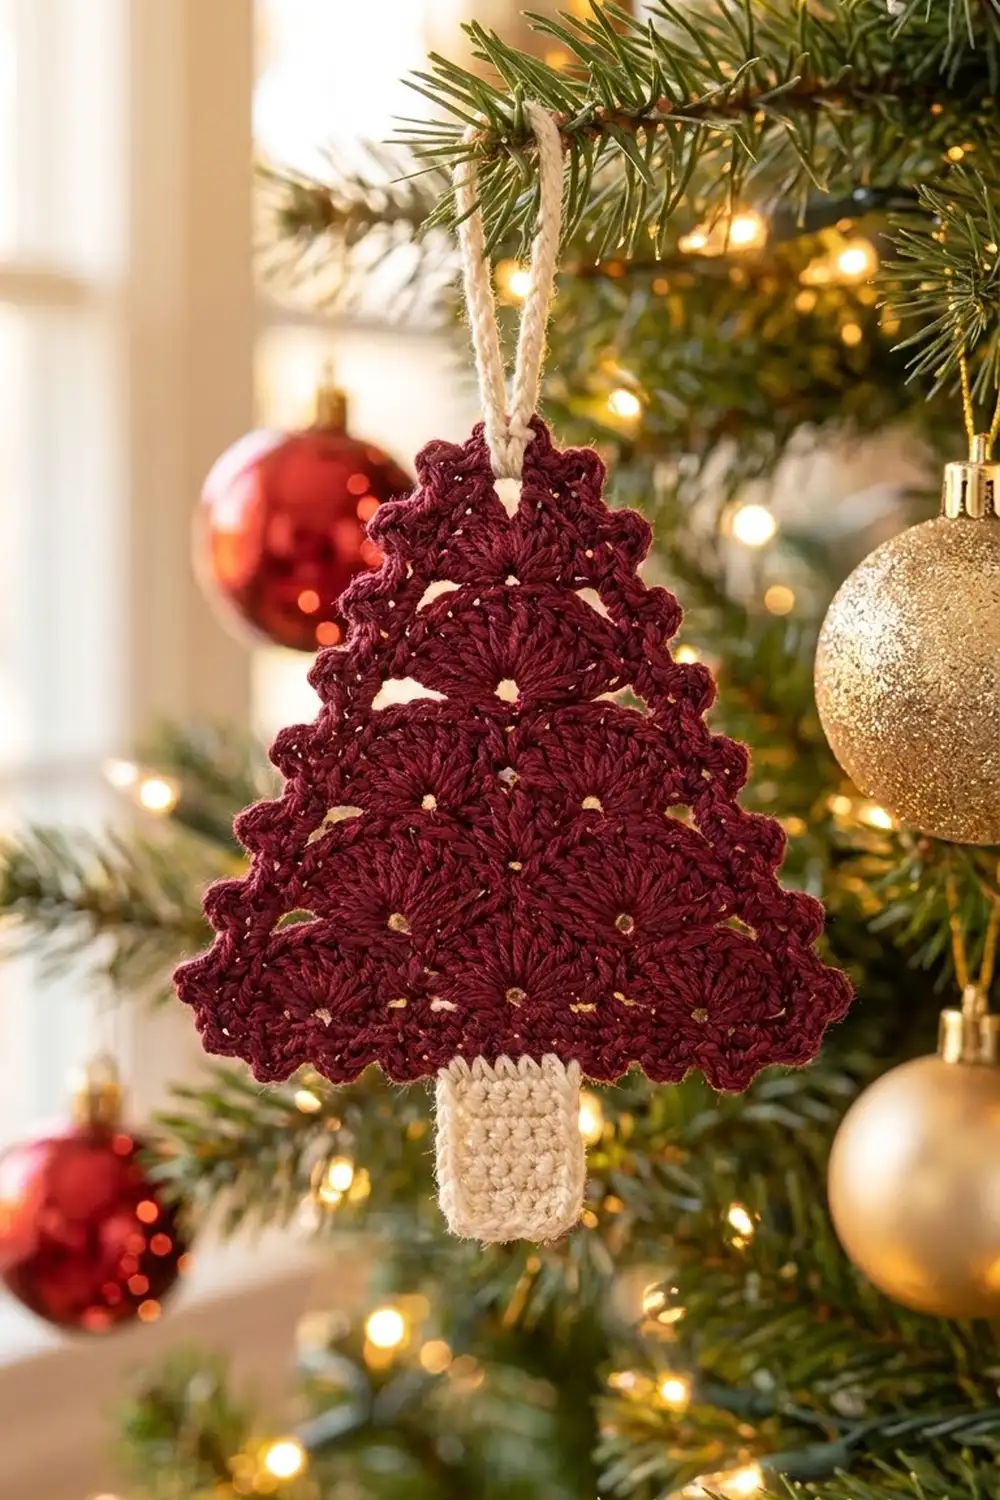
This little tree ornament is made from rows of soft fan stitches stacked like scales. Each row is a little narrower than the one below it, until a single fan forms the top point. A picot edging runs around all three sides, and a cream trunk and hanging cord finish the classic tree shape.
The colors are deep burgundy for the tree and warm cream for the trunk and loop. It looks great on a green tree with gold lights, as a gift topper, or in a garland of several ornaments. This pattern makes one ornament.
The pattern uses US crochet terms. The finished ornament is 4.8 in (12.2 cm) wide and 5.3 in (13.5 cm) tall from the tip to the bottom of the trunk. The hanging cord adds about 2 in (5.1 cm) above the tip.
The tree body is worked flat from the bottom up. Fan rows alternate with gathering single crochet rows, and each fan row has one fan fewer than the row before. You then add a two-round picot border, crochet a small trunk and a chain cord, and sew both to the back of the tree.
Finished Size and Construction
- Finished size: 4.8 in (12.2 cm) wide × 5.3 in (13.5 cm) tall, not counting the loop
- Skill level: Advanced beginner
- Terminology: US crochet terms
- Yarn weight: Sport (#2)
- Hook: 3.0 mm
- Number of pieces: 1 ornament, made from 3 parts (tree body, trunk, cord)
- Layout: Single triangle with the trunk centered below it and the loop centered above it
- Tree body size before border: 4.2 in (10.7 cm) wide × 3.7 in (9.4 cm) tall
- Border depth: 0.3 in (0.8 cm) on every edge
- Tree body after border: 4.8 in (12.2 cm) wide × 4.3 in (10.9 cm) tall
- Trunk: 1.0 in (2.5 cm) wide × 1.3 in (3.3 cm) tall
Materials
Yarn: Use a smooth sport-weight cotton or cotton blend. Cotton shows the fan stitches clearly and holds a crisp point after blocking. Avoid fuzzy yarns, which blur the holes at the base of each fan.
- Burgundy: 15 g / about 50 m (tree body and border)
- Cream: 5 g / about 17 m (trunk and hanging cord)
These amounts include a safety margin of about 30%, so a small leftover ball is usually enough.
Tools:
– 3.0 mm crochet hook
– Tapestry needle
– Scissors
– Stitch marker
– Rustproof pins and a blocking mat or folded towel
– Spray bottle with water
Abbreviations (US Terms)
- ch – chain
- sc – single crochet
- dc – double crochet
- sl st – slip stitch
- sk – skip
- st(s) – stitch(es)
- RS / WS – right side / wrong side
- Fan – 5 dc worked into the same stitch
- Picot – ch 3, sl st into the 3rd ch from the hook
Gauge and Checkpoints
Base gauge: 24 sc and 28 sc rows = 4 in (10.2 cm). One fan row measures about 0.45 in (1.1 cm) tall.
Since this is a single small piece, the first three rows of the tree body work as your gauge test.
- After Row 3: 4.2 in (10.7 cm) wide and about 0.75 in (1.9 cm) tall.
- After Row 7: the top edge is 2.8 in (7.1 cm) wide, and the piece is about 1.9 in (4.8 cm) tall.
- After Row 13: 4.2 in (10.7 cm) wide at the base and 3.7 in (9.4 cm) tall.
- After Border Round 1: about 4.5 in (11.4 cm) wide × 4.0 in (10.2 cm) tall.
- After Border Round 2: 4.8 in (12.2 cm) × 4.3 in (10.9 cm).
If the piece is too big: go down to a 2.75 mm hook, or tighten your fans by pulling each dc loop snug before you yarn over.
If the piece is too small: go up to a 3.25 mm or 3.5 mm hook.
Keep the stitch counts exactly as written either way. The border math depends on the row structure, not the hook.
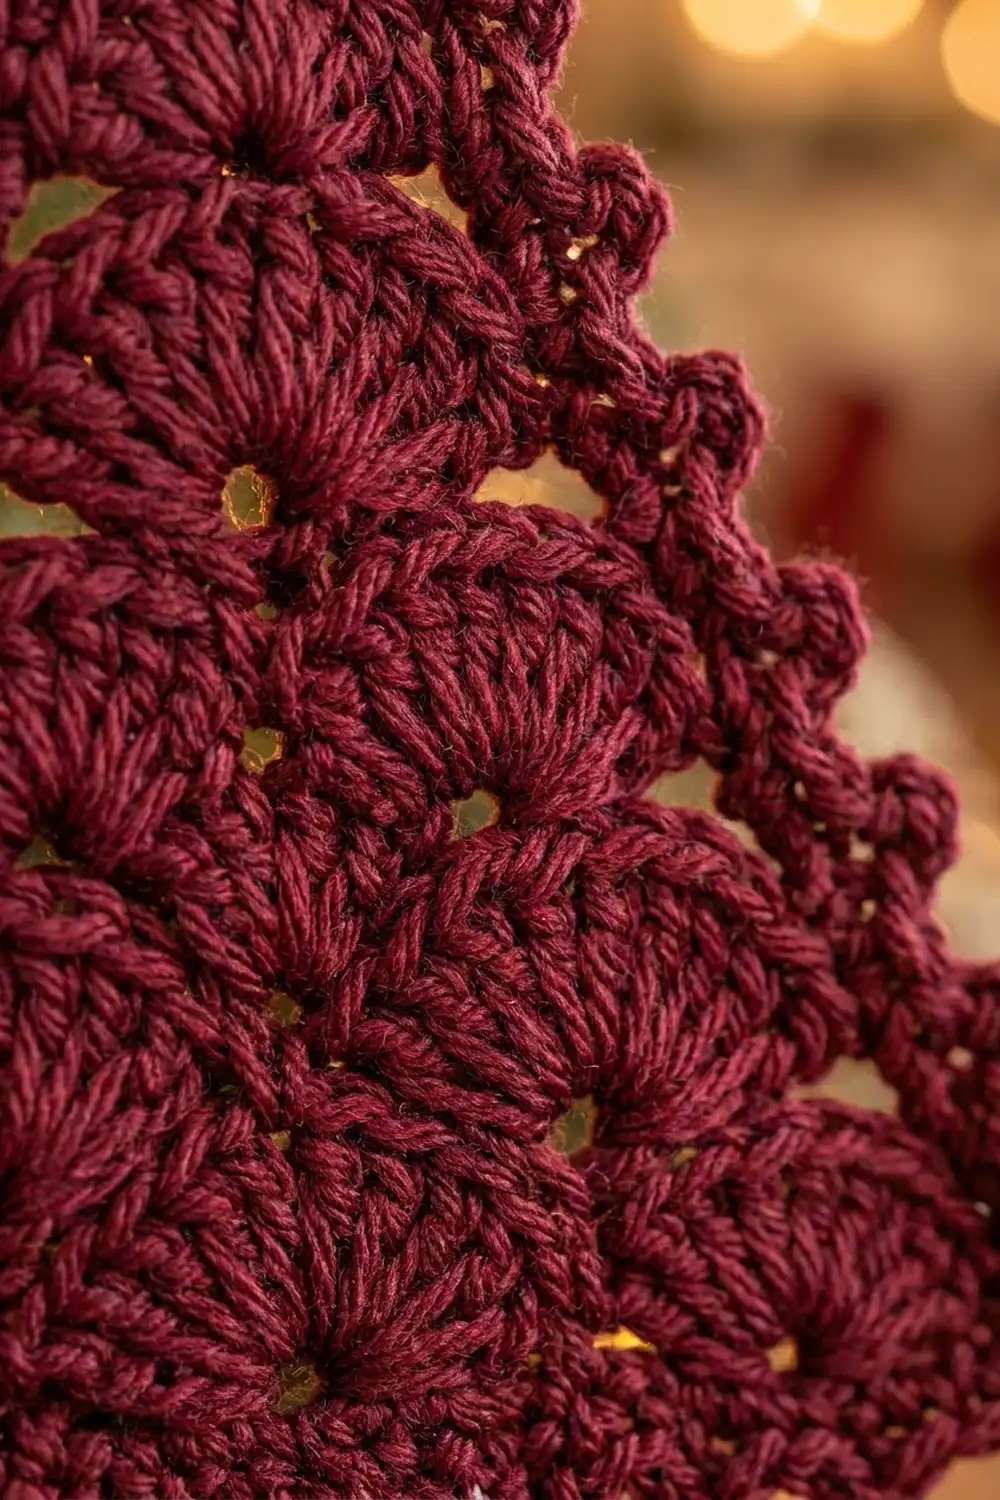
Tree Body (Burgundy)
The rows alternate between two types:
- Fan rows (even-numbered): fans sit in single crochet and are anchored by an sc in the center dc of the fan below. A fan row with k fans always has 6k + 1 sts.
- Gathering rows (odd-numbered): sc rows that skip the first and last dc of each fan. This pulls each fan back down to a 4-stitch base, so a gathering row with k fans below it has 4k + 1 sts.
Each new fan row starts with 2 slip stitches and stops 2 stitches before the end. This shifts the rows half a fan inward on each side and creates the staggered, brick-like layout. Even-numbered rows are the RS.
Row 1 (WS): Ch 26, sc in 2nd ch from hook and in each ch across. Turn. (25 sc)
Row 2 (RS): Ch 1, sc in first st, sk 1, Fan in next st, sk 1, sc in next st 6 times. Turn. (6 fans; 37 sts: 7 sc + 30 dc)
Row 3: Ch 1, sc in first sc, sk next dc, sc in each of next 3 dc, sk next dc, sc in next sc 6 times. Turn. (25 sc)
Row 4: Sl st in first 2 sts, ch 1, sc in next st (this st sits above the center dc of the first fan), sk 1, Fan in next st, sk 1, sc in next st 5 times. Leave the last 2 sts unworked. Turn. (5 fans; 31 sts)
Row 5: Work as Row 3, repeating 5 times. Turn. (21 sc)
Row 6: Work as Row 4, repeating 4 times. Turn. (4 fans; 25 sts)
Row 7: Work as Row 3, repeating 4 times. Turn. (17 sc)
Row 8: Work as Row 4, repeating 3 times. Turn. (3 fans; 19 sts)
Row 9: Work as Row 3, repeating 3 times. Turn. (13 sc)
Row 10: Work as Row 4, repeating 2 times. Turn. (2 fans; 13 sts)
Row 11: Work as Row 3, repeating 2 times. Turn. (9 sc)
Row 12: Work as Row 4, repeating once. Turn. (1 fan; 7 sts)
Row 13: Work as Row 3, repeating once. (5 sc)
Fasten off. The center sc of Row 13 (the 3rd st) is the tree’s top point.
Count check: Each fan row has 6 fewer sts than the last (37, 31, 25, 19, 13, 7). Each gathering row has 4 fewer (25, 21, 17, 13, 9, 5). If a count is off, the fan positions in the next row will drift away from the center.
Trunk (Cream)
Row 1: Ch 7, sc in 2nd ch from hook and in each ch across. Turn. (6 sc)
Rows 2–9: Ch 1, sc in each st across. Turn. (6 sc)
Fasten off and leave a 10 in (25.4 cm) tail for sewing. The trunk measures 1.0 in (2.5 cm) wide × 1.3 in (3.3 cm) tall.
Hanging Cord (Cream)
Ch 30, sl st in 2nd ch from hook and in each ch across. (29 sl sts)
Fasten off and leave an 8 in (20.3 cm) tail. The slip stitches turn the chain into a firm cord about 4 in (10.2 cm) long. When folded in half, it makes a 2 in (5.1 cm) loop.
Border (Burgundy)
Border gauge: the edging follows the base gauge of 24 sts = 4 in (10.2 cm), with one picot about every 0.5 in (1.3 cm).
How the sides are counted: each corner gets a 3-sc group. The side counts below are the sts between corner groups and do not include the corner groups.
Round 1 (sc round)
With the RS facing, join burgundy with an sc in the first remaining loop of the foundation chain at the right-hand base corner. Work 2 more sc in the same ch to finish the corner group.
- Base: sc in each of the next 23 foundation chains. Work 3 sc in the last foundation chain (corner).
- Left slanted side, bottom to top (29 sc):
- 2 sc in the side of Row 2 and 1 sc in the side of Row 3
- 2 sc along the 2 unworked sts at the end of Row 3
- Repeat this pattern for Rows 4–5, 6–7, 8–9 and 10–11: 2 sc in the fan-row side, 1 sc in the gathering-row side, then 2 sc along the 2 unworked sts
- 2 sc in the side of Row 12
- sc in the first 2 sts of Row 13
- Tip: 3 sc in the center st of Row 13.
- Right slanted side, top to bottom (29 sc): work the left-side sequence in reverse. Sc in the last 2 sts of Row 13, 2 sc in the side of Row 12, then for each pair of rows from 11–10 down to 3–2: 2 sc into the 2 slip-stitched sts, 1 sc in the gathering-row side, 2 sc in the fan-row side.
Sl st to the first sc.
Round 1 total: 90 sc (9 in corner groups + 23 along the base + 29 + 29 along the slanted sides).
The 2 sc on each step fill the half-fan jog that every fan row creates, which turns the stepped edge into a straight line.
Round 2 (picot round)
Sl st into the center sc of the base corner group. Ch 1.
- Each corner: (sc, picot, sc) in the center sc.
- Base stretch (25 sts): sc in next st, picot, sc in each of next 3 sts 8 times.
- Each slanted stretch (31 sts): sc in next st, picot, sc in each of next 3 sts 10 times.
Work around in this order: corner, base, corner, slanted side, tip corner, slanted side. Sl st to the first sc and fasten off.
Round 2 total: 93 sc and 31 picots.
Why the math works: each stretch runs between two corner centers. It includes the last sc of one corner group, the side sts, and the first sc of the next corner group. That makes 23 + 2 = 25 sts on the base and 29 + 2 = 31 sts on each slanted side. Both numbers equal 1 + a multiple of 3 (1 + 3×8 and 1 + 3×10), so the picots land evenly, with no half-repeat before the corners.
Check: 25 + 31 + 31 + 3 corner centers = 90 sts, which matches Round 1.
Final Blocking
- Weave in all burgundy ends along the WS of the gathering rows.
- Spray the tree body until it is evenly damp, not dripping.
- Lay it RS up on the mat. Pin the two base corners 4.8 in (12.2 cm) apart.
- Pin the tip 4.3 in (10.9 cm) above the center of the base.
- Pin each picot outward along all three edges so the sides are straight, not wavy.
- Gently press each fan open with your fingertip so the hole at its base shows.
- Block the trunk flat to 1.0 in × 1.3 in (2.5 cm × 3.3 cm).
- Let everything dry completely.
- Center the trunk behind the base, overlapping the tree by 0.3 in (0.8 cm), so 1.0 in (2.5 cm) shows below. Whipstitch it to the WS of Border Round 1 and Row 1 so no stitches show on the front.
- Fold the cord in half and sew both ends to the WS directly behind the tip, with the loop rising 2 in (5.1 cm) above the point.
Final Quality-Control Checklist
- Every fan row has the right number of fans: 6, 5, 4, 3, 2, 1.
- Fans are centered above the fans in the row below them.
- The base measures 4.8 in (12.2 cm) after blocking.
- The height from base to tip is 4.3 in (10.9 cm).
- There are 31 picots, including one at each corner.
- The trunk sits exactly at the center of the base.
- No sewing stitches show on the RS.
- The hanging loop is centered and the ornament hangs straight.
Troubleshooting
The fans lean to one side. You probably slipped the wrong number of sts at the start of a fan row. Use exactly 2 sl sts, then sc.
The edges ripple. Too many sts went into the row ends in Round 1. Recheck the per-row amounts and get 29 sts per slanted side.
The base curls upward. The foundation chain is too tight. Redo it with a hook 0.5 mm larger, then switch back to the 3.0 mm hook.
The picots don’t line up at the corners. Count the Round 1 sides again. Each side needs a total of 1 + a multiple of 3 between corner centers.
The trunk looks crooked. Mark the center foundation chain (the 12th of the 23 between the corner groups) and line up the middle of the trunk with it.
The ornament tips forward. The cord is sewn too low. Move it so it sits right behind the tip.
Care
Hand-wash in cool water with a mild soap, press out the water in a towel, and dry flat, reshaping the point. Store flat or hanging so the picots stay crisp.
Final Notes
Here is the measurement chain from start to finish:
- Gauge: 24 sc = 4 in (10.2 cm)
- 25-st base: 4.2 in (10.7 cm)
- Body after 13 rows: 3.7 in (9.4 cm) tall
- Two border rounds add 0.3 in (0.8 cm) on every edge, for a tree of 4.8 in × 4.3 in (12.2 cm × 10.9 cm)
- The trunk adds 1.0 in (2.5 cm) below, for 5.3 in (13.5 cm) in total
- The cord adds a 2 in (5.1 cm) loop on top
If each checkpoint matches, the finished ornament will too. Make one in burgundy, then try one in forest green or ivory for a matching set.
Happy crocheting!