

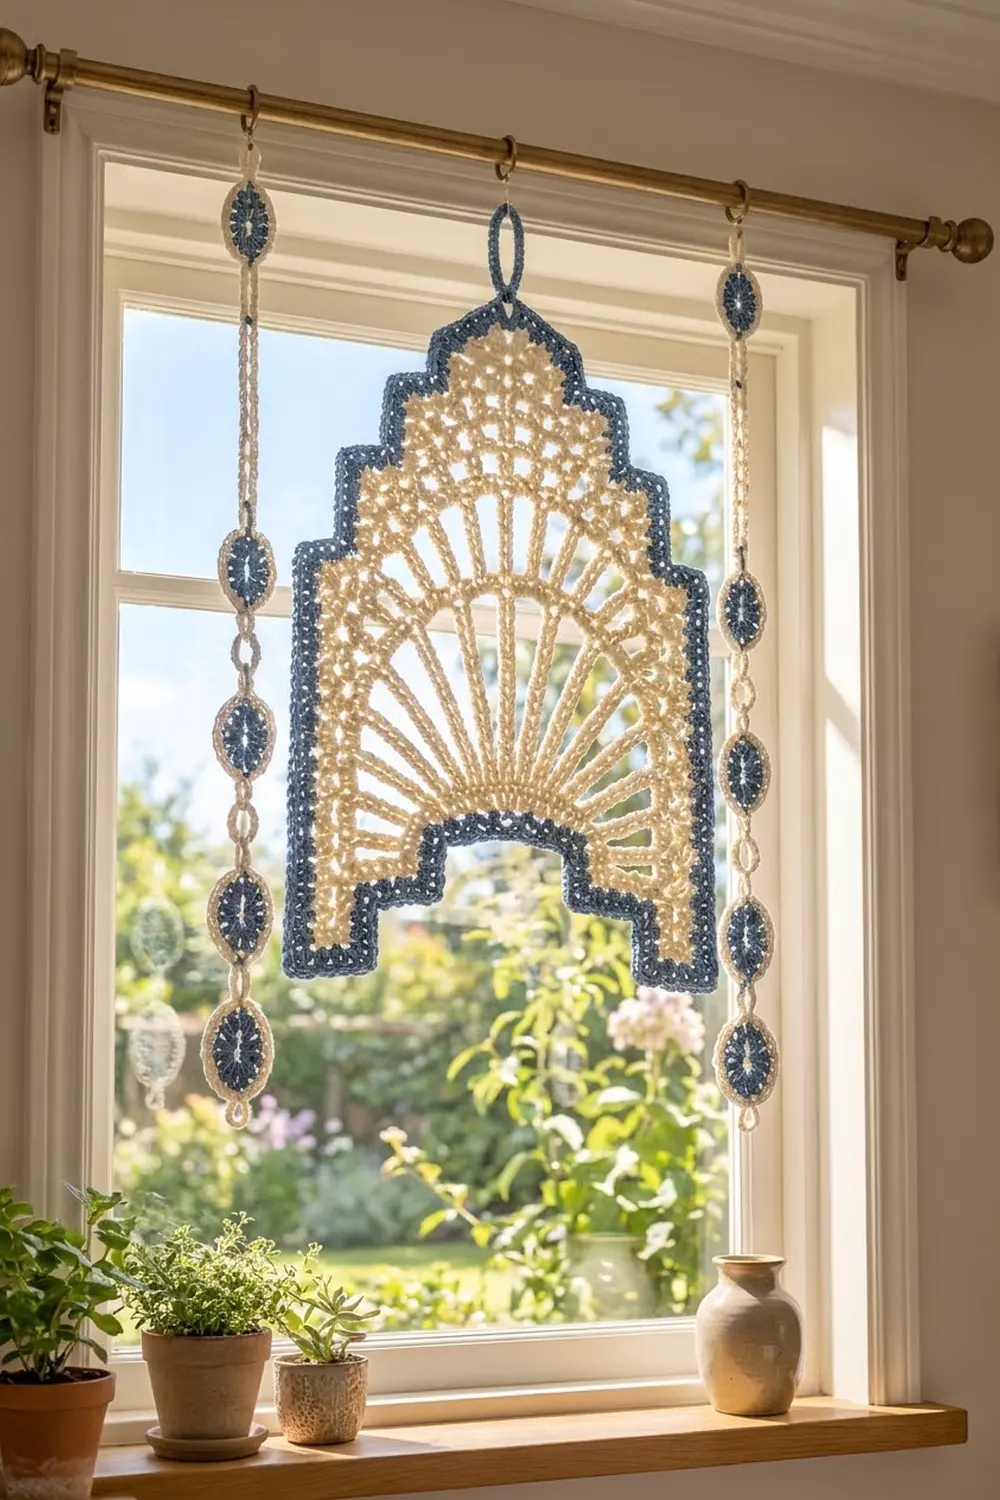
The Deco Sunrise Fan Panel is a stepped, Art Deco–style lace piece. A cream sunburst fan opens upward from an arched base, and above it a mesh of V-stitch tiers steps in toward a small peak. A crisp blue border traces every edge, step and corner. Two matching medallion drops hang on either side of the panel.
The palette is two colors: warm cream for the lace and soft cornflower blue for the border, the medallion centers and the hanging loop. The look is airy but structured, and it fits a window, a door or a bare wall.
This pattern uses US crochet terms. The finished panel measures 10 in (25.4 cm) wide by 12.5 in (31.8 cm) tall, or 13.5 in (34.3 cm) including the hanging loop. Each drop is also 13.5 in (34.3 cm) long.
Construction is simple. You work the fan in rows outward from a foundation chain that becomes the arch, square it off with graded stitches, and then add V-stitch tiers that step inward. A 2-round border finishes the panel. The medallions are worked in the round and linked into two drops with cream chains.
Finished Size and Construction
- Panel finished size: 10 in × 12.5 in (25.4 cm × 31.8 cm), plus a 1 in (2.5 cm) loop
- Panel size before border: 9 in × 11.5 in (22.9 cm × 29.2 cm)
- Border depth: 0.5 in (1.3 cm), 2 rounds of sc
- Medallion size: 1.75 in × 2.25 in (4.4 cm × 5.7 cm)
- Drop length: 13.5 in (34.3 cm)
- Skill level: Intermediate
- Terminology: US
- Yarn weight: DK (3), cotton
- Hook: 4.0 mm (G-6)
- Number of pieces: 3 separate pieces: 1 panel and 2 drops (each drop is 4 medallions linked together)
- Layout: Drop – Panel – Drop, hung side by side and not joined to each other
Materials
Use a smooth mercerized or combed DK cotton. Cotton shows the ray texture clearly and blocks to sharp steps. Avoid fuzzy yarns, because they blur the openwork.
- Cream: 60 g / 138 m (151 yd)
- Cornflower blue: 25 g / 58 m (63 yd)
Tools:
- 4.0 mm (G-6) crochet hook
- Tapestry needle
- Stitch markers
- Rust-proof pins and a blocking board
- Spray bottle
- Tape measure
The quantities include a margin of about 15% for your gauge swatch and weaving in ends.
Abbreviations (US Terms)
- ch – chain
- sl st – slip stitch
- sc – single crochet
- hdc – half double crochet
- dc – double crochet
- tr – treble crochet
- dtr – double treble crochet
- sc2tog – single crochet 2 together
- sk – skip
- sp – space
- st(s) – stitch(es)
- RS / WS – right side / wrong side
Special stitches:
- V-st: (dc, ch 1, dc) in the same st.
- Picot ring: ch 4, then sl st in the 4th ch from the hook.
Gauge and Checkpoints
Gauge: 18 sc and 16 sc rows = 4 in (10.2 cm). One V-st row plus one sc row = 0.75 in (1.9 cm). One tr row = 0.75 in (1.9 cm).
Make one medallion first. It should measure 1.75 in × 2.25 in (4.4 cm × 5.7 cm) after Round 3. This is a quick way to test your hook before you start the panel.
Panel checkpoints:
- Row 1: the foundation edge measures 4.7 in (11.9 cm). This is the arch, about 3 in (7.6 cm) across when curved.
- After Row 5: the fan is 8.5 in (21.6 cm) wide and 4.25 in (10.8 cm) tall.
- After Row 7: the block is 9 in (22.9 cm) wide and 4.75 in (12.1 cm) tall.
- After Row 13: the piece is 7 in (17.8 cm) tall.
- After Row 25: the piece is 9 in × 11.5 in (22.9 cm × 29.2 cm).
If your piece is too big, go down 0.5 mm in hook size. If it is too small, go up 0.5 mm. Don’t add or remove stitches, because every border count depends on these stitch counts.
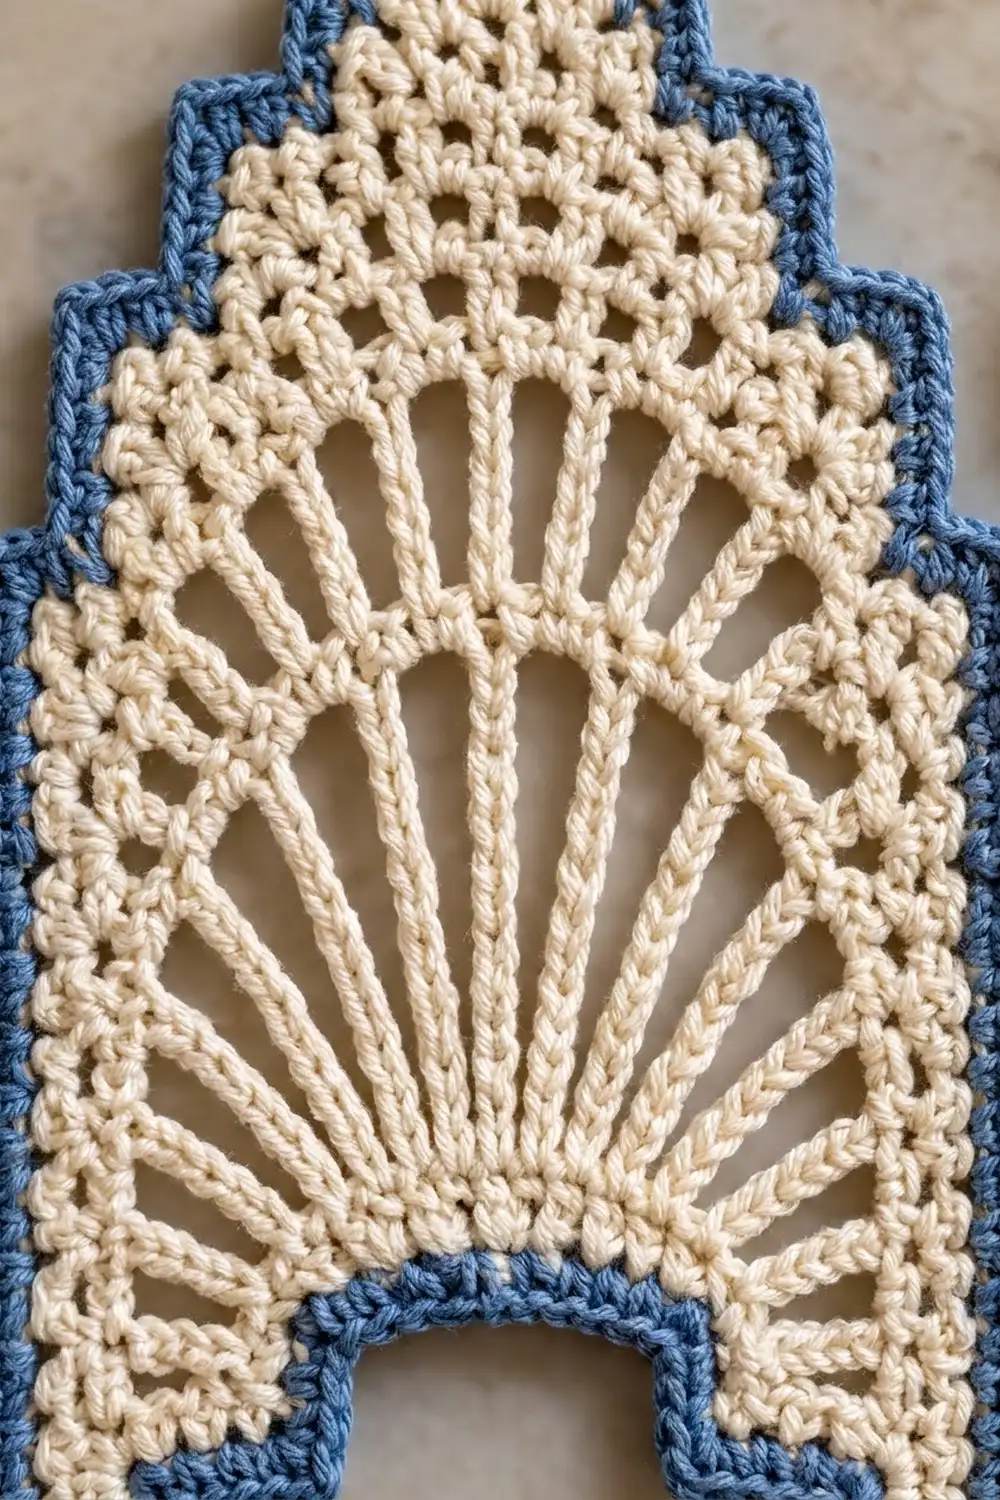
Panel: Fan Section
Use cream.
Foundation: ch 22.
Row 1 (RS): sc in 2nd ch from hook and in each ch across, turn. (21 sc)
Row 2: ch 4 (counts as tr), tr in next st, ch 1, tr in next st; rep from * to end, turn. (21 tr, 20 ch-1 sps)
Correction to Row 2: work it as ch 4 (counts as tr), ch 1, tr in next st; rep from * across, turn. (21 tr, 20 ch-1 sps)
Row 3: ch 4 (counts as tr), ch 2, tr in next tr; rep from * across, working the last tr in the top of the turning ch, turn. (21 tr, 20 ch-2 sps)
Row 4: ch 4 (counts as tr), ch 3, tr in next tr; rep from * across, turn. (21 tr, 20 ch-3 sps)
The chains get longer each row so the rays can spread into a half circle. The foundation edge curves into the arch on its own.
Row 5: ch 1, sc in first tr, 2 sc in next ch-3 sp, sc in next tr; rep from * across, turn. (21 sc in tr + 40 sc in spaces = 61 sc)
Row 6 (corner squaring): ch 1. Then work, with 1 st in each st:
- sc in next 3 sts
- hdc in next 3 sts
- dc in next 3 sts
- tr in next 3 sts
- dtr in next 5 sts (corner)
- tr in next 3 sts
- dc in next 3 sts
- hdc in next 3 sts
- sc in next 9 sts (top center)
- hdc in next 3 sts
- dc in next 3 sts
- tr in next 3 sts
- dtr in next 5 sts (corner)
- tr in next 3 sts
- dc in next 3 sts
- hdc in next 3 sts
- sc in last 3 sts
Fasten off. (61 sts)
The tall dtr groups fill out the two upper corners, and the short stitches stay low at the sides and at the top center. Stitches 1–12 and 50–61 now form the vertical sides. Stitches 13–49 form the top edge.
Row 7: with RS facing, join cream with a standing sc in st 13 (the first dtr of a corner group). Work across sts 13–49 only:
- sc in next 4 sts
- 2 sc in next st
- sc in next 8 sts
- 2 sc in next st
- sc in next 7 sts
- 2 sc in next st
- sc in next 8 sts
- 2 sc in next st
- sc in last 5 sts
Turn. (37 sts worked once + 4 extra = 41 sc)
Leave sts 1–12 and 50–61 unworked.
Panel: Stepped Tiers
Tier 1, Row 8 (V-row): ch 3 (counts as dc), sk next st, V-st in next st, sk 2 sts, V-st in next st; rep from * to last 2 sts, sk 1 st, dc in last st, turn. (13 V-sts, 41 sts)
Row 9 (sc row): ch 1, sc in first dc, sc in next dc, sc in ch-1 sp, sc in next dc; rep from * across, sc in top of turning ch, turn. (41 sc)
Rows 10–13: repeat Rows 8–9 twice more. (41 sc after Row 13)
Each new tier starts 3 sts in from both edges. That makes a step about 0.7 in (1.8 cm) wide and 0.75 in (1.9 cm) tall.
Tier 2, Row 14: sl st in first 4 sts, ch 3 (counts as dc), sk next st, V-st in next st, sk 2 sts, V-st in next st; rep from * until 5 sts remain, sk 1 st, dc in next st, leave the last 3 sts unworked, turn. (11 V-sts across 35 sts)
Row 15: work as Row 9. (35 sc)
Work Tiers 3–7 the same way as Tier 2: sl st over 3 sts at the start of each V-row and leave 3 sts unworked at the end.
| Tier | Rows | Sts | V-sts |
|---|---|---|---|
| 3 | 16–17 | 29 | 9 |
| 4 | 18–19 | 23 | 7 |
| 5 | 20–21 | 17 | 5 |
| 6 | 22–23 | 11 | 3 |
| 7 | 24–25 | 5 | 1 |
Fasten off. The 5-st peak is about 1.1 in (2.8 cm) wide.
Medallions
Make 8. Work Rounds 1–2 in blue and Round 3 in cream.
Foundation: with blue, ch 6.
Round 1: 2 hdc in 3rd ch from hook (the skipped ch count as 1 hdc). Then:
- hdc in next 2 ch
- 6 hdc in last ch
- working along the other side of the chain, hdc in next 2 ch
- 3 hdc in the same ch as the first hdcs
Sl st to the top of the beginning ch. (16 hdc: two 6-st ends, two 2-st sides)
Round 2: ch 1, then 2 sc in each of the 6 end sts, sc in each of the 2 side sts, 2 sc in each of the 6 end sts, sc in each of the 2 side sts. Sl st to the first sc and fasten off. (28 sc: 12 + 2 + 12 + 2)
Round 3: join cream in the first st of an end. Work (2 sc in next st, sc in next st) 6 times across the end, sc in each of the 2 side sts; rep from * once. Sl st to join and fasten off. (28 sts worked once + 12 extra = 40 sc: 18 + 2 + 18 + 2)
Make All Pieces
- Panel: 1. Rows 1–25 in cream; border and loop in blue.
- Medallions: 8. Rounds 1–2 in blue, Round 3 in cream.
- Drops: 2, each made from 4 medallions joined with cream links.
Layout as shown in the photo:
[ring]              [ring]
 (M)    /\  peak     (M)
 (M)   [  PANEL  ]   (M)
 (M)   [  fan    ]   (M)
 (M)   [_/arch\_]    (M)
[ring]              [ring]
Hang the drops about 1 in (2.5 cm) from each side of the panel. The three pieces stay separate.
Joining the Medallion Drops
Join within each drop only. Work every link from one end center to the next. Each medallion’s end center is the space between the 9th and 10th sc of an 18-st end group.
Each drop: with cream, ch 8 and sl st in the first ch to make the top ring, 0.75 in (1.9 cm). Ch 6, about 1 in (2.5 cm), then sl st into the top end center of Medallion 1.
To link the next medallion, sl st across to the bottom end center of Medallion 1. Ch 2, make a picot ring, ch 2, then sl st into the top end center of the next medallion. Each link is 0.75 in (1.9 cm). Repeat until all 4 medallions are joined.
After Medallion 4, sl st to its bottom end center, ch 2, make a picot ring and fasten off. The bottom ring is about 0.5 in (1.3 cm).
Pull each chain only as firmly as your gauge chains. Links that are too tight make the medallions tilt.
Checkpoint: the drop is 0.75 + 1 + (4 × 2.25) + (3 × 0.75) + 0.5 = 13.5 in (34.3 cm), the same as the panel with its loop.
Border
Use blue. Border gauge: 18 sc = 4 in (10.2 cm). Two rounds add 0.5 in (1.3 cm) to every edge.
There are 18 outer corners:
- the 2 lower outer corners (Row 6, sts 1 and 61)
- the 2 corners where the feet meet the arch (foundation sts 1 and 21)
- the 2 top corners of Tier 1 (Row 13, sts 1 and 41)
- 12 step corners (the first and last sts of the sc rows in Tiers 2–7)
There are 12 inner corners, at the base of each step riser.
Round 1: join with a standing sc at the left foot. Work 1 sc in each edge position and 3 sc in each outer corner. Going around the panel:
- Each foot: 11 sc (1 in the Row 1 end, 3 in each tr row-end of Rows 2–4, 1 in the Row 5 end)
- Arch: 19 sc in foundation loops 2–20
- Each side: 26 sc (11 in Row 6 sts 2–12 or 50–60, 6 along the post of the corner dtr, 1 in the Row 7 end, then 2 in each V-row end and 1 in each sc-row end of Rows 8–12)
- Each step: 2 sc in the exposed sts, 1 sc in the inner corner and 2 sc in the V-row end, so 5 sc × 6 steps per side
- Peak: 3 sc in sts 2–4
That gives 22 + 19 + 52 + 60 + 3 = 156 single positions. Add 18 corners × 3 sc = 54, for a total of 210 sc. Shown the other way, that is (156 + 18 = 174 positions worked once) + 36 extra = 210. Sl st to join.
Round 2: ch 1. Sc in each sc, working 3 sc in the center sc of each outer corner. At each inner corner, sc2tog the inner-corner sc with the next sc. Sl st to join and fasten off. (210 sts worked once + 36 extra − 12 decreases = 234 sc)
Why the math works: the straight edges gain nothing, so they stay flat. Each outer corner gains 2 sts per round, the extra needed to turn a square corner without pulling. Each inner corner loses 1 st per round, so the step stays crisp instead of rippling. Two rounds add 0.5 in (1.3 cm) to every edge, which takes the panel from 9 × 11.5 in to 10 × 12.5 in (25.4 × 31.8 cm).
Hanging loop: join blue in the center sc of the peak. Ch 10, sl st in the same st, then work 16 sc into the loop and sl st at the base. Fasten off. The loop stands about 1 in (2.5 cm) tall.
Final Blocking
- Weave in all ends along the border or the sc rows.
- Soak the panel and drops in cool water for 10 minutes, then press out the water in a towel.
- Pin the panel to 10 in × 12.5 in (25.4 cm × 31.8 cm). Pin every outer corner and every step corner first.
- Pin the arch into an even curve about 3.5 in (8.9 cm) across, counting the border.
- Pin each fan ray straight, fanning them evenly from the arch.
- Pin the drops straight to 13.5 in (34.3 cm), with each medallion flat and centered.
- Mist lightly and let everything dry completely before you unpin.
Final Quality-Control Checklist
- [ ] Row 5 has 61 sc and Row 7 has 41 sc.
- [ ] Each tier has 6 sts fewer than the one before it, ending at 5.
- [ ] The step corners match left to right.
- [ ] Border Round 1 has 210 sc and Round 2 has 234 sc.
- [ ] The panel measures 10 × 12.5 in (25.4 × 31.8 cm).
- [ ] All 8 medallions measure 1.75 × 2.25 in (4.4 × 5.7 cm).
- [ ] Both drops measure 13.5 in (34.3 cm).
- [ ] All ends are secured.
Troubleshooting
- Fan cups upward: your chains are too tight. Chain more loosely, or add 1 ch to each Row 4 space and keep 2 sc per space in Row 5.
- Fan ruffles: your chains are too loose. Go down a hook size for Rows 2–4 only.
- Upper corners dip: work the corner dtr loosely and pin those corners hard when blocking.
- Steps are uneven: count 4 sl sts at the start of each tier-shift row, and leave exactly 3 sts at the end.
- Arch ripples after the border: sc2tog once at the top center of the arch in Round 2.
- Medallions twist: join each link exactly at the end center.
Care
Hand wash in cool water with mild soap, press flat to dry and re-pin if needed. Hang the pieces out of harsh direct sun to keep the blue from fading.
Final Notes
The measurement chain runs like this:
- The 21-st arch fans out to a 61-st band.
- Squaring the corners gives a 41-st top that is 9 in (22.9 cm) wide.
- Six 3-st steps on each side narrow the tiers to a 5-st peak at 11.5 in (29.2 cm) tall.
- Two border rounds bring the panel to 10 × 12.5 in (25.4 × 31.8 cm).
- Four medallions and their links make each drop 13.5 in (34.3 cm) long, the same height as the panel with its loop.
Check each step against these numbers and the finished set will hang evenly.
Happy crocheting!