

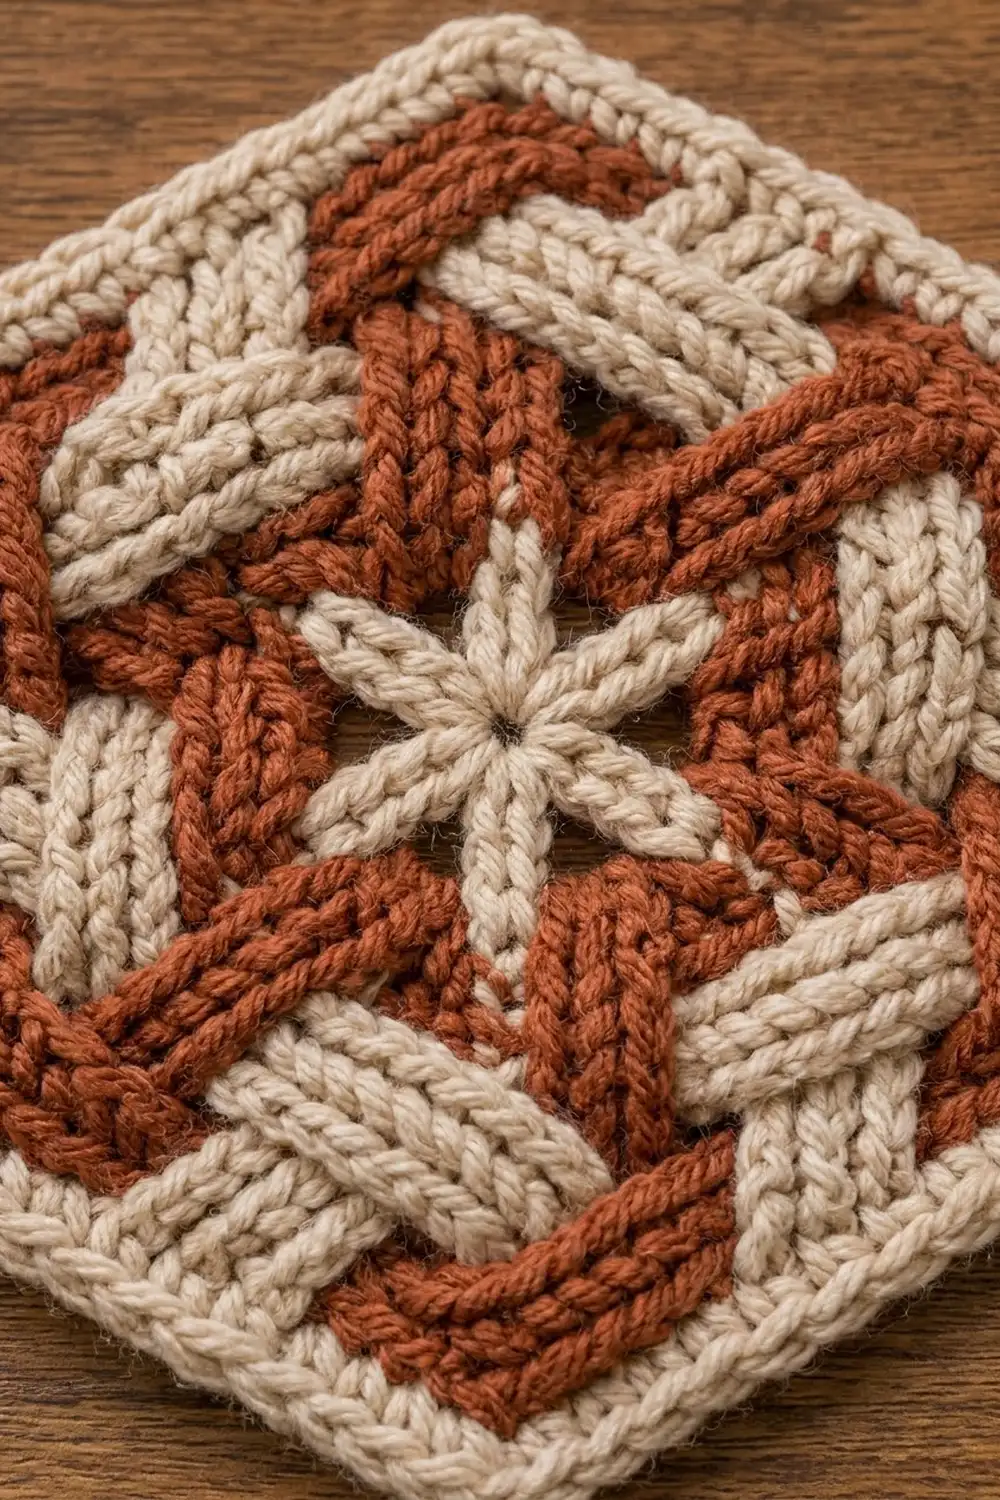
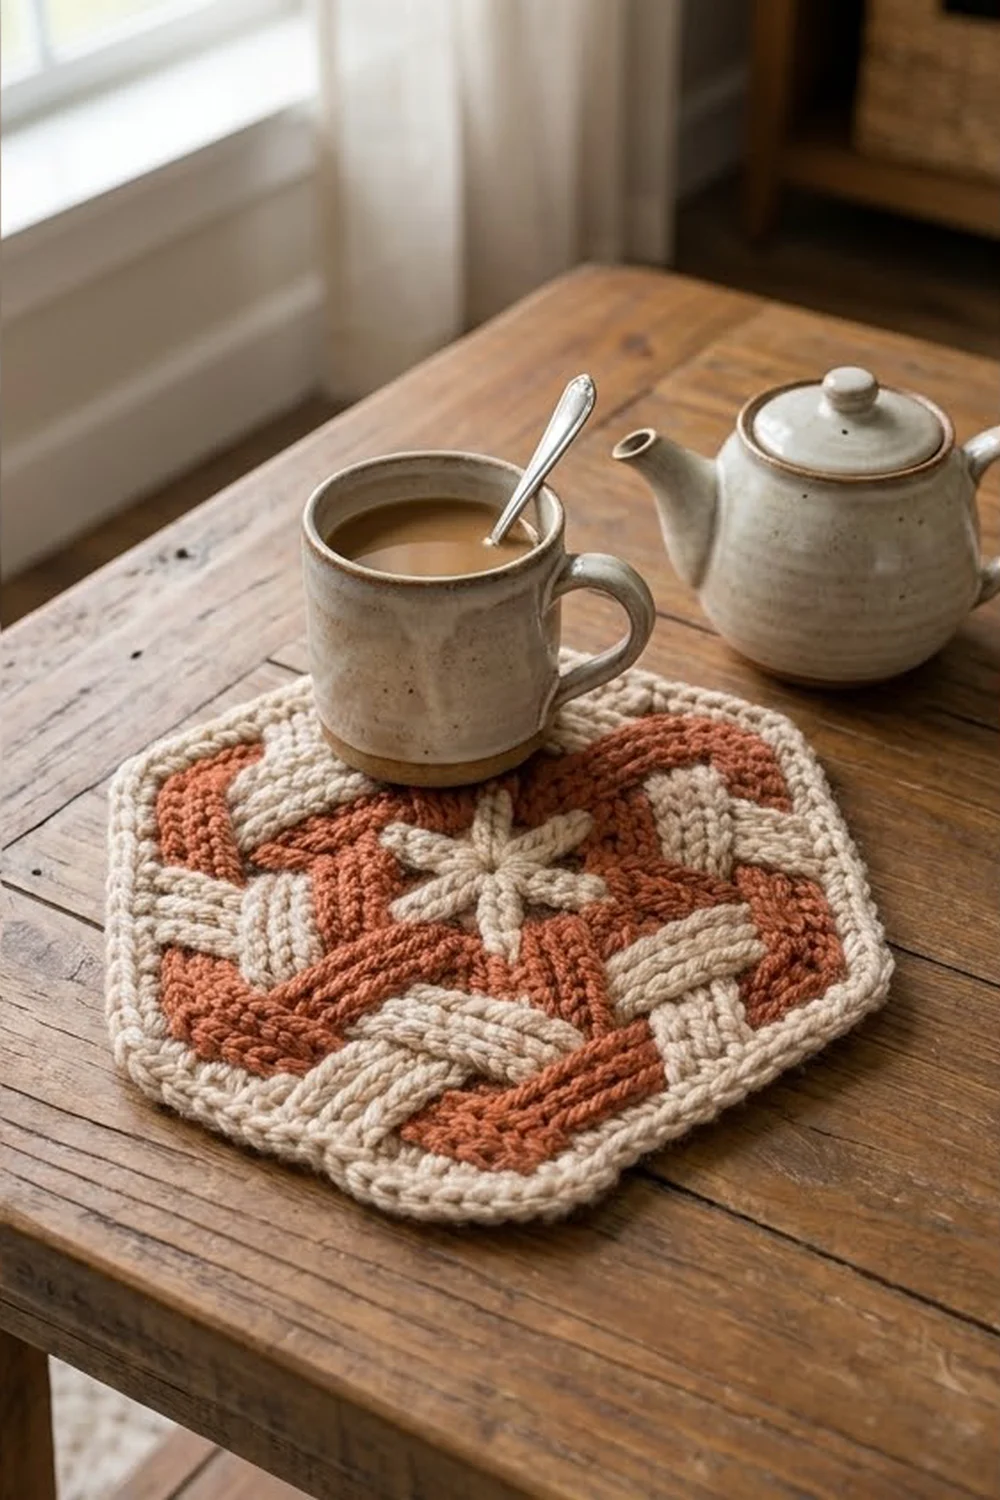
The Ember Weave Hexagon is a single, sturdy motif with a lot of texture in a small space. Warm rust bands swirl around the center in a pinwheel, and creamy oatmeal bands cross them for a woven, almost basketry look. A cream six-petal star sits in the middle, and a rope-like edge frames the whole piece.
The palette is just two colors: a brick rust and a soft natural cream. The style is cozy and rustic. The motif works well as a coaster, a mug rug or a small trivet topper. It’s also a good test motif before you commit to a bigger idea.
This pattern uses US crochet terms. The finished motif measures about 8 in (20.3 cm) from point to point and 7 in (17.8 cm) from flat side to flat side, with each side about 4 in (10.2 cm) long.
The construction is simple to follow. You work seven rounds of double crochet in the round, and the last four rounds use tapestry colorwork to make the slanted bands. Two cream border rounds finish the edge. Then you embroider the center star on top with lazy daisy stitches.
Finished Size and Construction
- Finished size: 8 in (20.3 cm) point to point; 7 in (17.8 cm) flat to flat
- Side length: about 4 in (10.2 cm)
- Skill level: Intermediate (tapestry color changes)
- Terminology: US
- Yarn weight: Worsted (#4)
- Hook: 5.0 mm (H-8)
- Number of pieces: 1 single hexagon motif
- Layout: One flat hexagon, worked in joined rounds
- Size before border: 6.25 in (15.9 cm) flat to flat; 7.2 in (18.3 cm) point to point
- Border depth: about 3/8 in (1.0 cm) on each side
Materials
Choose a smooth worsted-weight yarn with good stitch definition. Wool, a wool blend or a soft acrylic all work. Cotton gives crisper edges and is a good choice if you plan to use the motif as a coaster or hot pad. Avoid fuzzy or highly variegated yarn, because the bands depend on clean color changes.
- Rust (Color R): 12 g, about 24 m
- Cream (Color C): 10 g, about 20 m (includes the embroidered star)
These amounts assume a worsted yarn of about 200 m per 100 g. They include a small safety margin.
Tools:
– 5.0 mm (H-8) crochet hook
– Tapestry needle with a blunt tip
– Scissors
– Stitch marker
– Measuring tape or ruler
– Rust-proof pins and a blocking mat or folded towel
– Spray bottle with cool water
Abbreviations (US Terms)
- ch – chain
- sl st – slip stitch
- sc – single crochet
- dc – double crochet
- sp – space
- st(s) – stitch(es)
- rep – repeat
- R – Rust
- C – Cream
Special stitches
- Corner: (dc, ch 2, dc) in the same corner ch-2 sp.
- Tapestry color change: Work the last dc before the new color until 2 loops remain on the hook. Drop the old color, yarn over with the new color and pull through. Lay the unused color along the tops of the stitches and work over it so it’s carried inside the dc.
- Reverse sc (crab stitch): Work from left to right (if you’re right-handed). Insert the hook in the next st to the right, pull up a loop, yarn over and pull through both loops.
- Lazy daisy: Bring the needle up at the base of the petal, then insert it back at the same point to form a loop. Bring it up at the petal tip inside the loop, and tack the loop down with a tiny stitch.
Gauge and Checkpoints
Gauge matters because the color bands only line up if every side has the right count and the right width. This pattern is one piece, so the motif itself is your swatch. Work Rounds 1–3 and measure before you start the colorwork.
Gauge: Rounds 1–3 = 3 in (7.6 cm) flat to flat, about 3.5 in (8.9 cm) point to point.
Checkpoints:
– After Round 1: circle about 1.25 in (3.2 cm) across
– After Round 2: about 2 in (5.1 cm) flat to flat
– After Round 3: 3 in (7.6 cm) flat to flat
– After Round 5: about 4.6 in (11.7 cm) flat to flat
– After Round 7: 6.25 in (15.9 cm) flat to flat; 7.2 in (18.3 cm) point to point; each side about 3.6 in (9.1 cm)
– After Round 9: 7 in (17.8 cm) flat to flat; 8 in (20.3 cm) point to point
At Round 3, being 1/8 in (0.3 cm) off is fine. If you’re more than 1/4 in (0.6 cm) off, adjust before you go further.
If the motif is too big: go down to a 4.5 mm hook. If it’s too small: go up to a 5.5 mm hook. If the center cups, your tension is tight or your hook is too small. If the edges ripple, your hook is too large or the corner chains are too loose.
Pattern
Every side count below includes both corner dc on that side. The ch-2 corner spaces don’t count as stitches.
Round 1 (Rust)
With R, make a magic ring. Ch 3 (counts as dc), then work 11 dc in the ring. Pull the ring closed and join with a sl st to the top of the beginning ch-3. (12 dc)
Round 2 (Rust)
Ch 3 (counts as dc). Corner in next st, dc in next st, Corner in next st; rep from * 4 more times. Join with a sl st to the top of the beginning ch-3. (18 dc: 3 per side, 6 ch-2 corner sps)*
Round 3 (Rust)
Sl st in each st to the next ch-2 corner sp, then sl st into the sp. Ch 3 (counts as dc), ch 2, dc in same sp. Dc in each dc across to the next corner sp, Corner in sp; rep from * 4 more times. Dc in each dc across to the beginning and join with a sl st to the top of the beginning ch-3. (30 dc: 5 per side)*
Check your gauge now. The center should lie flat with six clear corners.
Don’t fasten off R. At the start of Round 4, lay the end of C along the tops of the stitches and carry it from the first stitch.
Rounds 4–7: Woven Pinwheel Bands (Tapestry)
All four colorwork rounds start the same way:
- Sl st in each st to the next ch-2 corner sp, then sl st into the sp.
- Ch 3. This counts as the first dc of Side 1.
- Work the side in the color order given. Its last dc goes into the next corner sp.
- Ch 2 in the color of the last stitch. Start the next side in the same corner sp.
- After Side 6, ch 2 and join to the top of the beginning ch-3.
Read each side from the dc just after a corner sp to the dc just before the next one. Carry the unused color inside every stitch.
Round 4 (7 dc per side): 1 dc R, 3 dc C, 3 dc R, ch 2; rep 6 times. (42 dc)
Round 5 (9 dc per side): 3 dc R, 3 dc C, 3 dc R, ch 2; rep 6 times. (54 dc)
Round 6 (11 dc per side): 5 dc R, 3 dc C, 3 dc R, ch 2; rep 6 times. (66 dc)
Round 7 (13 dc per side): 7 dc R, 3 dc C, 3 dc R, ch 2; rep 6 times. (78 dc)
Why the bands slant: Each side gains one stitch at each corner every round, so each stitch sits one position further along than the stitch below it. The cream block starts two positions later each round, which moves it one stitch clockwise compared with the round below. Six cream bands spiral out from the center. The rust blocks between them look like bands passing under and over, and that creates the woven pinwheel look.
The last 3 dc of every side are always rust, so each corner is outlined in rust before the cream border.
Fasten off R, leaving a 6 in (15.2 cm) tail. Keep C attached.
Measure: 6.25 in (15.9 cm) flat to flat, 7.2 in (18.3 cm) point to point.
Border
Border gauge: 17 sc along one side = 4 in (10.2 cm), about 4.25 sc per inch (1.7 sc per cm).
Round 8 (Cream)
With C, sl st into the next ch-2 corner sp. Ch 1, then 3 sc in the same sp. Sc in each of the next 13 dc, 3 sc in the next corner sp; rep from * 4 more times. Sc in each of the last 13 dc and join with a sl st to the first sc. (96 sc)*
Count per side: 13 sc along the edge + 2 sc from the corner groups next to them + 2 corner sts (the center sc of each 3-sc group) = 17 sc per side, including both corners. Six sides × 17 = 102, minus 6 shared corner sts = 96. To double-check: 6 × 13 = 78 side sts, plus 6 × 3 = 18 corner sts, gives 96 in total.
Round 9 (Cream, rope edge)
Ch 1. Don’t turn. Work reverse sc in each st around, then join with a sl st to the first reverse sc. (96 reverse sc, 17 per side including both corners)
Fasten off and leave a 6 in (15.2 cm) tail.
Why the math works:
– Round 7 has 13 dc per side and measures about 3.6 in (9.1 cm) per side.
– Round 8 places 1 sc in each dc and adds 3 sts at each corner. That handles the corner turn without pulling.
– At 4.25 sc per inch, those 17 sts per side fill the 4 in (10.2 cm) finished side.
– Round 9 is worked one-for-one, so the count stays at 96. The rope edge adds depth without flaring.
– Together, the two rounds add about 3/8 in (1.0 cm) on each side. That takes the motif from 6.25 in (15.9 cm) to 7 in (17.8 cm) flat to flat.
Center Star (Embroidery)
Thread a tapestry needle with about 40 in (101.6 cm) of C. Work 6 lazy daisy petals, starting each one at the magic ring and pointing it toward one of the six corners. Make each petal about 0.75 in (1.9 cm) long so it ends on Round 2. Keep the loops relaxed so each petal shows a clear open outline against the rust. Finish with a French knot in the center, or with a small ring of six straight stitches between the petal bases. Weave the tail through the back of Round 1.
Final Blocking
- Weave in all tails on the wrong side, each one through stitches of its own color.
- Lay the motif face up on a blocking mat or folded towel.
- Mist it evenly with cool water until it’s damp, not soaked.
- Pin each of the six points so the motif is 8 in (20.3 cm) point to point.
- Measure between opposite flat sides at three places. Each should be 7 in (17.8 cm).
- Add a pin at the middle of each side so the edge is straight, not scalloped.
- Gently press the center star flat with your fingers.
- Let the motif dry completely before you unpin it, usually 6–12 hours.
For acrylic, you can steam lightly instead. Hold the iron above the fabric and never press down.
Final Quality-Control Checklist
- Round 3 has 30 dc, 5 per side
- Round 7 has 78 dc, 13 per side
- All six cream bands slant the same direction
- No rust shows through the cream blocks, and the carried yarn is hidden
- Rounds 8 and 9 each have 96 sts, 17 per side including both corners
- The rope edge lies flat and doesn’t ripple
- The star has six even petals, each about 0.75 in (1.9 cm) long
- Size: 8 in (20.3 cm) point to point, 7 in (17.8 cm) flat to flat
- All tails are woven in securely
Troubleshooting
The center domes or cups. Your dc may be too short, or your hook may be too small. Loosen your tension or go up a hook size, then restart from Round 1.
The edges ripple. Corner ch-2 spaces that are too loose, or a hook that’s too large, can cause this. Keep the corner chains snug and check your stitch counts.
One band is off by a stitch. Count the side again from the corner sp. Every side must start with the dc worked into the corner sp.
Carried yarn peeks through. Keep the carried strand right on top of the stitches. Tug it gently every few stitches so it stays hidden.
The colors bleed into each other. Make every color change on the last yarn over of the stitch before.
The rope edge flares. Your reverse sc is too loose. Use a smaller hook for Round 9 only.
The star petals pucker. Your embroidery is too tight. Loosen the loops and don’t pull the tack stitches hard.
Care
Hand wash in cool water with mild soap. Press out the water in a towel, then dry the motif flat, reshaping it to 8 in (20.3 cm) point to point. If your yarn label allows machine washing, use a gentle cycle in a mesh bag.
Final Notes
The whole motif depends on a short measurement chain:
– Round 3: 3 in (7.6 cm) flat to flat, with 5 dc per side.
– Round 7: 6.25 in (15.9 cm) flat to flat, with 13 dc per side.
– Border: turns those 13 dc into 17 sc per side, bringing the hexagon to 7 in (17.8 cm) flat to flat and 8 in (20.3 cm) point to point.
If you check those three stages, the pinwheel bands will line up and the finished motif will lie flat and even. Make one, block it and enjoy that warm woven look.
Happy crocheting!