

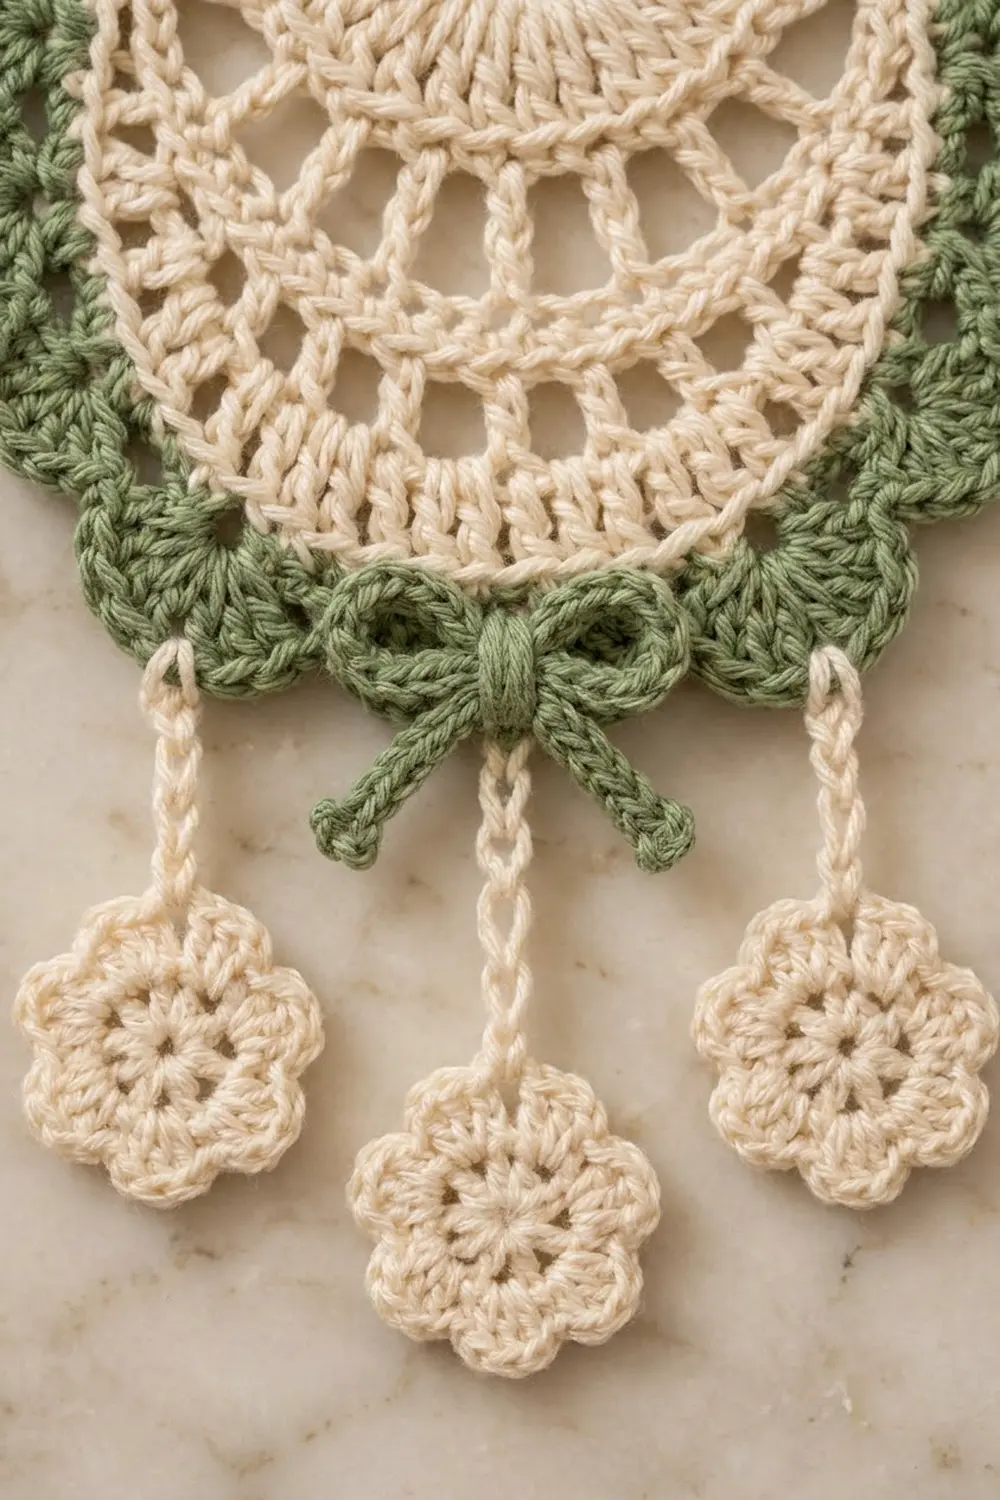
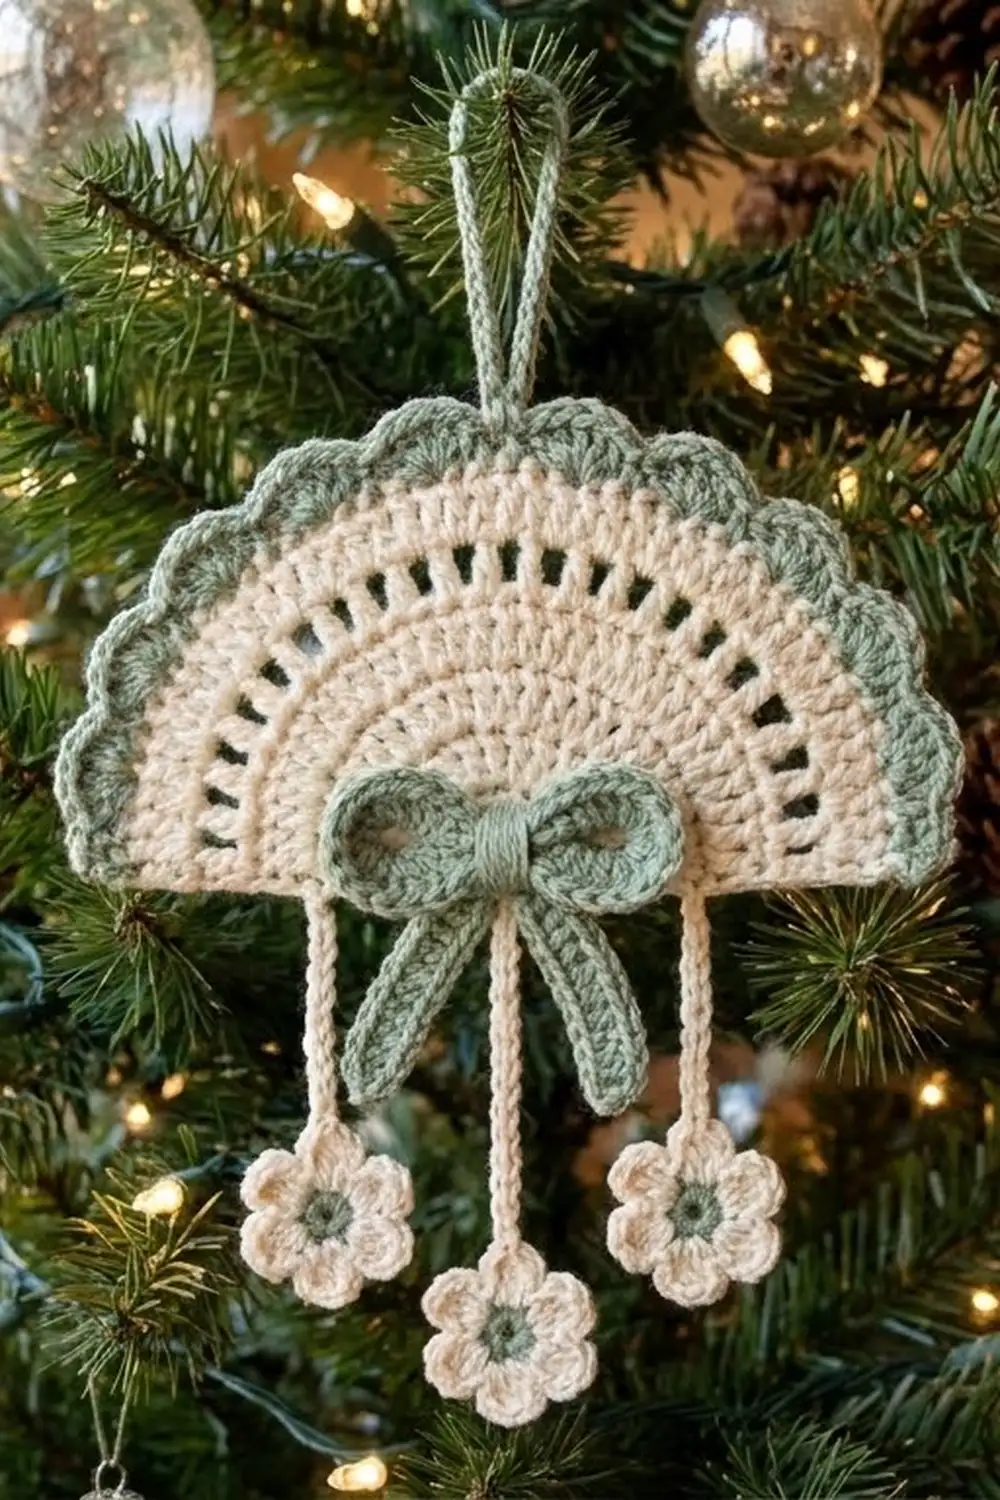
This lacy fan ornament has a soft vintage look. The cream fan opens downward from a small point at the top. A sage-green scalloped edge frames the curve, a little green bow sits at the bottom center, and three cream flowers hang below on chain strands.
The palette is just two colors: cream for the fan, chains and flowers, and sage green for the border, bow and hanging loop. Together they look calm and old-fashioned, and they show up well against dark tree branches or a pale window.
The pattern uses US crochet terms. The finished ornament is 5.5 in (14.0 cm) wide and 2.75 in (7.0 cm) tall across the fan with its border. With the center dangle it is 5.85 in (14.9 cm) tall, or 7.35 in (18.7 cm) with the hanging loop.
You work the fan in turned rows from a magic ring, add a cream edging along the straight top, then add a two-row green border along the curve. After that you make the bow and three flowers, attach the flowers with chain strands, sew on the bow, and add the loop. The result is one ornament with no joining of separate motifs.
Finished Size and Construction
- Finished size: 5.5 in (14.0 cm) wide × 2.75 in (7.0 cm) tall (fan with border)
- Total length: 5.85 in (14.9 cm) to the bottom of the center flower; 7.35 in (18.7 cm) with the loop
- Skill level: Easy-intermediate
- Terminology: US
- Yarn weight: #2 fine (sport) mercerized cotton
- Hook: 2.75 mm (C-2)
- Number of pieces: 1 ornament (fan body plus an attached bow, 3 flowers and a loop)
- Layout: Single motif. No grid and no joining.
- Fan size before border: 4.5 in (11.4 cm) wide × 2.25 in (5.7 cm) tall
- Border depth: 0.5 in (1.3 cm) along the curve
- Flower size: 1.1 in (2.8 cm) across
Materials
Use a smooth mercerized cotton with crisp stitch definition, about 170 yd per 50 g (155 m per 50 g). Cotton holds the lace open and keeps its shape after blocking. Avoid fuzzy or very stretchy yarn, because the windows will close up.
- Cream: 10 g / 31 m (34 yd), for the fan, top edging, dangles and flowers
- Sage green: 6 g / 18.6 m (20 yd), for the border, bow and hanging loop
Tools:
- 2.75 mm (C-2) crochet hook
- Tapestry needle
- Scissors
- Rustproof pins and a foam blocking board
- Spray bottle with water
- Ruler or tape measure
These quantities include about a 25% margin for swatching and weaving in ends.
Abbreviations (US Terms)
- ch – chain
- sl st – slip stitch
- sc – single crochet
- hdc – half double crochet
- dc – double crochet
- sk – skip
- sp(s) – space(s)
- st(s) – stitch(es)
- MR – magic ring
Special stitch – Shell: 5 dc in the same stitch.
Gauge and Checkpoints
Gauge is measured on the fan itself, so your first fan is your test piece. Check it at these points:
- After Row 1: radius 0.5 in (1.3 cm), measured from the ring center to the top of the dc.
- After Row 3: radius 1.25 in (3.2 cm).
- After Row 6: radius 2.25 in (5.7 cm), width 4.5 in (11.4 cm).
- Border gauge: 8 sc = 1 in (2.5 cm) along the edge.
- Chain gauge: 6 ch = 1 in (2.5 cm).
A difference of 0.125 in (0.3 cm) is fine. If your Row 3 radius is more than 0.25 in (0.6 cm) too large, change to a 2.5 mm hook. If it is too small, change to a 3.0 mm hook. Changing the hook is better than changing the stitch counts, because the border needs exactly 61 stitches.
Fan Body (Cream)
The fan is worked in turned rows. Each row makes a half circle. The beginning chain counts as the first dc.
Row 1: Make a MR. Ch 3 (counts as dc), then work 8 dc into the ring. Pull the ring snug but leave a tiny opening. Turn. (9 dc)
Row 2: Ch 3 (counts as dc), then dc in the same st. Work 2 dc in each st across, ending with 2 dc in the top of the turning ch. Turn. (18 dc)
Row 3: Ch 3 (counts as dc), then dc in the same st. Dc in the next st, 2 dc in the next st, and repeat from * across, ending with dc in the top of the turning ch. Turn. (27 dc)
Check that Row 3 reaches a radius of 1.25 in (3.2 cm) and lies flat.
Row 4 (inner windows): Ch 5 (counts as dc + ch 2). Sk the next st and dc in the next st. Ch 2, sk the next st, dc in the next st, and repeat from * across. The last dc goes into the top of the turning ch. Turn. (14 dc, 13 ch-2 sps)
The dc land on the odd-numbered stitches 1, 3, 5 … 27 of Row 3, which gives exactly 14 dc.
Row 5 (solid band): Ch 3 (counts as dc). Work 3 dc in each ch-2 sp across, skipping the dc between spaces. Finish with dc in the 3rd ch of the turning ch-5. Turn. (41 dc: 1 + 39 + 1)
Row 6 (outer windows): Ch 5 (counts as dc + ch 2). Sk the next st and dc in the next st. Ch 2, sk the next st, dc in the next st, and repeat from * across. The last dc goes into the top of the turning ch. (21 dc, 20 ch-2 sps)
The dc land on the odd-numbered stitches 1 through 41. That is 21 dc with 20 spaces between them.
Row 7 (top edging): Don’t turn. Ch 1 and rotate the piece so you are working along the straight top edge. Work 2 sc in the side of each row-end from Row 6 down to Row 1 (12 sc). Work 1 sc into the center of the ring; this will be the top point. Then work 2 sc in the side of each row-end from Row 1 up to Row 6 (12 sc). Fasten off and weave in the ends. (25 sc: 12 + 1 + 12)
The 13th sc, in the center, is where the hanging loop goes later.
Checkpoint: the fan should measure 4.5 in (11.4 cm) wide and 2.25 in (5.7 cm) tall. The edging lies flat along the top.
Green Border
Border gauge: 8 sc = 1 in (2.5 cm).
Border Row 1: With the right side facing, join green with sc in the first dc of Row 6 at the right top corner. Continue along the curve: work 2 sc in each ch-2 sp and 1 sc in each dc. End with sc in the 3rd ch of the turning ch-5 at the left top corner. Turn. (61 sc)
That is 21 sc in the dc plus 20 spaces × 2 sc (40 sc), for 61 sc in total.
Border Row 2 (scallops): Ch 1. Sc in the first sc. Sk 2 sts, work a Shell (5 dc) in the next st, sk 2 sts, sc in the next st, and repeat from * 9 more times. (10 shells, 11 sc, 61 sts)
Fasten off and weave in the ends.
Why the math works: each scallop repeat uses 6 stitches (sk 2, shell, sk 2, sc). A row of 10 repeats plus the first anchoring sc needs 6 × 10 + 1 = 61 stitches, which is exactly what Border Row 1 gives you. The anchoring sc land on stitches 1, 7, 13, 19, 25, 31, 37, 43, 49, 55 and 61. Stitch 31 is the center sc at the bottom of the curve. Stitches 19 and 43 are the same distance from it on each side, so the dangles hang symmetrically.
Each border row adds about 0.2 in (0.5 cm) for the sc row and 0.3 in (0.8 cm) for the scallops, so 0.5 in (1.3 cm) in total. Adding that to each side of the 4.5 in (11.4 cm) fan gives a width of 5.5 in (14.0 cm). Adding it once to the 2.25 in (5.7 cm) height gives 2.75 in (7.0 cm). The border arc is about 7.6 in (19.3 cm) long, so 61 sc at 8 per inch fits it with a little easing.
Flowers (Make 3, Cream)
Round 1: Make a MR. Ch 1, then work 12 sc into the ring. Join with sl st to the first sc. Leave a small open center rather than pulling the ring fully closed. (12 sc)
Round 2: Ch 3, sk the next st, sl st in the next st, and repeat from * 5 more times. The last sl st goes into the joining st. (6 ch-3 sps)
Round 3: In each ch-3 sp, work (sc, hdc, 2 dc, hdc, sc). Join with sl st to the first sc. (6 petals, 36 sts)
Fasten off and weave in the ends. Each flower measures 1.1 in (2.8 cm) across.
Dangles (Cream)
The chain gauge is 6 ch = 1 in (2.5 cm).
Side dangles: Join cream with sl st in the anchoring sc at stitch 19 of Border Row 2. Ch 9, which is 1.5 in (3.8 cm). Sl st into the gap between the 2 dc at the tip of one petal of a flower. Then sl st into the back bump of each ch back up the strand (9 sl st). Sl st into the starting sc again. Fasten off. Repeat at stitch 43.
Center dangle: Work the same way at stitch 31 with ch 12, which is 2 in (5.1 cm), followed by 12 sl st back up the strand.
Slip-stitching back up the chain makes a firm, slightly raised strand that keeps the flowers from twisting.
Bow (Green)
Loops strip: Ch 22. Sc in the 2nd ch from the hook and in each ch across. (21 sc)
The strip is about 3.5 in (8.9 cm) long. Fasten off and leave a 12 in (30.5 cm) tail.
Shaping: Bring both short ends to the center and overlap them slightly to form two loops. Wrap the tail tightly 5 times around the middle.
Streamers: Join green at the back of the wrapped center. Ch 7 and sl st back along the chain (6 sl st). Make a second streamer the same way. Each streamer is about 1 in (2.5 cm) long. The finished bow is about 1.75 in (4.4 cm) wide.
Attach: Center the bow over stitch 31, covering the top of the center dangle. Sew it through Border Row 1 and the edge of Row 6 with the tail, then weave in the end.
Hanging Loop (Green)
Join green with sl st in the 13th (center) sc of Row 7. Ch 20 and sl st into the same st. Work 2 more sl st around the base to strengthen it, then fasten off. The loop stands about 1.5 in (3.8 cm) tall.
Final Blocking
- Lightly mist the whole ornament, or dip it in cool water and press it gently in a towel.
- Lay it on the blocking board with the right side up.
- Pin the two top corners 5.5 in (14.0 cm) apart and keep the top edge straight.
- Pin the center of the curve 2.75 in (7.0 cm) below the top edge.
- Pin the tip of each of the 10 scallops so the curve is even. Open each Row 4 and Row 6 window with a pin if needed.
- Pin each flower flat with its petals evenly spaced. Pin the strands straight down.
- Pinch the bow loops into shape.
- Let it dry completely before you unpin. For a stiffer ornament, use a light spray starch.
Final Quality-Control Checklist
- Row stitch counts: 9, 18, 27, 14 dc / 13 sps, 41, 21 dc / 20 sps, 25 sc edging.
- Border Row 1 has 61 sc. Border Row 2 has 10 even shells.
- The width is 5.5 in (14.0 cm) and the height is 2.75 in (7.0 cm).
- The top edge is straight, with the loop at the exact center.
- The side dangles are 1.5 in (3.8 cm) and the center dangle is 2 in (5.1 cm).
- All three flowers have 6 petals and an open center.
- The bow is centered and covers the top of the center strand.
- All ends are woven in securely.
Troubleshooting
The fan cups: you have too few stitches or are working too tightly. Recount Rows 2 and 3, or go up a hook size.
The fan ruffles: you have extra stitches or loose tension. Recount, especially the final dc of each row.
The border flares: it was worked too loosely. Redo Border Row 1 with a 2.5 mm hook.
Scallops are off-center: you probably miscounted Border Row 1. You must have exactly 61 sc.
The flower curls: the Round 2 chains are too tight. Use ch 4 instead of ch 3.
The ornament hangs crooked: the loop isn’t on the center sc. Move it to the 13th sc.
Care
Hand wash in cool water with mild soap, press out the water in a towel, and reshape it flat to dry. Store it flat or hang it by its loop, away from direct sunlight.
Final Notes
The measurements build on each other. Row 3 reaches 1.25 in (3.2 cm), Row 6 gives a 4.5 in (11.4 cm) fan, and 61 border stitches make 10 exact scallops. The 0.5 in (1.3 cm) border brings the ornament to 5.5 in × 2.75 in (14.0 cm × 7.0 cm). The 1.5 in (3.8 cm) and 2 in (5.1 cm) dangles then bring it to 5.85 in (14.9 cm) at the center flower. If you check each step, the finished ornament will come out at the right size.
Happy crocheting!