

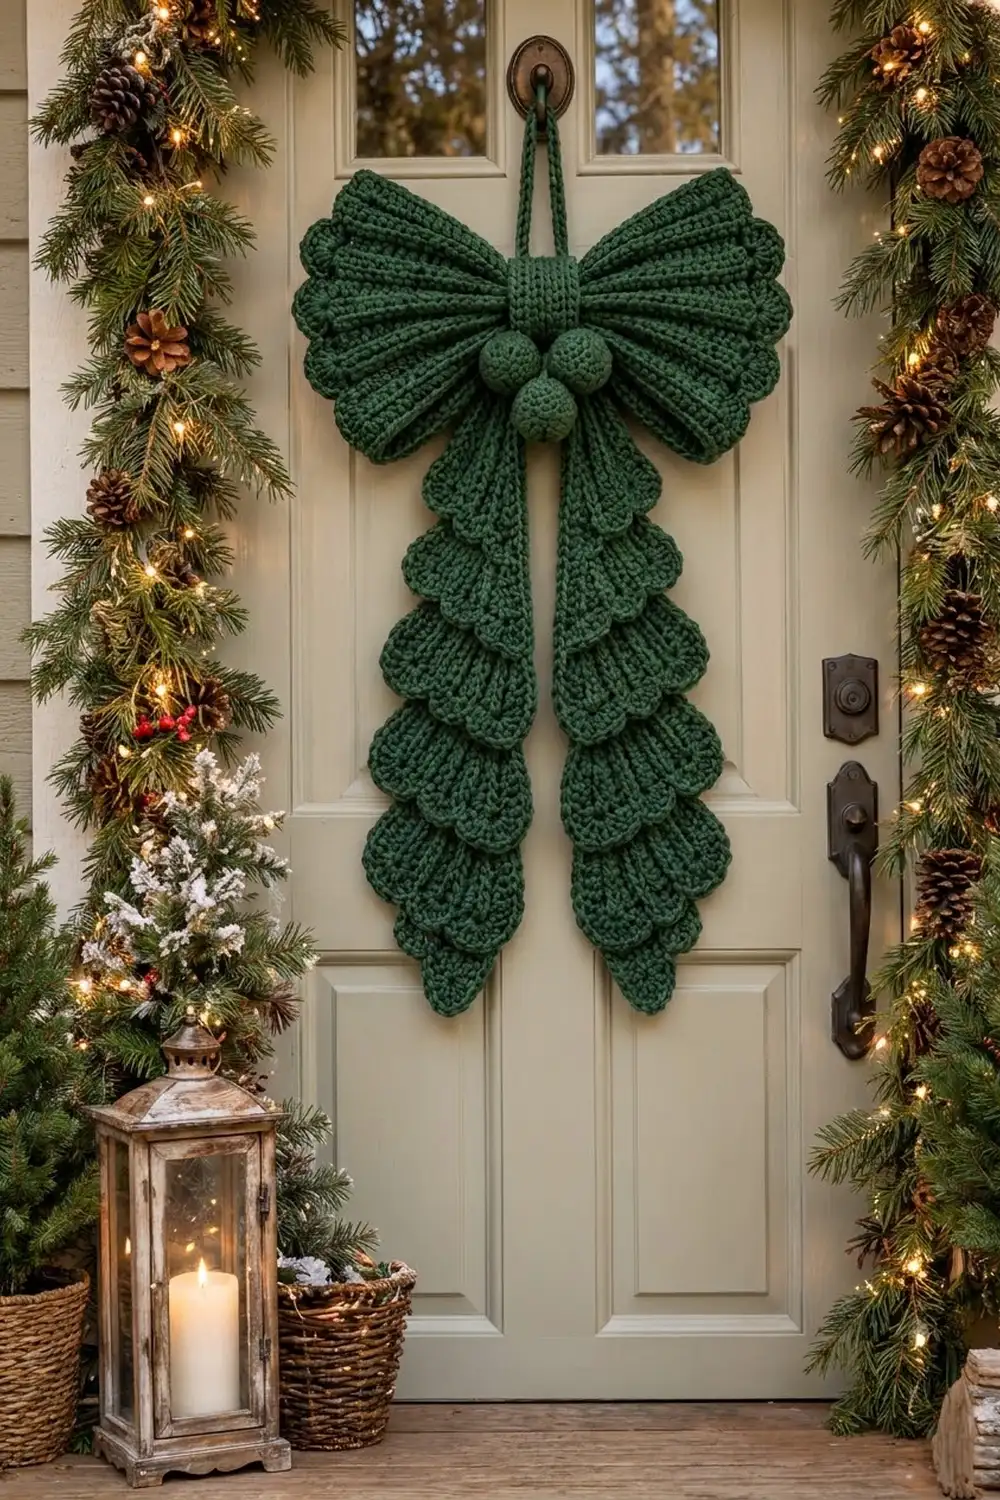
The Evergreen Cascade Bow is a large holiday door hanger in one deep forest green. Two ruffled, ribbed loops fan out from a ribbed center band. Three round baubles sit at the base of the knot, and two long tails hang below, each covered in tiers of overlapping scallops.
The bow is all one color, so the look comes from texture. Raised ribs run outward across each loop, and every tail tier ends in a shell edge that drapes over the tier below. It’s a classic, cozy style that works on a door without a wreath, on a mantel, or on top of a tree.
This pattern uses US crochet terms. The finished bow measures about 16 in (40.6 cm) wide and 20 in (50.8 cm) tall, not counting the hanging loop.
You’ll make nine components: 2 loops (wings), 2 tiered tails, 1 center band, 3 balls and 1 hanging cord. Then you gather the wings, layer the tails behind them, wrap the band around the center and sew the balls on top. The result is one assembled bow.
Finished Size and Construction
- Finished size: about 16 in (40.6 cm) wide × 20 in (50.8 cm) tall
- Skill level: Intermediate (post stitches, front/back loop work, simple shaping)
- Terminology: US
- Yarn weight: #4 worsted
- Hooks: 5.0 mm (H-8) for most pieces; 4.0 mm (G-6) for the balls
- Number of pieces: 9 components, assembled into 1 bow
- Layout: wings to the left and right of the band, tails hanging below in a V, balls in a downward triangle at the base of the band
- Wing size: 6.75 in (17.1 cm) deep; outer edge about 22 in (55.9 cm) along the curve before ruffling
- Wing size before border: 6 in (15.2 cm) deep
- Tail size: 4.9 in (12.4 cm) at the widest point, 15 in (38.1 cm) long
- Border depth: 0.75 in (1.9 cm) on the wings; about 1 in (2.5 cm) on the tail tips
Materials
Choose a smooth worsted yarn with good stitch definition, because the ribs and scallops are the whole design. Acrylic holds its shape outdoors under a porch roof. A cotton blend gives crisper scallops. Avoid fuzzy or strongly variegated yarn.
- Forest Green: 250 g, about 500 yd (457 m) of worsted weight yarn
This amount includes a margin of about 15 percent over the estimated use, which covers gauge swatches and sewing tails.
Tools:
- 5.0 mm (H-8) crochet hook
- 4.0 mm (G-6) crochet hook
- Fiberfill, a small handful
- Tapestry needle
- Locking stitch markers (at least 6)
- Pins or clips for assembly
- Scissors and a measuring tape
- Optional: fabric stiffener spray for the wings
Abbreviations (US Terms)
- ch – chain
- sl st – slip stitch
- sc – single crochet
- dc – double crochet
- tr – treble crochet
- dc2tog – double crochet 2 together
- FPdc – front post double crochet
- BPdc – back post double crochet
- BLO / FL – back loop only / front loop
- MR – magic ring
- inc – 2 sc in the same stitch
- dec – sc 2 together (invisible decrease recommended)
- st(s) – stitch(es)
- RS / WS – right side / wrong side
Special stitch – Shell: 5 tr in the same stitch.
Turning chains: In the wing and tail rows, the beginning ch 2 does not count as a stitch. In the tier rows, the beginning ch 4 does count as a tr.
Gauge and Checkpoints
- Rib gauge (5.0 mm): 14 sts × 8 rows = 4 in (10.2 cm) in the dc/post-stitch pattern
- Sc gauge (5.0 mm): 16 sc × 18 rows = 4 in (10.2 cm) in BLO sc
Make one tail first. It’s the quickest way to test your gauge on a real piece.
Checkpoints:
- Tail after Row 4: 3.7 in (9.4 cm) wide, 2 in (5.1 cm) tall
- Tail after Row 5: about 4.9 in (12.4 cm) wide
- Tail after Row 28: 14 in (35.6 cm) long
- Wing after Row 1: 7.1 in (18.0 cm) wide
- Wing after Row 12: 6 in (15.2 cm) deep
- Band: 2.5 in (6.4 cm) × 4.9 in (12.4 cm)
- Ball: about 1.75 in (4.4 cm) across
If your piece comes out too big, go down half a hook size. If it’s too small, go up half a size. Row height matters most for the tails, so a little difference in width is fine as long as the length checkpoints match.
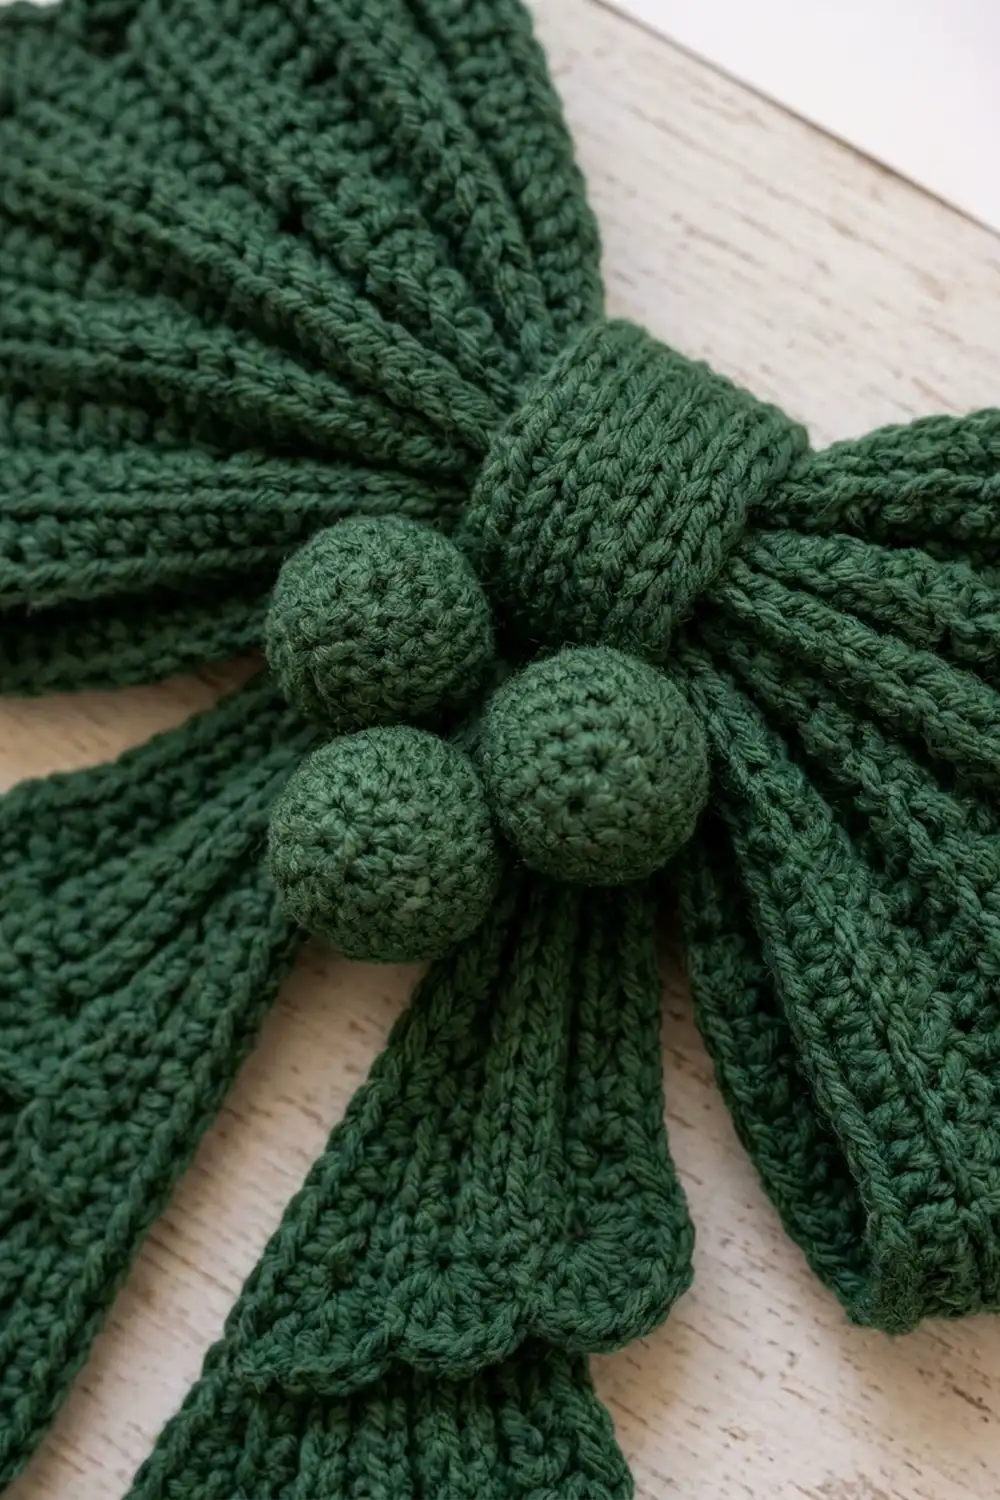
Wings (Make 2)
Use the 5.0 mm hook. You’ll work flat rows from the gathered inner edge out to the ruffled outer edge, so the rib columns run outward like the spokes of a fan. Ribs are at the even-numbered positions and valleys at the odd-numbered positions, so both edges are valleys.
Row 1 (RS): Ch 27, dc in 3rd ch from hook and in each ch across, turn. (25 dc)
Row 2 (WS): Ch 2, dc in first st, BPdc around next st, dc in next st; rep from * across, turn. (25 sts: 13 dc, 12 BPdc)*
Row 3 (RS): Ch 2, 2 dc in first dc, FPdc around next post, 2 dc in next dc; rep from * across, turn. (38 sts: 13 valleys of 2 dc, 12 FPdc)*
Row 4 (WS): Ch 2, dc in each dc and BPdc around each post across, turn. (38 sts)
Row 5 (RS): Ch 2. In each valley, dc in the first dc and 2 dc in the last dc. FPdc around each post. Turn. (51 sts: 13 valleys of 3 dc, 12 FPdc)
Row 6 (WS): Work as Row 4. (51 sts)
Row 7 (RS): Ch 2. In each valley, dc in each dc up to the last dc of that valley, then 2 dc in the last dc. FPdc around each post. Turn. (64 sts: 13 valleys of 4 dc, 12 FPdc)
Row 8 (WS): Work as Row 4. (64 sts)
Row 9 (RS): Work as Row 7. (77 sts: 13 valleys of 5 dc, 12 FPdc)
Row 10 (WS): Work as Row 4. (77 sts)
Row 11 (RS): Ch 2, dc in each dc and FPdc around each post across, turn. (77 sts)
Row 12 (WS): Work as Row 4, turn. (77 sts) Don’t fasten off. The wing border comes next (see Border).
The wing is now 6 in (15.2 cm) deep. Its outer edge is about 22 in (55.9 cm) long, compared with 7.1 in (18.0 cm) at the inner edge. That difference is what makes the wing flare into a ruffled fan.
Tails (Make 2)
Use the 5.0 mm hook. You’ll work flat from the top of the tail down to the tip. Every fourth row is worked in BLO, which leaves a line of free front loops on the RS. You’ll crochet the scallop tiers into those loops later.
Row 1 (RS): Ch 15, dc in 3rd ch from hook and in each ch across, turn. (13 dc)
Rows 2–4: Ch 2, dc in each st across, turn. (13 dc)
Row 5 (RS, BLO): Ch 2. Working in BLO, 3 dc in first st, dc in next 11 sts, 3 dc in last st, turn. (17 dc = 13 worked 1-per-stitch + 4 added)
Rows 6–8: Ch 2, dc in each st across, turn. (17 dc)
Row 9 (RS, BLO): Ch 2, dc in BLO of each st across, turn. (17 dc)
Rows 10–12: As Rows 6–8. (17 dc)
Row 13 (RS, BLO): As Row 9. (17 dc)
Rows 14–16: As Rows 6–8. (17 dc)
Row 17 (RS, BLO): As Row 9. (17 dc)
Rows 18–20: As Rows 6–8. (17 dc)
Row 21 (RS, BLO): As Row 9. (17 dc)
Rows 22–24: As Rows 6–8. (17 dc)
Row 25 (RS): Ch 2, dc2tog, dc across to last 2 sts, dc2tog, turn. (15 sts)
Row 26: Rep Row 25. (13 sts)
Row 27: Rep Row 25. (11 sts)
Row 28: Rep Row 25. (9 sts) Fasten off. The tip border comes later (see Border).
Scallop tiers: There are now lines of free front loops across the RS at Rows 4, 8, 12, 16 and 20. Turn the tail so the top points up, then work each tier in turn.
Tier Row A: With RS facing, join yarn in the first free FL at the right end. Ch 4 (counts as tr), tr in each remaining FL across, turn. (13 tr on the Row 4 tier; 17 tr on every other tier)
Tier Row B: Ch 1, sc in first st, sk 1, Shell in next st, sk 1, sc in next st; rep from * across, ending with sc in the top of the ch-4. Fasten off. (Row 4 tier: 3 shells, 4 sc; other tiers: 4 shells, 5 sc)*
Each tier is about 1.25 in (3.2 cm) tall. Let it fall downward over the section below so the scallops overlap toward the tip. With the tip border, each tail has six scalloped layers.
Center Band (Make 1)
Use the 5.0 mm hook.
Row 1: Ch 11, sc in 2nd ch from hook and in each ch across, turn. (10 sc)
Rows 2–22: Ch 1, sc in BLO of each st across, turn. (10 sc)
Fasten off, leaving a 12 in (30.5 cm) tail for sewing. The band measures 2.5 in (6.4 cm) × 4.9 in (12.4 cm). When you wrap it, the BLO ridges run vertically.
Balls (Make 3)
Use the 4.0 mm hook and work in continuous rounds.
Rnd 1: 6 sc in MR. (6)
Rnd 2: Inc in each st. (12)
Rnd 3: Sc 1, inc; rep from * 6 times. (18)*
Rnd 4: Sc 2, inc; rep from * 6 times. (24)*
Rnds 5–9: Sc in each st. (24)
Rnd 10: Sc 2, dec; rep from * 6 times. (18)*
Rnd 11: Sc 1, dec; rep from * 6 times. (12)* Stuff firmly.
Rnd 12: Dec 6 times. (6) Close the opening and leave a tail for sewing. Each ball is about 1.75 in (4.4 cm) across.
Hanging Cord (Make 1)
Use the 5.0 mm hook. Ch 51, then sl st in the back bump of the 2nd ch from hook and of each ch across. (50 sl st) The cord is about 14 in (35.6 cm) long.
Make All Pieces
All pieces are in Forest Green:
- Wings: 2
- Tails: 2
- Center band: 1
- Balls: 3
- Hanging cord: 1
Layout (front view):
            (cord loop)
                ||
[ Wing L ] [ Band ] [ Wing R ]
            (B)(B)
              (B)
      [ Tail L ]   [ Tail R ]
Joining
Sew the pieces together with the tapestry needle and matching yarn. Pull each stitch snug but not tight so the knot doesn’t pucker.
- Gather the wings. Weave a strand through the 25 foundation stitches of one wing. Pull until the inner edge measures 2.5 in (6.4 cm), then knot securely. Repeat with the second wing.
- Join the wings. Lay both wings RS up with the gathered edges overlapping by 0.5 in (1.3 cm). Whipstitch through both layers.
- Add the tails. Pinch the 13 stitches at the top of each tail down to 2 in (5.1 cm). Pin the tails behind the wing join, angled outward in a slight V, and sew them through the gathered layers.
- Add the cord. Fold the cord in half and sew both ends to the back of the center. The loop should rise about 6 in (15.2 cm) above the bow.
- Wrap the band. Wrap the band around the center so it covers all the gathers. At the back, sew Row 22 to the foundation chain, matching the 10 stitches one to one.
- Add the balls. Sew two balls side by side at the lower front edge of the band. Sew the third centered below them.
Size checkpoint: The assembled bow should measure about 16 in (40.6 cm) wide and 20 in (50.8 cm) tall.
Border
Border gauge: One shell repeat (sc, sk 1, Shell, sk 1) uses 4 stitches, which is about 1.1 in (2.8 cm) at rib gauge. The border is about 0.75 in (1.9 cm) deep on the wings and about 1 in (2.5 cm) on the tails.
Wing Border (Row 13, RS): Ch 1, sc in first st, sk 1, Shell in next st, sk 1, sc in next st; rep from * across. Fasten off. (19 shells, 20 sc)* Work this along the 77-stitch outer edge only. The side edges stay plain because they tuck into the gathers.
Tail Tip Border:
Base row (RS): Join yarn at the side edge of Row 25. Ch 1. Work 8 sc along the side edges of Rows 25–28 (2 sc per row end), then 1 sc in each of the 9 sts of Row 28. Finish with 8 sc along the other side edges, Rows 28–25. Turn. (25 sc: 8 + 9 + 8)
Shell row: Ch 1, sc in first st, sk 1, Shell in next st, sk 1, sc in next st; rep from * across. Fasten off. (6 shells, 7 sc)*
Why the math works: The shell repeat needs a multiple of 4 plus 1 stitches, so every edge starts and ends with a sc. The wing edge has 77 sts (4 × 19 + 1), which gives 19 shells. The tail tiers have 13 sts (4 × 3 + 1) or 17 sts (4 × 4 + 1). The tip base has 25 sts (4 × 6 + 1). None of these counts needs an extra filler stitch, so every scallop sits evenly.
Final Blocking
- Weave in all ends except the band seam, which you can finish once you’ve checked the fit.
- Mist the bow lightly with water. For acrylic, steam from above instead and don’t let the iron touch the yarn.
- Lay the bow face up on a blocking mat.
- Spread each wing into a fan and pin the outer edge in a gentle curve. Separate the shells with your fingers.
- Pin the tails in a slight V, 4.9 in (12.4 cm) wide at the widest point, and smooth each tier downward.
- Let the bow dry completely, about 24 hours.
- Optional: spray the wings lightly with stiffener and let them dry again.
Final Quality-Control Checklist
- Each wing has 12 raised ribs running outward
- Each wing edge has 19 even shells
- Each tail has 5 tiers plus a tip border, for 6 scallop layers
- Both tails are the same length, 15 in (38.1 cm)
- The band hides all the gathers and its seam faces the back
- All three balls are firm and the same size
- The cord holds the bow’s weight without stretching the band
- No loose ends show from the front
Troubleshooting
- Wings curl instead of fanning: Your post stitches are too tight. Work the FPdc/BPdc more loosely or block more firmly.
- Ribs disappear: You worked FPdc on a WS row. Check that every RS row is odd-numbered.
- Tiers stand up instead of draping: Steam them downward. Also make sure Tier Row A goes into the front loops, not the back loops.
- Shell count is off: Recount the base. It must equal 4 × shells + 1.
- Bow tilts on the door: Re-center the cord, or tack the tails together behind the knot with a stitch.
- Balls look lumpy: Add more stuffing before Rnd 12 and use invisible decreases.
Care
Spot clean with mild soap and cool water, then reshape and lay flat to dry. Between seasons, store the bow flat or loosely stuffed with tissue.
Final Notes
Your gauge sets each measurement in turn. The tails start 3.7 in (9.4 cm) wide, grow to 4.9 in (12.4 cm), and reach 14 in (35.6 cm) long before the tip border and 15 in (38.1 cm) after it. The wings grow from 7.1 in (18.0 cm) at the inner edge to a 22 in (55.9 cm) outer edge, 6 in (15.2 cm) deep. The border brings them to 6.75 in (17.1 cm). Once assembled, the bow measures 16 in (40.6 cm) × 20 in (50.8 cm). Check each stage against these numbers and the bow will come together evenly.
Happy crocheting!