

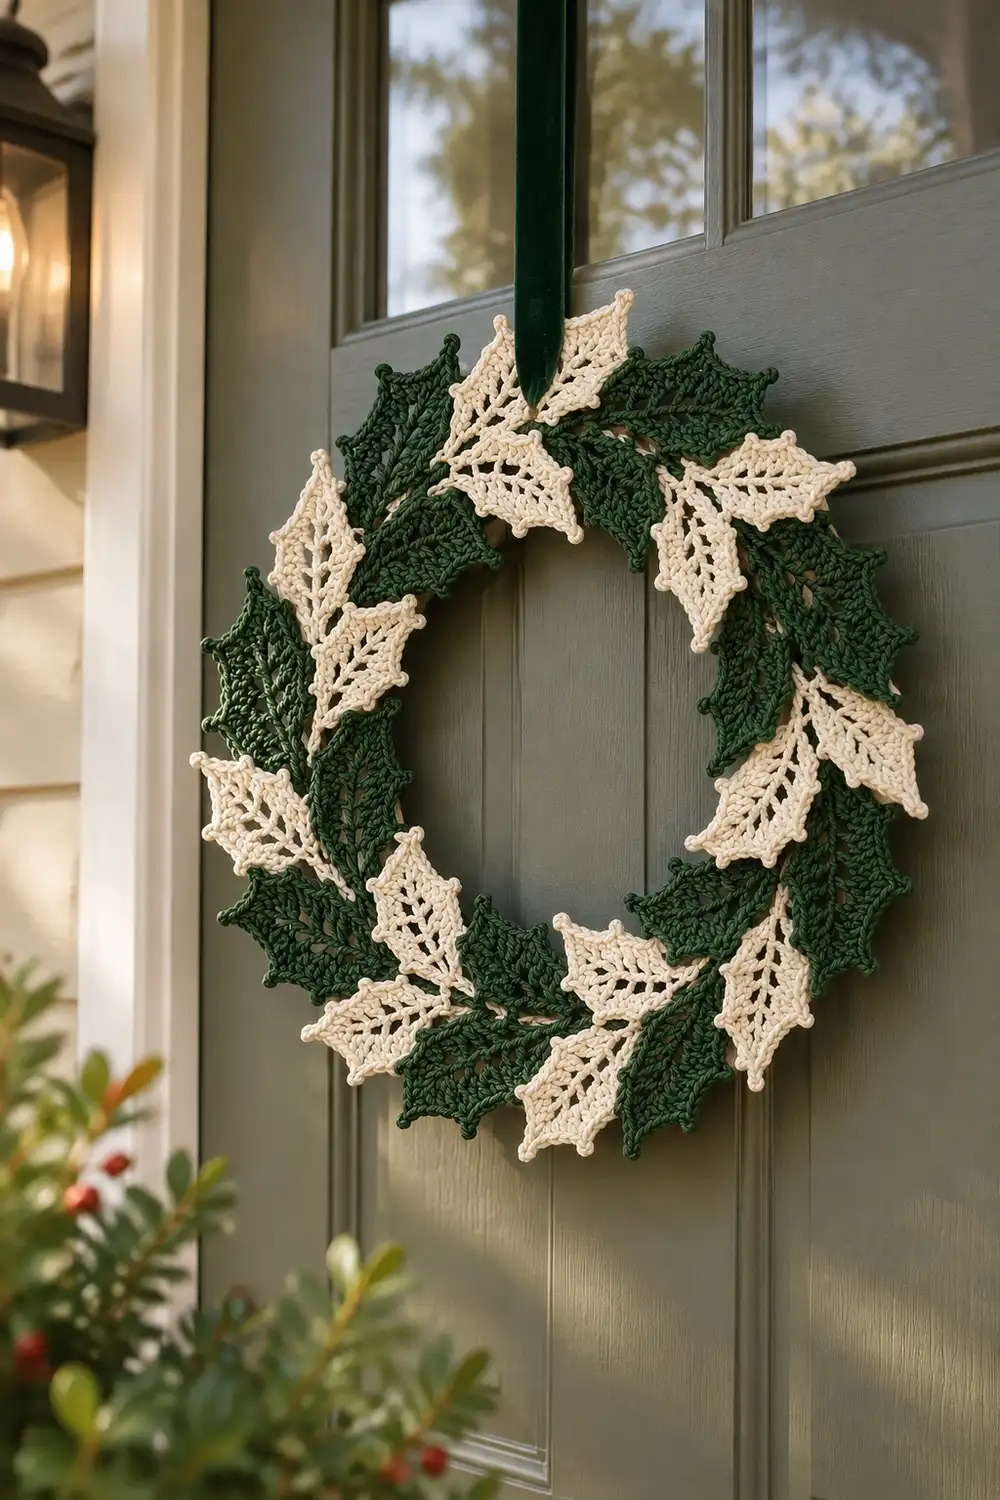
This holly wreath is built from 24 crocheted leaves arranged in a ring. Dark forest green leaves alternate with cream ones, and each leaf is angled and layered over its neighbor. The result looks full and dimensional while still hanging flat against a door.
Each leaf is a pointed oval worked in dense half double crochet. A raised vein of post stitches runs down the center. A fan-and-picot edging creates the spiky, scalloped holly outline, and those points together form the wavy outer edge of the wreath. A ribbon tied through the top center finishes the piece.
The pattern uses US crochet terms. The finished wreath measures about 17 in (43.2 cm) in outer diameter, with an inner opening of about 8 in (20.3 cm). Normal variation lands between 16 and 18 in (40.6 and 45.7 cm).
The construction is simple. You work each leaf in rows from base to tip, with a center post-stitch vein. You add a two-round edging to every leaf. Then you arrange the leaves on a paper template and tack them together where they overlap.
Finished Size and Construction
- Finished size: about 17 in (43.2 cm) outer diameter; inner opening about 8 in (20.3 cm)
- Skill level: Intermediate (post stitches, decreases, picots, assembly)
- Terminology: US crochet terms
- Yarn weight: Worsted weight (#4) cotton
- Hook: 4.0 mm (G-6)
- Number of pieces: 24 leaves (12 green, 12 cream)
- Layout: single ring, colors alternating, leaves angled clockwise
- Piece size (finished leaf): 5.5 in long x 3.25 in wide (14.0 x 8.3 cm)
- Leaf size before border: 5 in long x 2.75 in wide (12.7 x 7.0 cm)
- Border depth: about 0.25 in (0.6 cm) per side, including points
Materials
Choose a smooth, tightly plied worsted cotton or cotton blend. Cotton gives the crisp stitch definition and slight stiffness that make the leaves look real. Avoid fuzzy or very soft acrylic, because the vein and points will blur.
Yarn:
– Forest green: 100 g, about 190 m (208 yd)
– Cream: 100 g, about 190 m (208 yd)
Each leaf uses about 7 g, or about 13 m (14 yd). Twelve leaves need about 84 g, or 160 m (175 yd), per color. The quantities above include a margin for gauge swatches, sewing tails, and variation between brands.
Tools:
– 4.0 mm crochet hook
– Tapestry needle
– Stitch markers (at least 2)
– Scissors
– Rust-proof pins
– Blocking mat or folded towel
– Spray bottle
– Large sheet of paper, pencil, string (for the template)
– Dark green velvet ribbon, 1.5 in (3.8 cm) wide, about 36 in (91.4 cm) long
Abbreviations (US Terms)
- ch: chain
- sl st: slip stitch
- sc: single crochet
- hdc: half double crochet
- dc: double crochet
- st(s): stitch(es)
- RS / WS: right side / wrong side
- hdc2tog: (yarn over, insert hook in next st, pull up a loop) twice, yarn over and pull through all 5 loops
- hdc3tog: (yarn over, insert hook in next st, pull up a loop) 3 times, yarn over and pull through all 7 loops
Special stitches:
– FPdc (front post double crochet): Yarn over and insert the hook from front to back to front around the post of the indicated st. Complete as a dc.
– BPdc (back post double crochet): Yarn over and insert the hook from back to front to back around the post of the indicated st. Complete as a dc. Worked on a WS row, it pushes the post toward the RS, so the vein stays raised on the front.
– Picot: ch 3, sl st in 3rd ch from hook.
– Holly point (worked over 5 sts): sl st in next st, sc in next st, (hdc, dc, picot, dc, hdc) in next st, sc in next st, sl st in next st.
When you work a post stitch, skip the st behind it.
Gauge and Checkpoints
Gauge: 16 hdc and 12 rows = 4 in (10.2 cm) in hdc rows. That works out to 4 hdc and 3 rows per inch.
Make one complete leaf, including the edging, before starting the others. It is your real gauge swatch. Check these measurements:
- After Row 5: width 2.75 in (7.0 cm), 11 sts
- After Row 10: length about 3.3 in (8.4 cm)
- After Row 15: length 5 in (12.7 cm), width 2.75 in (7.0 cm)
- After the edging: 5.5 x 3.25 in (14.0 x 8.3 cm)
If your leaf is too big, go down to a 3.75 mm hook. If it is too small, go up to a 4.25 mm hook. A difference of 0.25 in (0.6 cm) per leaf is fine. A larger difference will push the wreath outside the 16–18 in (40.6–45.7 cm) range.
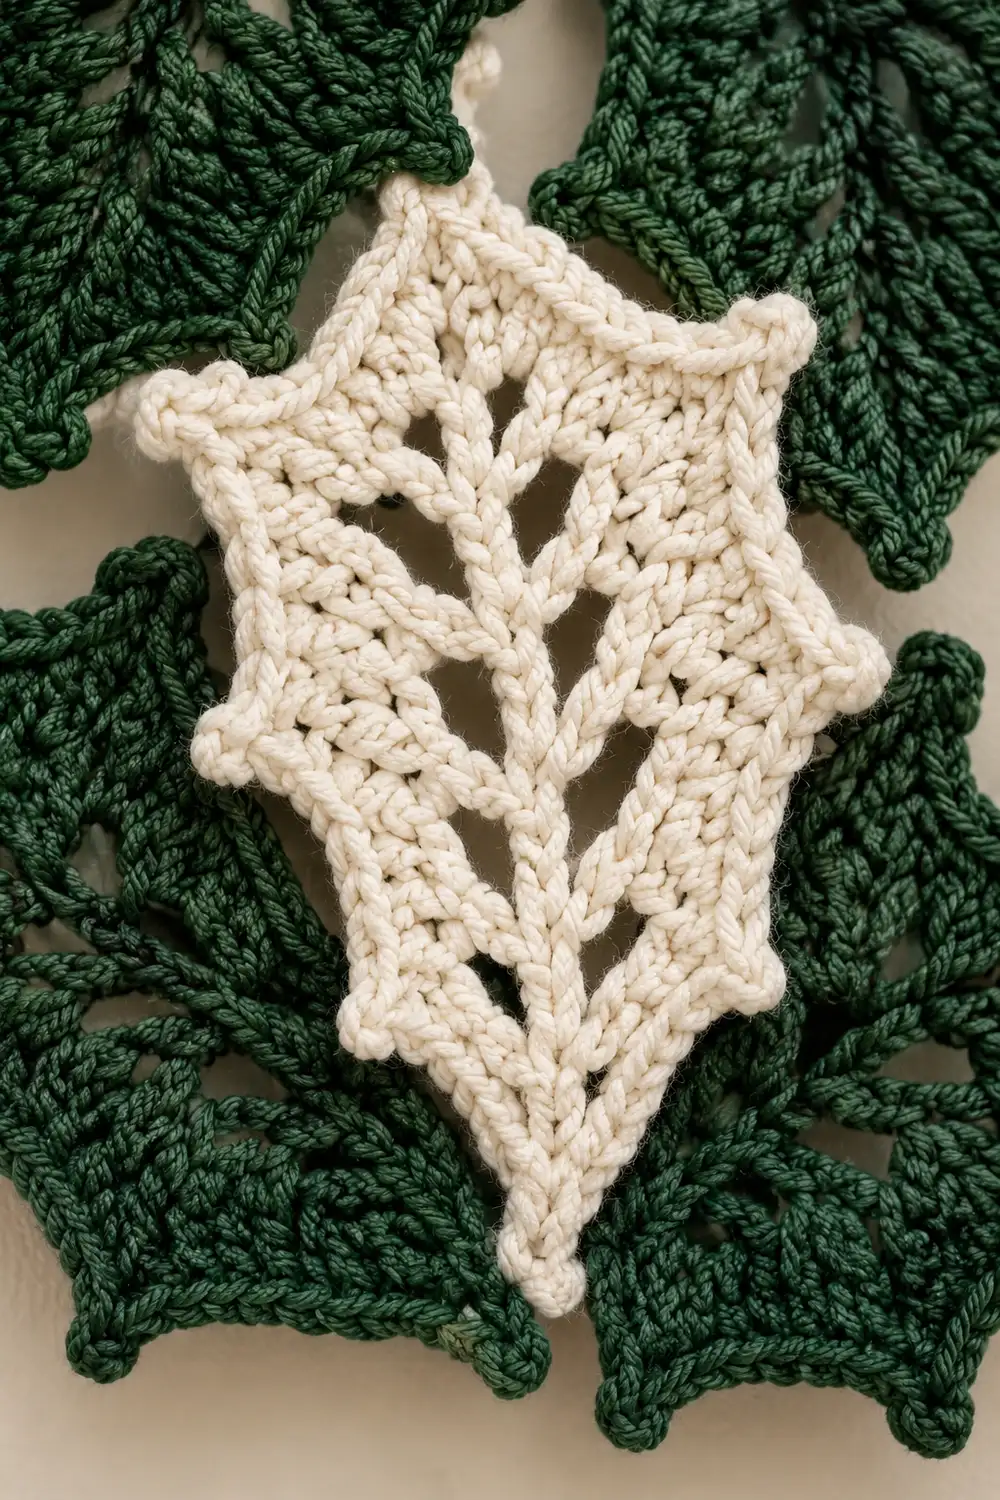
Leaf Pattern
Work in rows. Odd rows are RS and even rows are WS. The ch 2 at the start of Rows 2–15 does not count as a st. Place a marker in the center st of each row if that helps you track the vein.
Row 1 (RS): Ch 5. Hdc in 3rd ch from hook and in each of next 2 ch. Turn. (3 sts)
Row 2 (WS): Ch 2, 2 hdc in first st, BPdc around center st, 2 hdc in last st. Turn. (5 sts)
Row 3: Ch 2, 2 hdc in first st, hdc in next st, FPdc around center post, hdc in next st, 2 hdc in last st. Turn. (7 sts)
Row 4: Ch 2, 2 hdc in first st, hdc in next 2 sts, BPdc around center post, hdc in next 2 sts, 2 hdc in last st. Turn. (9 sts)
Row 5: Ch 2, 2 hdc in first st, hdc in next 3 sts, FPdc around center post, hdc in next 3 sts, 2 hdc in last st. Turn. (11 sts)
Rows 6–10: Ch 2, hdc in next 5 sts, post st around center post, hdc in next 5 sts. Turn. Use BPdc on even rows and FPdc on odd rows. (11 sts each row)
Row 11 (RS): Ch 2, hdc2tog, hdc in next 3 sts, FPdc around center post, hdc in next 3 sts, hdc2tog. Turn. (9 sts)
Row 12 (WS): Ch 2, hdc2tog, hdc in next 2 sts, BPdc around center post, hdc in next 2 sts, hdc2tog. Turn. (7 sts)
Row 13: Ch 2, hdc2tog, hdc in next st, FPdc around center post, hdc in next st, hdc2tog. Turn. (5 sts)
Row 14: Ch 2, hdc2tog, BPdc around center post, hdc2tog. Turn. (3 sts)
Row 15: Ch 2, hdc3tog. (1 st)
Do not fasten off. Continue directly with the Leaf Edging in the Border section.
The leaf now has a raised vein running from base to tip. It widens over Rows 1–5, stays straight over Rows 6–10, and tapers over Rows 11–15 to a pointed oval.
Make All Pieces
Work every leaf through Row 15, then add the Leaf Edging (see Border) before joining. Every leaf must have its edging finished before assembly.
- Forest green: 12 leaves
- Cream: 12 leaves
- Total: 24 leaves
Block all leaves before joining (see Final Blocking). Flat leaves are much easier to position.
Template: On paper, use string and a pencil to draw two circles with the same center. Make one 17 in (43.2 cm) across and one 8 in (20.3 cm) across. Mark 24 evenly spaced positions around the ring, one every 15 degrees. Position 1 sits just right of top center.
Layout grid (clockwise from top center):
POSITIONS 1-6:   CREAM GREEN CREAM GREEN CREAM GREEN
POSITIONS 7-12:  CREAM GREEN CREAM GREEN CREAM GREEN
POSITIONS 13-18: CREAM GREEN CREAM GREEN CREAM GREEN
POSITIONS 19-24: CREAM GREEN CREAM GREEN CREAM GREEN
Place each leaf with its base and stem near the inner circle and its tip angled clockwise toward the outer circle. Each new leaf lies on top of the previous one. Position 24 (green) tucks under position 1 (cream) to close the ring.
Joining
Use a tapestry needle and a 12 in (30.5 cm) length of yarn matching the top leaf. Work on the back of the wreath wherever possible so the stitches stay hidden.
Tack 1 (inner, structural): Lay leaf N+1 over leaf N so that leaf N+1’s base sits on leaf N’s center vein. Sew the 3 base edging sts of leaf N+1, one to one, to the vein posts of leaf N at Rows 5, 6, and 7. Then sew the stem of leaf N+1 flat along the back of leaf N, about 1.25 in (3.2 cm) long.
Tack 2 (outer, shape): Find the valley sl sts between the 2nd and 3rd holly points on the edge of leaf N+1 that lies over leaf N. Sew those valley sts to the matching valley on leaf N’s outer edge with 2–3 small stitches.
Repeat around the ring. Finish by tucking leaf 24 under leaf 1 and making the same two tacks.
Tension: Stitches should be snug enough that the leaves don’t slide, but not so tight that the fabric puckers. Keep the wreath flat on the template the whole time, and pin each leaf before sewing.
Size checkpoint: After joining, measure across the wreath in four directions. Every measurement should fall between 16 and 18 in (40.6 and 45.7 cm). The opening should be about 8 in (20.3 cm). If the wreath has gone oval, loosen and re-tack the leaves on the long side.
Border (Leaf Edging)
The wreath has no separate outer border. Its scalloped edge comes from the edging on each leaf. Work this edging around every leaf, directly after Row 15.
Border gauge: about 4.25 sc per inch along the row-end edges. This is slightly denser than the body’s 4 hdc per inch, which helps the points sit flat instead of rippling.
Edging Round 1 (sc foundation): Ch 1 and work 3 sc in the Row 15 st (tip).
- Side A: Working down the row ends of Rows 14 to 1, work 1 sc in each row end. Work 2 sc in the row ends of Rows 13, 11, 9, 6, 4, and 2. This gives 14 + 6 = 20 sc.
- Base: Work 1 sc in each of the 3 unused foundation-chain loops. (3 sc)
- Side B: Working up the row ends of Rows 1 to 14, repeat the Side A spacing for 20 sc.
Sl st to first sc. Round total: 3 (tip) + 20 + 3 (base) + 20 = 46 sc.
Side A runs along roughly 4.7 in (11.9 cm) of row ends. Twenty sc spread over that distance gives the stated border gauge.
Edging Round 2 (holly points):
- Tip: Ch 1, sc in first sc, (dc, picot, dc) in next sc, sc in next sc.
- Side A: Work 4 holly points over the 20 sc.
- Base: Sl st in first base sc. In the center base sc, work (sc, ch 6, sl st in 2nd ch from hook and each of next 4 ch, sc). This makes the stem. Sl st in last base sc.
- Side B: Work 4 holly points over the 20 sc.
Sl st to first sc. Fasten off and weave in ends.
Why the math works: Each holly point uses exactly 5 sts, and each side has 20 sc, so each side holds exactly 4 points. The tip and base each use their own 3 sts. Round 2 therefore covers all 46 sts of Round 1 with nothing left over. The paired sl sts between points form the valleys, and the picots form the sharp holly tips.
Final Blocking
- Make sure all tacks are secure and all ends are woven in.
- Lay the wreath face-up on a blocking mat over the paper template.
- Mist the wreath evenly with water until the cotton is damp, not soaked.
- Pin the outer circle to 17 in (43.2 cm) and the opening to 8 in (20.3 cm).
- Pin each picot outward to sharpen the holly points.
- Run a fingertip down each vein to lift it.
- Let the wreath dry completely, usually 12–24 hours.
- Unpin it. Thread the ribbon behind the leaves at top center, between positions 24 and 1. Wrap it over the ring and tie it at the length your door needs.
Final Quality-Control Checklist
- 24 leaves: 12 green, 12 cream, alternating around the ring
- Every leaf measures about 5.5 x 3.25 in (14.0 x 8.3 cm)
- The vein is raised on the front of every leaf
- 4 holly points per side, plus a pointed tip, on every leaf
- All leaves angled the same direction (clockwise)
- Outer diameter 16–18 in (40.6–45.7 cm), opening about 8 in (20.3 cm)
- No visible tacking yarn on the front
- The wreath hangs flat, with the ribbon centered at the top
Troubleshooting
- The vein sinks on the front: You used FPdc on a WS row. Use BPdc on even rows.
- The leaf cups or curls: Your hdc tension is too tight. Go up 0.25 mm, or block more firmly.
- The edge ripples: You have too many sc in Edging Round 1. Recount to exactly 20 per side.
- The points look soft: Pull each picot snug and pin it sharply while blocking.
- The leaf is lopsided: The center post drifted. Make sure each post stitch goes around the previous row’s center post.
- There are gaps in the ring: Move Tack 1 down one vein row, to Rows 4–6.
- The wreath is too small: Move Tack 1 up one vein row, to Rows 6–8.
- The wreath sags when hung: Add a third tack between the inner-edge points of neighboring leaves.
Care
Spot clean with cool water and mild soap, then reshape and dry flat. Store the wreath flat or loosely wrapped so the points don’t crush.
Final Notes
The whole wreath comes down to one measurement chain:
- Gauge of 4 hdc and 3 rows per inch
- Leaf body of 11 sts x 15 rows, measuring 2.75 x 5 in (7.0 x 12.7 cm)
- Edging of 20 sc per side, which becomes 4 holly points, for a finished leaf of 5.5 x 3.25 in (14.0 x 8.3 cm)
- 24 leaves tacked at vein Rows 5–7 into a 17 in (43.2 cm) ring
Check each link as you go, and the wreath will come together evenly.
Optional: For a larger door, the same leaf works in a 30-leaf ring on a wider template.
Happy crocheting!