

This lace curtain panel is made of small evergreen trees. Each tree is built from six fan-textured triangles stacked into a pyramid, with a short square trunk. Light passes through the open gaps between the triangles and through the chain net that links the trees, so the curtain stays bright while still giving some privacy.
The whole panel uses one color, a soft ecru mercerized cotton. Because it is a single neutral color, the design can stay up all winter. It looks seasonal without being loud. The pattern uses US crochet terms throughout.
The finished panel measures 45 in (114.3 cm) wide and 80.6 in (204.7 cm) long from the top of the header to the lowest trunk, not counting the rod loops. Make two panels for a pair like the one in the photo.
Construction is join-as-you-go. You make each tree from six small triangles, joining them corner to corner as you work, then add a trunk, chain arms and a drop chain. You work the trees row by row, and they lock into the chain net as you go. A sc-and-dc header with rod loops goes along the top, and a narrow chain-and-stitch border runs down each side.
Finished Size and Construction
- Finished size: 45 in × 80.6 in (114.3 cm × 204.7 cm) per panel
- Skill level: Intermediate
- Terminology: US
- Yarn weight: Sport (2), mercerized cotton
- Hook: 3.25 mm (US D-3)
- Number of pieces: 59 tree motifs per panel (118 for a pair), each made of 6 fan triangles plus a trunk
- Layout: 13 offset rows; odd rows have 5 trees and even rows have 4 (7 × 5 + 6 × 4 = 59)
- Piece size: each tree is 7.5 in (19.1 cm) wide × 6 in (15.2 cm) tall including the trunk, plus a 1.2 in (3.0 cm) stem
- Size before border: tree zone 43.5 in × 79.2 in (110.5 cm × 201.2 cm)
- Border depth: header 1.4 in (3.6 cm); each side border 0.75 in (1.9 cm)
Materials
Choose a smooth, mercerized sport-weight cotton or cotton blend. It shows the fan texture clearly, holds its shape when blocked and won’t stretch much while hanging. Avoid fuzzy or very stretchy fibers, because they blur the chain net and sag over the panel’s length.
- Ecru: 350 g / 1,085 m per panel (seven 50 g / 155 m balls); 700 g / 2,170 m for a pair
Each panel uses about 820 m. The quantities above include a margin for gauge swatches, the many yarn tails and differences in tension.
Tools:
– 3.25 mm (US D-3) crochet hook
– Tapestry needle
– Locking stitch markers
– Scissors
– Measuring tape
– Rustproof pins and a large blocking surface (a clean sheet on a floor or bed works)
– Spray bottle
– Curtain rod for hanging
Abbreviations (US Terms)
- ch – chain
- sl st – slip stitch
- sc – single crochet
- hdc – half double crochet
- dc – double crochet
- tr – treble crochet
- st(s) – stitch(es)
- tch – turning chain
- FT – fan triangle
- rep – repeat
Special stitches
Corner Join (CJ): Take the hook out of the working loop. Insert it from front to back through the top of the target stitch on the neighboring piece, pick up the dropped loop and pull it through. A CJ adds no stitches.
Junction (J): Insert the hook through the last chain of the waiting arm. If a drop chain hangs above this spot, also insert the hook through its last chain. Yarn over and pull through all loops on the hook. A J adds no stitches.
Gauge and Checkpoints
- dc: 20 sts and 10 rows = 4 in (10.2 cm)
- sc: 20 sts and 20 rows = 4 in (10.2 cm)
- Chain: 5 ch = 1 in (2.5 cm)
Make one complete tree before anything else, then block it lightly and measure it.
Checkpoints:
– One FT: 2.5 in (6.4 cm) across the base and 1.6 in (4.1 cm) from the top point to the base.
– Tree triangle (6 FTs): 7.5 in (19.1 cm) wide × 4.8 in (12.2 cm) tall.
– Tree with trunk: 6 in (15.2 cm) tall. The trunk is 1 in (2.5 cm) wide × 1.2 in (3.0 cm) tall.
– Stem: 6 ch = 1.2 in (3.0 cm). Drop chain: 24 ch = 4.8 in (12.2 cm).
If your FT is too big, go down half a hook size. If it is too small, go up half a size. If only the chains are off, work them looser or tighter rather than changing their counts, because the net spacing depends on those counts.
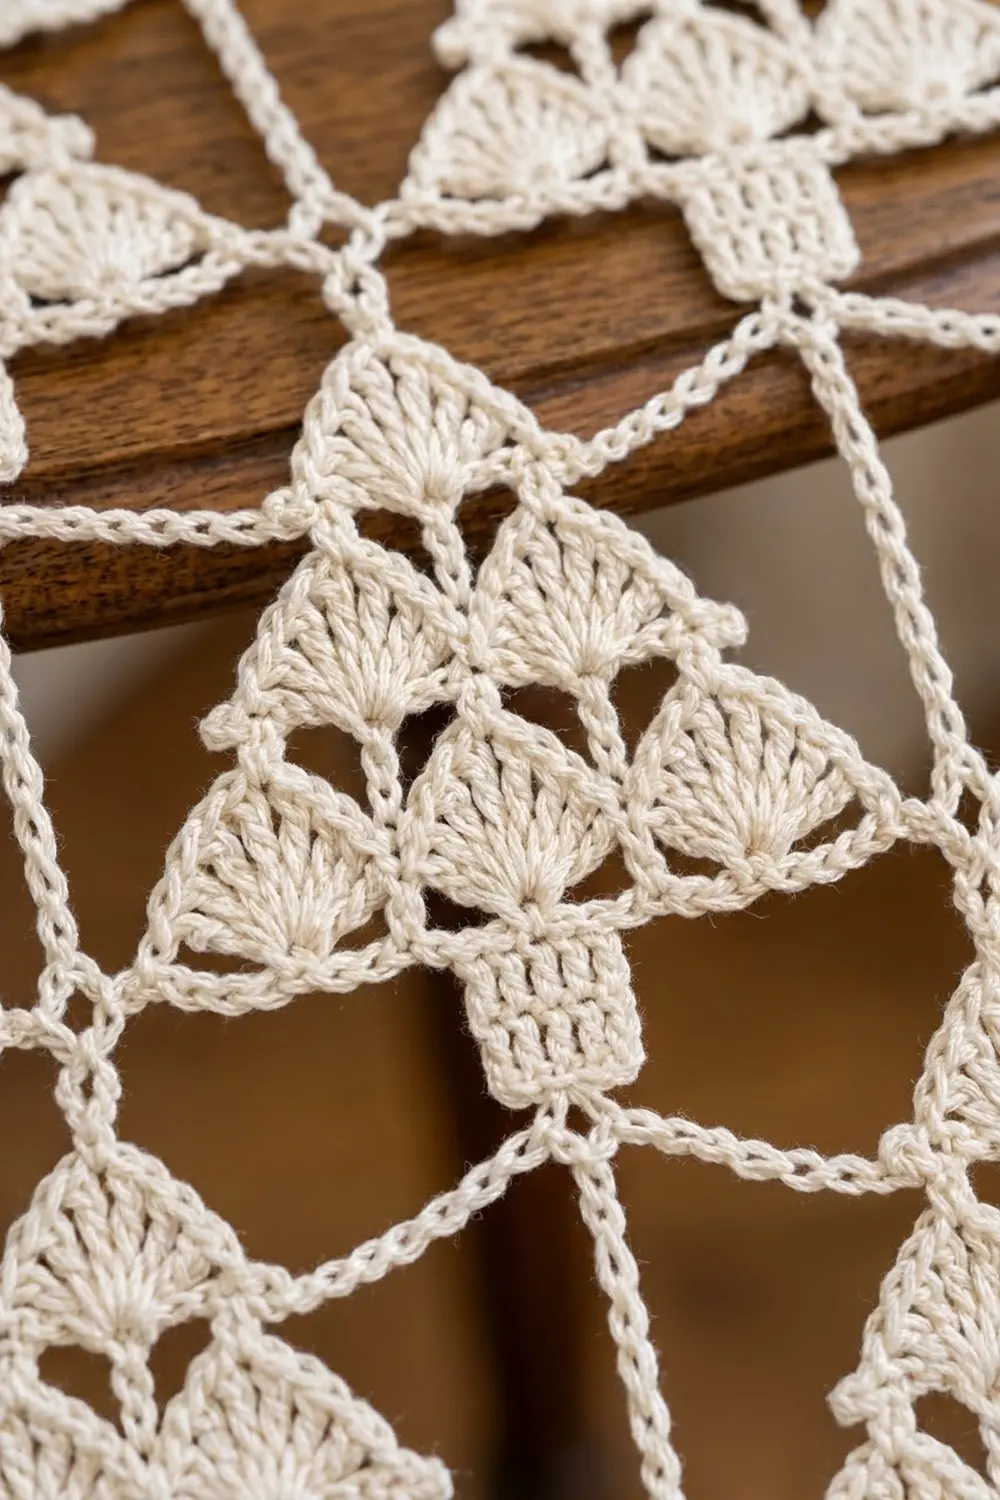
Fan Triangle (FT)
Top FT (A), first tree row only: Make a slip knot and leave an 8 in (20.3 cm) tail. Ch 10, then sl st in the 4th ch from the hook to form a ring. The first 6 ch are the stem.
Top FT (A), tree rows 2–13: Make a slip knot on the hook, insert the hook into the junction above, and sl st. Ch 10, then sl st in the 4th ch from the hook to form the ring.
FTs B–F: Ch 2, CJ into the target corner (see Tree Assembly), ch 2, then sl st in the first ch to form a 4-ch ring.
Row 1: Ch 3 (counts as a dc), then work 4 dc in the ring. Keep all of them on the side opposite the stem or join, so that point stays at the top. Turn. (5 dc)
Row 2 (growth): Ch 3 (counts as a dc), dc in the same st, then 2 dc in each remaining st, including the tch. Turn. (10 dc)
Row 3 (growth): Ch 3 (counts as a dc), 2 dc in the next st, dc in the next st, 2 dc in the next st; rep from * 3 more times. Turn. (15 dc)
Row 4 (trim): Ch 4 (counts as a tr), dc in the next 2 sts, hdc in the next 2, sc in the next 5, hdc in the next 2, dc in the next 2, tr in the top of the tch. (15 sts: 15 worked 1 per stitch + 0 added)
The graded stitches straighten the curved edge into a flat base. The tall tr at each end makes the two sharp bottom corners, the ring forms the top point, and the stacked dc columns give the fan texture. Fasten off.
Tree Assembly
Join the six triangles in this order:
- A: Work as above, starting with the stem.
- B: At the ring, CJ into A’s left corner.
- C: At the ring, CJ into A’s right corner. In Row 4, CJ into B’s right corner at the corner that touches B: right after the ch 4 if it is at the start of the row, or right after the last tr if it is at the end.
- D: At the ring, CJ into B’s left corner.
- E: At the ring, CJ into the point where B and C meet (B’s right corner). In Row 4, CJ into D’s right corner.
- F: At the ring, CJ into C’s right corner. In Row 4, CJ into E’s right corner.
Checkpoint: The three base FTs form a straight 45-st edge (3 × 15) that measures 7.5 in (19.1 cm), with open inverted-triangle gaps between the tiers.
Trunk:
– Row 1: Join the yarn in the 6th st of E’s Row 4 (the first of the 5 center sc). Ch 3 (counts as a dc), then dc in the next 4 sts. (5 dc)
– Rows 2–3: Ch 3, turn, dc in the next 4 sts. (5 dc) Fasten off.
The 5 sc are centered in E’s 15 sts, so the trunk hangs exactly in the middle.
Drop chain (rows 1–12 only): Join the yarn in the 3rd dc of trunk Row 3. Ch 24 and fasten off, leaving a 4 in (10.2 cm) tail. Row 13 trees have no drop chain.
Make All Pieces
You make each tree in its place as the panel grows, so complete them row by row:
Header: 225 sts = 5 columns x 45
Row 1:   T     T     T     T     T
Row 2:      T     T     T     T
Row 3:   T     T     T     T     T
  ...  (pattern alternates)
Row 13:  T     T     T     T     T
- Odd rows: 1, 3, 5, 7, 9, 11 and 13, with 5 trees each, for 35 trees.
- Even rows: 2, 4, 6, 8, 10 and 12, with 4 trees each, for 24 trees.
- Per panel: 59 trees and 354 FTs. For a pair: 118 trees and 708 FTs.
Work over the starting tails as you go to cut down on weaving in later.
Joining
Each tree has a stem and drop chain, plus chain arms that join its neighbors at junctions. Every junction sits halfway between two trees and links four chains: the right arm of the left tree, the left arm of the right tree, the drop chain of the tree above, and the stem of the tree below.
Work the arms on each tree after its trunk.
Odd rows:
– Right arm (trees 1–4): Join the yarn in F’s right corner, ch 5 and fasten off. This arm waits for the next tree.
– Left arm (trees 2–5): Join the yarn in D’s left corner, ch 5, J (into the waiting arm and, from row 3 on, the drop chain above). Fasten off.
Even rows:
– Tree 1, left arm: Ch 5 from D’s corner, J into the drop chain of odd tree 1 above, ch 19 and fasten off.
– Tree 4, right arm: Ch 5 from F’s corner, J into the drop chain of odd tree 5 above, ch 19 and fasten off.
– Between trees: Make the arms as for odd rows.
The ch-19 ends stop at the panel’s side line.
Why the spacing works:
– Swags: Each swag is 10 ch (2 in / 5.1 cm) spanning a 1.5 in (3.8 cm) gap, which gives a soft drape.
– Tree spacing: Tree centers are 9 in (22.9 cm) apart, and each row is offset by half that.
– Row height: Each row adds a 1.2 in (3.0 cm) stem plus a 4.8 in (12.2 cm) tree triangle, so the rows are 6 in (15.2 cm) apart. The 24-ch drop chain covers the 4.8 in (12.2 cm) from the trunk bottom to the junction below.
Tension: Keep the chains even and relaxed, because a tight swag pulls the whole row up.
Checkpoint: After 3 rows, the panel should measure 43.5 in (110.5 cm) wide. From the row 1 stem tips to the row 3 base, it should measure 18 in (45.7 cm).
Border
The border gauge matches the main gauge: 5 sts and 5 ch = 1 in (2.5 cm).
Header
Row 1: Ch 226, then sc in the 2nd ch from the hook and in each ch across. (225 sc) This is 5 tree columns × 45 sts.
Row 2: Ch 3 (counts as a dc), turn, dc in each st. (225 sts: 225 worked 1 per stitch + 0 added)
Row 3: Ch 1, turn, sc in each st. (225 sts: 225 + 0)
Row 4: Repeat Row 2. (225 sts)
Row 5: Repeat Row 3. (225 sts)
Row 6 (rod loops): Ch 1, turn. Sc in the next 4 sts, sc in the next st, ch 20, sl st in the same sc, sc in the next 4 sts; rep from * 24 more times. (225 sc: 225 + 0 added, plus 25 loops)
The header’s rows add up to 1.4 in (3.6 cm): 0.2 + 0.4 + 0.2 + 0.4 + 0.2 in, which is 0.5 + 1.0 + 0.5 + 1.0 + 0.5 cm.
Make the header before row 1, then sew each row 1 stem tip into the free foundation loop of header st 23, 68, 113, 158 or 203. These are the center sts of the five 45-st columns.
Side lines: Work these after row 13.
– Left side: Join the yarn in the foundation loop of header st 4. Ch 30, then sl st into the next edge point: tree 1’s left corner on odd rows or the end of the ch-19 on even rows. Rep from * 12 more times, for 13 segments, finishing at row 13’s corner.
– Right side: Work the same way, starting in st 222.
Side border, each side:
– Row 1: Working along the outer side of the side line, sc in each ch and skip the 13 joining sl sts. (390 sc: 13 segments × 30)
– Row 2: Ch 3 (counts as a dc), turn, dc in each st. (390 sts: 390 + 0) Sl st the row end to the edge of the header.
Why the math works:
– Side length: Each 30-ch segment is 6 in (15.2 cm), the same as the row height, so 30 sc per segment lies flat with no ruffling.
– Side width: The chain (0.15 in / 0.4 cm), the sc row (0.2 in / 0.5 cm) and the dc row (0.4 in / 1.0 cm) add up to 0.75 in (1.9 cm).
– Total width: 43.5 + 0.75 + 0.75 = 45 in (114.3 cm), and 45 in × 5 sts = 225, which matches the header count exactly.
– Bottom edge: It is left open on purpose, so the row 13 trunks hang free.
Final Blocking
- Weave in all remaining tails along the stitch columns.
- Soak the panel in cool water, then press the water out in a towel without wringing.
- Lay it flat on a sheet over a large surface. If space is short, work in sections.
- Pin the header straight at 45 in (114.3 cm).
- Pin the side borders straight and parallel, then check that the length is 80.6 in (204.7 cm).
- Pin each tree’s base corners and top point so the triangles sit sharp and the swags hang evenly.
- Let it dry completely, then unpin and hang it.
Final Quality-Control Checklist
- [ ] Every FT has 15 sts in Row 4 and measures 2.5 in (6.4 cm) across.
- [ ] All tree corners are joined, with open gaps between the tiers.
- [ ] The trunks are centered, with 5 dc in each of 3 rows.
- [ ] Every junction holds all of its chains.
- [ ] The header has 225 sts and 25 loops.
- [ ] Each side border has 390 sts.
- [ ] The panel is 45 × 80.6 in (114.3 × 204.7 cm).
Troubleshooting
- Triangles cup: The ring or Row 4 is too tight. Work them more loosely.
- Corners don’t meet: Your FT is off gauge. Recheck the 2.5 in (6.4 cm) base.
- Rows pull upward: The swags or drop chains are tight. Redo them with looser chains.
- Header flares: The sides are short of 390 sts. Recount the segments.
- Panel leans: The side line has fewer or more than 30 ch in some segments. Correct those segments.
Care
Hand wash in cool water with mild soap, roll it in a towel and dry it flat. Re-pin while damp if the trees lose their shape.

Final Notes
The measurements build on each other:
– Triangle: 2.5 in (6.4 cm) wide.
– Tree: 3 triangles make a 7.5 in (19.1 cm) tree.
– Width: Tree centers 9 in (22.9 cm) apart give a 43.5 in (110.5 cm) tree zone. The two 0.75 in (1.9 cm) side borders and the 225-st header bring it to 45 in (114.3 cm).
– Length: 13 rows at 6 in (15.2 cm) each, plus the trunks and the header, give 80.6 in (204.7 cm).
Check each link in that chain as you go, and the panel will hang straight.
Happy crocheting!