

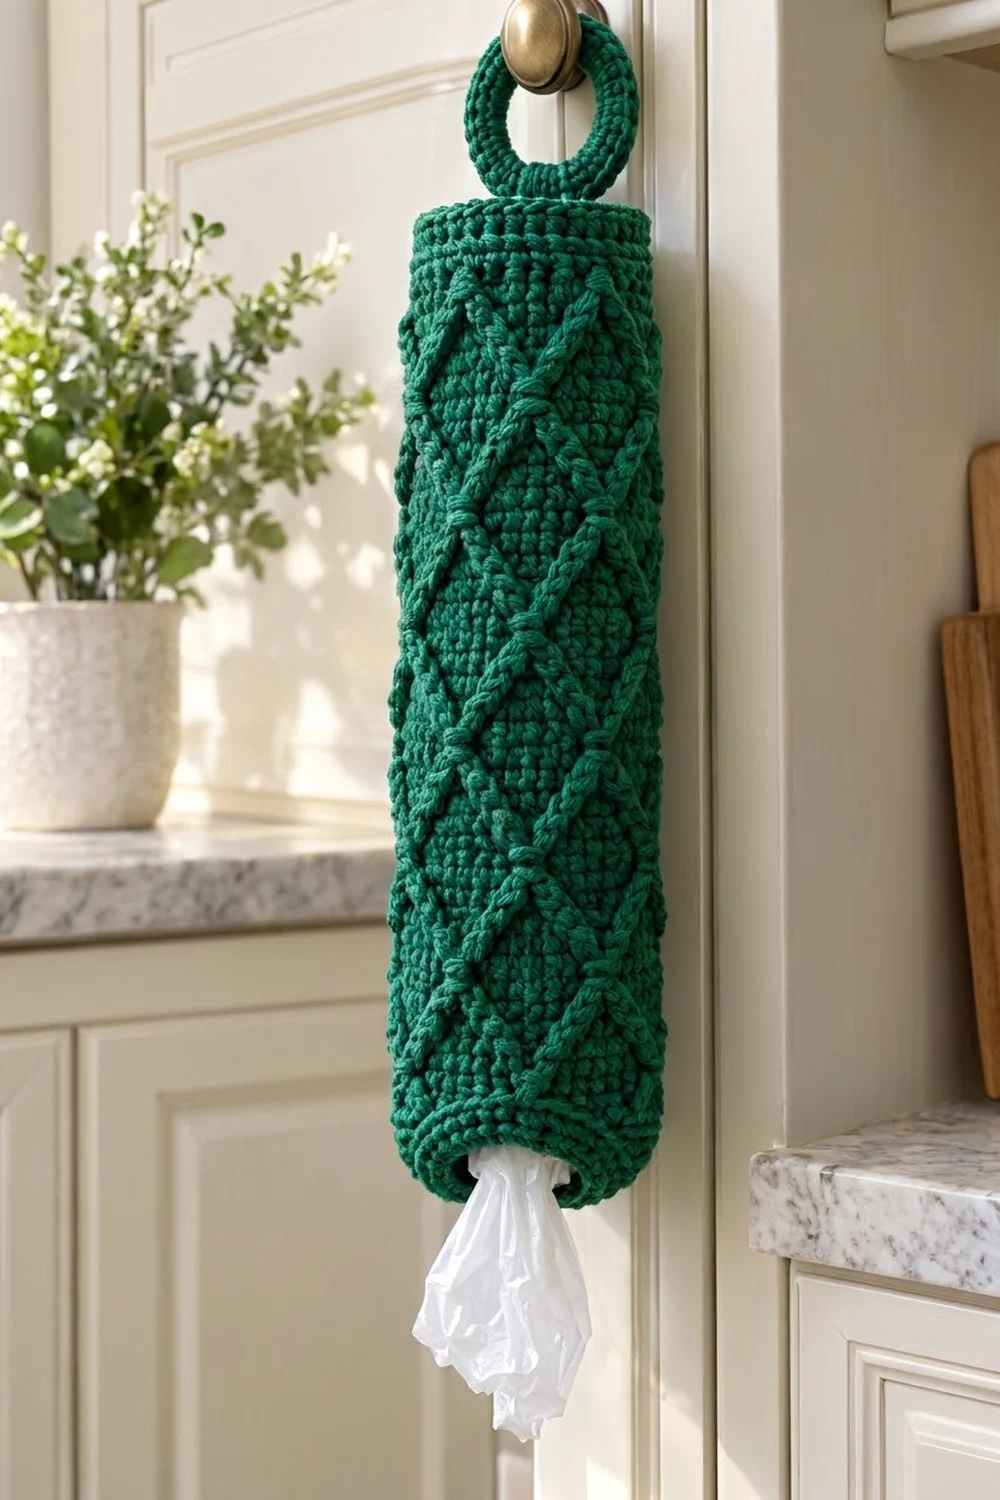
Plastic grocery bags tend to pile up under the sink. This holder turns that pile into something tidy you can hang on a cabinet knob. You stuff bags in at the top and pull them out one at a time through the hole in the base.
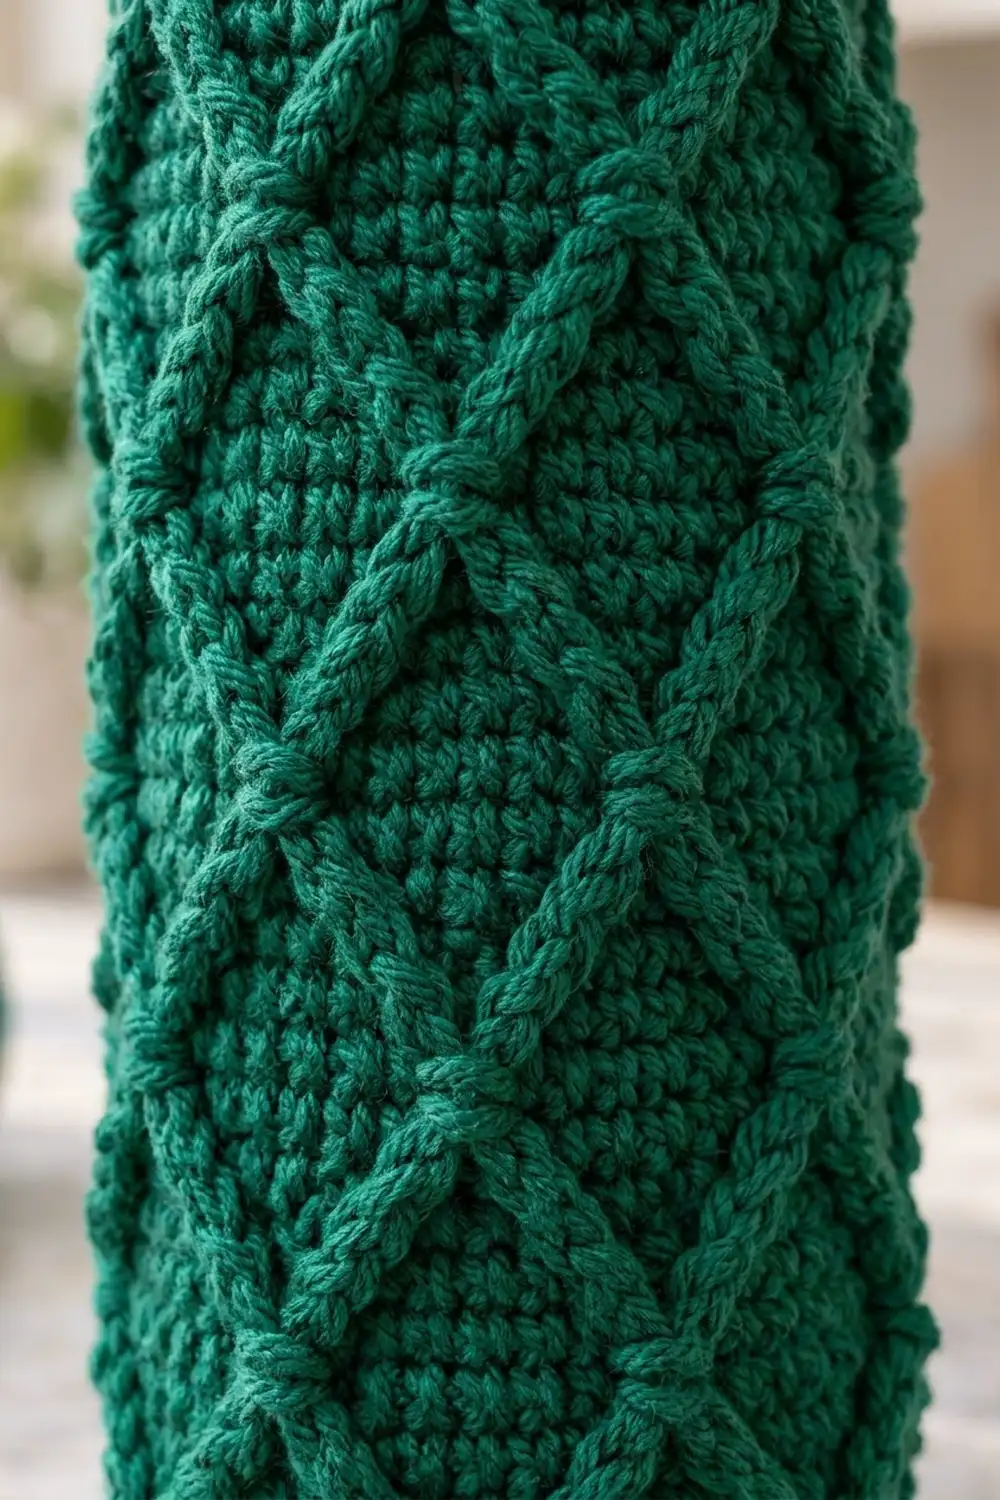
The Evergreen Lattice holder is worked in a single deep emerald green. Raised diagonal lines cross to form a diamond lattice over a background of single crochet. The look is classic and textured, a bit like a fisherman sweater, and it suits a farmhouse or traditional kitchen.
This pattern uses US crochet terms. The finished body is 12.4 in (31.5 cm) tall and 3.8 in (9.7 cm) across, or 6 in (15.2 cm) wide when pressed flat. With the hanging ring, the holder is 14.4 in (36.6 cm) long overall.
You start at the base with a chain ring, which leaves an open center hole for dispensing bags. You increase in the round to make a flat disk, then turn upward with one round worked in back loops only. The lattice comes from front-post trebles worked every second round. Last, you add a plain rim, then cover a wooden ring in stitches and sew it to the back.
Finished Size and Construction
- Finished size: body 12.4 in (31.5 cm) tall × 3.8 in (9.7 cm) across; 14.4 in (36.6 cm) overall with the ring
- Skill level: Intermediate
- Terminology: US
- Yarn weight: worsted (#4)
- Hook: 5 mm (H-8)
- Number of pieces: 2 (one body, one covered ring)
- Layout: one vertical tube with the ring sewn to the center back of the top rim
- Piece size: circumference 12 in (30.5 cm); 48 stitches around
- Size before border: 11.3 in (28.7 cm) tall after Rnd 57
- Border depth: 1.1 in (2.8 cm), 5 rounds
Materials
Yarn: Use worsted-weight cotton or a cotton blend. Cotton holds the raised lines crisply and doesn’t stretch out when the holder is full of bags. Acrylic also works, but the tube will sag a little more.
- Emerald green: 180 g (approx. 306 m / 335 yd)
The quantity includes a margin of about 15% for your gauge swatch and any small differences in tension.
Tools:
– 5 mm (H-8) crochet hook
– One 2 in (5.1 cm) wooden or bamboo ring
– 7 stitch markers
– Tapestry needle
– Scissors
– Tape measure
Abbreviations (US Terms)
- ch – chain
- sl st – slip stitch
- sc – single crochet
- inc – 2 sc in the same stitch
- BLO – back loop only
- FPtr – front post treble crochet
- st(s) – stitch(es)
- sk – skip
- rnd – round
- rep – repeat
Special stitch – FPtr: Yarn over twice. Insert your hook from front to back to front around the post of the stitch named in the instructions, which will be two rounds below. Yarn over and pull up a loop, then (yarn over, pull through 2 loops) 3 times. Always skip the stitch of the current round that sits behind the FPtr. Each FPtr counts as one stitch.
Gauge and Checkpoints
Gauge: 16 sc and 18 rnds = 4 in (10.2 cm) in single crochet worked in the round. That works out to 4 sts and 4.5 rnds per inch.
Test piece first: Work the base (Rnds 1–6) and measure it before you go any further. It should be 3.8 in (9.7 cm) across with a 1.4 in (3.6 cm) hole in the center.
- Too big: go down half a hook size and start again.
- Too small or very stiff: go up half a hook size.
Checkpoints for height, measured from the ridge at Rnd 7:
– After Rnd 25: 4.2 in (10.7 cm)
– After Rnd 41: 7.8 in (19.8 cm)
– After Rnd 57: 11.3 in (28.7 cm)
– After Rnd 62: 12.4 in (31.5 cm)
If you are more than 0.5 in (1.3 cm) short at any checkpoint, your rounds are compressing. Loosen up a little rather than adding rounds, because extra rounds would break the lattice repeat.
Pattern Notes
- Work in joined rounds. Each round starts with ch 1, which does not count as a stitch, and ends with a sl st to the first sc. This keeps the lattice lines lined up and puts the join at the back.
- Every round from Rnd 7 onward has 48 sts, made of 6 repeats of 8 sts. Put a marker after every 8th stitch.
- Within each repeat, the positions are numbered 1–8.
- Odd rounds from Rnd 11 onward are post rounds. Each FPtr goes around the FPtr two rounds below.
Base
Foundation: Ch 18 and sl st to the first ch to form a ring. Don’t twist the chain.
Rnd 1: Ch 1, sc in each ch around, join. (18 sts)
Rnd 2: Ch 1, (sc 2, inc) 6 times, join. (24 sts)
Rnd 3: Ch 1, (sc 3, inc) 6 times, join. (30 sts)
Rnd 4: Ch 1, (sc 4, inc) 6 times, join. (36 sts)
Rnd 5: Ch 1, (sc 5, inc) 6 times, join. (42 sts)
Rnd 6: Ch 1, (sc 6, inc) 6 times, join. (48 sts)
Checkpoint: The disk should be 3.8 in (9.7 cm) across with a 1.4 in (3.6 cm) hole. A very slight cup is fine, since the sides turn up next.
Body
Rnd 7 (turning ridge): Ch 1, sc in BLO of each st around, join. (48 sts) The unused front loops form the crisp edge around the base.
Rnd 8: Ch 1, sc in each st around, join. (48 sts)
Rnd 9 (lattice setup): Ch 1, FPtr around the Rnd 7 st directly below position 1, FPtr around the Rnd 7 st below position 2, sc 6; rep from * 6 times, join. (12 FPtr + 36 sc = 48 sts)
Lattice Block (Rnds 10–25)
Work every even round as: ch 1, sc in each st around (including the tops of the FPtr), join. (48 sts)
The odd rounds below are written for one repeat. Work each one 6 times around. Every repeat ends with 8 sts, so every round totals 48 sts.
Rnd 11: sc 2; FPtr around the post at position 2; sc 4; FPtr around the post at position 1 of the next repeat. (2 + 1 + 4 + 1 = 8) In the last repeat, that final FPtr goes around the first post of the round.
Rnd 13: sc 3; FPtr around the post at position 3; sc 2; FPtr around the post at position 8; sc 1. (8)
Rnd 15: sc 4; FPtr around the post at position 4; FPtr around the post at position 7; sc 2. (8) The two lines now sit side by side.
Rnd 17 (center cross): sc 4; skip the post at position 5 and work FPtr around the post at position 6; then, working in front of the stitch you just made, FPtr around the skipped post at position 5; sc 2. (8)
Rnd 19: sc 3; FPtr around the post at position 5; sc 2; FPtr around the post at position 6; sc 1. (8)
Rnd 21: sc 2; FPtr around the post at position 4; sc 4; FPtr around the post at position 7. (8)
Rnd 23: FPtr around the post at position 8 of the previous repeat; FPtr around the post at position 3; sc 6. (8) In the first repeat, the first FPtr goes around the last post of the round.
Rnd 25 (edge cross): skip the post at position 1 and work FPtr around the post at position 2; then, working in front, FPtr around the skipped post at position 1; sc 6. (8)
Checkpoint: 4.2 in (10.7 cm) tall from the ridge. Each diamond is 2 in (5.1 cm) wide and 3.6 in (9.1 cm) tall.
Rnds 26–41: Repeat Rnds 10–25 once.
Rnds 42–57: Repeat Rnds 10–25 once more.
After Rnd 57 you have 3 full diamonds stacked vertically and 6 around the tube, finished with a row of edge crosses. Still 48 sts.
Border (Top Rim)
Border gauge: the same as the body, 4.5 rnds per inch, so 5 rounds = 1.1 in (2.8 cm).
When you press the tube flat, each side carries 24 sts: positions 1–8 of 3 repeats. There are no corners to count twice, because the tube is continuous.
Rnds 58–61: Ch 1, sc in each st around, join. (48 sts each round; 24 per flat side)
Rnd 62: Ch 1, sl st loosely in each st around, join. (48 sts; 24 per flat side) Fasten off and weave in the end.
Why the math works: The border adds no increases. The rim’s 48 sts match the 6 lattice repeats of 8 sts and the 12 in (30.5 cm) circumference exactly, so the opening stays the same width as the body and doesn’t flare. The slip-stitch round firms the edge without adding height.
Checkpoint: 11.3 in + 1.1 in = 12.4 in (31.5 cm) total body height.
Covered Hanging Ring
Rnd 1: Leave a 6 in (15.2 cm) tail. Attach the yarn to the wooden ring with a sl st. Ch 1, then work 44 sc over the ring, packing them tightly so no wood shows. Join to the first sc. (44 sts)
Fasten off, leaving a 12 in (30.5 cm) tail for sewing. The covered ring measures 2.4 in (6.1 cm) across.
Attach the Ring
- Flatten the body so the round joins run down the center back.
- Place the ring so its lower edge overlaps the inside of the back rim by 0.4 in (1.0 cm), centered over the join line.
- Whipstitch through 6 sts of the ring and 6 sts of Rnds 60–62, going through both layers twice for strength.
- Secure the tail on the inside and weave it in.
The ring now extends 2 in (5.1 cm) above the rim, so the holder is 14.4 in (36.6 cm) overall.
Final Blocking
- Lightly mist the body with water. Don’t soak it, or the raised lines will flatten.
- Slide a rolled towel or a 3.75 in (9.5 cm) bottle into the tube.
- Press the base flat and shape the ridge into a clean edge.
- Straighten the lattice lines so the diamonds stack up vertically.
- Set the ring upright and let everything dry completely.
Final Quality-Control Checklist
- Base is 3.8 in (9.7 cm) across with a 1.4 in (3.6 cm) open hole
- Every round from Rnd 7 onward has 48 sts
- 6 diamonds around and 3 diamonds tall
- All crosses lean the same way, with each front FPtr in front
- Rim is flat and doesn’t flare
- Body is 12.4 in (31.5 cm) tall; overall length is 14.4 in (36.6 cm)
- Ring is sewn on securely, centered at the back, with no wood showing
Troubleshooting
- Lattice lines drift sideways: you probably forgot to skip the st behind an FPtr. Count to 8 between markers.
- Ripples behind the FPtr: your trebles are too short. Pull the first loop up to the height of the current round.
- Base ruffles: your increases are too loose. Go down half a hook size for Rnds 1–6 only.
- Bags fall out too easily: work Rnd 1 tighter, or start with ch 16 and use (sc 2, inc) 4 times, sc 2 for Rnd 2 to get back to 24.
- Wood shows through the ring: add 2–4 more sc and push them together.
Care
Hand wash in cool water, press out the water in a towel, and reshape the holder over a bottle to dry. Don’t tumble dry.
Final Notes
The measurement chain is simple. The 18-st hole grows to a 48-st base that is 3.8 in (9.7 cm) across. The tube keeps all 48 sts as 6 lattice repeats, reaching 11.3 in (28.7 cm) before the rim. The 5-round rim brings it to 12.4 in (31.5 cm), and the 2.4 in (6.1 cm) covered ring finishes the holder at 14.4 in (36.6 cm). Check each link in that chain and your holder will match.
Happy crocheting!