
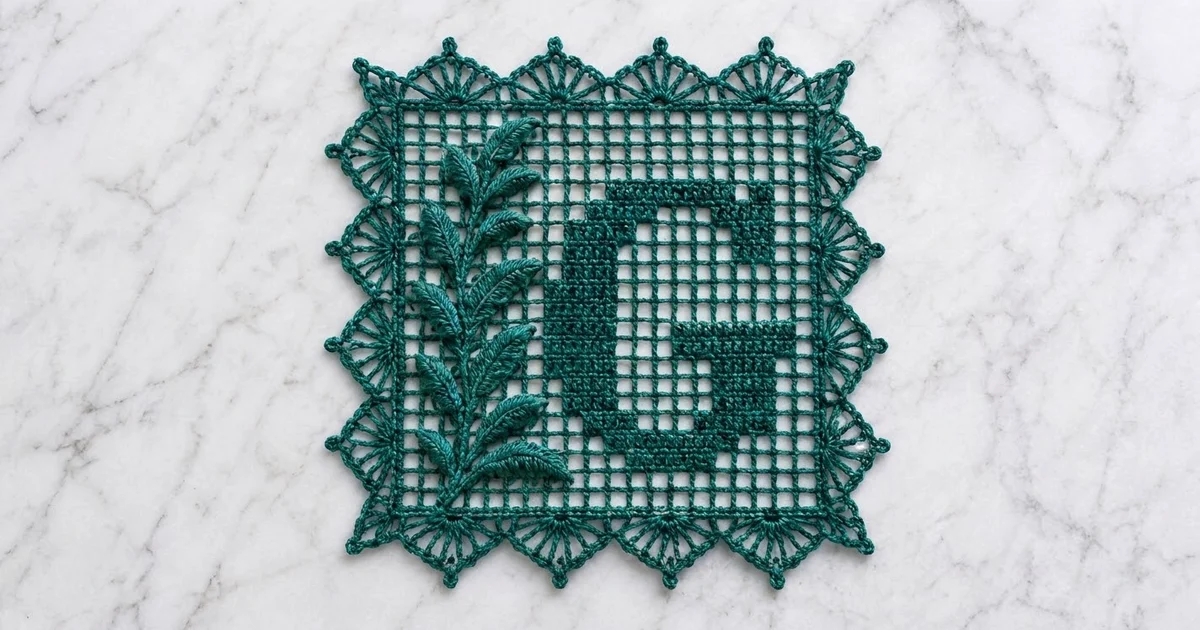
The Evergreen Monogram is a filet crochet square with a bold block letter “G” set into an airy mesh grid. A sculpted leaf sprig climbs the left side, and a fan-and-picot lace border frames the whole piece. It is made in one deep teal-green cotton, so the texture shows clearly.
The style sits between classic heirloom filet and modern monogram décor. Use it as a doily, a framed wall piece, a table accent, or a personalized gift for anyone whose name starts with G.
This pattern uses US crochet terms. The finished square measures 10 x 10 in (25.4 x 25.4 cm) to the picot tips. The filet panel alone is 8 x 8 in (20.3 x 20.3 cm).
You work it in three parts. First, crochet the filet panel flat in rows, following a written chart for the letter. Next, add a three-round border in the round. Last, make the leaf sprig separately and sew it onto the open mesh on the left.
Finished Size and Construction
- Finished size: 10 x 10 in (25.4 x 25.4 cm), blocked, to the picot tips
- Skill level: Intermediate
- Terminology: US crochet terms
- Yarn weight: Super Fine (#1), fingering-weight mercerized cotton
- Hook: 2.25 mm (US B-1)
- Number of pieces: 1 square panel plus 1 sewn-on leaf sprig appliqué
- Layout: Single square; no joining
- Grid: 24 meshes wide x 24 rows tall
- Size before border: 8 x 8 in (20.3 x 20.3 cm)
- Border depth: 1 in (2.5 cm) on each side
Materials
Yarn: Choose a smooth, tightly twisted mercerized cotton in fingering weight. A crisp yarn gives clean mesh holes and sharp picots. Avoid fuzzy or very soft blends, because they blur the letter.
- Deep teal-green: 50 g, about 170 m (186 yd)
This quantity includes a safety margin. The project uses about 40 g: roughly 25 g for the panel, 10 g for the border and 5 g for the sprig.
Tools:
– 2.25 mm (US B-1) crochet hook
– Tapestry needle
– Scissors
– Rustproof pins
– Blocking mat or folded towel
– Spray bottle and light spray starch (optional)
– Ruler or tape measure
Abbreviations (US Terms)
- ch – chain
- sl st – slip stitch
- sc – single crochet
- hdc – half double crochet
- dc – double crochet
- sk – skip
- sp – space
- st(s) – stitch(es)
- RS / WS – right side / wrong side
Special stitches
– Mesh (open square): ch 2, sk next 2 sts (or the next ch-2 sp), dc in next dc.
– Block (filled square): Over a ch-2 sp, work 2 dc in the ch-2 sp, then dc in next dc. Over a block, dc in each of the next 3 dc.
– Picot: ch 3, sl st in 3rd ch from hook.
– Fan: (dc, ch 1) 6 times in the same st, then dc in that same st. That makes 7 dc and 6 ch-1 sps.
– Corner fan: (dc, ch 1) 8 times in the same sp, then dc in that same sp. That makes 9 dc and 8 ch-1 sps.
Gauge and Checkpoints
Gauge: 9 meshes and 9 rows = 3 x 3 in (7.6 x 7.6 cm). That works out to 3 meshes and 3 rows per inch (2.5 cm).
Test swatch: Ch 32. Dc in the 8th ch from hook, then ch 2, sk 2 ch, dc in next ch across (9 meshes). Work 8 more rows of meshes. Your swatch should measure 3 x 3 in (7.6 x 7.6 cm), with the squares close to square.
Checkpoints:
– After Row 9: the panel is 3 in (7.6 cm) tall.
– After Row 12: 4 in (10.2 cm) tall.
– After Row 24: 8 x 8 in (20.3 x 20.3 cm).
– After Border Round 1: 8 1/4 in (21.0 cm) square.
– After Border Round 2: 9 1/2 in (24.1 cm) square.
– After Border Round 3: 10 in (25.4 cm) square to the picot tips.
If the swatch is too big, go down to a 2.0 mm hook. If it is too small, go up to a 2.5 mm hook. If the meshes are taller than they are wide, keep your dc a little shorter by pulling up a lower first loop.
Filet Panel
Every row contains 25 dc “posts” with 24 squares between them. Each row has 73 sts in total: 25 dc plus 48 sts that are either chains or dc filling the blocks.
- Starting a row with a mesh: ch 5 (counts as dc and ch 2), sk the next 2 sts or sp, dc in the next dc.
- Starting a row with a block: ch 3 (counts as dc), then work the block as usual.
- Ending every row: your last dc goes into the 3rd ch of the turning ch.
RS (odd) rows are read right to left on the chart. WS (even) rows are read left to right. The instructions below already list each row in working order.
Foundation: Ch 77.
Row 1 (RS): Dc in the 8th ch from hook, ch 2, sk 2 ch, dc in next ch 23 times. Turn. (24 meshes; 73 sts)
Rows 2–4: Ch 5, sk 2 ch, dc in next dc, ch 2, dc in next dc across, ending with dc in 3rd ch of turning ch. Turn. (24 meshes)
Row 5 (RS): 4 mesh, 8 blocks, 12 mesh. Turn.
Row 6 (WS): 11 mesh, 10 blocks, 3 mesh. Turn.
Row 7: 3 mesh, 11 blocks, 10 mesh. Turn. This is the bottom bar of the G.
Row 8: 10 mesh, 3 blocks, 5 mesh, 3 blocks, 3 mesh. Turn.
Row 9: 3 mesh, 3 blocks, 5 mesh, 3 blocks, 10 mesh. Turn.
Row 10: Repeat Row 8.
Row 11: Repeat Row 9.
Row 12: 10 mesh, 3 blocks, 2 mesh, 6 blocks, 3 mesh. Turn.
Row 13: 3 mesh, 6 blocks, 2 mesh, 3 blocks, 10 mesh. Turn. This finishes the inward crossbar of the G.
Row 14: 10 mesh, 3 blocks, 11 mesh. Turn.
Row 15: 11 mesh, 3 blocks, 10 mesh. Turn.
Rows 16–17: Repeat Rows 14–15.
Row 18: Repeat Row 8. This is the upper arm of the G.
Row 19: Repeat Row 7.
Row 20: Repeat Row 6.
Row 21: Repeat Row 5.
Rows 22–24: Work as Rows 2–4. (24 meshes)
Every row from 5 to 21 adds up to 24 squares. For example, Row 8 is 10 + 3 + 5 + 3 + 3 = 24. Each row still has 73 sts.
Do not fasten off. Checkpoint: 8 x 8 in (20.3 x 20.3 cm). Columns 1–10 on the left stay fully open, which leaves room for the sprig.
Border
Border gauge: Round 1 has 73 sc per side over 8 in (20.3 cm), which is about 9 sc per inch (2.5 cm).
Round 1 (RS): Turn so the RS faces you; you are at the top right corner. Ch 1.
– Top right corner: (sc, ch 2, sc) in the first st.
– Top edge: Sc in each dc and 2 sc in each ch-2 sp across. That is 23 dc + (24 x 2) = 71 sc.
– Top left corner: (sc, ch 2, sc) in the last st.
– Left side: 2 sc over the first row end, then 3 sc over each of the next 23 row ends. That is 2 + 69 = 71 sc.
– Bottom left corner: (sc, ch 2, sc) at the base of the corner st.
– Bottom edge: Working along the foundation chain, sc at the base of each dc and 2 sc under each ch-2 sp. That is 71 sc.
– Bottom right corner: (sc, ch 2, sc) at the base of the corner st.
– Right side: 2 sc over the first row end, then 3 sc over each of the next 23 row ends. That is 71 sc.
Join with sl st to the first sc.
Count: Each side has 73 sc between the corner ch-2 sps. That is 71 sc along the edge plus 1 sc from each corner group, so the corner sc are counted only once. Total: 292 sc and 4 corner ch-2 sps.
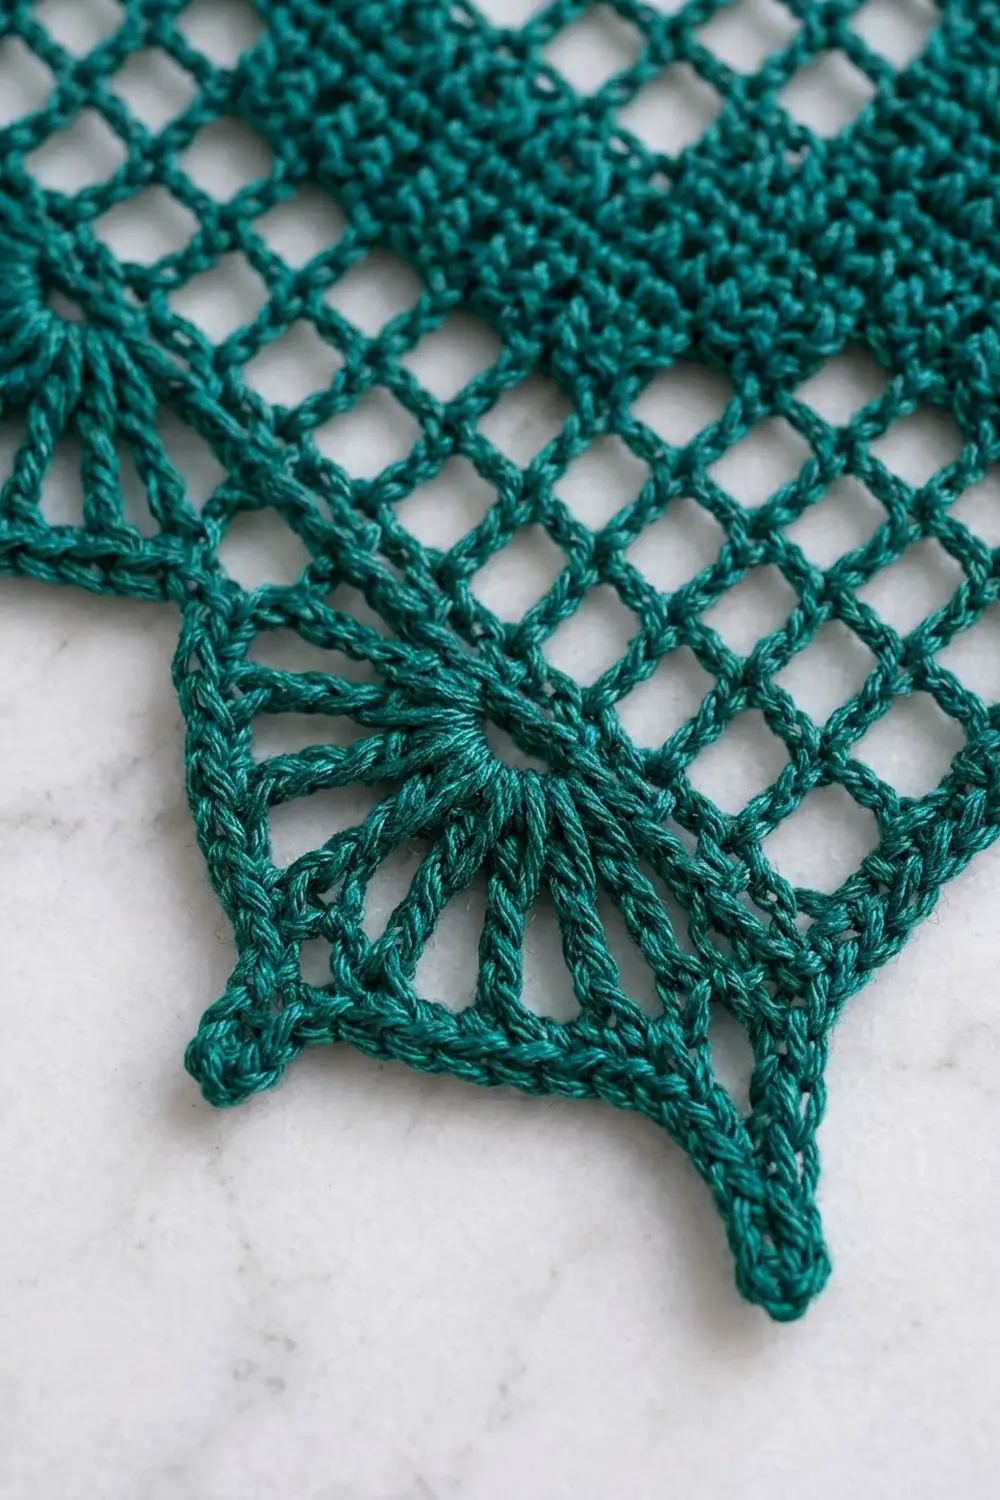
Round 2: Sl st in the next corner ch-2 sp. Ch 4 (counts as dc and ch 1), then (dc, ch 1) 7 times and dc in the same sp. That is your first corner fan.
Along the side: Sc in the next sc (st 1 of the side). Then work [sk 5 sc, fan in next sc, sk 5 sc, sc in next sc] 6 times. The last sc lands in st 73.
At the corner: Corner fan in the corner ch-2 sp.
Repeat around, leaving out the last corner fan. Join with sl st to the 3rd ch of the beginning ch-4.
Count per side: 7 sc and 6 fans. Total: 28 sc, 24 fans and 4 corner fans.
Round 3: Ch 1. Over the corner fan, sc in the first dc. (Sc in next ch-1 sp, sc in next dc) 3 times, then sc in next ch-1 sp. Work (sc, picot, sc) in the center (5th) dc. (Sc in next ch-1 sp, sc in next dc) 4 times. That gives 18 sc and 1 picot.
Along the side: Sl st in the next sc. Then for each fan: sc in the first dc, (sc in ch-1 sp, sc in dc) twice, sc in ch-1 sp, (sc, picot, sc) in the center (4th) dc, (sc in ch-1 sp, sc in dc) 3 times, and sl st in the next sc. That gives 14 sc and 1 picot per fan.
At each corner: Work the corner fan the same way as at the start.
Repeat around. Join with sl st to the first sc and fasten off.
Count: 408 sc (336 on the side fans + 72 on the corner fans), 28 picots and 28 sl st valleys.
Why the math works: One fan repeat uses 12 sc: sc, 5 skipped, fan st, 5 skipped. Six repeats use 72 sc, and the one extra sc closes the side, so 6 x 12 + 1 = 73. The corner fans sit in the ch-2 sps, which are not counted in the 73. That way each corner turns smoothly without bunching.
Leaf Sprig Appliqué
Large leaf (L): Ch 9.
1. First side: Working toward the stem, sc in the 2nd ch from hook, then hdc, dc, dc, dc, hdc, sc, and sl st in the last ch (8 sts).
2. Second side: Rotate and work along the other side of the chain toward the tip: sc, hdc, dc, dc, dc, hdc, sc (7 sts).
3. Tip: Ch 2, sl st in the tip ch.
4. Vein: Work 8 surface sl sts down the center line of the leaf back to the stem. This makes the raised vein.
The leaf is about 1 in (2.5 cm) long.
Small leaf (S): Ch 7.
1. First side: Sc in the 2nd ch from hook, then hdc, dc, hdc, sc, and sl st in the last ch (6 sts).
2. Second side: Sc, hdc, dc, hdc, sc (5 sts).
3. Tip: Ch 2, sl st in the tip ch.
4. Vein: Work 6 surface sl sts back to the base.
The leaf is about 3/4 in (1.9 cm) long.
Sprig:
Ch 41. This is 34 ch for the stem plus 7 ch for the top leaf.
Top leaf: Work the Small leaf on the last 7 ch made.
Stem: Sl st in each of the next 3 stem ch.
– Node 1: Sl st in next ch, then make S, sl st in the same stem ch, make S again, sl st in the same stem ch.
– Sl st in the next 5 ch.
– Node 2: Work the same as Node 1.
– Sl st in the next 5 ch.
– Nodes 3–5: Work the same as Node 1 but with L leaves, with 5 sl sts between nodes.
– Sl st in the remaining 6 ch.
Fasten off and leave a 20 in (50.8 cm) tail.
Count: 11 leaves: 5 S and 6 L. The stem is worked twice (chain plus sl st), which keeps it thick and firm. The finished sprig is about 6 in (15.2 cm) tall and 2 3/4 in (7.0 cm) wide.
Final Blocking
- Soak the panel and the sprig separately in cool water for 10 minutes, then press out the water in a towel.
- Pin the panel RS up to a 10 x 10 in (25.4 x 25.4 cm) square. Check that the mesh area measures 8 x 8 in (20.3 x 20.3 cm).
- Pin the grid lines straight, then pin out each picot so the tips are sharp.
- Shape the sprig with your fingers. Point the leaves upward and press each vein into a ridge. Do not pin the sprig flat.
- Spray both lightly with starch if you want a crisp finish, and let them dry completely.
- Place the sprig over columns 2–9, with the stem base on Row 3 and the tip on Row 21, curving slightly toward the letter.
- Use the tail to sew the stem and each leaf base and vein to the mesh posts with small hidden stitches. Leave the leaf edges free so they stand up.
Final Quality-Control Checklist
- The panel measures 8 x 8 in (20.3 x 20.3 cm), and the finished square is 10 x 10 in (25.4 x 25.4 cm).
- All 24 rows contain 24 squares.
- The G reads correctly from the RS, with the crossbar pointing inward.
- Each side has 6 fans plus the corner fans, and there are 28 picots in total.
- All four corners lie flat with no ruffling.
- The sprig is secure, with raised leaves and visible veins.
- All tails are woven in through solid blocks.
Troubleshooting
- The G is mirrored: You read the RS rows left to right. Check the direction at Row 5.
- The meshes are tall rectangles: Your dc are too tall. Change hooks or shorten your yarn-over.
- The border ruffles: Your fans are too loose. Use a hook 0.25 mm smaller for Rounds 2–3.
- The border cups: Make sure you worked 3 sc over each row end in Round 1.
- The fan count is off on a side: Count the Round 1 sc again. Each side must be 73.
- The leaves lie flat: Sew only along the veins and bases, not the edges.
Care
Hand wash in cool water with mild soap, roll it in a towel, and dry it flat, re-pinning the picots if needed. Do not tumble dry or wring.

Final Notes
The measurement chain is:
– Gauge: 3 meshes per inch (2.5 cm).
– Panel: 24 meshes = 8 in (20.3 cm).
– Border Round 1: 73 sc per side, which is 6 fan repeats of 12 sc plus 1.
– Border depth: 1 in (2.5 cm) per side, for a 10 in (25.4 cm) finished square.
If each checkpoint matches, the finished square will too.
Happy crocheting!