

These curtains are built from one simple shape: a pointed arch, repeated. Each motif is a gothic-window teardrop outlined with a thick ribbed band and finished with a small solid block at its base. The arches are stacked in columns and joined side by side, making an open lattice that filters light beautifully.
The pair shown uses one deep forest green, which looks rich and leafy against a sunny window. The style sits somewhere between boho macramé and old church window tracery: sculptural, airy and modern.
This pattern uses US crochet terms. Each finished panel is 31.5 in (80.0 cm) wide. It measures 80.75 in (205.1 cm) long from the bottom of the lowest blocks to the top of the header band, or 83.25 in (211.5 cm) including the hanging tabs.
You will make 77 arch motifs per panel and join them as you go into a grid 7 motifs wide and 11 motifs tall. Then you work a solid header band across the top points and add six thick loop tabs to slide onto a curtain rod. Make two panels for the pair.
Finished Size and Construction
- Finished panel size: 31.5 in (80.0 cm) wide x 80.75 in (205.1 cm) long; 83.25 in (211.5 cm) with tabs
- Skill level: Intermediate
- Terminology: US crochet terms
- Yarn weight: Bulky (#5) cotton or cotton blend
- Hook: 6 mm (US J-10)
- Number of pieces: 77 motifs per panel, 154 for the pair
- Layout: 7 motifs across x 11 motifs down per panel
- Motif size: 4.5 in (11.4 cm) wide x 6 in (15.2 cm) tall arch, plus a 1 in (2.5 cm) block, for a 7 in (17.8 cm) vertical repeat
- Size before border: 31.5 in (80.0 cm) x 77 in (195.6 cm)
- Border (header band) depth: 3.75 in (9.5 cm), plus 2.5 in (6.4 cm) tabs
Materials
Choose a smooth, firm bulky cotton or cotton blend. Cotton keeps the arch points crisp and hangs straight without stretching the way acrylic can over a long drop. Avoid fuzzy or highly textured yarns, because they hide the ribbed outline.
- Forest Green: 700 g / 980 m (about 1,072 yd) per panel, or 1,400 g / 1,960 m (about 2,144 yd) for the pair. These amounts assume a yarn of about 100 g / 140 m.
The amounts include about 15% extra to allow for gauge differences, swatching and weaving in ends.
Tools:
- 6 mm (US J-10) crochet hook
- Locking stitch markers
- Tapestry needle
- Scissors
- Measuring tape
- Blocking mats and rust-proof pins
- Spray bottle
- Curtain rod, up to 1.25 in (3.2 cm) in diameter
Abbreviations (US Terms)
- ch: chain
- sl st: slip stitch
- sc: single crochet
- dc: double crochet
- st(s): stitch(es)
- sp: space
- rnd: round
- RS: right side
Special stitch: joining sc (jsc). Take the hook out of the working loop. Insert the hook from front to back through the matching sc on the finished motif next to it, pick up the dropped loop and pull it through. Then insert the hook into the next stitch of the current motif and complete a normal sc. A jsc counts as 1 sc.
Gauge and Checkpoints
Gauge: 12 sc and 14 rows = 4 in (10.2 cm); 12 dc and 7 rows = 4 in (10.2 cm).
Make one complete motif before anything else and measure it flat without stretching. Check it at each stage:
- After Rnd 2: inner opening about 2.75 in (7.0 cm) wide x 4 in (10.2 cm) tall
- After Rnd 3: about 3.75 in (9.5 cm) x 5.25 in (13.3 cm)
- After Rnd 4: 4.5 in (11.4 cm) wide x 6 in (15.2 cm) tall
- After the block: 7 in (17.8 cm) total height
If your motif is too big, go down one hook size. If it is too small, go up one hook size. Being off by just 0.25 in (0.6 cm) per motif adds up to 1.75 in (4.4 cm) across the width and 2.75 in (7.0 cm) down the length, so correct your gauge now.
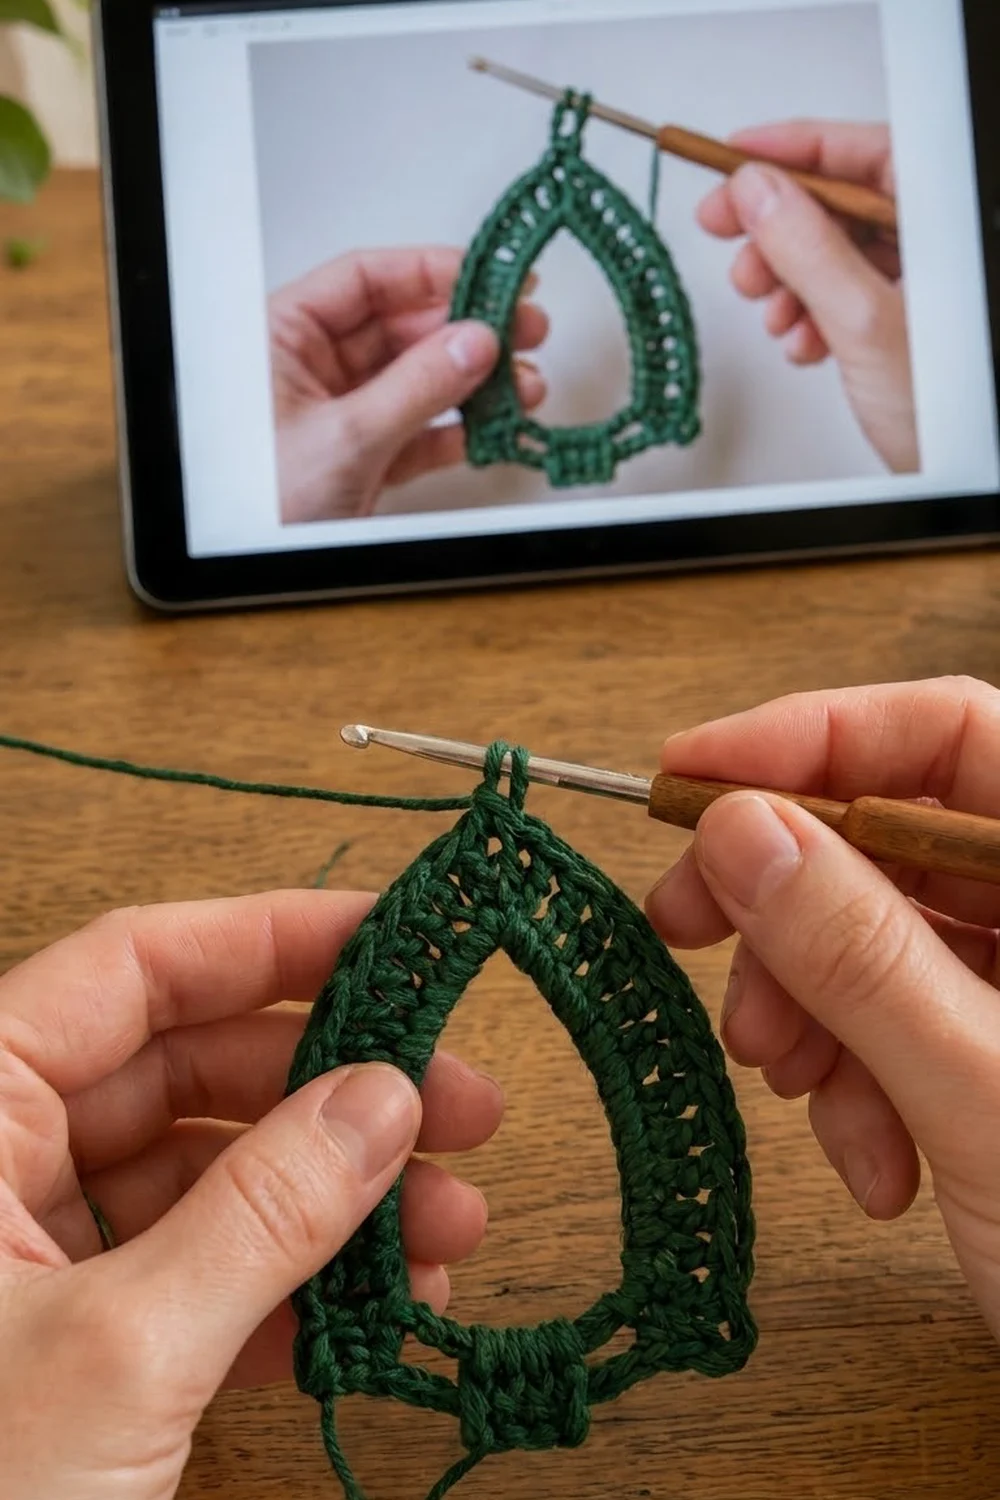
Arch Motif
The motif is worked in rounds around a chain ring. The inner edge stays the same length, while the outer edge grows only at the two shoulders. This pushes the top into a point and keeps the bottom flat.
Rnd 1: Ch 32, sl st in first ch to form a ring, taking care not to twist. (32 ch)
Rnd 2: Ch 1, sc in each ch around, sl st in first sc. Place a marker in the first sc; this is st 1, the top of the arch. (32 sc)
Rnd 3: Ch 3 (counts as dc), ch 2, dc in st 1 (point made). Dc in next 7 sts (side). 2 dc in each of next 5 sts (first shoulder). Dc in next 7 sts (bottom). 2 dc in each of next 5 sts (second shoulder). Dc in last 7 sts (side). Sl st in ch-2 sp to get in position for the next rnd.
Count: 32 sts worked 1 per stitch + 11 extra (1 at the point, 5 at each shoulder) = 43 dc and 1 ch-2 sp.
Rnd 4: Ch 1, (sc, ch 2, sc) in ch-2 sp. Sc in next 8 dc (side, including the second dc of the point). 2 sc in next dc, sc in next dc 5 times (shoulder). Sc in next 7 dc (bottom). Sc in next dc, 2 sc in next dc 5 times (shoulder). Sc in last 8 dc (side, ending in the beginning ch-3). Sl st in first sc.
Count: 43 sc worked 1 per stitch + 2 sc in the point sp + 10 extra at the shoulders = 55 sc and 1 ch-2 sp.
The middle 3 sts of each 15-st shoulder group are the widest point of the arch. These are the stitches you join at the sides.
Base block: Do not fasten off. Sl st along the side and shoulder to the 7 bottom sc, then sl st in the first bottom sc.
Row 1: Ch 1, sc in next 5 sc, leaving the last bottom sc unworked. Turn. (5 sc)
Rows 2–4: Ch 1, sc in each sc across. Turn. (5 sc)
Fasten off, leaving a 6 in (15.2 cm) tail. The block is about 1.67 in (4.2 cm) wide x 1 in (2.5 cm) tall. Weave in the starting tail now. Weave the final tail into the block after joining.
Make All Pieces and Layout
Each panel needs 77 motifs in Forest Green (154 for the pair). Work the first motif completely. Join every other motif as you go during its Rnd 4.
Work across the panel one row at a time, starting at the top. Keep the RS facing you.
Row 1:   A1  A2  A3  A4  A5  A6  A7     <- top (header attaches here)
Row 2:   B1  B2  B3  B4  B5  B6  B7
...
Row 11:  K1  K2  K3  K4  K5  K6  K7     <- bottom (blocks hang free)
Every motif sits directly below the one above it, so the columns stay perfectly straight.
Joining
All joins happen in Rnd 4 of the new motif. Stitch counts do not change.
Side joins: When you reach the shoulder that touches a finished motif on the left, work the middle 3 sts of that shoulder group as jsc into the middle 3 sts of the matching shoulder on that motif. Join one stitch to one stitch, in order, so the motifs meet at their widest point and the arch sides curve away freely above and below.
Top-to-bottom joins: For any motif in Rows 2–11, replace the point (sc, ch 2, sc) with: sc in ch-2 sp, ch 1, sl st in the center (3rd) sc of Row 4 of the block above, ch 1, sc in same ch-2 sp. The ch 1, sl st, ch 1 takes the place of the ch-2 sp, so the count stays at 55 sc and 1 point sp.
Tension: Keep the join loops the same height as your sc. Tight joins pucker the shoulders and pull the panel narrow. Loose joins make the grid sag.
Size checkpoint: After the first row of motifs, the strip should measure 31.5 in (80.0 cm) wide. After all 11 rows, the panel measures 31.5 in (80.0 cm) x 77 in (195.6 cm).
Border: Header Band and Tabs
The header is the only border. It turns the 7 separate points into a straight, solid top edge.
Border gauge: Same as the motif gauge, 12 sts = 4 in (10.2 cm).
Row 1 (RS): Join yarn in the 3rd sc before the point on motif A1. Ch 1, sc in same sc and next 2 sc, 3 sc in point sp, sc in next 3 sc (9 sc on A1). Ch 5, sc in 3rd sc before the point of next motif and next 2 sc, 3 sc in point sp, sc in next 3 sc. Repeat 5 more times. Turn.
Count: 7 motifs x 9 sc = 63 sc, plus 6 gaps x 5 ch = 30 ch, for 93 sts.
Row 2: Ch 1, sc in each sc and each ch across. Turn. (93 sc)
Rows 3–7: Ch 3 (counts as dc), dc in each st across. Turn. (93 dc)
Row 8: Ch 1, sc in each st across. Turn. (93 sc)
Row 9 (tab row): Ch 1, sc in first 3 sts. (Sc, ch 16, sc) in st 4 (tab 1). Sc in next 16 sts, (sc, ch 16, sc) in next st. Repeat from * twice more (tabs at sts 21 and 38). Sc in next 17 sts, (sc, ch 16, sc) in st 56. Sc in next 16 sts, (sc, ch 16, sc) in st 73. Sc in next 16 sts, (sc, ch 16, sc) in st 90. Sc in last 3 sts. Fasten off.
Count: 93 sts worked 1 per stitch + 6 extra sc = 99 sc and 6 ch-16 loops.
Tab trim: Join yarn at the base of each ch-16 loop and work 24 sc into the loop. Sl st at the base and fasten off. Each tab stands about 2.5 in (6.4 cm) tall.
Why the math works: At 3 sts per inch, 93 sts give 31 in (78.7 cm). The 5-ch bridges relax slightly under the weight of the panel, bringing the header to 31.5 in (80.0 cm) to match the motif width. The tabs sit 17 or 18 sts apart, with 3 sts at each outer edge, so the weight is spread evenly. The header depth comes from 2 sc rows, 5 dc rows and 1 sc row, for about 3.75 in (9.5 cm).
Final Blocking
- Weave in all ends securely, especially at the block tips, which take strain when the curtain hangs.
- Lay the panel flat on mats, RS up. Work in sections if you are short on space.
- Mist evenly with water until damp, not soaked.
- Pin each column straight, using a long ruler or tape as a guide.
- Pin the arch points and shoulders so each opening is a clean teardrop.
- Pin the header straight at 31.5 in (80.0 cm) wide.
- Let it dry completely before unpinning.
- Repeat for the second panel, matching its measurements exactly.
Final Quality-Control Checklist
- 77 motifs per panel, 7 across and 11 down
- Every motif has 55 sc in Rnd 4 and a 5-st, 4-row block
- All side joins sit at the widest point of the shoulders
- Every block is attached to the point directly below it
- The header has 93 sts in Rows 1–8 and 6 tabs in Row 9
- Each panel measures 31.5 in (80.0 cm) x 80.75 in (205.1 cm), plus tabs
- Both panels are within 0.5 in (1.3 cm) of each other in length
- No loose ends or visible knots
Troubleshooting
The arch top looks rounded, not pointed: Make sure the point in Rnd 3 is (dc, ch 2, dc) in one stitch, and work no increases on the straight sides.
The bottom of the arch bulges: The 7 bottom sts may have extra increases. Recount Rnd 3 and Rnd 4.
The motif cups or ruffles: The outer rounds are too loose compared with Rnd 1. Work the dc a little tighter, or chain the ring a little looser.
The panel is narrower than expected: The side joins are too tight. Redo them with looser join loops.
The header ripples: The 5-ch bridges are too long. Chain them more firmly.
The curtain gets longer after hanging: Some drop is normal with cotton. Block well, and choose a firmer, tightly plied yarn.
Care
Hand wash in cool water with a mild detergent, press out the water in a towel and dry flat. Never hang the curtain wet, because its weight will stretch the lattice.
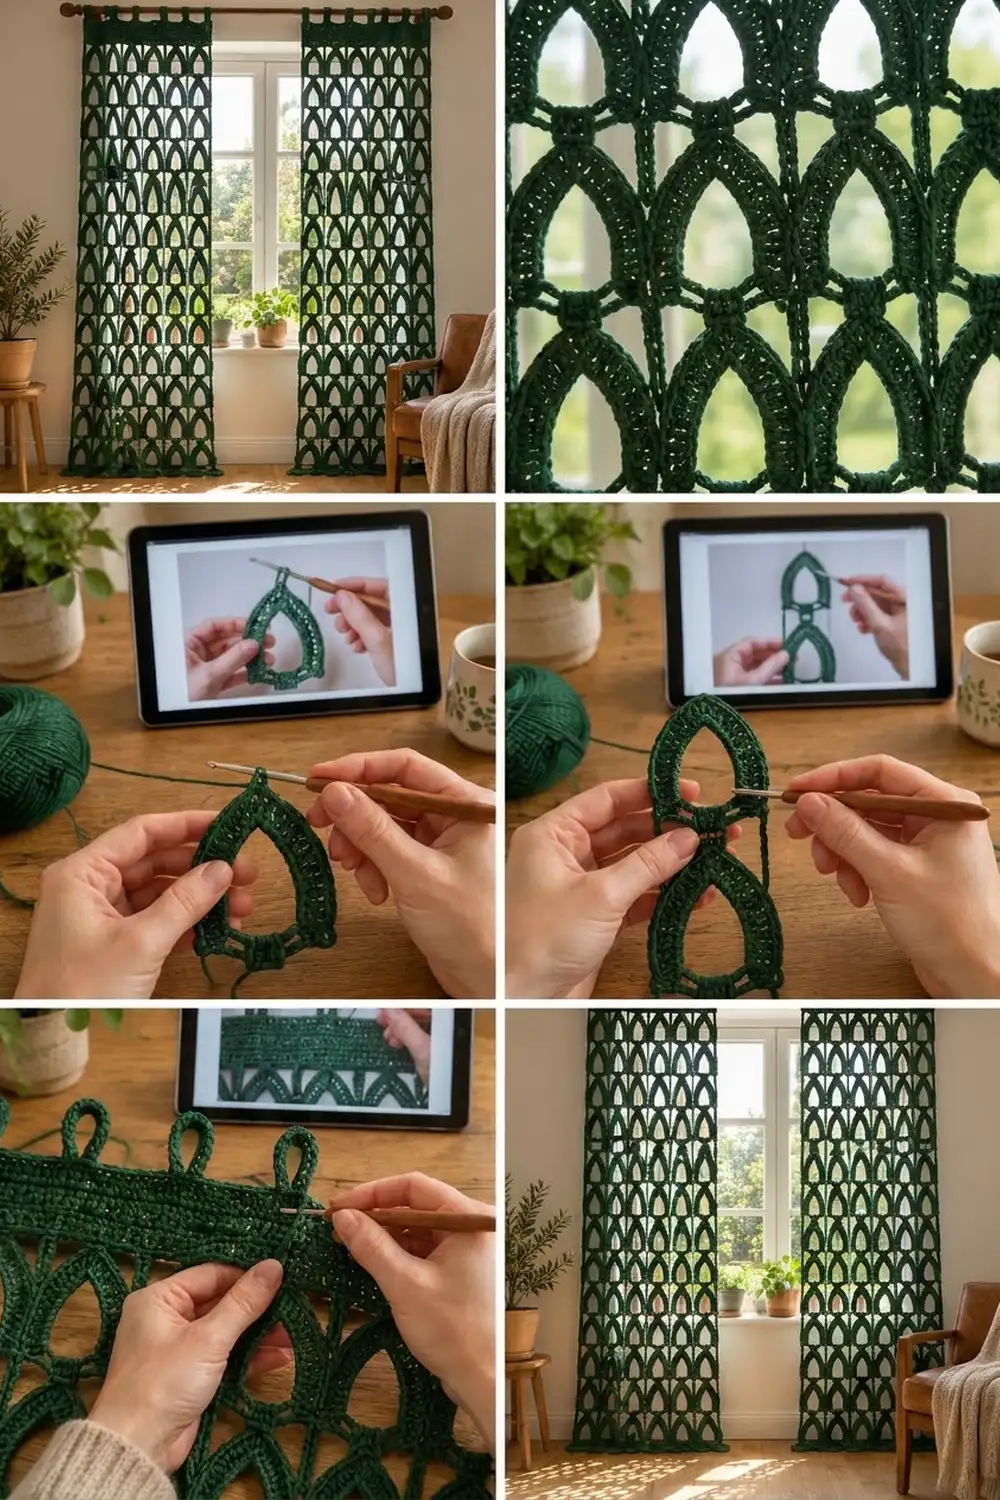
Final Notes
The whole curtain depends on one chain of measurements. Start with a 4.5 in (11.4 cm) x 7 in (17.8 cm) motif repeat. Seven motifs across give 31.5 in (80.0 cm), and 11 motifs down give 77 in (195.6 cm). A 3.75 in (9.5 cm) header brings the length to 80.75 in (205.1 cm), and 2.5 in (6.4 cm) tabs bring it to 83.25 in (211.5 cm). Get the first motif right, and every number after it falls into place.
Happy crocheting!