

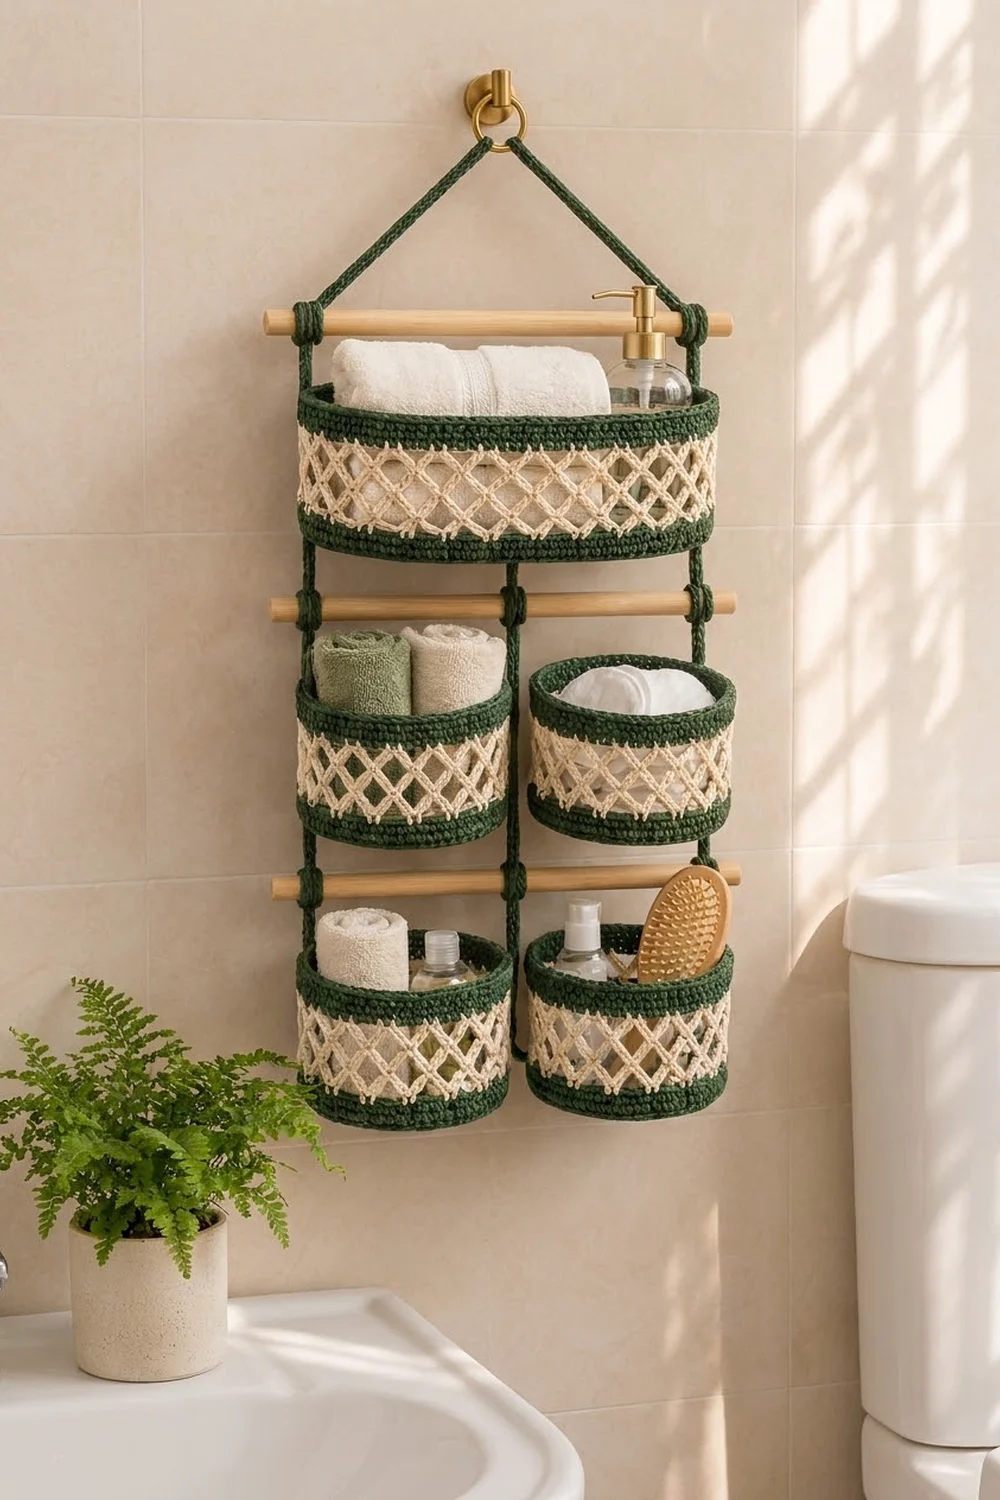
This hanging organizer is a set of five crocheted baskets joined into one tidy vertical unit. One long oval basket sits at the top, with two pairs of round baskets below, all held by green straps and three wooden dowels.
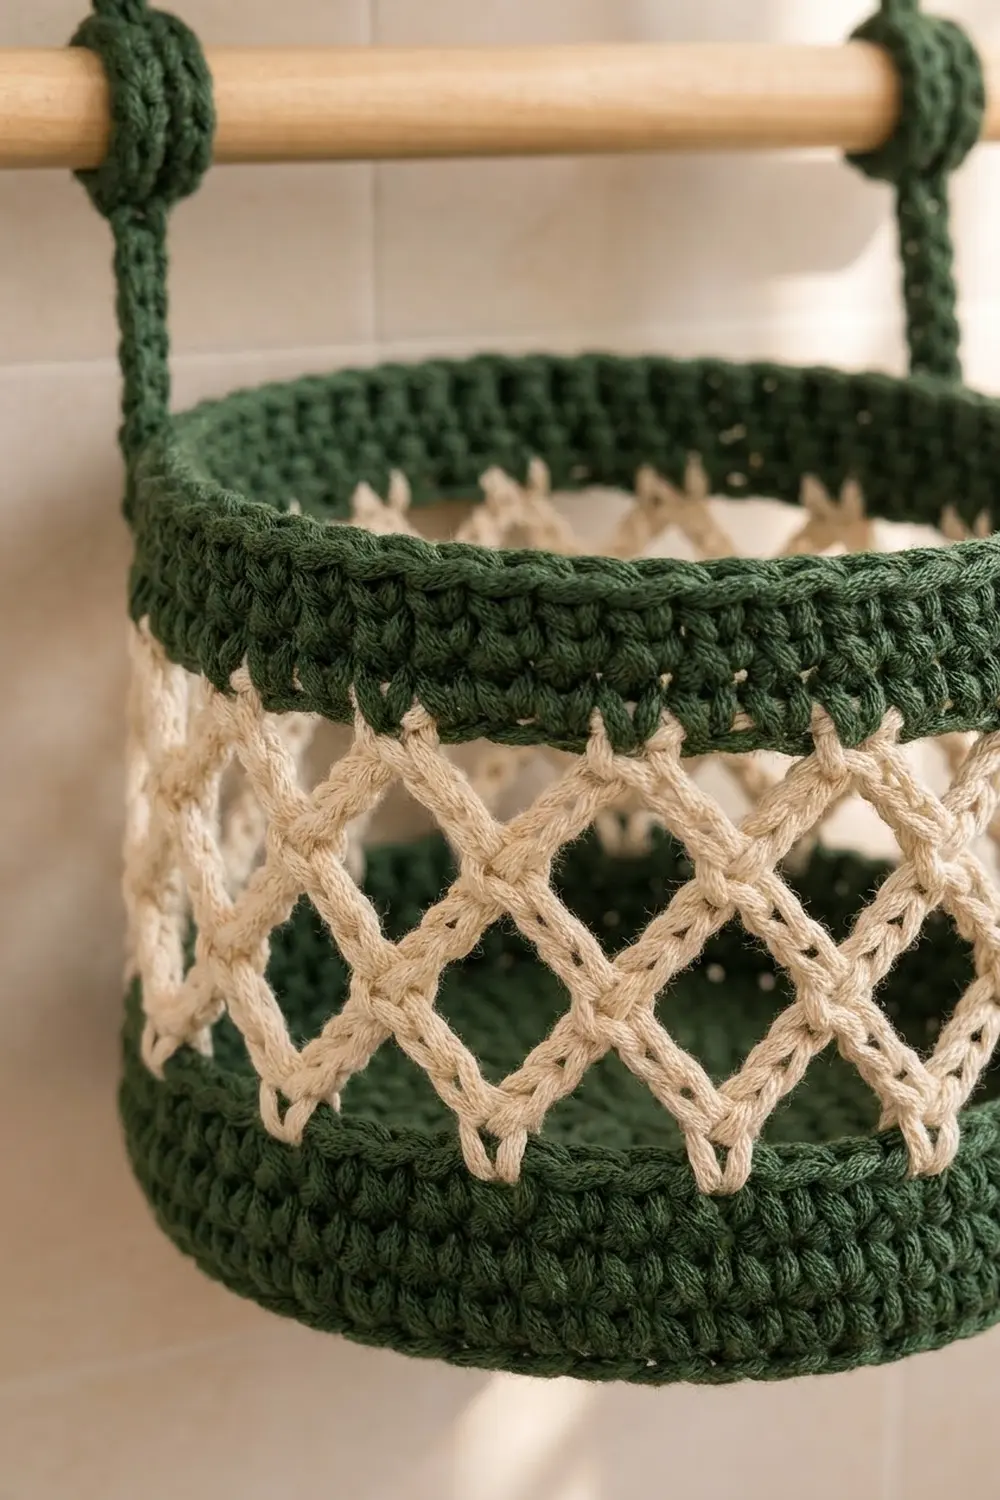
The colors are deep forest green and natural cream. Each basket has a solid green base and bottom band, an airy cream diamond-lattice wall, and a green rim with a twisted, rope-like edge. The look is fresh and natural, perfect for toilet paper, toiletries, and small towels.
This pattern uses US crochet terms. The finished organizer is 15 in (38.1 cm) wide between strap edges, 20 in (50.8 cm) from the top dowel to the bottom of the lowest baskets, and about 29 in (73.7 cm) tall including the hanger.
You will crochet five baskets from the base up in joined rounds, then make four flat straps. The baskets are sewn to the straps, the dowels slide through strap tunnels or are lashed in place, and a hanger strap runs through a brass ring.
Finished Size and Construction
- Organizer size: 15 in (38.1 cm) wide, 20 in (50.8 cm) dowel-to-bottom, about 29 in (73.7 cm) with hanger
- Skill level: Intermediate
- Terminology: US
- Yarn weight: Worsted (#4) cotton
- Hook: 4.5 mm (US 7)
- Number of pieces: 9 crocheted (1 oval basket, 4 round baskets, 2 side straps, 1 center strap, 1 hanger strap)
- Layout: 3 tiers: 1 oval basket on top, 2 round baskets in each lower tier
- Piece size: Round basket 6 in (15.2 cm) across x 5 in (12.7 cm) tall; oval basket 13 x 6 in (33.0 x 15.2 cm) x 5 in (12.7 cm) tall
- Size before border (rim): Wall 4 in (10.2 cm) tall
- Border (rim) depth: 1 in (2.5 cm)
Materials
Choose a firm, smooth worsted-weight cotton, roughly 154 m per 100 g. Cotton holds its shape, tolerates damp bathrooms, and shows the lattice clearly.
- Forest green: 180 g, about 277 m (303 yd)
- Natural cream: 65 g, about 100 m (109 yd)
These amounts include a margin of about 20%.
Tools:
- 4.5 mm (US 7) crochet hook
- Tapestry needle
- 8 stitch markers
- 3 wooden dowels, 17 in (43.2 cm) long, 3/4 in (1.9 cm) diameter
- 1 brass ring, about 1.5 in (3.8 cm) across
- Wall hook with screw and anchor
- Scissors and tape measure
Abbreviations (US Terms)
- ch – chain
- sl st – slip stitch
- sc – single crochet
- dc – double crochet
- inc – 2 sc in the same stitch
- BLO – back loop only
- sk – skip
- st(s) – stitch(es)
- rev sc – reverse single crochet
Special stitch – Reverse sc (crab stitch): Working left to right (right-handers), insert hook into the next stitch to the right, yarn over, pull up a loop, yarn over, pull through both loops. This creates the twisted, rope-like rim.
Round notes: Rounds are joined with sl st. The ch 1 at the start of a round does not count as a stitch.
Gauge and Checkpoints
Gauge: 16 sc and 16 rounds = 4 in (10.2 cm). In the lattice, 2 mesh rounds = 1 in (2.5 cm) of height.
Make one round basket first as your test piece. Measure at each checkpoint:
- Round 6 of base: 3 in (7.6 cm) across
- Round 12 of base: 6 in (15.2 cm) across
- After Round 16: green bottom band 1 in (2.5 cm) tall
- After Round 22: wall 4 in (10.2 cm) tall
- After Round 26: basket 5 in (12.7 cm) tall
Too big? Go down to a 4 mm (US G-6) hook. Too small? Go up to a 5 mm (US H-8) hook. If the lattice is too tall but the base is right, use ch 4 instead of ch 5 in the mesh rounds and keep all counts the same.
Round Basket (Make 4)
Base
With green, make a magic ring.
Rnd 1: Ch 1, 6 sc in ring, sl st to first sc. (6)
Rnd 2: Ch 1, inc in each st around, sl st to first sc. (12)
Rnd 3: Ch 1, *sc 1, inc; rep from * around, join. (18)
Rnds 4–12: Ch 1, *sc in next (n − 2) sts, inc; rep from * 6 times around, join, where n is the round number. Each round adds 6 sts, so Rnd n has 6 x n sts.
- Rnd 4: 24
- Rnd 6: 36 (checkpoint: 3 in / 7.6 cm)
- Rnd 9: 54
- Rnd 12: 72 (checkpoint: 6 in / 15.2 cm)
The base must lie flat. If it ruffles, check your increases; if it cups, your tension is too tight.
Bottom Band
Rnd 13: Ch 1, sc BLO in each st around, join. (72) This turns the wall upward.
Rnds 14–16: Ch 1, sc in each st around, join. (72)
Change to cream on the final sl st of Rnd 16. Fasten off green.
Lattice Wall
Rnd 17 (mesh foundation): Ch 1, sc in first st, *ch 5, sk 3 sts, sc in next st; rep from * 16 more times, ch 2, sk last 3 sts, dc in first sc. (18 loops) The ch 2 plus dc forms the 18th loop and leaves your hook at its center.
Rnds 18–21: Ch 1, sc around the dc post under hook, *ch 5, sc in next ch-5 loop; rep from * 16 more times, ch 2, dc in first sc. (18 loops)
Rnd 22: Ch 1, sc around the dc post under hook, *ch 5, sc in next ch-5 loop; rep from * 16 more times, ch 5, sl st to first sc. (18 sc, 18 loops)
The chains stagger each round, so the loops form an open diamond lattice. Checkpoint: the wall is 4 in (10.2 cm) tall.
Continue directly with the rim below.
Oval Basket (Make 1)
Base
With green, ch 31.
Rnd 1: 3 sc in 2nd ch from hook (end A), sc in next 28 ch, 3 sc in last ch (end B), rotate and work along the underside of the chain, sc in next 28 ch, sl st to first sc. (62)
Each round now has two straight sides of 28 sts and two curved ends.
Rnds 2–12: Ch 1, *[sc in next (n − 2) sts, inc] 3 times, sc in next 28 sts; rep from * once more, join, where n is the round number. Each round adds 3 sts per end, so Rnd n has 56 + (6 x n) sts.
- Rnd 2: 68
- Rnd 6: 92 (checkpoint: 10 x 3 in / 25.4 x 7.6 cm)
- Rnd 9: 110
- Rnd 12: 128 (checkpoint: 13 x 6 in / 33.0 x 15.2 cm)
If the ends drift out of line with the straight sides, place a marker at each first increase and recheck each round.
Bottom Band and Lattice
Work exactly as for the Round Basket, Rnds 13–22, with these counts:
- Rnds 13–16: 128 sts each
- Rnd 17: Ch 1, sc in first st, *ch 5, sk 3, sc in next; rep from * 30 more times, ch 2, sk last 3, dc in first sc. (32 loops)
- Rnds 18–21: 32 loops each
- Rnd 22: 32 sc, 32 loops, closed with ch 5 and sl st
Top Rim (Border)
The rim is the border for each basket. Work it the same way on all five baskets, directly after Rnd 22.
Border gauge: 4 sc and 4 rounds per inch (2.5 cm), matching the base.
Rnd 23 (cream conversion round): Ch 1, sc in same sc as join, 3 sc in next ch-5 loop, *sc in next sc, 3 sc in next ch-5 loop; rep from * around, sl st to first sc.
- Round basket: 18 sc (1 per existing sc) + 54 sc (3 per loop) = 72
- Oval basket: 32 sc (1 per existing sc) + 96 sc (3 per loop) = 128
Change to green on the final sl st. Fasten off cream.
Rnds 24–25: Ch 1, sc in each st around, join. (72 / 128)
Rnd 26: Ch 1, rev sc in each st around, sl st to first st. (72 / 128) Fasten off and weave in all ends.
Why the math works: Rnd 17 used one sc plus 3 skipped sts per loop, which is 4 sts per loop: 18 x 4 = 72 and 32 x 4 = 128. Rnd 23 puts back exactly 4 sts per loop (1 sc + 3 sc), so the rim matches the base count and the wall stays straight instead of flaring out or pulling in. The rim is 1 in (2.5 cm) deep: Rnd 23 adds 0.25 in (0.6 cm) and Rnds 24–26 add 0.75 in (1.9 cm).
Straps
All straps are worked flat in green rows, 4 sc wide.
Foundation: Ch 5, sc in 2nd ch from hook and in each ch across. (4) This is Row 1.
Every following row: Ch 1, turn, sc in each st across. (4)
Each strap is 1 in (2.5 cm) wide, and 4 rows = 1 in (2.5 cm).
- Side straps (make 2): 96 rows, 24 in (61.0 cm)
- Center strap (make 1): 68 rows, 17 in (43.2 cm)
- Hanger strap (make 1): 120 rows, 30 in (76.2 cm)
Make All Pieces
- Green: all bases, bands, rims, and 4 straps
- Cream: all lattice walls and conversion rounds
- Totals: 1 oval basket, 4 round baskets, 2 side straps, 1 center strap, 1 hanger strap
Layout grid:
          [ brass ring ]
          /            \
     hanger strap   hanger strap
=========== DOWEL 1 ===========
|S| [ OVAL  13 x 6 in      ] |S|
=========== DOWEL 2 ===========
|S| [ ROUND ] |C| [ ROUND ] |S|
=========== DOWEL 3 ===========
|S| [ ROUND ] |C| [ ROUND ] |S|
S = side strap, C = center strap.
Joining
Width math: 1 in strap + 13 in oval + 1 in strap = 15 in (38.1 cm). Below, 1 in + 6 in + 1 in + 6 in + 1 in = 15 in (38.1 cm). The tiers line up.
Tunnels: Fold the top 16 rows (4 in / 10.2 cm) of each side strap around Dowel 1 and whipstitch the end to the strap. Fold the top 16 rows of the center strap around the middle of Dowel 2 and sew it the same way.
Marking rows: On each side strap, count down from the tunnel fold and mark rows 5, 24, 28, 33, 52, 56, 59, and 78. On the center strap, count from its fold. Its basket zones are rows 33–52 and 59–78, and Dowel 3 sits at row 56.
Lashing: Lay Dowel 2 behind the side straps at row 28 and Dowel 3 behind all straps at row 56. Wrap green yarn 8 times around each strap and dowel, then knot on the inside.
Sewing baskets: Whipstitch with green, stitch to stitch. Strap rows and basket rounds share the same gauge, so join 1 strap row to 1 basket round.
- Oval: Sew each end to a side strap at rows 5–24.
- Upper round pair: Rows 33–52; sew the outer side to the side strap and the inner side to the center strap.
- Lower round pair: Rows 59–78, sewn the same way.
On each basket, sew the 4 rounds of the bottom band and the 4 rounds of the rim firmly. Tack the lattice section with two small stitches at its center.
Tension advice: Sew snugly but do not pucker the strap. The basket walls should hang straight, not tilt.
Hanger: Fold 16 rows at each end of the hanger strap around Dowel 1, just outside the side straps, and sew. Thread the center through the brass ring and sew 4 rows closed under the ring.
Size checkpoint: 15 in (38.1 cm) wide between strap edges; 20 in (50.8 cm) from Dowel 1 to the strap ends.
Final Blocking
- Lightly mist each basket with water before assembly.
- Fill each basket with a towel or a container of the right size to square the walls.
- Pin the lattice so the diamonds are even and open.
- Lay the straps flat and pin them to 1 in (2.5 cm) wide and their full lengths.
- Let everything dry completely, about 24 hours.
- Assemble, hang, and adjust the baskets so the rims are level.
Final Quality-Control Checklist
- Round bases 6 in (15.2 cm) across; oval base 13 x 6 in (33.0 x 15.2 cm)
- All baskets 5 in (12.7 cm) tall
- 72 sts in Rnds 12–16 and 23–26 of the round baskets
- 128 sts in the same rounds of the oval basket
- 18 or 32 loops in every mesh round
- Rev sc rim even all around
- Straps 1 in (2.5 cm) wide and the correct lengths
- All three dowels level
- All ends woven in securely
Troubleshooting
- Wall flares outward: Too many sts in Rnd 23. Recount: 4 per loop.
- Wall leans in: Mesh chains are too tight. Loosen them, or go up a hook size for the mesh only.
- Lattice twists: You missed a loop. Count loops every round.
- Base cups: Tension is too tight or increases were missed. Recount.
- Organizer hangs crooked: Recount the marked rows on both side straps.
- Rim curls: Work the rev sc more loosely.
Care
Hand wash in cool water and lay flat to dry. Reshape the baskets while damp and keep them away from direct heat.
Final Notes
The measurements build in a simple chain. The round bases are 6 in (15.2 cm) across and the oval base is 13 x 6 in (33.0 x 15.2 cm). A 1 in (2.5 cm) bottom band, a 3 in (7.6 cm) lattice, and a 1 in (2.5 cm) rim make each basket 5 in (12.7 cm) tall. Straps at 4 rows per inch hold everything at 15 in (38.1 cm) wide and 20 in (50.8 cm) deep. Check your gauge on the first basket, and the rest will follow.
Happy crocheting!