

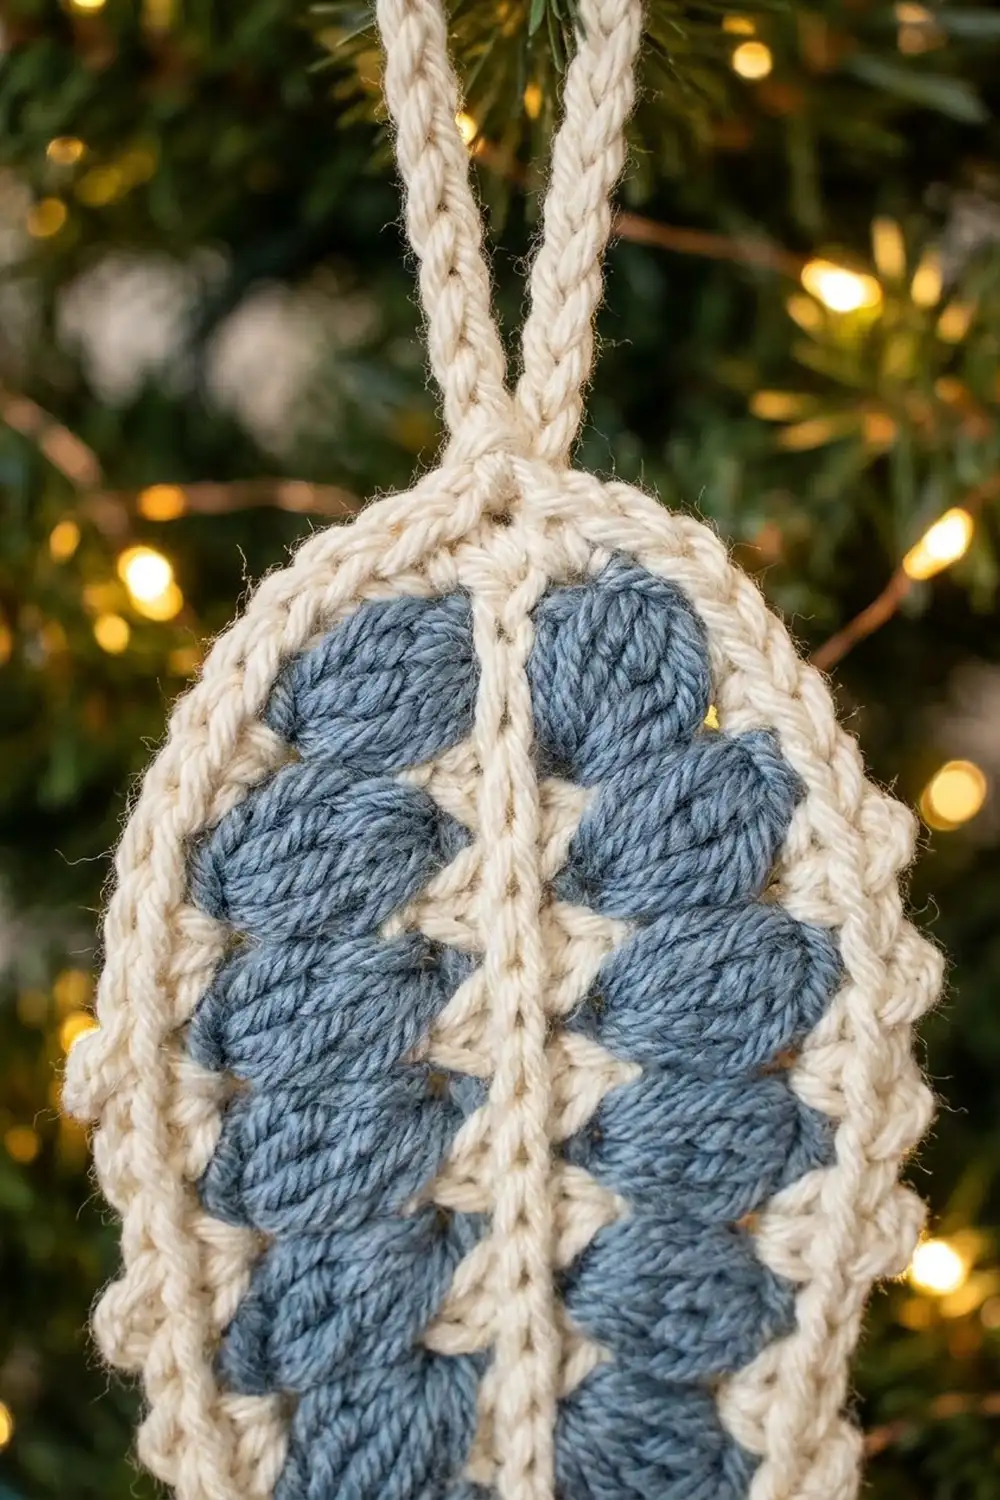
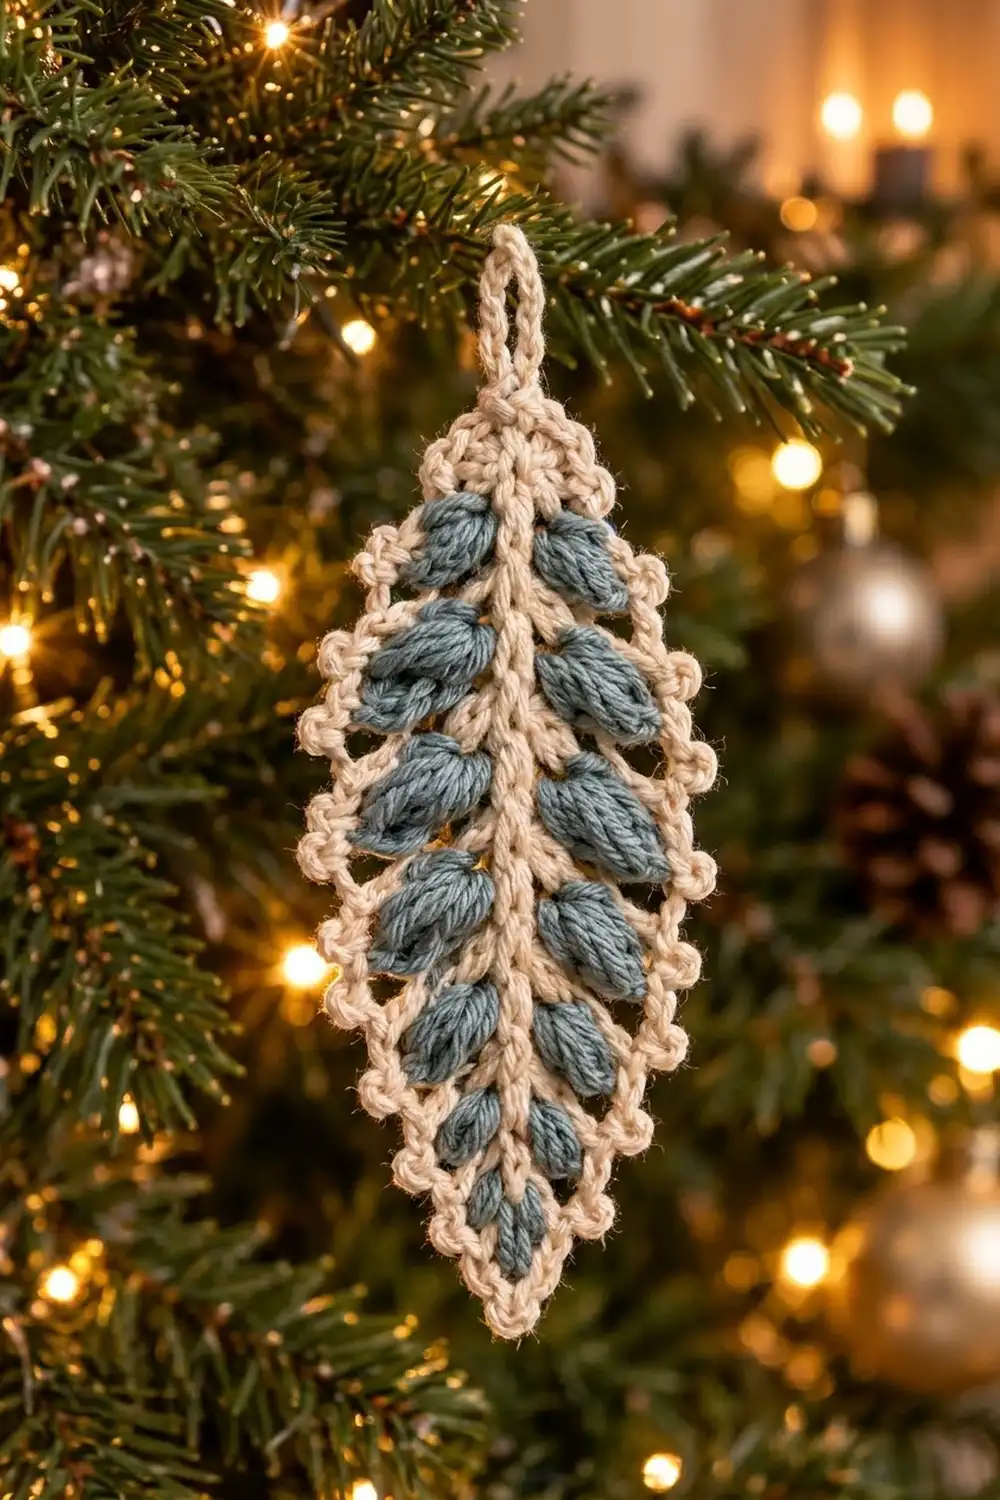
The Frosted Fern Leaf Ornament is a small leaf made in one piece. Plump dusty blue puff-stitch leaflets sit in two neat rows along a raised cream center vein. A cream outline and a dainty picot edge frame the whole leaf, and a chain loop at the top makes it ready to hang.
The palette is calm and wintry: soft cream with a muted blue-grey that looks like frosted eucalyptus. It suits a natural, Scandinavian-style tree, and it works just as well as a gift topper or a garland charm.
This pattern uses US crochet terms. The finished ornament measures 6.5 in (16.5 cm) long and 2.75 in (7.0 cm) wide, not counting the hanging loop. With the loop, it is about 7.75 in (19.7 cm) long.
Construction is simple and worked in four rounds. You single crochet around both sides of a foundation chain to make the cream spine. Next, you work blue puff stitches into that spine to form the leaflets. A cream round then outlines every leaflet, and a final picot round adds the border and the hanging loop.
Finished Size and Construction
- Finished size: 6.5 in x 2.75 in (16.5 cm x 7.0 cm), excluding loop
- Length with loop: about 7.75 in (19.7 cm)
- Skill level: Easy-intermediate
- Terminology: US crochet terms
- Yarn weight: Worsted (#4), cotton or cotton blend
- Hook: 4.0 mm (G-6)
- Number of pieces: 1 (single motif)
- Layout: One leaf, worked in rounds around a foundation chain
- Piece size after Rnd 3 (before border): 6 in x 2.25 in (15.2 cm x 5.7 cm)
- Border depth: 0.25 in (0.6 cm) per edge, plus picots
Materials
Yarn: Use a smooth worsted-weight cotton or cotton blend so the stitches are crisp and the puffs are well defined. Fuzzy acrylic will hide the cream outlines between leaflets. Choose a cream with a warm tone and a blue with a grey undertone for the frosted look.
- Color A – Cream/Ecru: 8 g, about 16 m
- Color B – Dusty Blue-Grey: 6 g, about 12 m
Both quantities include a margin of about 25% for your gauge swatch and yarn tails.
Tools:
- 4.0 mm (G-6) crochet hook
- Tapestry needle
- Scissors
- 4 stitch markers
- Blocking mat and rust-proof pins
- Spray bottle with cool water
- Ruler or tape measure
Abbreviations (US Terms)
- ch – chain
- sc – single crochet
- sl st – slip stitch
- st(s) – stitch(es)
- sk – skip
- sp – space
- yo – yarn over
- rnd – round
Special stitches:
- Small puff (S): (Yo, insert hook in st, yo and pull up a loop to about 0.5 in / 1.3 cm) 3 times, yo and pull through all 7 loops, ch 1 to close.
- Medium puff (M): As above, but pull up loops 4 times (9 loops on hook), yo and pull through all 9 loops, ch 1 to close.
- Large puff (L): As above, but pull up loops 5 times (11 loops on hook), yo and pull through all 11 loops, ch 1 to close.
- Picot: Ch 3, sl st in 3rd ch from hook.
The closing ch 1 on a puff is not counted as a separate stitch. Each puff counts as 1 stitch.
Gauge and Checkpoints
Gauge: 16 sc and 18 sc rows = 4 in (10.2 cm) with a 4.0 mm hook.
Because this is a small single piece, the ornament is your best gauge test. Make the first one and measure it at each checkpoint below.
- After Rnd 1: 5 in x 0.5 in (12.7 cm x 1.3 cm)
- After Rnd 2: 5.5 in x 1.75 in (14.0 cm x 4.4 cm)
- After Rnd 3: 6 in x 2.25 in (15.2 cm x 5.7 cm)
- After Rnd 4: 6.5 in x 2.75 in (16.5 cm x 7.0 cm)
If your piece is too big: Change to a 3.75 mm (F-5) hook and pull your puff loops up a little shorter.
If your piece is too small: Change to a 4.5 mm (7) hook.
The length is set by the foundation chain, so check it closely after Rnd 1. A spine that is 0.25 in (0.6 cm) too long becomes a leaf that is noticeably too long.
Pattern
Rnd 1 – Center Spine (Color A, Cream)
With Color A, ch 21.
Sc in 2nd ch from hook, sc in next 18 ch, 3 sc in last ch (this is the bottom tip). Working along the opposite side of the foundation, sc in next 18 ch, 2 sc in last ch (the same ch as the first sc). Join with a sl st to the first sc.
Stitch count: 42 sc. That is 18 sc along each long side, plus a 3-sc group at the top and a 3-sc group at the bottom tip.
Place a marker in the center sc of the top group (the last sc you made) and another in the center sc of the bottom tip group (the 2nd of the 3 sc worked into the last ch).
Fasten off Color A, leaving a 6 in (15.2 cm) tail.
Checkpoint: 5 in x 0.5 in (12.7 cm x 1.3 cm). This round becomes the raised cream vein down the middle of the leaf.
Rnd 2 – Leaflets (Color B, Dusty Blue-Grey)
Join Color B with a sl st in the marked center sc at the top. Ch 1, sc in same st, sc in next st. You are now at the start of Side A.
Side A (top to tip): Each puff is followed by (ch 1, sk next st).
M, ch 1, sk 1; L, ch 1, sk 1; L, ch 1, sk 1; L, ch 1, sk 1; L, ch 1, sk 1; M, ch 1, sk 1; M, ch 1, sk 1; S, ch 1, sk 1; S, ch 1, sk 1.
This makes 9 puffs and uses all 18 sts along the side.
Bottom tip: Sc in next st, (sc, ch 2, sc) in marked center tip st, sc in next st.
Side B (tip to top): Work the same repeat, with the sizes in reverse order.
S, ch 1, sk 1; S, ch 1, sk 1; M, ch 1, sk 1; M, ch 1, sk 1; L, ch 1, sk 1; L, ch 1, sk 1; L, ch 1, sk 1; L, ch 1, sk 1; M, ch 1, sk 1.
Top: Sc in last st (the first sc of the top 3-sc group). Join with a sl st to the first sc.
Stitch count: 25 sts. That is 18 puffs and 7 sc, plus 18 ch-1 sps and 1 ch-2 sp at the tip.
Fasten off Color B, leaving a 6 in (15.2 cm) tail.
Checkpoint: 5.5 in x 1.75 in (14.0 cm x 4.4 cm).
The puffs will stand up from the spine. Gently push each one so it lies flat and leans slightly toward the top of the leaf. This gives the swept-back look of the leaflets.
Rnd 3 – Leaflet Outline (Color A, Cream)
This is a conversion round. Each existing stitch gets 1 sc, and each ch-1 sp gets 2 sc.
Join Color A with a sl st in the center top sc of Rnd 2 (the first sc of the round). Ch 1, 3 sc in same st, sc in next sc.
Side A: (Sc in top of next puff, 2 sc in next ch-1 sp) 9 times. That is 27 sc.
Tip: Sc in next 2 sc, (sc, ch 2, sc) in ch-2 sp, sc in next 2 sc. That is 6 sc.
Side B: (Sc in top of next puff, 2 sc in next ch-1 sp) 9 times. That is 27 sc.
Top: Sc in last sc. Join with a sl st to the first sc.
Stitch count: 65 sc, plus a ch-2 sp at the tip.
- Worked 1 per existing stitch: 25 sc (18 puffs + 7 sc)
- Added in ch-1 spaces: 36 sc
- Extra at the top center (3 sc in 1 st): 2 sc
- Added in the tip ch-2 sp: 2 sc
- Total: 25 + 36 + 2 + 2 = 65
Here is the same total by position: 5 sc across the top, 27 sc on each side, and 6 sc at the tip.
The 2 sc in each ch-1 sp pull the cream down between the leaflets. This makes the cream outline you see around every blue puff.
Do not fasten off.
Checkpoint: 6 in x 2.25 in (15.2 cm x 5.7 cm). This is your size before the border.
Rnd 4 – Picot Border and Hanging Loop (Color A)
Border gauge: Each 3-sc repeat with 1 picot measures about 0.67 in (1.7 cm) along the edge, matching the spacing of one leaflet.
Ch 1, sc in same st as join. This is the first of the 3 sc worked into the top center.
Top and loop: In the next st (the center top st), work (sc, ch 12, sc). The ch 12 is the hanging loop. Then sc in next 2 sts.
Side A: (Sc in next 2 sts, picot, sc in next st) 9 times. That is 27 sc and 9 picots.
Tip: Sc in next 3 sts, (sc, picot, sc) in ch-2 sp, sc in next 3 sts. That is 8 sc and 1 picot.
Side B: (Sc in next 2 sts, picot, sc in next st) 9 times. That is 27 sc and 9 picots.
Top: Sc in last st. Join with a sl st to the first sc. Fasten off, leaving a 6 in (15.2 cm) tail.
Stitch count: 68 sc, 19 picots, and 1 ch-12 loop.
- Worked 1 per existing stitch: 65 sc
- Extra at the top center (loop stitch worked twice): 1 sc
- Added in the tip ch-2 sp: 2 sc
- Total: 65 + 1 + 2 = 68
Why the math works: Each side of Rnd 3 has exactly 27 sts, and 27 ÷ 3 = 9. So the 3-stitch picot repeat fits each side with nothing left over. The 9 picots per side also match the 9 leaflets per side, so every bump on the edge lines up with a leaflet. The tip’s 6 sc split evenly, 3 on each side of the ch-2 sp, so the tip picot sits exactly at the point. At the top, the 5 sts become 6 sc, with the loop in the middle stitch, so the loop hangs straight in line with the center vein.
Checkpoint: 6.5 in x 2.75 in (16.5 cm x 7.0 cm), excluding the loop. The loop adds about 1.25 in (3.2 cm).
Weaving In Ends
Weave each tail into stitches of its own color. Run blue tails behind the puffs and cream tails along the spine or the outline round. Go in one direction, then back the other way for 1 in (2.5 cm) before trimming.
Final Blocking
- Lightly mist the ornament with cool water until it is damp, not soaked.
- Lay it right side up on the blocking mat.
- Pin the top center and the bottom tip so the spine is straight and measures 6.5 in (16.5 cm) from top edge to tip picot.
- Pin the widest point, at the 3rd and 4th large leaflets, to 2.75 in (7.0 cm) across.
- Ease the sides into a smooth taper toward the tip and a gentle curve at the top.
- Pin each picot open with a single pin if you want a crisp scalloped edge.
- With your fingertips, push each puff so it leans slightly toward the top of the leaf.
- Pin the hanging loop flat and straight above the center vein.
- Let it dry completely, usually 6–8 hours, before unpinning.
Final Quality-Control Checklist
- 9 puffs on each side, 18 in total
- Puff sizes taper: largest in the middle, smallest near the tip
- Cream spine straight and centered
- Cream outline visible between every pair of neighboring leaflets
- 9 picots per side, plus 1 at the tip (19 total)
- Hanging loop centered at the top
- Size 6.5 in x 2.75 in (16.5 cm x 7.0 cm)
- All ends woven into matching colors, with no blue showing on cream areas
Troubleshooting
The leaf curves like a banana. Your Rnd 1 tension was uneven between the two sides. Block firmly with the spine pinned straight. On the next ornament, keep the sc on both sides of the chain the same size.
The puffs look flat or messy. Pull every loop up to the same height before closing, and always close with ch 1. A slightly smaller hook can help.
The leaf ruffles along the sides. Your Rnd 3 is too loose. Work it with the next smaller hook, but keep 2 sc in each ch-1 sp.
The leaf cups or puckers. Your Rnd 3 or Rnd 4 is too tight. Go up one hook size for those rounds only.
The tip is blunt. Check that you worked (sc, ch 2, sc) at the tip in Rnds 2 and 3 and placed the picot in the ch-2 sp in Rnd 4.
The picots don’t line up with the leaflets. Recount Rnd 3. Each side must have exactly 27 sc.
The loop is crooked. The loop must go in the 2nd stitch of Rnd 4, which is the center of the top 3-sc group from Rnd 3.
Care
Spot clean with cool water and mild soap, then reshape and dry flat. Store flat or hung in a box between seasons so the puffs keep their shape.
Final Notes
Here is the measurement chain. A 21-chain spine gives 5 in (12.7 cm). The puff round brings the leaf to 5.5 in x 1.75 in (14.0 cm x 4.4 cm). The outline round brings it to 6 in x 2.25 in (15.2 cm x 5.7 cm). The picot border finishes it at 6.5 in x 2.75 in (16.5 cm x 7.0 cm).
The stitch counts follow the same chain: 42, then 25, then 65, then 68. If each checkpoint matches, the finished leaf will match too.
Make one in an evening, then make a few more for the tree.
Happy crocheting!