

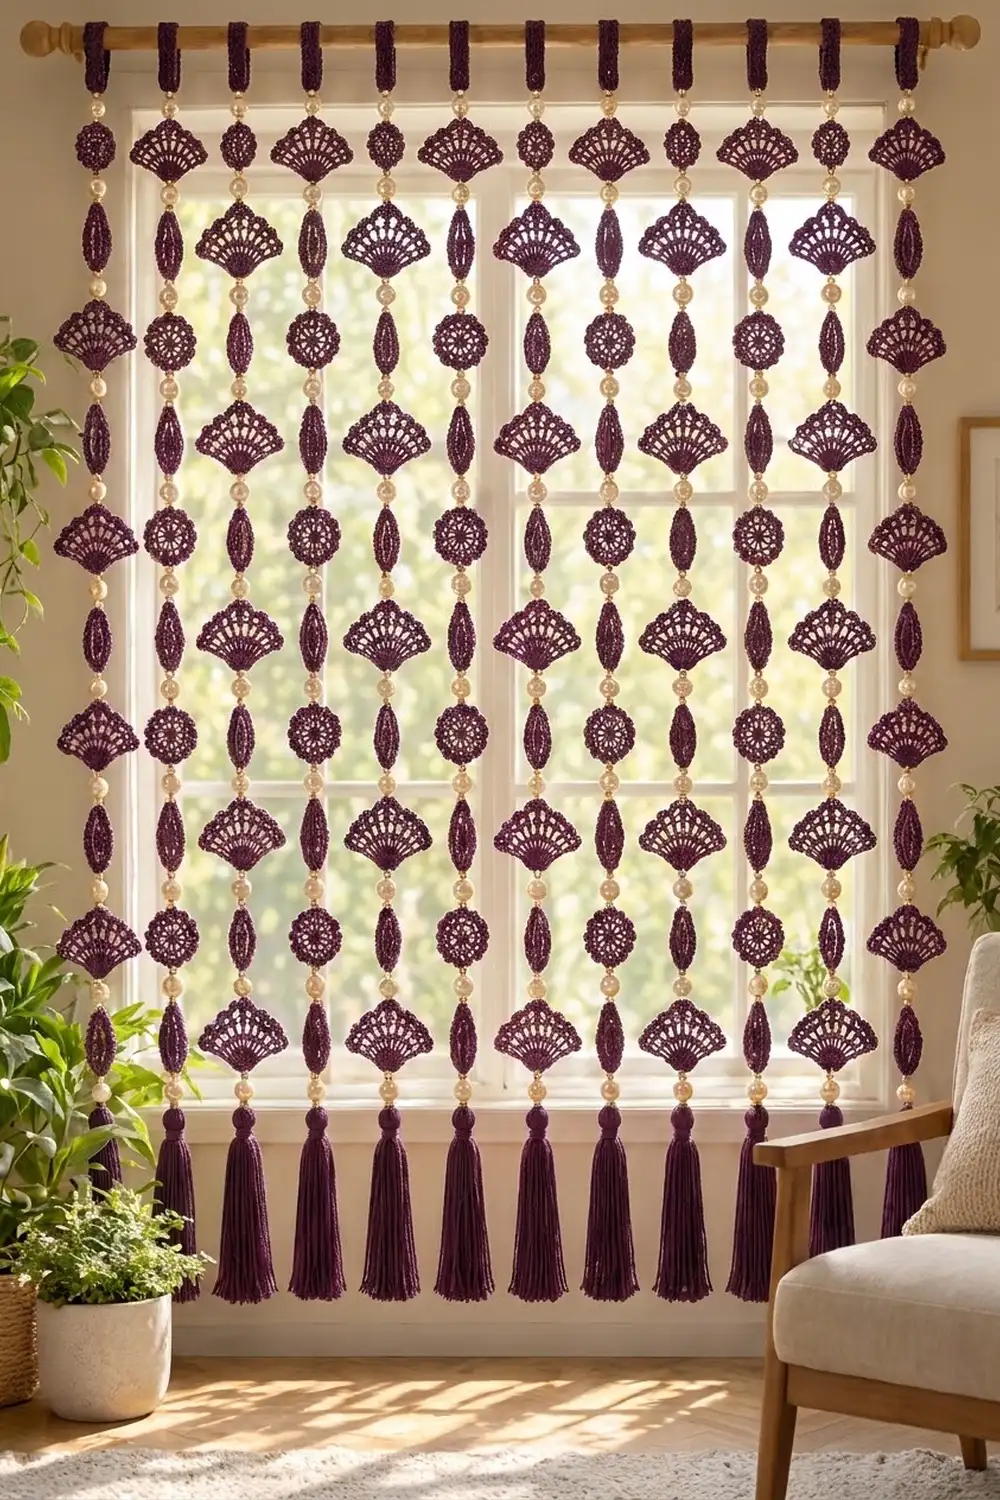
This beaded curtain mixes lacy crochet motifs with pearl beads. Twelve strands hang from a rod, and each one repeats three motifs: an openwork fan, a scalloped rosette and a pointed almond oval. Pearls space the motifs apart, and a heavy tassel finishes the bottom of each strand.
Everything is worked in one deep plum mercerized cotton, so the pearls and the lace texture stand out. It has a boho, vintage-parlor look and works in a window, a doorway or as a room divider.
The finished curtain measures about 59.5 in (151.1 cm) wide and 48 in (121.9 cm) long from the rod to the tips of the tassels. All instructions use US crochet terms.
The construction is simple. You crochet each motif on its own, then thread the motifs and pearls onto a yarn cord. The top of each cord ties into a crocheted hanging loop, and the bottom ends in a tassel.
Finished Size and Construction
- Finished size: 59.5 in (151.1 cm) wide × 48 in (121.9 cm) long
- Skill level: Intermediate
- Terminology: US crochet terms
- Yarn weight: Sport (#2) mercerized cotton
- Hook: 3.25 mm (US D-3)
- Number of pieces: 144 motifs (48 fans, 48 rosettes, 48 ovals), plus 12 hanging loops and 12 tassels
- Layout: 12 strands; each strand has 4 repeats of fan, rosette, oval
- Piece sizes: fan 4.5 in (11.4 cm) wide × 2.5 in (6.4 cm) tall; rosette 3 in (7.6 cm) across; oval 1.75 in (4.4 cm) × 3.25 in (8.3 cm)
- Size before border (motifs and pearls only): 41.5 in (105.4 cm) per strand
- Border depth: hanging loop drop of 1.5 in (3.8 cm) at the top; tassel of 5 in (12.7 cm) at the bottom
Materials
Yarn: Use a smooth, mercerized sport-weight cotton. It shows stitch detail clearly and won’t stretch much while hanging. Avoid acrylic and fuzzy blends, because they stretch under the weight of the pearls and tassels.
- Plum: 450 g / about 1,395 m (9 balls of 50 g / 155 m each)
Beads and tools:
– 160 cream or champagne glass pearls, 10 mm (0.4 in), with holes at least 2 mm wide (you need 156, plus spares)
– 3.25 mm (US D-3) crochet hook
– Large-eye tapestry needle, or a big-eye beading needle that fits through the pearls
– Stiff card, 5 in (12.7 cm) tall, for winding tassels
– Scissors, tape measure, rust-proof pins, blocking mats, spray bottle
– Curtain rod about 1 in (2.5 cm) in diameter
The yarn amount includes a margin of about 20% for gauge differences and tassel trimming.
Abbreviations (US Terms)
- ch: chain
- sl st: slip stitch
- sc: single crochet
- hdc: half double crochet
- dc: double crochet
- tr: treble crochet
- sp: space
- st(s): stitch(es)
- tch: turning chain
Special stitches:
– Shell: (hdc, 3 dc, hdc) worked into the same space.
– Scallop: (sc, hdc, 5 dc, hdc, sc) worked into the same loop.
– Side picot: (sc, ch 2, sc) worked around the post of one row-end stitch.
Gauge and Checkpoints
Base gauge: 18 dc = 4 in (10.2 cm), and 1 dc row = about 0.5 in (1.3 cm) tall.
Before making 144 pieces, crochet one rosette and check it:
- After Rnd 1: 1.25 in (3.2 cm) across
- After Rnd 2: 2 in (5.1 cm) across
- After Rnd 3: 2.5 in (6.4 cm) across
- After Rnd 4: 3 in (7.6 cm) across
Then make one fan and one oval:
- Fan: 1.5 in (3.8 cm) wide after Row 1, 2 in (5.1 cm) tall after Row 4, and 4.5 in (11.4 cm) × 2.5 in (6.4 cm) when finished
- Oval: 1 in (2.5 cm) × 2.5 in (6.4 cm) after Rnd 1, and 1.75 in (4.4 cm) × 3.25 in (8.3 cm) when finished
If your motifs are too big, go down to a 3.0 mm hook. If they are too small, go up to a 3.5 mm hook. Over a full strand, a 0.25 in (0.6 cm) error per motif adds up to 3 in (7.6 cm) of extra or missing length. That is why the checkpoints matter.
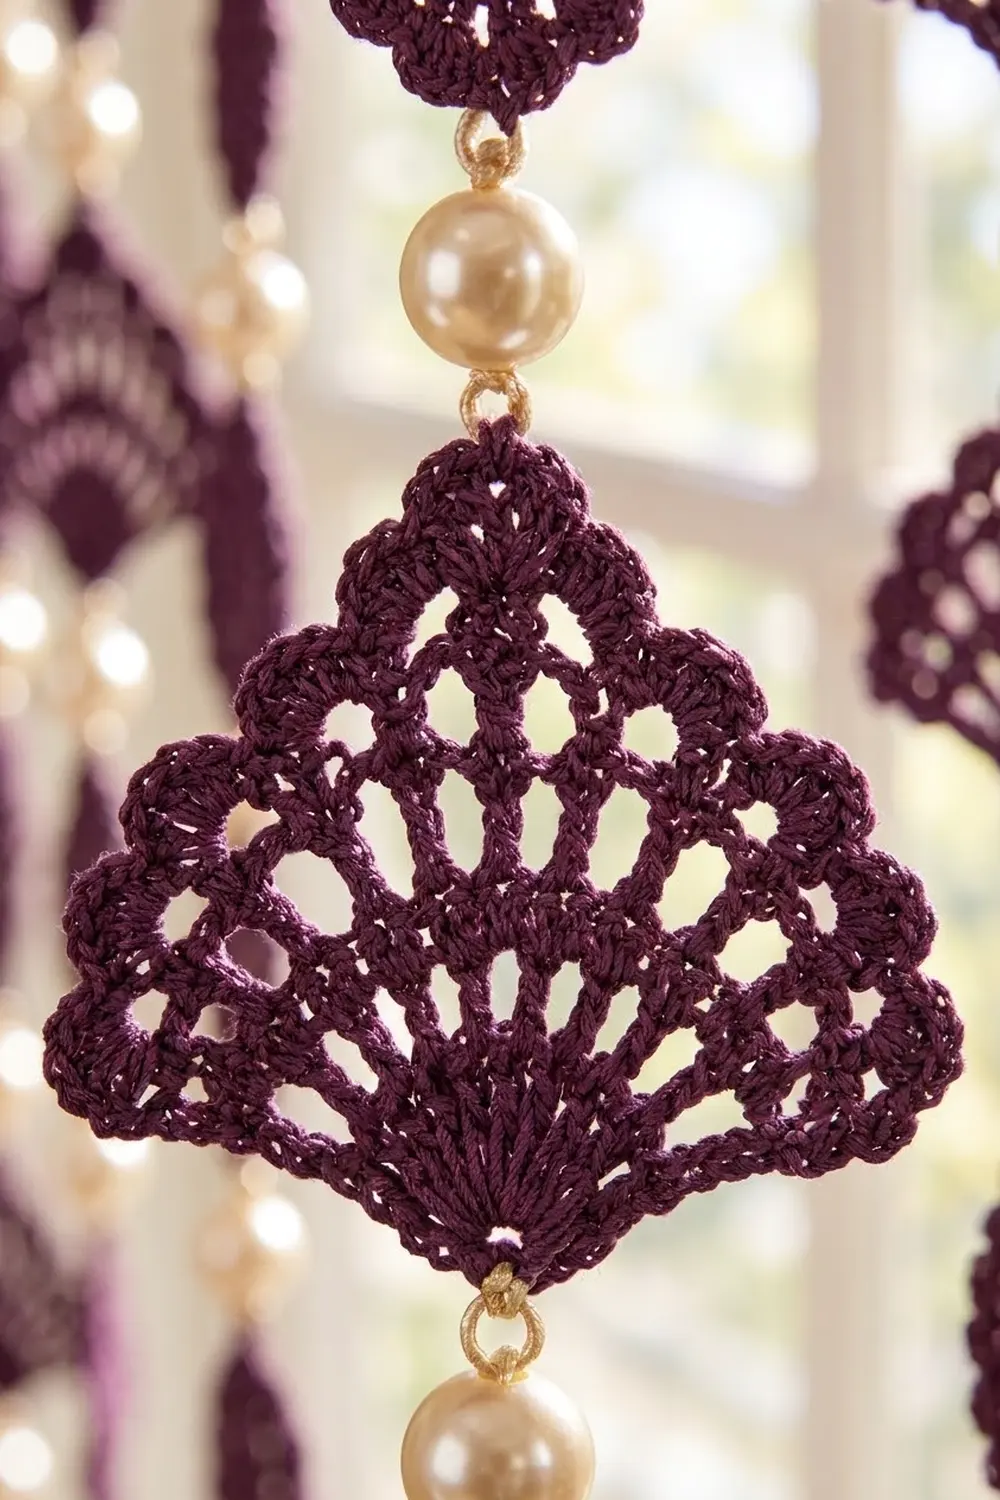
Motif A: Fan (make 48)
The fan is worked in rows, starting at the point and spreading outward.
Ch 4, sl st to the first ch to form a ring.
Row 1: Ch 3 (counts as dc), 8 dc in ring. Turn. (9 dc)
Row 2: Ch 4 (counts as dc + ch 1), dc in next dc, ch 1; repeat from * 6 more times, dc in top of tch. Turn. (9 dc, 8 ch-1 sp)
Row 3: Ch 5 (counts as dc + ch 2), dc in next dc, ch 2; repeat from * 6 more times, dc in 3rd ch of tch. Turn. (9 dc, 8 ch-2 sp)
Row 4: Ch 6 (counts as dc + ch 3), dc in next dc, ch 3; repeat from * 6 more times, dc in 3rd ch of tch. Turn. (9 dc, 8 ch-3 sp)
The 9 dc columns are the fan’s spokes. Because the spaces between them get wider each row, the piece opens out into a fan.
Row 5 (scallop edge): Ch 1, sc in first dc, shell in next ch-3 sp, sc in next dc; repeat from * 7 more times, working the last sc in the 3rd ch of tch. (9 sc + 8 shells of 5 sts = 49 sts)
Side edging: Do not turn. Work down the straight side you are on: side picot around each of the 4 row ends (Rows 4, 3, 2, 1), then sl st into the ring at the point. Now work up the other straight side: side picot around each of the 4 row ends (Rows 1, 2, 3, 4). Sl st into the first sc of Row 5. (8 side picots)
Fasten off and weave in the ends. The 5th sc of Row 5 (the middle of its 9 sc) is the top center. You’ll thread the cord through it later.
Motif B: Rosette (make 48)
Ch 5, sl st to the first ch to form a ring.
Rnd 1: Ch 3 (counts as dc), 15 dc in ring. Join with sl st to top of ch-3. (16 dc)
Rnd 2: Ch 5 (counts as dc + ch 2), dc in next dc, ch 2; repeat from * 14 more times. Join to 3rd ch of beginning ch-5. (16 dc, 16 ch-2 sp)
Rnd 3: Sl st into the first ch-2 sp, ch 1, sc in same sp, ch 5, skip next ch-2 sp, sc in next ch-2 sp; repeat from * 6 more times, ch 5. Join to first sc. (8 sc, 8 ch-5 loops)
Rnd 4: Sl st into the first ch-5 loop, scallop in each ch-5 loop around. Join to first sc. (8 scallops of 9 sts = 72 sts)
Fasten off. The center dc of any scallop is the top. The center dc of the scallop opposite it (4 scallops away) is the bottom.
Motif C: Almond Oval (make 48)
Ch 12.
Rnd 1: Sc in 2nd ch from hook, hdc in next ch, dc in next 2 ch, tr in next 3 ch, dc in next 2 ch, hdc in next ch, 3 sc in last ch. Rotate and work along the other side of the foundation chain: hdc in next ch, dc in next 2 ch, tr in next 3 ch, dc in next 2 ch, hdc in next ch, 2 sc in the same ch as the first sc. Join to first sc.
Stitch count: 10 + 3 + 9 + 2 = 24 sts. The tr stitches in the middle make the oval wide there, and the sc stitches keep both ends pointed.
Rnd 2: Ch 1, sc in same st, ch 3, skip 1 st, sc in next st; repeat from * 10 more times, ch 3, skip last st. Join to first sc. (12 sc, 12 ch-3 loops)
One loop sits over each tip: the loop over st 12 at one end and the loop over st 24 at the other.
Rnd 3: Sl st into the first ch-3 loop. (Sc, hdc, dc, hdc, sc) in each ch-3 loop around. Join. (12 small scallops of 5 sts = 60 sts)
Fasten off. The two tip scallops are where the cord goes through.
Make All Pieces
Everything is made in Plum:
- 48 fans (Motif A)
- 48 rosettes (Motif B)
- 48 almond ovals (Motif C)
- 12 hanging loops and 12 tassels (see Border)
Block the motifs before joining (see Final Blocking). Sizes stay much more even that way.
Layout of one strand (all 12 strands are the same and hang side by side):
ROD  ===========================================
     L   L   L   L   L   L   L   L   L   L   L   L    hanging loop
     •   •   •   •   •   •   •   •   •   •   •   •    pearl
     F   F   F   F   F   F   F   F   F   F   F   F    fan
     •   •   •   •   •   •   •   •   •   •   •   •
     R   R   R   R   R   R   R   R   R   R   R   R    rosette
     •   •   •   •   •   •   •   •   •   •   •   •
     O   O   O   O   O   O   O   O   O   O   O   O    oval
     ... (F, R, O repeated 4 times in total) ...
     •   •   •   •   •   •   •   •   •   •   •   •
     T   T   T   T   T   T   T   T   T   T   T   T    tassel
Each strand uses 13 pearls: 1 under the hanging loop, 11 between the 12 motifs, and 1 above the tassel.
Joining
Method: Thread the motifs onto a strung cord. Cut 2.5 m of Plum, fold it in half, and thread both ends through the needle so you are working with a doubled cord. Before you start, check that the doubled cord passes through a pearl.
Stitch-to-stitch logic:
- Tie the folded end of the cord around the sl st join of the hanging loop.
- Thread 1 pearl.
- Fan: Go into the top center sc of Row 5 (the 5th of 9 sc). Pass the cord down the back of the center spoke and come out through the ring at the point. Then thread 1 pearl.
- Rosette: Go into the center dc of the top scallop, pass through the center ring, and come out through the center dc of the bottom scallop. Then thread 1 pearl.
- Oval: Go through the top tip scallop, run along the back of the tr spine, and come out through the bottom tip scallop. Then thread 1 pearl.
- Repeat steps 3–5 three more times. You will have 12 motifs and 13 pearls.
- Tie the cord tightly to the tassel’s top tie and weave the tails into the tassel head.
Locking each motif: Where the cord enters and leaves a motif, take one extra small stitch through that same stitch. This stops the motifs from sliding down the cord.
Tension advice: Each pearl gap should measure 0.5 in (1.3 cm) from the edge of one motif to the edge of the next. If the cord is too tight, the motifs pucker. If it’s too loose, the pearls slip and the gaps sag.
Size checkpoint per strand:
– Motifs: 4 × (2.5 + 3 + 3.25) = 4 × 8.75 in = 35 in (88.9 cm)
– Gaps: 13 × 0.5 in = 6.5 in (16.5 cm)
– Strand body total: 41.5 in (105.4 cm)
Border: Hanging Loops and Tassels
This curtain has no frame around it. Instead, the border is the hanging loop at the top and the tassel at the bottom of each strand.
Border gauge: 5 sc = 1 in (2.5 cm).
Hanging loop (make 12): Ch 30, sl st to the first ch to form a ring, making sure the chain isn’t twisted.
Rnd 1: Ch 1, sc in each ch around. Join. (30 sc)
Fasten off, leaving a 6 in (15.2 cm) tail.
Why the math works: 30 sc ÷ 5 sc per inch = a loop 6 in (15.2 cm) around. The rod is about 3.1 in (7.9 cm) around. When the loop is pulled snug around the rod, it hangs about 1.5 in (3.8 cm) below it.
Tassel (make 12):
1. Wind Plum 40 times around the 5 in (12.7 cm) card.
2. Slide a 12 in (30.5 cm) tie under the wraps at the top of the card and knot it tightly.
3. Cut through the wraps at the bottom. This gives 80 ends, each 5 in (12.7 cm) long.
4. Wrap the neck 0.75 in (1.9 cm) below the top, 8 times, then knot and hide the end.
5. Trim the ends level so the tassel is 5 in (12.7 cm) long.
Total length: 1.5 in + 41.5 in + 5 in = 48 in (121.9 cm).
Hanging: Space the loops 5 in (12.7 cm) apart, center to center. The outer strands are then 11 × 5 in = 55 in (139.7 cm) apart. Add half a fan width on each side (4.5 in in total) and the overall width is 59.5 in (151.1 cm). Fans next to each other end up 0.5 in (1.3 cm) apart, so the rows read as clean lines without overlapping.
Final Blocking
- Block the motifs before joining. Pin each fan to 4.5 in × 2.5 in (11.4 cm × 6.4 cm). Pin out each of its 9 spokes and each scallop.
- Pin each rosette into a 3 in (7.6 cm) circle, with a pin in every scallop.
- Pin each oval to 1.75 in × 3.25 in (4.4 cm × 8.3 cm), with sharp points at both ends.
- Mist the motifs until they are damp, not soaked. Let them dry completely.
- After joining, hang the curtain. Mist the tassels and smooth them down with your fingers.
- Leave it hanging for 24 hours so the cords settle under the weight of the tassels.
Final Quality-Control Checklist
- [ ] 48 fans, 48 rosettes and 48 ovals, all within 0.125 in (0.3 cm) of the target size
- [ ] Every fan has 9 spokes, 8 shells and 8 side picots
- [ ] Every rosette has 8 even scallops
- [ ] Every oval has 12 scallops and two sharp points
- [ ] 13 pearls per strand, with each gap 0.5 in (1.3 cm)
- [ ] Every strand body is 41.5 in (105.4 cm)
- [ ] All tassels are 5 in (12.7 cm) and trimmed level
- [ ] Motif rows line up horizontally across all 12 strands
- [ ] Loops are spaced 5 in (12.7 cm) apart on the rod
Troubleshooting
Fan cups instead of lying flat: Your chains are too tight in Rows 3–4. Loosen them, or add one extra ch per space in Row 4.
Fan ruffles: The chains are too loose. Go down one hook size for Rows 2–4 only.
Rosette scallops are uneven: Check that Rnd 3 skips exactly one ch-2 sp each time. You should have 8 loops.
Oval tips are rounded: Make sure you work 3 sc in the last ch of Rnd 1, and that the tip loops in Rnd 2 sit over the middle of those 3 sc.
Strand is too long: Check the pearl gaps first. They are the most common place for extra length to creep in.
Rows don’t line up across the curtain: Re-tension the gaps so every strand matches the 41.5 in (105.4 cm) body length.
Motifs twist when hanging: Add the locking stitch at every entry and exit point.
Care
Dust the curtain gently, or take it down and hand-wash it in cool water with mild soap. Lay it flat to dry and re-block as needed. Don’t machine wash, because the pearl finish can wear off.
Final Notes
The measurement chain is the whole project. If the dc gauge is right (18 dc = 4 in / 10.2 cm), the motifs come out at the sizes in this pattern. Those sizes give a 35 in (88.9 cm) stack of motifs per strand. Thirteen 0.5 in (1.3 cm) pearl gaps bring the strand body to 41.5 in (105.4 cm). The 1.5 in (3.8 cm) loop drop and the 5 in (12.7 cm) tassel complete the 48 in (121.9 cm) length. Twelve strands at 5 in (12.7 cm) spacing make the curtain 59.5 in (151.1 cm) wide.
Happy crocheting!