

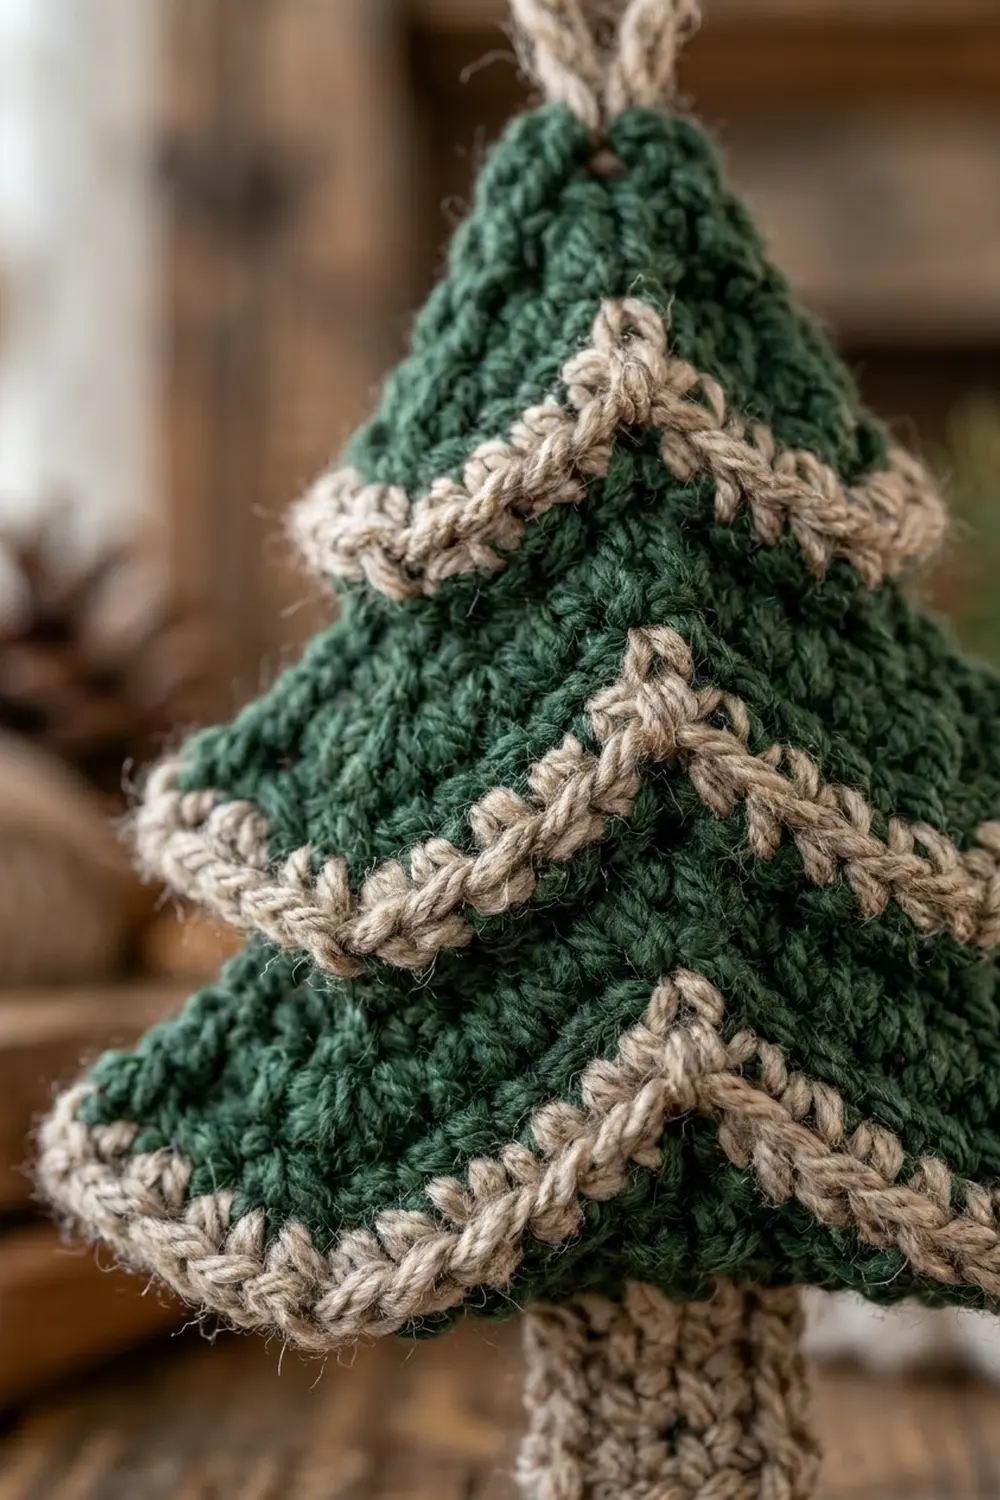
The Frosted Fir is a flat Christmas tree ornament with four stepped tiers of deep forest green. Each tier is edged with a raised oatmeal-beige ridge that looks like a light dusting of snow. The tiers flare a little at the tips, so every layer hangs over the one below, and a small beige trunk anchors the bottom.
Only two colors are used: dark forest green for the branches and warm oatmeal beige for the trims, trunk, and hanging loop. The look is rustic and cozy. It suits a window garland, a tree branch, or a gift tag.
This pattern uses US crochet terms. The finished ornament measures about 4.6 in (11.7 cm) wide and 5.3 in (13.5 cm) tall, not counting the hanging loop.
The tree is one single piece, worked flat in rows from the tip down. Each tier grows by increasing at both ends and finishes with one beige trim row. The next tier starts two stitches in from each edge. The trunk is worked straight down from the center of the last trim, and a chain loop is added at the tip.
Finished Size and Construction
- Finished size: 4.6 in (11.7 cm) wide x 5.3 in (13.5 cm) tall, not counting the loop
- Skill level: Easy
- Terminology: US crochet terms
- Yarn weight: DK (light worsted, weight 3)
- Hook: 3.5 mm (E-4)
- Number of pieces: 1
- Layout: single flat tree, four tiers plus trunk
- Piece size: body (four tiers) 4.6 in (11.7 cm) wide x 4.4 in (11.2 cm) tall; trunk 1 in (2.5 cm) wide x 0.9 in (2.3 cm) tall
- Size before border: 4.2 in (10.7 cm) wide at the last green row of the bottom tier
- Border depth: 1 row of beige trim per tier, about 0.2 in (0.5 cm)
Materials
Choose a smooth cotton or cotton-blend DK yarn. Cotton gives crisp stitch definition and keeps the tiers flat. Avoid fuzzy yarns, because they blur the beige ridges, which are the main feature of this design.
- Color A, dark forest green: 10 g, about 23 m
- Color B, oatmeal beige: 5 g, about 12 m
These amounts include extra for checking gauge and weaving in ends.
Tools:
- 3.5 mm (E-4) crochet hook
- Tapestry needle
- Scissors
- Stitch markers (2)
- Ruler or tape measure
- Pins and a foam blocking mat
- Spray bottle with water
Abbreviations (US Terms)
- ch – chain
- sc – single crochet
- sl st – slip stitch
- st(s) – stitch(es)
- BLO – back loop only
- inc – 2 sc in the same st
- RS / WS – right side / wrong side
Special stitch – standing sc: With a slipknot on the hook, insert the hook into the stated st (or loop), yarn over, pull up a loop, yarn over, and pull through both loops. This joins new yarn and makes the first sc in one step.
Gauge and Checkpoints
Gauge: 20 sc and 22 rows = 4 in (10.2 cm) in sc with a 3.5 mm hook. That is 5 sts and 5.5 rows per 1 in (2.5 cm).
This is a small single piece, so the ornament itself is your test piece. Make Tier 1, measure it, and only then continue.
Checkpoints:
- After Tier 1 (Row 6): 2.2 in (5.6 cm) wide at the trim, 1.1 in (2.8 cm) tall
- After Tier 2 (Row 12): 3 in (7.6 cm) wide at the trim, 2.2 in (5.6 cm) tall
- After Tier 3 (Row 18): 3.8 in (9.7 cm) wide at the trim, 3.3 in (8.4 cm) tall
- After Tier 4 (Row 24): 4.6 in (11.7 cm) wide, 4.4 in (11.2 cm) tall
- After the trunk: 5.3 in (13.5 cm) total height
Being off by up to 0.2 in (0.5 cm) is fine. If Tier 1 is wider than 2.4 in (6.1 cm), go down to a 3.25 mm hook. If it is narrower than 2 in (5.1 cm), go up to a 3.75 mm hook. Height usually follows width. If your rows come out taller than expected, tighten the final yarn-over that you pull through both loops.
Pattern
Notes:
- The ch 1 at the start of a row does not count as a st.
- Odd rows are RS rows and even rows are WS rows. Place a marker on the RS of Row 1.
- Every beige trim row is a WS row. The first green row of each new tier is a RS row worked in BLO. This leaves the beige front loops as a raised ridge on the RS.
- Each tier uses fresh green, joined with a standing sc. Leave 6 in (15.2 cm) tails.
Tier 1 (Top)
With Color A, make a slipknot.
Row 1 (RS): Ch 2, 3 sc in 2nd ch from hook, turn. (3 sts)
Row 2: Ch 1, inc in first st, sc in next st, inc in last st, turn. (5 sts)
Row 3: Ch 1, inc, sc in next 3 sts, inc, turn. (7 sts)
Row 4: Ch 1, inc, sc in next 5 sts, inc, turn. (9 sts)
Row 5: Ch 1, sc in each st across, changing to Color B in the last st, turn. (9 sts) Fasten off Color A.
Row 6 (WS, beige trim): With Color B, ch 1, inc, sc in next 7 sts, inc. (11 sts: 2 + 7 + 2) Fasten off Color B.
The trim row adds 1 st at each end, which makes the small flared wing tips.
Tier 2
Row 7 (RS): With RS facing, skip the first 2 sts of Row 6. Join Color A with a standing sc in the BLO of the 3rd st, sc in BLO of next 6 sts, leave the last 2 sts unworked, turn. (7 sts: 2 skipped + 7 worked + 2 skipped = 11)
Row 8: Ch 1, inc, sc in next 5 sts, inc, turn. (9 sts)
Row 9: Ch 1, inc, sc in next 7 sts, inc, turn. (11 sts)
Row 10: Ch 1, inc, sc in next 9 sts, inc, turn. (13 sts)
Row 11: Ch 1, sc in each st across, changing to Color B in the last st, turn. (13 sts) Fasten off Color A.
Row 12 (WS, beige trim): With Color B, ch 1, inc, sc in next 11 sts, inc. (15 sts: 2 + 11 + 2) Fasten off Color B.
Tier 3
Row 13 (RS): Skip the first 2 sts of Row 12, join Color A with a standing sc in BLO of the 3rd st, sc in BLO of next 10 sts, leave the last 2 sts unworked, turn. (11 sts: 2 + 11 + 2 = 15)
Row 14: Ch 1, inc, sc in next 9 sts, inc, turn. (13 sts)
Row 15: Ch 1, inc, sc in next 11 sts, inc, turn. (15 sts)
Row 16: Ch 1, inc, sc in next 13 sts, inc, turn. (17 sts)
Row 17: Ch 1, sc in each st across, changing to Color B in the last st, turn. (17 sts) Fasten off Color A.
Row 18 (WS, beige trim): With Color B, ch 1, inc, sc in next 15 sts, inc. (19 sts: 2 + 15 + 2) Fasten off Color B.
Tier 4 (Bottom)
Row 19 (RS): Skip the first 2 sts of Row 18, join Color A with a standing sc in BLO of the 3rd st, sc in BLO of next 14 sts, leave the last 2 sts unworked, turn. (15 sts: 2 + 15 + 2 = 19)
Row 20: Ch 1, inc, sc in next 13 sts, inc, turn. (17 sts)
Row 21: Ch 1, inc, sc in next 15 sts, inc, turn. (19 sts)
Row 22: Ch 1, inc, sc in next 17 sts, inc, turn. (21 sts)
Row 23: Ch 1, sc in each st across, changing to Color B in the last st, turn. (21 sts) Fasten off Color A.
Row 24 (WS, beige trim): With Color B, ch 1, inc, sc in next 19 sts, inc. (23 sts: 2 + 19 + 2) Fasten off Color B.
Checkpoint: the body is now 4.6 in (11.7 cm) wide and 4.4 in (11.2 cm) tall.
Trunk
Row 1 (RS): With RS facing, skip the first 9 sts of Row 24. Join Color B with a standing sc in BLO of the 10th st, sc in BLO of next 4 sts, leave the last 9 sts unworked, turn. (5 sts: 9 + 5 + 9 = 23)
Rows 2–5: Ch 1, sc in each st across, turn. (5 sts each)
Fasten off. The trunk is 1 in (2.5 cm) wide and 0.9 in (2.3 cm) tall, centered under the tree.
Hanging Loop
With RS facing, join Color B with a sl st in the center st of Row 1 at the tip. Ch 20, sl st in the same st. Fasten off, leaving an 8 in (20.3 cm) tail. Pass the tail through the base of the loop twice to secure it, then weave it in. The loop rises about 2 in (5.1 cm) above the tip.
If you want a twisted-cord look instead, take a 12 in (30.5 cm) strand of Color B and twist it until it kinks. Fold it in half, let it twist on itself, and stitch both ends to the tip.
Border
The four beige trim rows are the border of this ornament. Each one finishes the lower edge of a tier. Together with the trunk, they frame the green.
Border gauge: the same as the body, 5 sts per 1 in (2.5 cm). Each trim is 1 row deep, about 0.2 in (0.5 cm).
Counts per trim row (left wing + center + right wing):
- Row 6: 2 + 7 + 2 = 11 sts, 2.2 in (5.6 cm)
- Row 12: 2 + 11 + 2 = 15 sts, 3 in (7.6 cm)
- Row 18: 2 + 15 + 2 = 19 sts, 3.8 in (9.7 cm)
- Row 24: 2 + 19 + 2 = 23 sts, 4.6 in (11.7 cm)
The “2” at each end is the inc. Those same 2 sts are the ones the next tier skips, and they form the overhanging wing, 0.4 in (1.0 cm) on each side.
Why the math works: Each trim adds 2 sts, 1 per side. The next tier starts 4 sts narrower, because it skips 2 sts per side. That tier then grows by 6 sts over its 3 increase rows, and its own trim adds 2 more. So from one trim to the next, the net change is −4 + 6 + 2 = +4 sts. Each trim is exactly 4 sts, or 0.8 in (2.0 cm), wider than the one above: 11, 15, 19, 23. The trunk uses the center 5 of the last 23 sts and leaves 9 on each side, so it sits exactly in the middle.
Final Blocking
- Weave in all ends first, each into a section of its own color. Run green tails along the back of green sts and beige tails inside the beige rows, so nothing shows on the RS.
- Lightly mist the ornament with water until it is damp, not soaked.
- Lay it RS up on the blocking mat.
- Pin the tip, then pin the outer point of each wing on both sides. Check that the left and right wing points sit at the same height.
- Measure 4.6 in (11.7 cm) across the bottom trim, 4.4 in (11.2 cm) from the tip to the bottom trim, and 5.3 in (13.5 cm) from the tip to the bottom of the trunk.
- Pin the trunk square at 1 in (2.5 cm) wide.
- Use your fingertip to nudge each beige ridge so it sits forward and slightly down over the tier below.
- Let it dry completely before unpinning.
Final Quality-Control Checklist
- Four green tiers, with 11, 15, 19, and 23 sts in their trim rows
- Every beige ridge shows on the RS, with no green sl sts or strands crossing it
- Wings hang over evenly, 2 sts on each side of every tier
- Trunk is 5 sts wide, with 9 unworked sts on each side
- Width is 4.6 in (11.7 cm) and height is 5.3 in (13.5 cm) without the loop
- Hanging loop is centered on the tip and secured
- No ends show on the RS
Troubleshooting
The beige ridge is on the back. The first row of the new tier was worked on the WS or in the front loop. Rework it in BLO with the RS facing.
The tree leans to one side. One side lost or gained a st. Count each row and make sure each inc is in the very first and very last st.
The tiers ruffle. Your tension loosens on increase rows. Go down a hook size or tighten the inc sts.
The wings curl upward. This is normal before blocking. Damp-block with the wing points pinned slightly down.
The trunk is off-center. Recount the 9 skipped sts on Row 24 before joining.
Gaps appear where a tier starts. Pull the standing sc snug and weave its tail through the first 2 sts.
Care
Hand wash in cool water with mild soap, press the water out in a towel, and dry flat, reshaping the wings. Store the ornament flat so the loop and wings keep their shape.

Final Notes
The whole ornament comes down to one simple chain of measurements. A gauge of 5 sts and 5.5 rows per 1 in (2.5 cm) gives a Tier 1 trim of 11 sts, or 2.2 in (5.6 cm). Each new trim adds 4 sts, or 0.8 in (2.0 cm), giving 15, 19, and 23 sts. Six rows per tier add 1.1 in (2.8 cm) of height, so 24 rows make a 4.4 in (11.2 cm) body. The 5-row trunk adds 0.9 in (2.3 cm), for a finished tree of 4.6 in x 5.3 in (11.7 cm x 13.5 cm).
Make one, check it against the checkpoints, and then make a whole set for a garland or the tree.
Happy crocheting!