

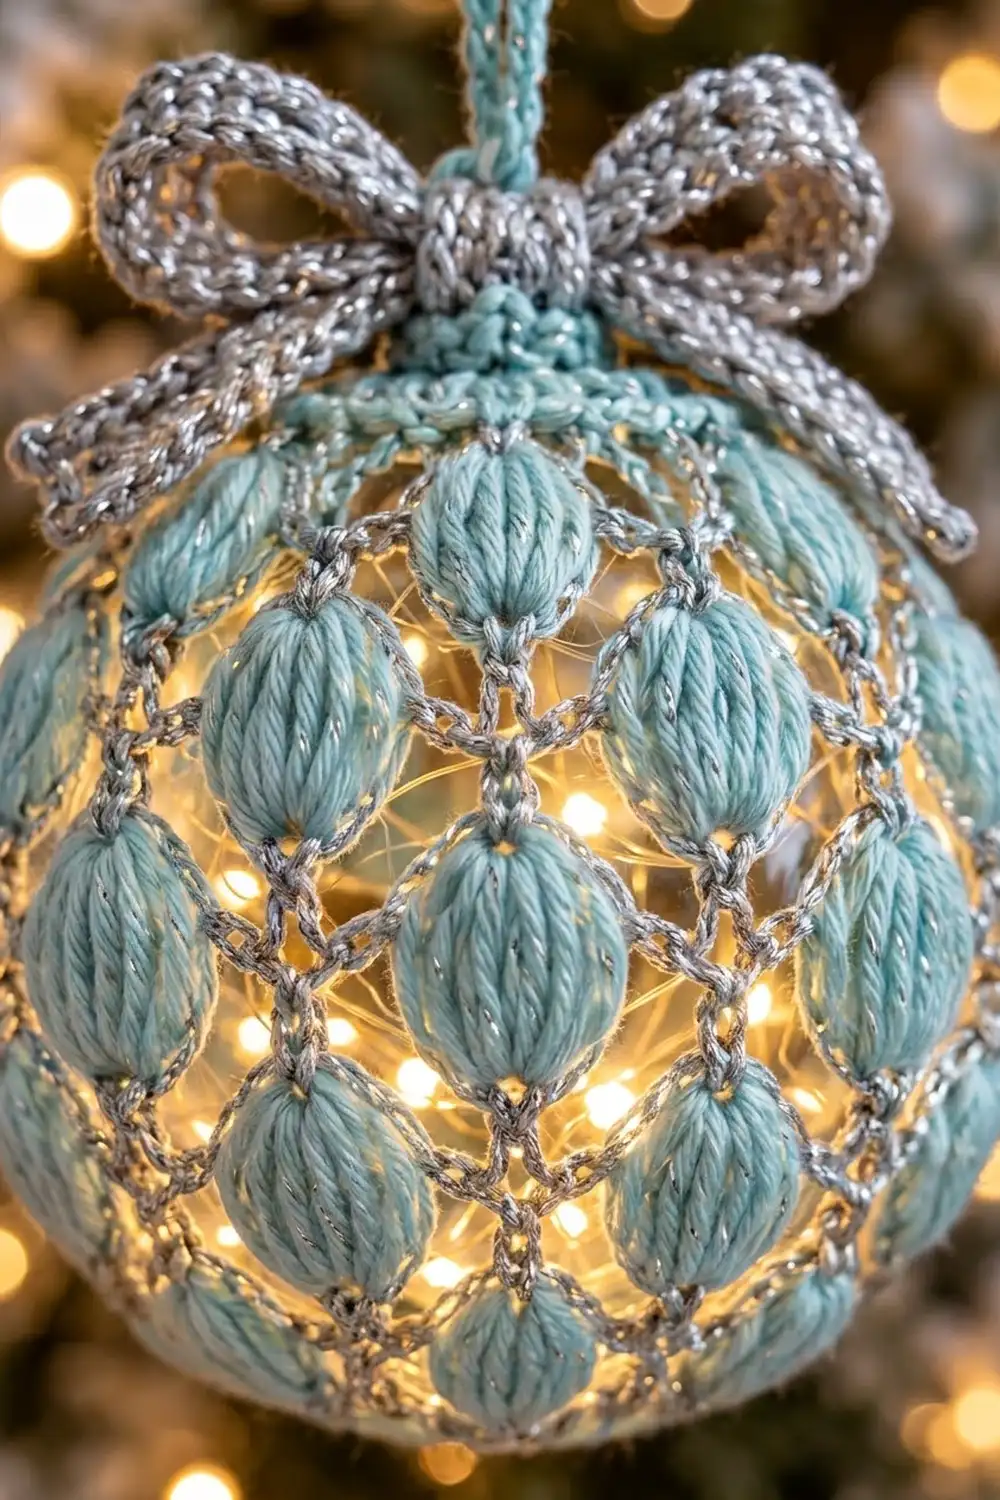
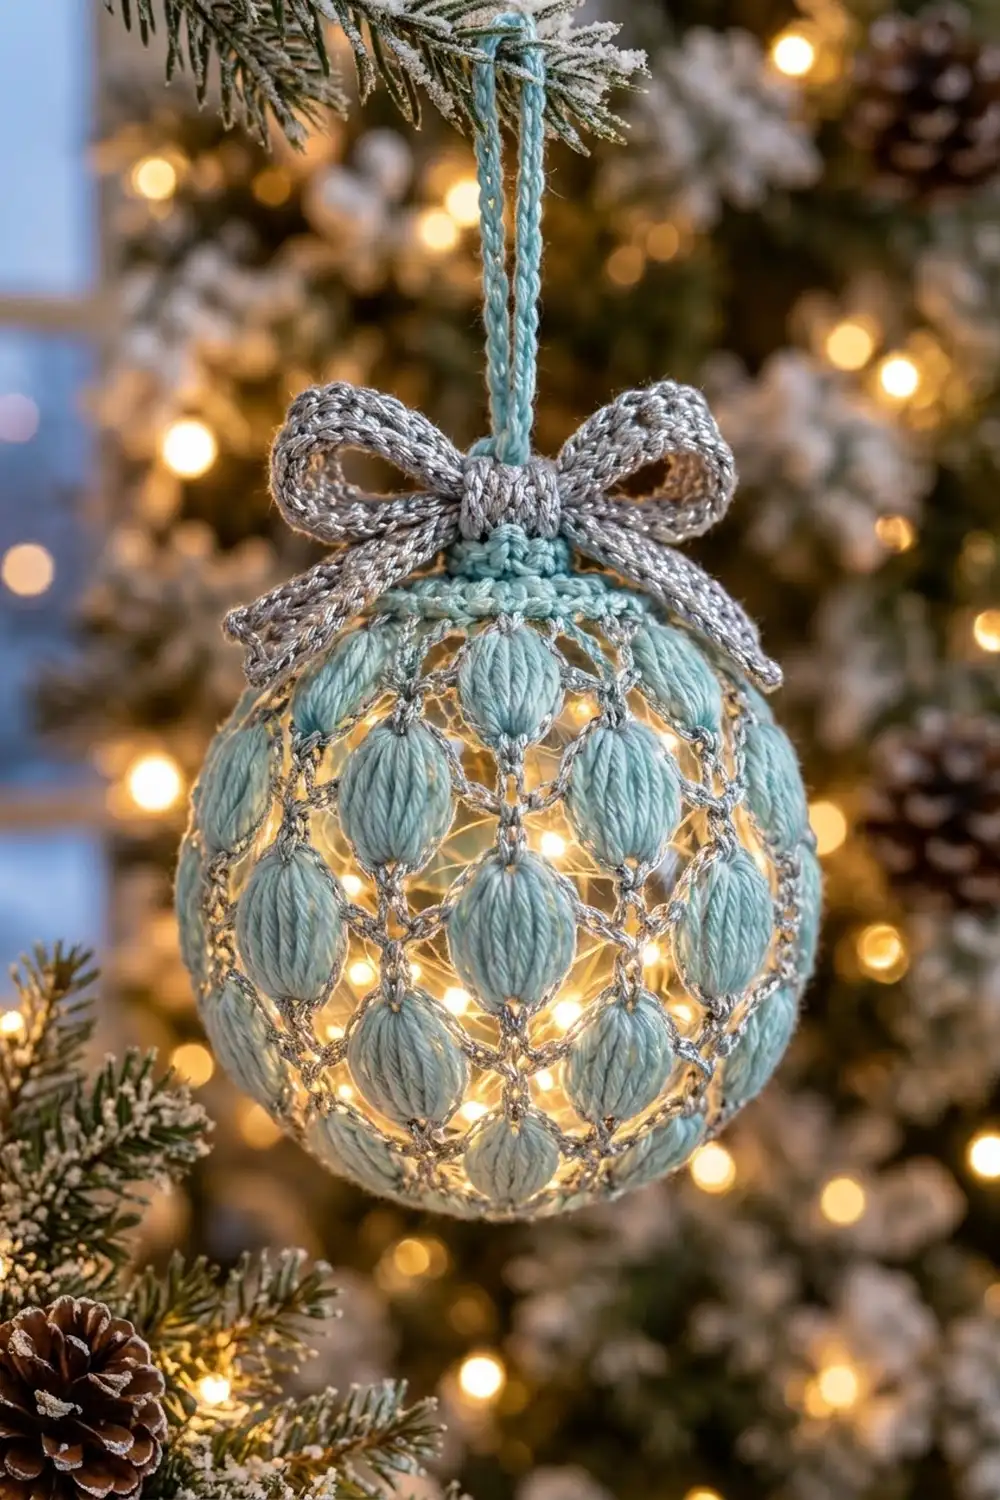
This ornament cover turns a plain clear bauble into a small glowing lantern. Tall aqua puff stitches sit inside a fine silver chain lattice. Fill the bauble with fairy lights and the light shines through every diamond, so the puffs look like frosted glass beads.
The colors are soft and wintry: light aqua cotton for the puffs, cap and collar, and silver-gray metallic yarn for the netting and the bow. The style is classic Christmas with a light, open look. All instructions use US crochet terms.
The finished cover fits a 4 in (10.2 cm) clear fillable ornament. With the puffs on the surface, it measures about 4.25 in (10.8 cm) across. The bow adds about 1.25 in (3.2 cm) of height at the top.
The cover is one piece, worked in the round from the bottom upward. It starts with a small single-crochet cap, then aqua puff rounds alternate with silver chain-net rounds. You put the bauble inside before the last tiers, close the cover with a snug collar, then sew on a separate bow and hanging cord.
Finished Size and Construction
- Finished size: fits a 4 in (10.2 cm) ornament; about 4.25 in (10.8 cm) across when covered
- Skill level: Intermediate
- Terminology: US crochet terms
- Yarn weight: DK (light worsted, #3)
- Hook: 3.5 mm (E-4)
- Number of pieces: 1 cover, plus a small bow and a hanging cord
- Layout: 12 puffs per tier, 5 staggered tiers
- Piece size: 12.6 in (32.0 cm) around the widest part (the equator)
- Size before border: the net ends with 12 nodes around the ornament’s neck
- Border depth: top collar about 0.5 in (1.3 cm)
Materials
For color A, choose a smooth mercerized cotton or cotton blend. It makes crisp puffs and holds its shape on a hard surface. Avoid fuzzy or very stretchy yarns, because the puffs need clear stitch definition to show as smooth vertical strands.
For color B, a DK metallic blend gives the silver sparkle. If yours is thinner, hold it double.
- Color A, light aqua: 20 g, about 46 m (50 yd)
- Color B, silver-gray metallic: 10 g, about 25 m (27 yd)
Quantities include a margin of about 25 percent for swatching and joins.
Tools:
– 3.5 mm (E-4) crochet hook
– Clear fillable ornament, 4 in (10.2 cm) across, with its cap
– Mini battery fairy lights (optional, for the glow)
– Stitch marker
– Tapestry needle
– Scissors
– Measuring tape
Abbreviations (US Terms)
- MR: magic ring
- ch: chain
- sl st: slip stitch
- sc: single crochet
- sc2tog: single crochet 2 together
- sp: space
- st(s): stitch(es)
- yo: yarn over
- TP: tall puff (see below)
Tall puff (TP): *Yo, insert hook in the given space, yo and pull up a loop to 0.75 in (1.9 cm); repeat from * 4 more times (11 loops on hook). Yo and draw through all 11 loops, then ch 1 tightly to close. This closing ch is the top of the TP. Keep every loop the same height so the strands lie smooth and vertical.
Color changes: Don’t fasten off between rounds. At the end of each round, drop the working color to the inside of the cover and pull up the other color at the start of the next round. Keep the carried strands at the back of the ornament.
Gauge and Checkpoints
Gauge: 5 sc and 6 rows = 1 in (2.5 cm) in color A.
Make one test cover before you make a set. Puff height controls the whole fit, so check it early. Before you start, you can also test the puff on its own: chain 15, work 3 TP into the chain about 4 sts apart, and measure. Each puff should be 0.75 in (1.9 cm) tall.
- After Rnd 2: the cap measures 0.75 in (1.9 cm) across.
- After Rnd 4: one TP measures 0.75 in (1.9 cm) tall.
- After Rnd 7: set the piece on the ornament like a cup. The net should reach the equator.
- After Rnd 9: the cover stretches easily around the 12.6 in (32.0 cm) equator.
Too big: the net sags and the puffs slide around. Go down to a 3.25 mm hook, or shorten each ch-5 to ch-4.
Too small: the net won’t stretch past the equator. Go up to a 3.75 mm hook, or lengthen each ch-5 to ch-6.
Pattern: Ornament Cover
Bottom Cap (Color A)
Rnd 1: MR, 6 sc in ring, join with sl st to first sc. (6 sc)
Rnd 2: Ch 1, 2 sc in each st around, join. (12 sc)
The cap measures 0.75 in (1.9 cm) across. Drop A.
Puff Tiers
Rnd 3 (B, net): Pull up B in first sc, ch 1, *sc in next sc, ch 3; repeat from * 11 more times, join to first sc. (12 sc, 36 ch; 12 ch-3 sps) Drop B.
Rnd 4 (A, puffs): Pull up A in first ch-3 sp, ch 1 (does not count), TP in same sp, ch 2, *TP in next ch-3 sp, ch 2; repeat from * 10 more times, join to top of first TP. (12 TP, 24 ch; 12 ch-2 sps) Drop A.
Rnd 5 (B, net): Pull up B in the closing ch of first TP, ch 1, *sc in closing ch of next TP, ch 4; repeat from * 11 more times, join. (12 sc, 48 ch; 12 ch-4 sps)
Each sc sits on top of a puff and makes the small node above it. The ch-2 sps from Rnd 4 stay hidden behind the chain arcs.
Rnd 6 (A, puffs): Pull up A in first ch-4 sp, ch 1, TP in same sp, ch 2, *TP in next ch-4 sp, ch 2; repeat from * 10 more times, join. (12 TP, 24 ch)
Working each TP into the middle of an arc pulls the arc into a V. Two neighboring V’s make one silver diamond, and the new puffs sit staggered between the puffs below.
Tension note: Keep the chains relaxed but even. If the chains are tight, the diamonds pinch and the puffs bulge out of line. If they’re loose, the lattice sags and the nodes drift off-center. Ideally, every chain in one round looks the same length when you lay the piece over the ornament.
Rnd 7 (B, net): As Rnd 5, but ch 5 between sc. (12 sc, 60 ch; 12 ch-5 sps)
Rnd 8 (A, puffs): As Rnd 6, working into ch-5 sps. (12 TP, 24 ch)
Rnd 9 (B, net): As Rnd 7. (12 sc, 60 ch; 12 ch-5 sps)
This round sits on the equator. Check that it stretches around the ornament without gaps wider than the puffs.
Rnd 10 (A, puffs): As Rnd 8. (12 TP, 24 ch)
Rnd 11 (B, net): As Rnd 5, with ch 4 between sc. (12 sc, 48 ch; 12 ch-4 sps)
Insert the ornament now. Turn on the fairy lights, put them inside, and close the ornament cap. Tuck the battery pack inside if it fits. If it doesn’t, run the thin wire out beside the cap so the cord and collar will hide it. Slide the bauble into the cover with the cap facing the opening.
Rnd 12 (A, puffs): As Rnd 6, working around the ornament. (12 TP, 24 ch)
Rnd 13 (B, net): Pull up B in the closing ch of first TP, ch 1, *sc in closing ch of next TP, ch 2; repeat from * 11 more times, join. (12 sc, 24 ch; 12 ch-2 sps) Fasten off B.
The chain arcs get shorter toward each end (3, 4, 5, 5, 4, 2 chains), so the tiers follow the curve of the sphere and the puffs look smaller near the top and bottom.
Border: Top Collar
The collar closes the cover around the ornament’s neck and gives the bow a solid base.
Collar gauge: 5 sc = 1 in (2.5 cm), the same as the cap.
Rnd 14 (A, conversion): Pull up A in any sc, ch 1, sc in each sc and 1 sc in each ch-2 sp around, join. (12 sc in sc + 12 sc in sps = 24 sc)
The collar now measures about 4.8 in (12.2 cm) around.
Rnd 15: Ch 1, *sc in next st, sc2tog; repeat from * 7 more times, join. (16 sc)
Rnd 16: Ch 1, sc in each st around, join. (16 sc)
Rnd 17: Sl st loosely in the back loop of each st around. (16 sl st) Fasten off, leaving a 6 in (15.2 cm) tail.
Work the collar firmly, since this is where the cover grips the ornament. Pull each sc2tog snug so the decreases sit flat against the neck.
Why the math works: Rnd 13 has 12 nodes and 12 ch-2 sps, so one sc in each gives an even 24. Decreasing 1 of every 3 sts leaves 16 sc. That’s 3.2 in (8.1 cm) around, or about 1 in (2.5 cm) across, which matches the neck of a standard 4 in (10.2 cm) fillable ornament. The collar hugs the cap without sliding.
Bow (Color B)
Bow loops: Ch 41.
Row 1: Sc in 2nd ch from hook and each ch across. (40 sc)
Row 2: Ch 1, turn, sc in each st across. (40 sc) Fasten off.
The strip measures 8 in (20.3 cm) long and about 0.4 in (1.0 cm) wide.
Tails: Ch 26.
Row 1: Sc in 2nd ch from hook and each ch across. (25 sc)
Row 2: Ch 1, turn, sc in each st across. (25 sc) Fasten off.
The tail strip measures 5 in (12.7 cm) long.
Assembly: Fold both ends of the loop strip to the center so each loop is 2 in (5.1 cm) wide. Fold the tail strip into a V and lay the loops on top. Wrap B tightly around the middle 10 times to make a round knot, then secure it on the back.
Hanging Cord (Color A)
Holding A double, ch 50 (about 10 in / 25.4 cm). Fold it into a 5 in (12.7 cm) loop and sew both ends inside the top of the collar. Sew the bow to the front of the collar, just below the cord.
Final Blocking
- Keep the ornament inside the cover.
- Mist the cover lightly with water.
- Roll each puff gently between your fingers so the strands sit straight and vertical.
- Nudge each node so it sits directly above and below its puff.
- Even out the diamonds so every tier lines up around the sphere.
- Shape the bow loops with your fingers and stuff them with a little tissue.
- Let it dry completely, away from heat, then remove the tissue.
- Test the lights again and turn the cover so the carried strands face the back.
Final Quality-Control Checklist
- Every puff tier has 12 TP.
- Every net round has 12 nodes.
- The puffs are staggered, each one centered inside a diamond.
- The equator measures 12.6 in (32.0 cm) with no gaps.
- The collar has 16 sts and hugs the neck.
- Carried strands are hidden at the back.
- The bow is centered under the cord.
- All ends are woven in.
Troubleshooting
Puffs look loose or uneven: Pull up all 11 loops to the same 0.75 in (1.9 cm) height and close firmly with the ch 1.
Diamonds look like straight rows: Make sure each TP goes into the middle of a chain arc, not into a node.
Cover is too loose at the top: Work Rnd 16 as (sc 2, sc2tog) 4 times, for 12 sc.
Cover won’t pass over the equator: Undo to Rnd 9 and lengthen each arc by 1 chain.
Puffs lean to one side: Make sure you insert the hook from front to back for every loop in a puff.
Bow droops: Add a third row of sc to both strips for extra body.
Carried yarn shows through the glass: Keep every round join in the same vertical line at the back.
Care
Spot clean only, with a damp cloth. Take out the lights and batteries before cleaning, and store the ornament in a box between seasons.
Final Notes
The measurements build on each other in a simple chain: a 0.75 in (1.9 cm) cap, puffs 0.75 in (1.9 cm) tall, a 12.6 in (32.0 cm) equator, and a 16-stitch collar that’s 3.2 in (8.1 cm) around. If every checkpoint matches, the cover will fit a 4 in (10.2 cm) ornament every time and glow like a small frosted lantern.
Happy crocheting!