

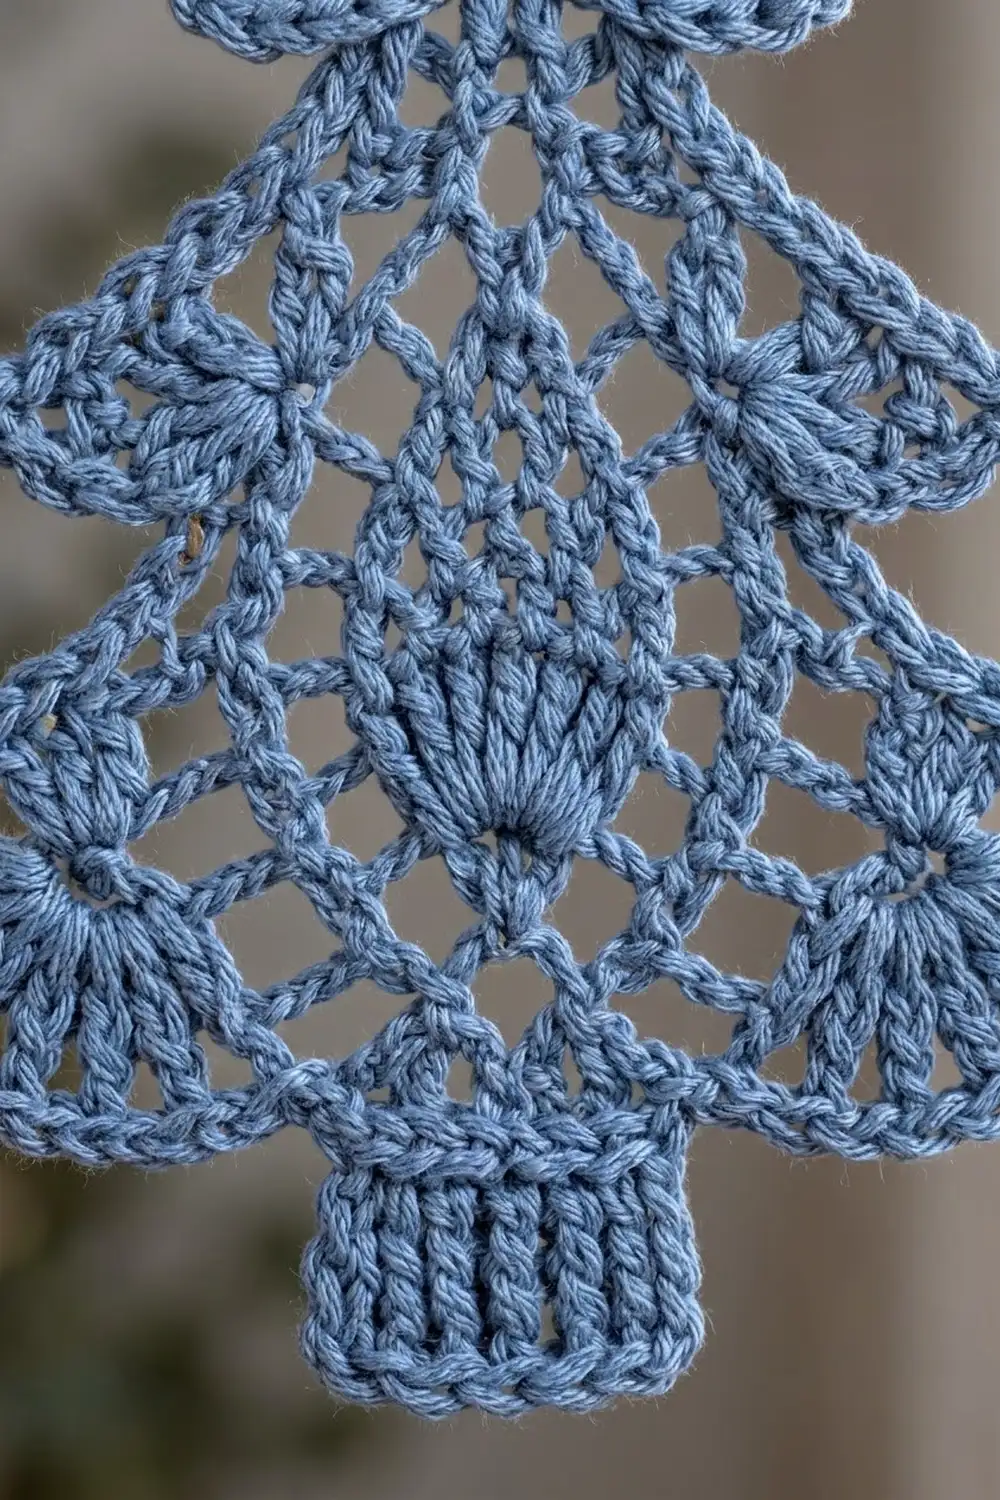
This tree ornament is open and lacy, made of three stacked tiers of filet-style mesh. Each tier ends in two flared fans, so the outline looks scalloped and layered, like snow-heavy branches. A solid teardrop “pinecone” sits in the center of the bottom tier above a third fan, and a small ribbed trunk anchors the whole tree.
The sample is in a single dusty denim blue. One soft color shows off the lace without looking busy, and it suits a calm, Scandinavian-style window. The pattern works just as well in white, sage, or cranberry.
All terms are US crochet terms. The finished ornament is 4.75 in (12.1 cm) wide and 5.85 in (14.9 cm) tall, not counting the hanging loop, which adds 1.5 in (3.8 cm).
The tree is worked top-down in rows, starting with a fan in a small ring at the apex. Each tier grows by one mesh space at each end per row and finishes with corner fans. The next tier is joined just inside those fans, so the fans overhang it. After that you add the trunk, then one round of single crochet around the outline, and the hanging loop goes on last.
Finished Size and Construction
- Finished size: 4.75 in (12.1 cm) wide x 5.85 in (14.9 cm) tall, plus a 1.5 in (3.8 cm) loop
- Skill level: Intermediate
- Terminology: US
- Yarn weight: Light (#3 / DK) mercerized cotton
- Hook: 3.0 mm
- Number of pieces: 1
- Layout: single piece, no joining
- Piece size before border: 4.5 in (11.4 cm) wide x 5.6 in (14.2 cm) tall
- Border depth: 1 round of sc, about 0.125 in (0.3 cm) on every edge
Materials
Yarn: Use a smooth mercerized cotton or cotton blend in DK weight. Mercerized cotton gives crisp fans, holds starch well, and won’t fuzz. Acrylic is fine too, but it needs stronger starch to stay flat.
- Dusty denim blue: 12 g, about 28 m (31 yd)
These quantities include a margin of roughly 20 percent for your gauge swatch and weaving in ends. A 50 g ball makes at least four ornaments.
Tools:
- 3.0 mm crochet hook
- Tapestry needle
- Scissors
- Rustproof pins and a foam blocking board
- Spray starch or a fabric stiffener
Abbreviations (US Terms)
- ch – chain
- sl st – slip stitch
- sc – single crochet
- dc – double crochet
- sp(s) – space(s)
- sk – skip
- st(s) – stitch(es)
- RS / WS – right side / wrong side
Special stitches and terms:
- Mesh space: a dc + ch 2 unit. A row with N spaces has N + 1 dc, counting the turning chain.
- Block: a filled mesh space. Over an open space, work 2 dc in the ch-2 sp and then dc in the next dc. Over a block, work dc in each of the next 3 dc.
- Fan: 7 dc worked into one ch-2 sp. At the start of a row, the ch 3 plus 6 dc in the first sp count as the fan. At the end of a row, 6 dc in the last sp plus the dc in the turning chain count as the fan.
- Increase row: Ch 5 (counts as dc + ch 2), dc in the st at the base of the ch-5, ch 2, dc in next dc; repeat from * across, working the last dc in the 3rd ch of the turning ch; ch 2, dc in same ch. This takes the row from N to N + 2 spaces.
- Standing dc: start with a slipknot on the hook and work a dc without joining with a sl st first.
Gauge and Checkpoints
Mesh gauge: 5 mesh spaces and 5 rows = 2 in (5.1 cm) square, after blocking.
Solid gauge: 7 dc = 1 in (2.5 cm).
Lace size depends almost entirely on gauge, so make Tier 1 first as a test. Then check each stage against these measurements:
- After Row 3: 5 spaces measure 2 in (5.1 cm) across.
- After Row 4 (Tier 1): 2.25 in (5.7 cm) wide with the fans and 1.6 in (4.1 cm) tall.
- After Row 7 (Tier 2): 3 in (7.6 cm) wide with the fans and 2.8 in (7.1 cm) tall in total.
- After Row 11 (Tier 3): 4.5 in (11.4 cm) wide with the fans and 4.4 in (11.2 cm) tall in total.
- After the trunk: 5.6 in (14.2 cm) tall in total.
If your piece is too big, go down to a 2.75 mm hook or keep your ch-2 spaces snugger. If it is too small, go up to a 3.25 mm hook. Stitch counts stay the same either way; only the hook changes.
Pattern
Tier 1 (Top)
Ring: Ch 4, sl st in first ch to form a ring.
Row 1 (RS): Ch 3 (counts as dc), 6 dc in ring. Turn. (7 dc: this is the apex fan.)
Row 2 (WS): Ch 5 (counts as dc + ch 2), sk next dc, dc in next dc, ch 2, sk next dc, dc in next dc, ch 2, sk next dc, dc in top of turning ch. Turn. (4 dc, 3 spaces)
Row 3 (RS): Work an Increase row. Turn. (6 dc, 5 spaces)
Row 4 (WS, fan edge): Ch 3 (counts as dc), 6 dc in first ch-2 sp (fan made), dc in next dc, ch 2, dc in next dc 3 times, 6 dc in last ch-2 sp, dc in 3rd ch of turning ch (fan made). Fasten off. (2 fans of 7 dc, 4 framing dc, 3 middle spaces)
Each fan takes up one outer space. That leaves 3 middle spaces between the two framing dc that sit just inside the fans.
Tier 2 (Middle)
Row 5 (RS): With RS facing, join with a standing dc in the framing dc just inside the right-hand fan. Ch 2, dc in same st (increase), ch 2, dc in next dc 3 times, ending in the other framing dc, then ch 2, dc in same st. Turn. (6 dc, 5 spaces)
The new outer spaces sit under the Tier 1 fans, so the fans overhang this tier.
Row 6 (WS): Work an Increase row. Turn. (8 dc, 7 spaces)
Row 7 (RS, fan edge): Ch 3, 6 dc in first sp, dc in next dc, ch 2, dc in next dc 5 times, 6 dc in last sp, dc in 3rd ch of turning ch. Fasten off. (2 fans of 7 dc, 6 framing dc, 5 middle spaces)
Tier 3 (Bottom, With Pinecone)
Row 8 (WS): With WS facing, join with a standing dc in the framing dc just inside the right-hand fan. Ch 2, dc in same st, ch 2, dc in next dc twice, 2 dc in next ch-2 sp, dc in next dc (center block made), ch 2, dc in next dc twice, ch 2, dc in same st. Turn. (10 dc, 7 spaces: 6 open + 1 block)
The block falls in space 4, directly over the center space of Row 7. This is the point of the pinecone.
Row 9 (RS): Ch 5, dc in same st, ch 2, dc in next dc twice, 2 dc in next sp, dc in next dc (block), dc in each of next 3 dc (block over block), 2 dc in next sp, dc in next dc (block), ch 2, dc in next dc twice, working the last dc in the 3rd ch of turning ch, ch 2, dc in same ch. Turn. (16 dc, 9 spaces: 6 open + 3 blocks in spaces 4–6)
Row 10 (WS): Ch 5, dc in same st, ch 2, dc in next dc 3 times, dc in each of next 3 dc (block), ch 2, sk 2 dc, dc in next dc (open center), dc in each of next 3 dc (block), ch 2, dc in next dc 3 times, working the last dc in the 3rd ch of turning ch, ch 2, dc in same ch. Turn. (16 dc, 11 spaces: 9 open + 2 blocks in spaces 5 and 7)
With a single block, then three, then two blocks around an opening, the pinecone forms a pointed teardrop.
Row 11 (RS, fan edge): Ch 3, 6 dc in first sp, dc in next dc, ch 2, dc in next dc 3 times, ch 2, sk 2 dc, dc in next dc, 7 dc in next ch-2 sp (center fan), dc in next dc, ch 2, sk 2 dc, dc in next dc, ch 2, dc in next dc 3 times, 6 dc in last sp, dc in 3rd ch of turning ch. Fasten off. (31 dc: 3 fans of 7 dc + 10 framing dc; 8 open spaces)
Check the result: space 1 + spaces 2–5 + center space 6 + spaces 7–10 + space 11 = 11 spaces, the same as Row 10.
Trunk
Row 1: With RS facing, join with a standing dc in the framing dc just before the center fan, dc in each of the 7 fan sts, dc in the framing dc after the fan. Turn. (9 dc)
Rows 2–3: Ch 3 (counts as dc), dc in each st across. Turn. (9 dc)
After Row 3, fasten off. The trunk measures about 1.25 in (3.2 cm) wide x 1.2 in (3.0 cm) tall, and the dc posts stack into neat ribbed columns.
Border
Border gauge: 5 sc = 1 in (2.5 cm) along the edge. A mesh or dc row is 0.4 in (1.0 cm) tall, so 2 sc per row-end matches it exactly and the edge lies flat without ruffling or cupping.
Round 1 (RS): Join with a standing sc at the apex, around the ring. Work 2 more sc around the ring (3 sc at the apex).
Side 1, down from the apex (43 sc):
– 2 sc in each row-end of Rows 1–3 (6)
– Row 4 fan: 2 sc in the outer row-end, then sc in each of the 7 fan tops (9)
– 2 sc in each row-end of Rows 5–6 (4)
– Row 7 fan: same as Row 4 (9)
– 2 sc in each row-end of Rows 8–10 (6)
– Row 11 fan: same as Row 4 (9)
Bottom segment 1 (12 sc): Sc in next framing dc, 2 sc in next sp, sc in next dc 3 times, 2 sc in next sp, ending at the trunk.
Trunk side 1 (6 sc): 2 sc in each of the 3 trunk row-ends.
Trunk bottom (13 sc): 3 sc in first st, sc in each of next 7 sts, 3 sc in last st. The 9 trunk sts already include both corner sts, so each corner adds only 2 sc: 9 + 4 = 13.
Trunk side 2 (6 sc), Bottom segment 2 (12 sc), Side 2 up to the apex (43 sc): Work these as a mirror image of the first half.
Join with a sl st to the first sc. Total: 3 + 43 + 12 + 6 + 13 + 6 + 12 + 43 = 138 sc.
Why the math works: Each fan gets exactly 1 sc per top, so its curve isn’t stretched or pulled in. Each bottom segment covers 4 spaces and 4 dc. Each space gets 2 sc for its 2 chains, and each dc gets 1 sc. The trunk dc that connects to the tree is skipped because the trunk already uses it, so you get 4 x 2 + 3 + 1 = 12. The two sides are mirror images, so the tree stays symmetrical.
Hanging Loop
Sl st into the center apex sc, ch 22, sl st in the same sc. Ch 1, then work 30 sc over the chain loop and sl st to the apex. Fasten off. The loop stands 1.5 in (3.8 cm) above the tree.
Final Blocking
- Weave in all ends along mesh dc posts, not across open spaces.
- Soak the ornament in cool water for 5 minutes, then roll it in a towel to press out the excess.
- Pin it RS up on the foam board at 4.75 in (12.1 cm) wide x 5.85 in (14.9 cm) tall.
- Put a pin at the tip of every fan so all seven fans flare evenly.
- Pin the trunk into a straight rectangle and the loop into a neat oval.
- Square up the mesh openings with your fingertips, or with a pin through each space.
- Spray with starch or brush on fabric stiffener, then let it dry completely, at least 12 hours.
Final Quality-Control Checklist
- The row counts read 3, 5, 7, 7, 9, 11 spaces in Rows 2, 3, 6, 8, 9, 10.
- Every fan has exactly 7 dc.
- The pinecone reads 1, 3, 2 blocks from top to bottom, with an open center above the bottom fan.
- The trunk is 9 dc wide and 3 rows tall.
- The border totals 138 sc, with 43 on each side.
- The finished size is 4.75 in (12.1 cm) x 5.85 in (14.9 cm).
- The ornament hangs straight from its loop.
Troubleshooting
Fans curl or cup: Your tension is too tight on the fan dc. Loosen up slightly, and pin the fans hard when you block.
Tree leans to one side: You probably missed a turning chain. Count each row’s dc against the totals above.
Pinecone sits off-center: Count the spaces before the first block. It must fall in space 4 of Row 8.
Border ruffles: You have more than 2 sc per row-end. Rework those row-ends with exactly 2.
Border pulls in: Go up a hook size for the border round only.
Trunk too narrow: You probably worked into the fan with only 7 sts. Make sure both framing dc are included, for 9 sts in all.
Care
Hand wash in cool water with mild soap, press it dry in a towel, and re-block with starch whenever the ornament starts to soften. Store it flat between tissue paper.

Final Notes
The measurement chain runs like this. The 2 in (5.1 cm) gauge sets Tier 1 at 2.25 in (5.7 cm), Tier 2 at 3 in (7.6 cm), and Tier 3 at 4.5 in (11.4 cm) wide. The trunk brings the height to 5.6 in (14.2 cm). The 138-sc border then takes the ornament to 4.75 in (12.1 cm) x 5.85 in (14.9 cm), with a 1.5 in (3.8 cm) loop on top. If you check each stage, the tree will block square and symmetrical every time.
Happy crocheting!