

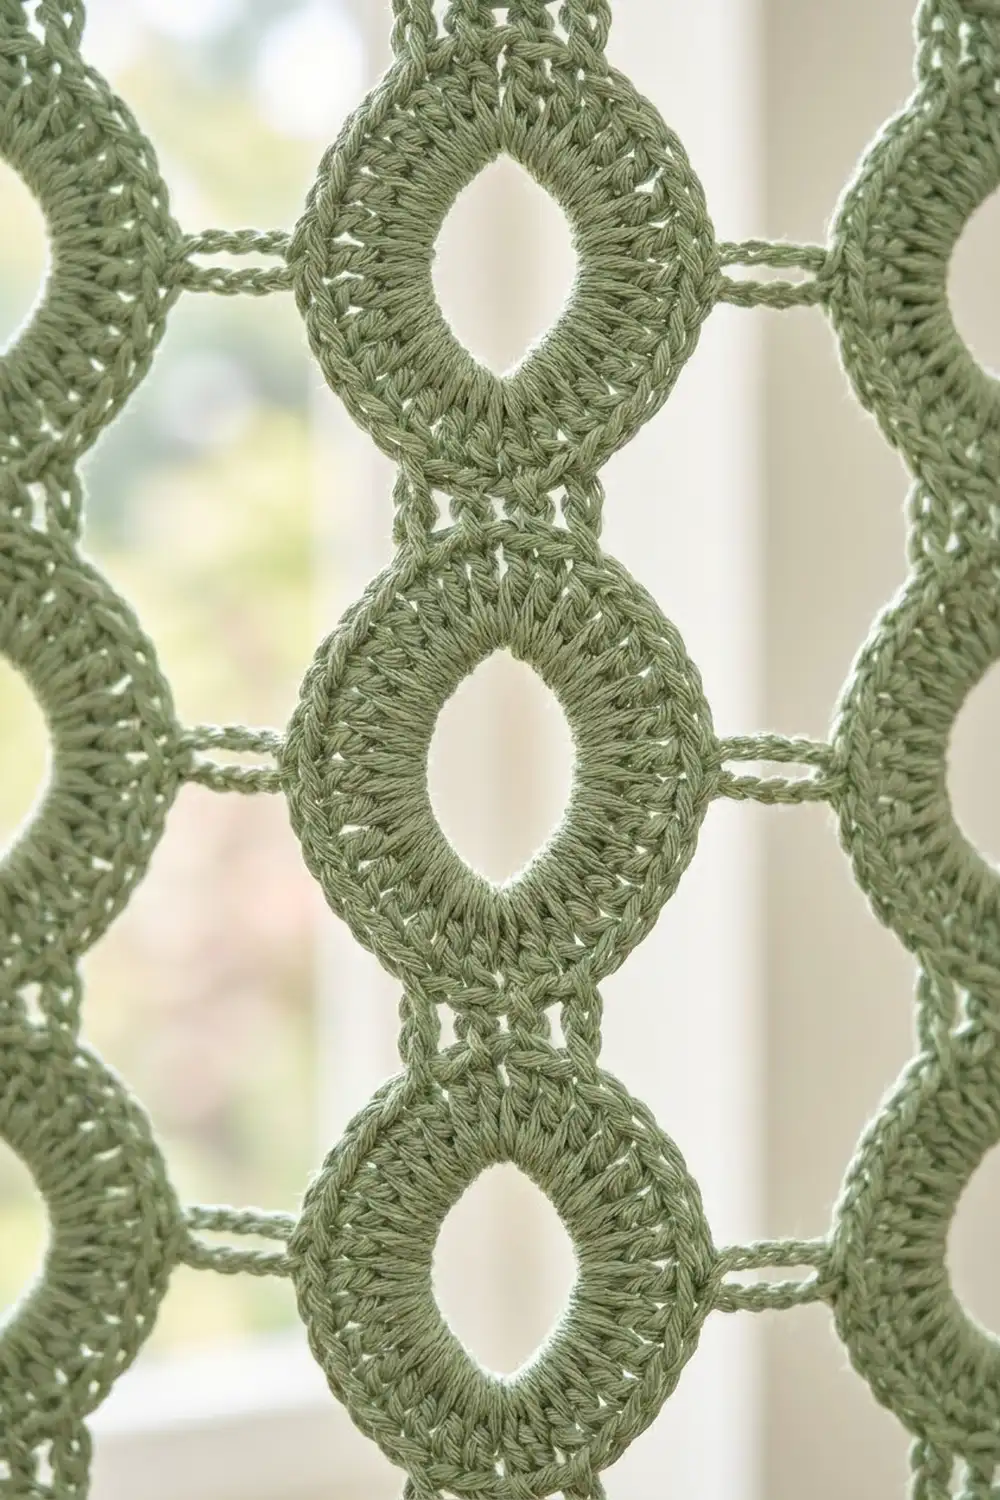
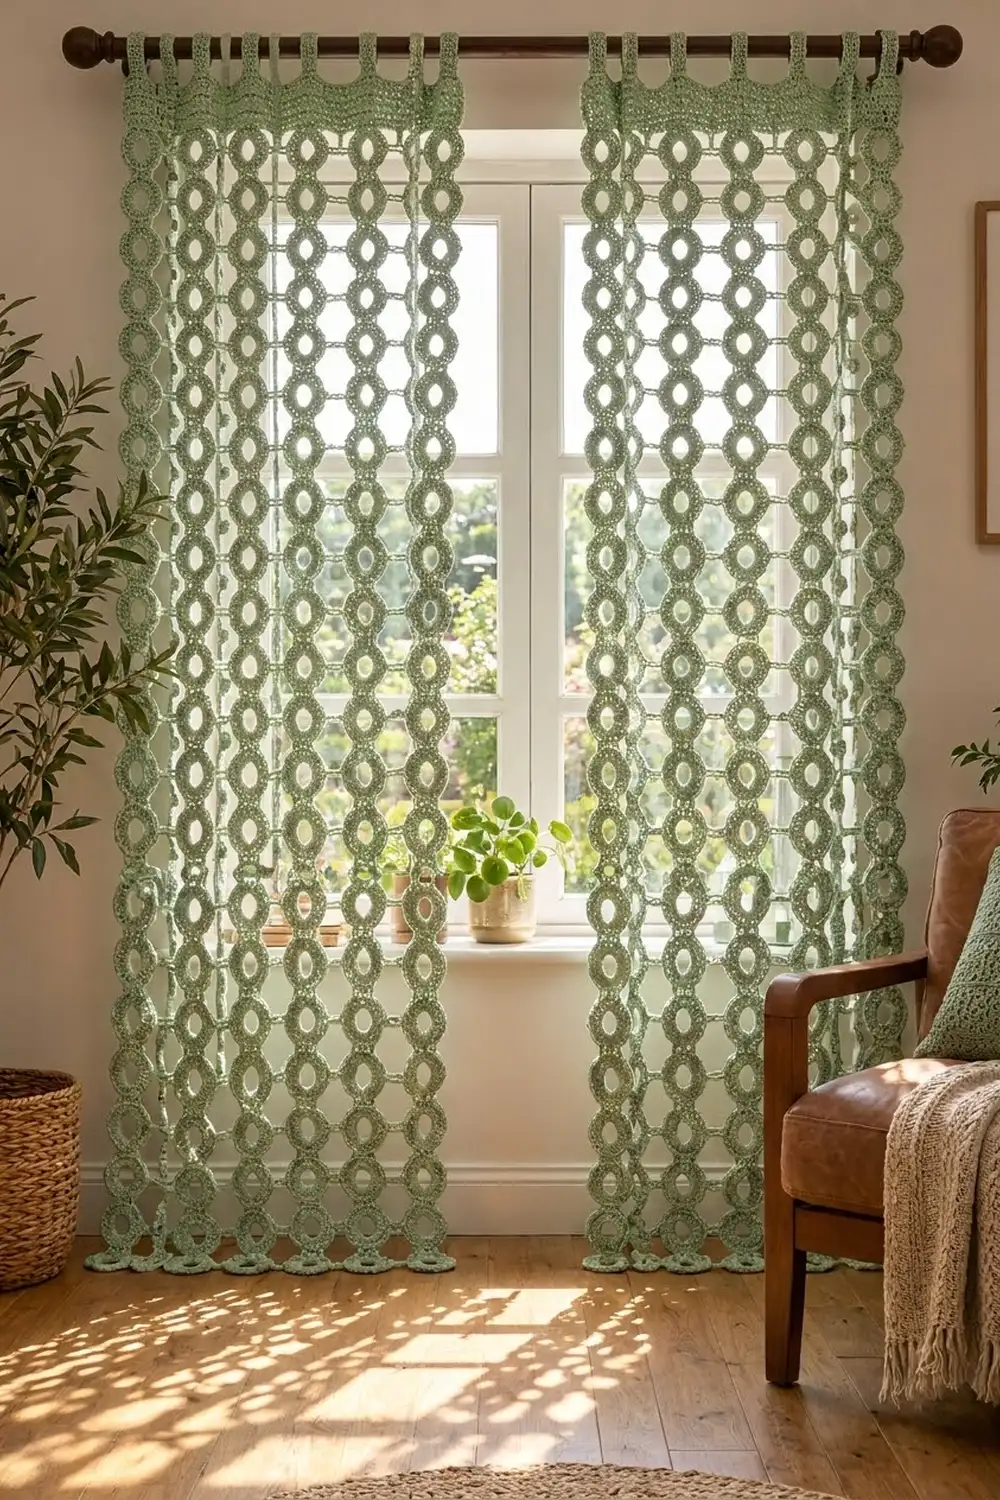
The Sage Ring Lattice Curtain is a pair of airy, light-filtering panels built entirely from small crochet rings. Each ring has a pointed almond opening, so the strands look like rows of seeds or leaves. Short chain bridges hold the strands together and leave narrow windows of light between them.
The design uses one calm color, sage green, in DK-weight cotton. The look is modern farmhouse and works well in a sunny living room or bedroom. The pattern uses US crochet terms throughout.
Each finished panel measures about 37 in (94.0 cm) wide and 81.25 in (206.4 cm) long from the top of the header band to the hem, plus tab loops that rise about 2.5 in (6.4 cm) above the header when hung. You make two panels.
Construction is simple and repetitive. You make one ring at a time and join it as you go: each ring joins to the ring below it at the points and to the neighboring strand at the side. Once all 10 strands of 26 rings are joined, you work a solid header band across the top rings, then add 8 hanging tabs.
Finished Size and Construction
- Finished panel size: 37 in (94.0 cm) wide × 81.25 in (206.4 cm) long, excluding tabs
- Skill level: Intermediate (easy stitches, careful joining)
- Terminology: US crochet terms
- Yarn weight: DK (light worsted / 3), cotton or cotton blend
- Hook: 4.0 mm (US G-6)
- Number of pieces: 260 ring motifs per panel, 520 for the pair, joined as you go into 2 panels
- Layout per panel: 10 strands wide × 26 rings tall
- Single ring size: 3 in (7.6 cm) diameter
- Size before header band: 36.75 in (93.3 cm) wide × 78 in (198.1 cm) long
- Header band depth: 3.25 in (8.3 cm)
Materials
Yarn: Choose a smooth, mercerized or matte DK cotton. Cotton holds the ring shape crisply and hangs straight under its own weight. Avoid fuzzy or very stretchy yarns, because long panels will grow.
- Sage green: 2,200 g / about 5,280 m in total for the pair (about 1,100 g / 2,640 m per panel). That’s forty-four 50 g / 120 m (131 yd) balls.
These quantities include a margin of about 10% for swatching, tails, and dye-lot safety. Buy everything from one dye lot.
Tools:
– 4.0 mm (US G-6) crochet hook
– Tapestry needle
– 12 or more locking stitch markers
– Measuring tape
– Spray bottle and rust-proof pins
– Large flat surface or foam mats for blocking
– Curtain rod (up to 1.25 in / 3.2 cm diameter)
Abbreviations (US Terms)
- ch – chain
- sl st – slip stitch
- sc – single crochet
- hdc – half double crochet
- dc – double crochet
- st(s) – stitch(es)
- RS / WS – right side / wrong side
Special technique – Drop-Loop Join (DLJ): Take the hook out of the working loop. Insert the hook from front to back through the top of the named stitch on the neighboring ring, pick up the dropped loop, and pull it through. A DLJ is not counted as a stitch.
Special technique – Side Bridge: Ch 2, sl st into the space between the named stitches of the neighboring ring, ch 2. A bridge is not counted in the ring’s stitch total.
Gauge and Checkpoints
Ring gauge: One ring = 3 in (7.6 cm) across after blocking.
Header gauge: 19 dc and 10 rows = 4 in (10.2 cm).
Test before committing. Make 3 rings joined vertically into a short strand, then block it.
- After Rnd 1: the ring measures about 2 in (5.1 cm) across.
- After Rnd 2: the ring measures 3 in (7.6 cm) across, and the opening is about 1.25 in (3.2 cm) tall × 0.75 in (1.9 cm) wide.
- Three-ring strand: 9 in (22.9 cm) tall.
If your ring is bigger than 3 in (7.6 cm), go down half a hook size. If it’s smaller, go up half a size. Every 0.25 in (0.6 cm) of error on one ring adds 6.5 in (16.5 cm) over a 26-ring strand, so take this step seriously.
Ring Motif
Each ring starts at the top point and works counterclockwise, with the RS facing.
Foundation: Ch 16, sl st in the first ch to form a ring.
Rnd 1: Ch 1 (does not count as a st). Working into the ring: [1 sc, 2 hdc, 8 dc, 2 hdc, 1 sc] twice. Sl st to the first sc. (28 sts)
The short sc and hdc at top and bottom hug the chain ring, while the tall dc along the sides push outward. This pinch creates the almond-shaped opening. Two sc sit together at the top point (sts 28 and 1) and two at the bottom point (sts 14 and 15).
Rnd 2: Ch 2 (does not count as a st). Work the first half:
– 2 dc in the first sc
– 2 hdc in each of the next 2 hdc
– [sc in each of the next 3 dc, 2 sc in the next dc] twice
– 2 hdc in each of the next 2 hdc
– 2 dc in the next sc (22 sts for this half)
Repeat for the second half. Sl st to the first dc. (44 sts) Fasten off and leave a 4 in (10.2 cm) tail.
Reference map for Rnd 2 (you’ll use it for every join):
– Sts 1–2: dc (top point, left of center)
– Sts 3–6: hdc
– Sts 7–16: sc (left side, top to bottom)
– Sts 17–20: hdc
– Sts 21–24: dc (bottom point; center falls between sts 22 and 23)
– Sts 25–28: hdc
– Sts 29–38: sc (right side, bottom to top)
– Sts 39–42: hdc
– Sts 43–44: dc (top point; center falls between sts 44 and 1)
The tall dc at the points balance the short sc at the points in Rnd 1, which brings the outer edge back to a round shape. The center of the left side falls between sts 11 and 12. The center of the right side falls between sts 33 and 34.
Make All Pieces
Each panel has 260 rings in 10 strands of 26. For the pair:
- Sage green: 520 rings in total (260 per panel)
Number the strands 1 to 10 from right to left with the RS facing you. Number the rings 1 to 26 from the hem up.
Strand:  10  9  8  7  6  5  4  3  2  1
Ring 26:  O--O--O--O--O--O--O--O--O--O   (header band above)
Ring 25:  O--O--O--O--O--O--O--O--O--O
  ...     |  |  |  |  |  |  |  |  |  |
Ring 2:   O--O--O--O--O--O--O--O--O--O
Ring 1:   O--O--O--O--O--O--O--O--O--O   (hem)
O = ring   -- = side bridge   | = point join
Joining
All joining happens during Rnd 2, so you never sew rings together.
Strand 1 (rightmost):
– Ring 1: Work the full ring with no joins.
– Rings 2–26: Work Rnd 2 as written through st 22, then DLJ into st 1 of the ring below. Work st 23, then DLJ into st 44 of the ring below. Complete the round.
The two joins sit at the matching center stitches: the new ring’s st 22 (left of bottom center) meets the lower ring’s st 1 (left of top center). St 23 meets st 44 in the same way on the right. This fuses the rings into a neat waist without adding stitches.
Strands 2–10: Work each ring on the same level as its neighbor in the previous strand.
– Ring 1 of each strand: Work Rnd 2 through st 33, then make a Side Bridge into the space between sts 11 and 12 of Ring 1 in the strand to the right. Continue with st 34 and complete the round.
– Rings 2–26: Make the two point joins exactly as in Strand 1, plus the Side Bridge after st 33.
The right side of the new ring (sts 29–38) faces the left side of its neighbor (sts 7–16), so the bridges always land at both rings’ widest points.
Tension: Make the DLJ loop snug but not tight. Pulling hard puckers the waist. The bridge chains should match your normal chain size. Tight bridges narrow the panel, and loose ones let the strands sag apart.
Size checkpoint: After Strands 1–3, the width is 3 × 3 in + 2 × 0.75 in = 10.5 in (26.7 cm). After all 10 strands, the ring section measures 36.75 in (93.3 cm) wide × 78 in (198.1 cm) long.
Weave in all tails along the inside of the rings as you go.
Header Band (Border)
The header is a solid band worked across the top arcs of the 10 top rings (Ring 26 in every strand). Work it at the header gauge of 19 dc and 10 rows = 4 in (10.2 cm).
Row 1 (RS): Join the yarn at st 38 of Ring 26 in Strand 1. Work across the top arc of that ring:
– dc in st 38
– hdc in sts 39–40
– sc in sts 41–44 and sts 1–4 (8 sc)
– hdc in sts 5–6
– dc in st 7 (14 sts)
Then ch 4 to span the gap and work the same 14 sts across the next ring. Repeat across all 10 rings, ending at st 7 of Strand 10. Turn.
Row 1 count: (10 rings × 14 sts) + (9 gaps × 4 ch) = 140 + 36 = 176 sts
The 4 ch in each gap are the only stitches added between rings. They are shown exactly above and are not repeated anywhere else. The dc at each end of an arc lifts the low ring edge to meet the chains, while the sc over the high center stay low. This turns the wavy ring tops into a straight edge.
Row 2 (WS): Ch 3 (counts as dc), dc in each st and each ch across. (176 sts) Turn.
Rows 3–8: Repeat Row 2. (176 sts each row)
Row 9 (RS): Ch 1, sc in each st across. (176 sts) Do not fasten off.
Why the math works: At 19 sts per 4 in, 176 sts = 37.05 in, which is about 37 in (94.0 cm). That’s within 0.25 in (0.6 cm) of the 36.75 in (93.3 cm) ring section, so the header lies flat without ruffling or pulling in. The depth is 1 sc row plus 7 dc rows plus 1 sc row = 3.25 in (8.3 cm).
Tabs (make 8):
– Tab placement: Tabs sit at sts 1–8, 25–32, 49–56, 73–80, 97–104, 121–128, 145–152, and 169–176. That’s 8 tabs of 8 sts (64) plus 7 gaps of 16 sts (112), for a total of 176.
– Each tab: Join at the first stitch of the tab. Ch 1, sc in 8 sts. Turn and repeat for 28 rows in total, about 5 in (12.7 cm). Fasten off and leave a 12 in (30.5 cm) tail.
– Finishing the tabs: Fold each tab to the WS and sew its last row across Row 7 of the header.
Each tab is about 1.75 in (4.4 cm) wide, and the gaps between tabs are about 3.4 in (8.6 cm).
Final Blocking
- Lay the panel flat on foam mats or a clean floor covered with towels, RS up.
- Mist it with water until it’s evenly damp but not dripping.
- Pin the header band straight to 37 in (94.0 cm) wide.
- Align each strand vertically and pin through ring centers every few rings.
- Gently shape each opening into a neat almond, about 1.25 in × 0.75 in (3.2 cm × 1.9 cm).
- Check that the length from the header top to the hem is 81.25 in (206.4 cm).
- Let it dry completely before unpinning, then repeat for the second panel.
Final Quality-Control Checklist
- [ ] Each panel has 10 strands × 26 rings = 260 rings
- [ ] Every ring has 44 sts in Rnd 2
- [ ] Each waist has exactly 2 point joins
- [ ] Each ring in Strands 2–10 has one bridge at its widest point
- [ ] Header Rows 1–9 each have 176 sts
- [ ] 8 tabs are evenly spaced, with 16 sts between tabs
- [ ] The panel measures 37 in (94.0 cm) × 81.25 in (206.4 cm)
- [ ] Both panels match in length to within 0.5 in (1.3 cm)
- [ ] All tails are woven into the ring interiors
Troubleshooting
The rings cup or ruffle. If they cup, Rnd 2 is too tight, so go up half a hook size. If they ruffle, check that you didn’t add extra increases. Recount to 44.
The opening is round instead of almond-shaped. Rnd 1 is too loose at the points. Keep the sc at the points snug against the ring.
The strands lean or zigzag. A bridge was placed off-center. Check that it falls between sts 33 and 34 of the new ring and sts 11 and 12 of its neighbor.
The header ripples. Your header gauge is too loose. Rework it with a smaller hook so that 176 sts measure 37 in (94.0 cm).
One panel is longer. Cotton relaxes when it hangs. Re-block both panels together and keep your tension consistent from ring to ring.
Care
Hand wash in cool water or use a gentle machine cycle in a mesh bag, then reshape and dry flat. Don’t hang the panels wet, because the weight of the water stretches them.
Final Notes
The measurement chain is simple:
– One ring is 3 in (7.6 cm).
– 26 rings make a 78 in (198.1 cm) strand.
– 10 strands with 9 bridges of 0.75 in (1.9 cm) make 36.75 in (93.3 cm).
– The 176-stitch header measures 37 in (94.0 cm) and adds 3.25 in (8.3 cm), for a finished length of 81.25 in (206.4 cm).
Check your first ring carefully, and the rest of the pattern follows naturally.
Happy crocheting!