

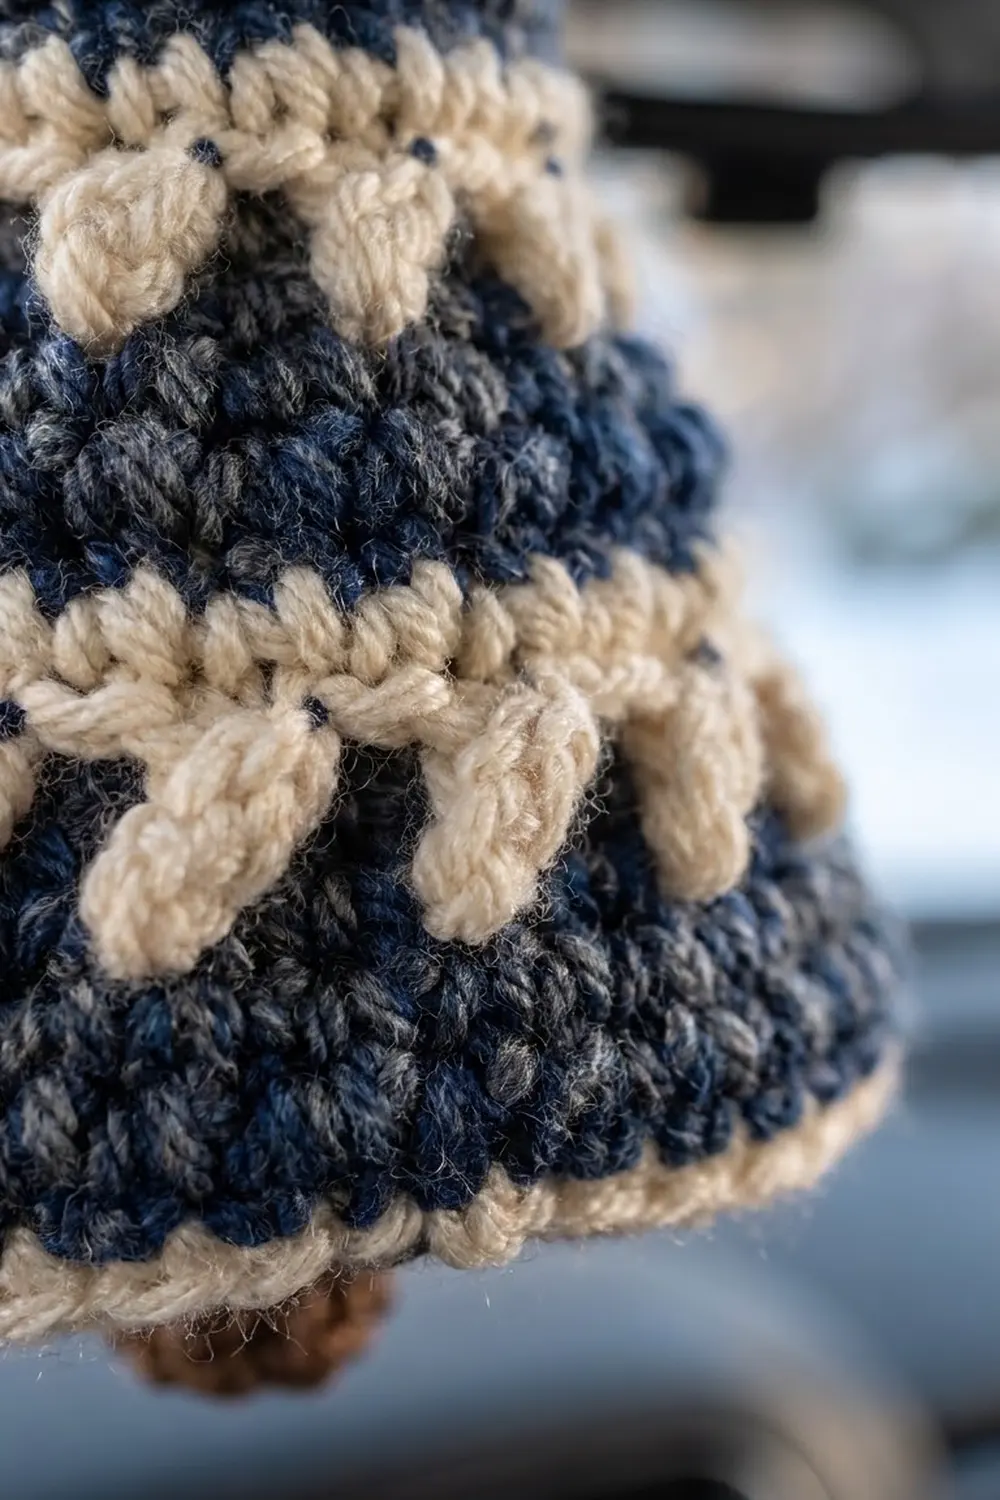
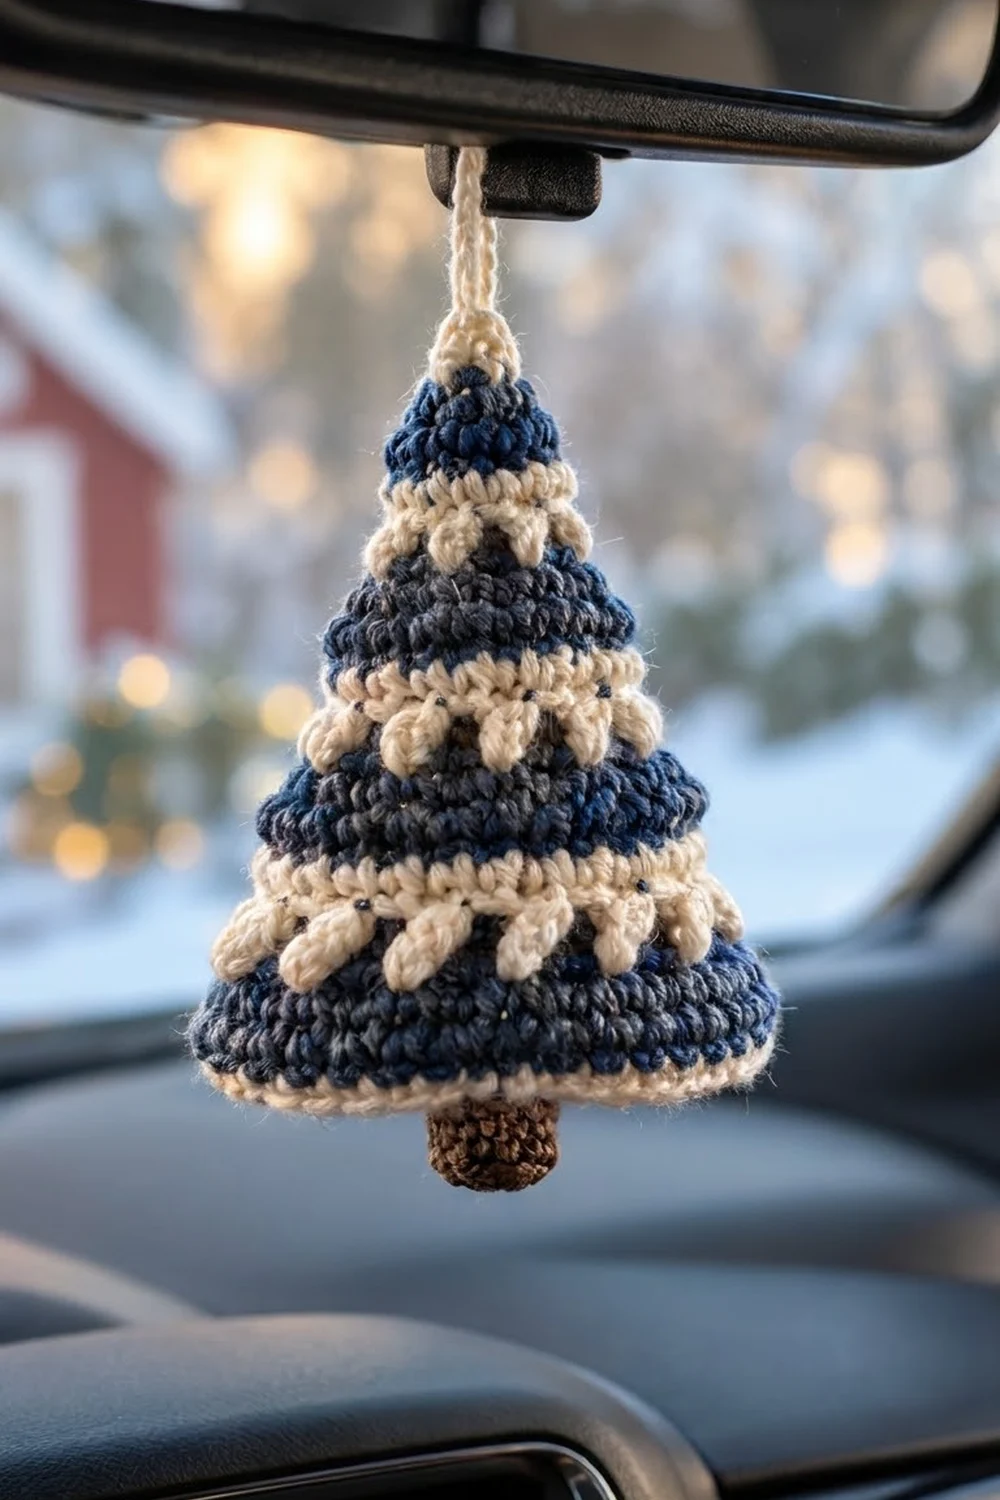
This little tree is a single 3D cone ornament. It has heathered navy and slate-gray stripes, and each stripe is topped with a cream band of long spike stitches. The spikes hang down over the dark yarn like snow sliding off pine branches. A short brown trunk sits under a crisp cream base rim, and a cream cord loop at the tip lets you hang it from a rearview mirror, a tree branch, or a door knob.
The palette is quiet and wintry: deep navy, soft charcoal-blue gray, warm cream, and chocolate brown. It works for modern farmhouse decor, a gift topper, or a cozy car charm.
The pattern uses US crochet terms. The finished ornament is about 3.2 in (8.1 cm) across the base before the border and 3.5 in (8.9 cm) after it. The cone is about 3.9 in (9.9 cm) tall, or 4.6 in (11.7 cm) including the trunk. The hanging loop adds about 2.5 in (6.4 cm).
You work it in one continuous piece from the bottom up. First the trunk, then a flat base disc, then the cone walls, which decrease to the tip. The spike stitches only point downward because the cone is worked bottom-up. To finish, you add a one-round ledge border around the base and a slip-stitch cord loop at the top.
Finished Size and Construction
- Finished size: 3.5 in (8.9 cm) base diameter with border; 4.6 in (11.7 cm) tall with trunk, loop not included
- Skill level: Easy-intermediate (spiral rounds, color changes, spike stitches)
- Terminology: US crochet terms
- Yarn weight: DK (light worsted, #3)
- Hook: 3.0 mm (between US C-2 and D-3)
- Number of pieces: 1 (a single, seamless 3D ornament)
- Layout: Not applicable, single piece
- Piece size: cone 3.9 in (9.9 cm) tall; trunk 0.7 in (1.8 cm) tall and 0.6 in (1.5 cm) wide
- Size before border: 3.2 in (8.1 cm) base diameter
- Border depth: about 0.15 in (0.4 cm) per side
Materials
Pick a smooth DK cotton, cotton blend, or acrylic. A slightly heathered navy and gray will give you the soft, tweedy look in the photo. A firm yarn holds the cone shape better than a fuzzy or very drapey one.
The amounts below assume about 230 m per 100 g:
- Cream (A): 25 g / 58 m (base, rim, spike bands, border, loop)
- Navy (B): 10 g / 23 m
- Slate gray (C): 8 g / 18 m
- Brown (D): 5 g / 12 m
All quantities include a margin for swatching and weaving in ends.
Tools:
- 3.0 mm hook
- Stitch marker
- Tapestry needle
- Scissors
- Polyester fiberfill, about 5 g
- Optional: a 3 in (7.6 cm) circle of plastic canvas or stiff card to keep the base flat
Abbreviations (US Terms)
- MR – magic ring
- ch – chain
- sc – single crochet
- inc – 2 sc in the same stitch
- dec – single crochet 2 together (invisible decrease recommended)
- sl st – slip stitch
- BLO / FLO – back loop only / front loop only
- st(s) – stitch(es)
- ( ) x N – repeat the sequence in parentheses N times
Spike sc (spike): Look at the next stitch. The stitch you would normally work into counts as 1 round below. Count down to the stitch 3 rounds below in the same column. Insert your hook through the fabric there, yarn over, and pull up a long loop to the height of the current round. Yarn over and pull through both loops. Skip the stitch behind the spike in the current round. Each spike counts as 1 st and is about 0.5 in (1.3 cm) long.
Gauge and Checkpoints
Gauge: 6 sc and 6 rounds = 1 in (2.5 cm) in sc worked in the round.
The trunk and base disc work as your test piece, so check them before you go on to the walls:
- After Round 6 (trunk): circumference is 2 in (5.1 cm), width is about 0.6 in (1.5 cm).
- After Round 14 (base disc): the disc lies flat and measures 3.2 in (8.1 cm) across.
- After Round 16 (rim): circumference is 10 in (25.4 cm).
- After Round 39 (tip): the cone is 3.9 in (9.9 cm) tall from base to tip.
If the disc is larger than 3.2 in (8.1 cm), go down to a 2.75 mm hook. If it’s smaller, or the fabric is stiff enough to curl, go up to a 3.25 mm hook. If the disc ruffles at the right size, your increases are drifting: stagger them, and count every round. Tight sc matters here so the stuffing won’t show through.
Pattern
Work in a continuous spiral and do not join rounds. Move the marker up to the first stitch of each round. To change color, work the last stitch of the old color up to the final yarn over, then pull the new color through. Carry the colors loosely up the inside, or cut them and leave 4 in (10.2 cm) tails. Keep the color jogs lined up at the back.
Trunk (Brown, D)
Round 1: 6 sc in MR. (6)
Round 2: inc in each st around. (12)
Round 3: in BLO, sc around. (12) This turns the bottom edge.
Rounds 4–6: sc around. (12)
Stuff the trunk firmly.
Base Disc (Cream, A)
Change to A on the last stitch of Round 6.
Round 7: in FLO, (sc, inc) x 6. (18) Working in the FLO turns the work out flat.
Round 8: (2 sc, inc) x 6. (24)
Round 9: (3 sc, inc) x 6. (30)
Round 10: (4 sc, inc) x 6. (36)
Round 11: (5 sc, inc) x 6. (42)
Round 12: (6 sc, inc) x 6. (48)
Round 13: (7 sc, inc) x 6. (54)
Round 14: (8 sc, inc) x 6. (60)
Checkpoint: the disc is flat and 3.2 in (8.1 cm) across.
Base Rim (Cream, A)
Round 15: in BLO, sc around. (60) The front loops of Round 14 stay free for the border.
Round 16: sc around. (60)
If you’re using the plastic canvas circle, drop it in now so it rests on the base disc.
Cone Walls
The walls are made of dark bands, each followed by a two-round cream band. The second cream round of each band holds the spikes. Spike rounds have no decreases, so their counts stay the same.
Dark Band 1 (Navy, B)
Round 17: sc around. (60)
Round 18: (8 sc, dec) x 6. (54)
Round 19: sc around. (54)
Snow Band 1 (Cream, A)
Round 20: sc around. (54)
Round 21: (2 sc, spike) x 18. (54) Each spike goes into Round 18, so it covers the cream of Round 20 and the navy of Round 19.
Dark Band 2 (Gray, C)
Round 22: (7 sc, dec) x 6. (48)
Round 23: sc around. (48)
Round 24: (6 sc, dec) x 6. (42)
Snow Band 2 (Cream, A)
Round 25: sc around. (42)
Round 26: (2 sc, spike) x 14. (42) The spikes go into Round 23.
Dark Band 3 (Navy, B)
Round 27: (5 sc, dec) x 6. (36)
Round 28: sc around. (36)
Round 29: (4 sc, dec) x 6. (30)
Stuff the lower cone lightly. Shape it from the inside so the base stays flat and the walls stay straight, not rounded.
Snow Band 3 (Cream, A)
Round 30: sc around. (30)
Round 31: (2 sc, spike) x 10. (30) The spikes go into Round 28.
Dark Band 4 (Gray, C)
Round 32: (3 sc, dec) x 6. (24)
Round 33: sc around. (24)
Round 34: (2 sc, dec) x 6. (18)
Snow Band 4 (Cream, A)
Round 35: sc around. (18)
Round 36: (2 sc, spike) x 6. (18) The spikes go into Round 33.
Tip (Navy, B)
Round 37: (sc, dec) x 6. (12)
Finish stuffing. Push the fiberfill into the tip with the back end of your hook.
Round 38: sc around. (12)
Round 39: dec x 6. (6)
Fasten off and leave a 6 in (15.2 cm) tail. Thread it through the front loops of the last 6 sts, pull tight, and weave in.
Checkpoint: the cone is 3.9 in (9.9 cm) tall. You should see 4 cream bands with 18, 14, 10, and 6 spikes from bottom to top.
Hanging Loop (Cream, A)
Join A with a sl st through the center of the tip. Ch 36, then sl st into the same tip stitch. Turn, and sl st into the back bump of each of the 36 ch. Sl st into the tip again. Fasten off, and weave the tail down into the cone. This makes a firm cord loop that hangs about 2.5 in (6.4 cm) tall. For a longer mirror hanger, add 7 ch for every extra 1 in (2.5 cm) of loop circumference.
Border: Base Ledge Edging
Border gauge: same as the body, 6 sc = 1 in (2.5 cm).
Turn the tree upside down. You’ll find the 60 free front loops of Round 14 around the edge of the base.
Border Round: Join A in any free front loop and ch 1. Sc in each of the 60 front loops around. Join with a sl st to the first sc. (60) Fasten off, and weave in the end.
The tree is round, so there are no sides or corners. The border has one continuous edge of 60 sts, which is the same as the 60 sts of Rounds 14–16.
Why the math works: Working 1 sc into each of the 60 front loops uses every free loop exactly once, so nothing is added or left over. The ledge sticks out about 0.15 in (0.4 cm) all around. Its outer edge is only a little longer than the rim, so it cups very slightly downward instead of ruffling. That gives a crisp cream edge and takes the diameter from 3.2 in (8.1 cm) to 3.5 in (8.9 cm). If you added increases, the ledge would flute. If you skipped stitches, it would pull the base into a dome.
Final Blocking
- Weave in all the color-change tails along the inside, matching each to its own color.
- Roll the cone between your palms to even out the stuffing, then press the base flat on a table.
- Lightly mist the spike bands with water, or steam them from 1 in (2.5 cm) away. Don’t steam acrylic too much.
- While the bands are damp, nudge each spike with your fingertip so it hangs straight down and evenly spaced.
- Pinch the base ledge flat between your thumb and finger all the way around.
- Let it dry standing upright on its base, then check that it’s 3.5 in (8.9 cm) across and 4.6 in (11.7 cm) tall.
Final Quality-Control Checklist
- The base sits flat and doesn’t rock.
- The base is 3.5 in (8.9 cm) across with the border.
- The tree is 4.6 in (11.7 cm) tall from the bottom of the trunk to the tip.
- There are 4 cream spike bands with 18, 14, 10, and 6 spikes.
- All spikes point straight down and land in the dark band below.
- The color jogs line up at the back.
- No stuffing shows between stitches.
- The trunk is centered and stands straight.
- The loop is secure and centered on the tip.
Troubleshooting
Spikes point up instead of down: The piece must be worked bottom-up. Check that you started at the trunk.
Spikes look loose or saggy: Pull each long loop up only to the height of the current round, then hold it with your finger as you finish the stitch.
Spikes pucker the fabric: The loop is too short. Pull it up a little taller.
Cone looks rounded or bulgy: It’s overstuffed. Take some fiberfill out and keep the walls firm but straight.
Base domes upward: Check the Round 14 count (60). Use the plastic canvas circle.
Trunk leans: Re-stuff the trunk firmly. Make sure Round 7 was worked in the FLO all the way around.
Visible stripe jogs: Before the first stitch of the new color, sl st into the first stitch of the round, then carry on.
Care
Spot clean with mild soap and cool water, reshape, and air dry upright. If it hangs in a car, keep it out of strong sun to slow fading.
Final Notes
The whole tree comes from one measurement chain. Start with a gauge of 6 sc and 6 rounds = 1 in (2.5 cm). That gives a 12-st trunk 2 in (5.1 cm) around, and a 60-st base disc 3.2 in (8.1 cm) across. The rim keeps 10 in (25.4 cm) of circumference. Over 25 wall rounds the cone tapers from 60 sts to 6 and reaches 3.9 in (9.9 cm) tall. Finally, a 60-st ledge border brings the base to 3.5 in (8.9 cm). Check each step, and the tree will come out the right size.
Happy crocheting!