

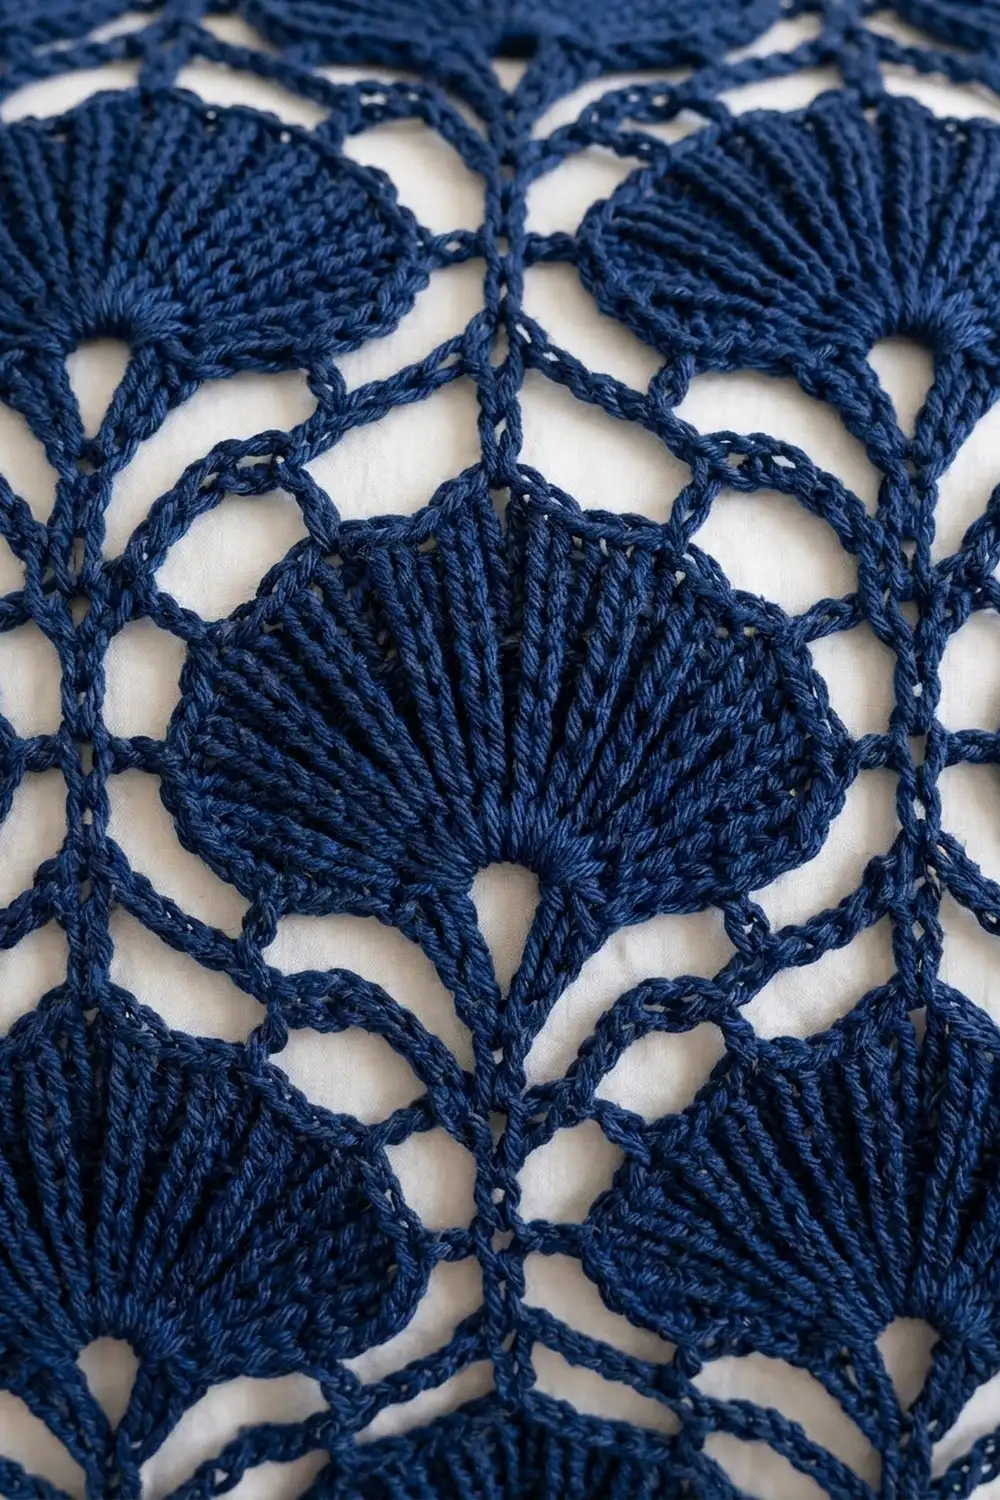
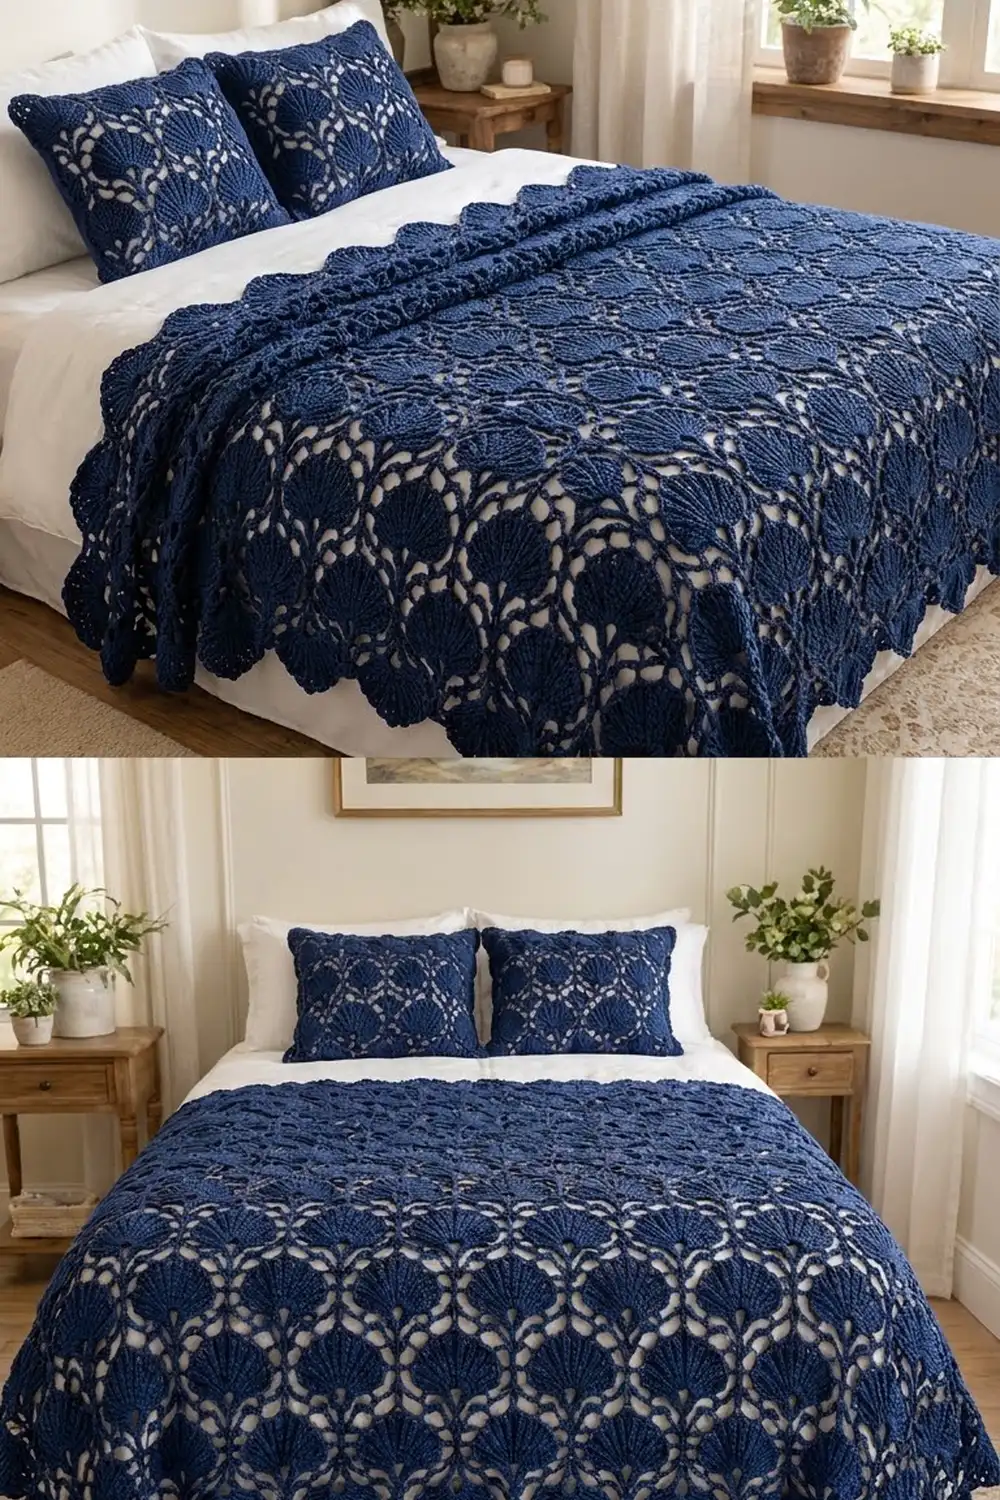
The Midnight Ginkgo Bedspread is a one-piece lace coverlet. Rows of solid fans sit inside an open chain lattice. Each fan grows from a small V-stitch stem, and its ribs open into a semicircle that looks like a ginkgo leaf or a seashell. Fans in alternating rows are offset by half a repeat, so the chains between them form a chain of diamonds.
The sample uses one deep navy cotton. A single dark color makes the fan texture stand out, especially over white sheets where the lattice shows through. The style is classic heirloom lace with a cleaner, modern finish. This pattern uses US crochet terms throughout.
The finished bedspread measures 88 x 93 in (223.5 x 236.2 cm), which suits a queen bed as a top coverlet. You work the body flat in rows, from a long foundation chain up to the final lattice row. You then add a three-round scalloped fan border around all four sides. There are no motifs to join.
Finished Size and Construction
- Finished size: 88 x 93 in (223.5 x 236.2 cm)
- Skill level: Intermediate
- Terminology: US crochet terms
- Yarn weight: Worsted (#4) cotton
- Hook: 5 mm (H-8)
- Number of pieces: 1
- Layout: one rectangular panel worked in rows, 21 fan repeats wide
- Piece size before border: 84 x 89 in (213.4 x 226.1 cm)
- Border depth: 2 in (5.1 cm) on each side
Materials
Yarn: Use a smooth worsted-weight cotton or cotton blend. Mercerized or combed cotton gives crisp fan ribs and clean chain lattice. Avoid fuzzy or very soft yarns, because they blur the fans.
- Navy: about 2,800 g / 4,760 m (28 balls of 100 g / 170 m each)
These quantities include a margin of about 10% for swatching and blocking. Buy all of your yarn from one dye lot. On a piece this large, a dye-lot change will show as a visible band.
Tools:
– 5 mm (H-8) crochet hook
– Locking stitch markers (about 25)
– Tapestry needle
– Measuring tape
– Blocking mats or a clean carpet covered with a sheet, plus rust-proof pins
– Spray bottle
Abbreviations (US Terms)
- ch – chain
- sc – single crochet
- dc – double crochet
- sl st – slip stitch
- sk – skip
- sp – space
- st(s) – stitch(es)
- rep – repeat
- RS / WS – right side / wrong side
Special stitches:
– V-st (V-stitch): (dc, ch 3, dc) in the same stitch. The ch-3 space at its center is where a fan is worked.
– Fan: 13 dc worked into the ch-3 space of one V-st. The center stitch of a fan is its 7th dc.
– Half fan: 7 dc (the turning chain counts as 1 dc) worked into the ch-3 space of an edge V-st.
Gauge and Checkpoints
Pattern gauge (blocked): 1 pattern repeat (12 foundation ch) = 4 in (10.2 cm) wide. 4 rows = 4 in (10.2 cm) tall, so each row averages 1 in (2.5 cm).
Test swatch first. Ch 38 (3 repeats + 2), then work Rows 1–5 and Rows 2–5 once more, for 9 rows total. Wet-block the swatch. It should measure 12 x 9 in (30.5 x 22.9 cm).
- If your swatch is too big, go down to a 4.5 mm (US 7) hook.
- If it is too small, go up to a 5.5 mm (I-9) hook.
A width difference of just 0.25 in (0.6 cm) per repeat adds up to more than 5 in (12.7 cm) across the full bedspread, so check the swatch carefully.
Checkpoints while you work:
1. After Row 1: the relaxed row should be about 84 in (213.4 cm) wide. Count 21 V-sts.
2. After Row 5: the piece should measure about 5 in (12.7 cm) tall.
3. After 24 rows: the piece should measure about 24 in (61.0 cm) tall. Measure it gently flattened, not stretched.
4. Before the border: the body should measure 84 x 89 in (213.4 x 226.1 cm) after a light steam.
Bedspread Body
Ch 254 (21 repeats of 12 + 2). If you tend to chain tightly, use a hook one size larger for the foundation chain only.
Row 1 (RS): Sc in 2nd ch from hook. Ch 5, sk 5 ch, V-st in next ch, ch 5, sk 5 ch, sc in next ch. Rep from * across. Turn.
Count: 21 V-sts, 22 sc, 42 ch-5 sps.*
Row 2 (fan row): Ch 1, sc in first sc. Ch 3, sk ch-5 sp, 13 dc in ch-3 sp of next V-st, ch 3, sk ch-5 sp, sc in next sc. Rep from * across. Turn.
Count: 21 fans (273 dc), 22 sc, 42 ch-3 sps.*
The ch-3 spans pass over the Row 1 ch-5 spaces. This lets each fan sit on its V-st, which shows as a small stem at the base of the fan.
Row 3 (offset lattice row): Ch 6 (counts as dc + ch 3), dc in first sc. This makes the edge V-st. Ch 5, sk ch-3 sp and 6 dc, sc in next dc (the center of the fan), ch 5, sk 6 dc and ch-3 sp, V-st in next sc. Rep from * across, ending with a V-st in the last sc. Turn.
Count: 22 V-sts, 21 sc, 42 ch-5 sps.*
Each new V-st now sits between two fans. This creates the half-drop offset.
Row 4 (offset fan row): Ch 3 (counts as dc), 6 dc in ch-3 sp of first V-st. This is a half fan. Ch 3, sc in next sc, ch 3, 13 dc in ch-3 sp of next V-st. Rep from * 19 more times, for 20 full fans. Ch 3, sc in last sc, ch 3, 7 dc in ch-3 sp of the last V-st (the space made by the turning ch-6) for the second half fan. Turn.
Count: 20 full fans + 2 half fans (274 dc), 21 sc, 42 ch-3 sps.*
Row 5 (return lattice row): Ch 1, sc in first dc. Ch 5, sk 6 dc and ch-3 sp, V-st in next sc, ch 5, sk ch-3 sp and 6 dc, sc in next dc (the center of the fan). Rep from . On the last repeat, sk the last 6 dc of the half fan and sc in the top of the turning ch-3. Turn.
Count: 21 V-sts, 22 sc, 42 ch-5 sps.
Row 5 matches Row 1 exactly, so the fans return to their original alignment.
Rows 6–89: Rep Rows 2–5 another 21 times, for 22 repeats of Rows 2–5 in total. The last row is a Row 5 lattice row. Do not fasten off.
Row total: 1 + (22 × 4) = 89 rows, at about 1 in (2.5 cm) per row = 89 in (226.1 cm).
Tip: Place a stitch marker every 10 rows. It makes counting much easier on a piece this large.
Border
Border gauge: 3 sc = 1 in (2.5 cm). This matches the foundation gauge of 12 ch = 4 in (10.2 cm).
Round 1 (sc frame): Continue from the last row, so you are working along the top edge with the RS facing.
– Top edge: Ch 1. Sc in first sc. 5 sc in ch-5 sp, sc in ch-3 sp of V-st (sk the dc on each side), 5 sc in next ch-5 sp, sc in next sc. Rep from * across. Count: 253 sc (1 + 21 × 12).
– Corner: Ch 2.
– Side edge: Work down the row ends. Work 2 sc in the end of the last row, 3 sc in each of the next 87 row ends, and 2 sc in the end of Row 1. Count: 265 sc.
– Corner: Ch 2.
– Bottom edge: Sc in the underside of each foundation ch. Count: 253 sc.
– Corner: Ch 2.
– Second side edge: Work as for the first side edge (265 sc*). Ch 2 and join with a sl st to the first sc.
Round 1 count: 1,036 sc + 4 corner ch-2 sps. The side counts are the stitches between corner spaces. Corners are spaces, not stitches, so nothing is counted twice.
Round 2 (scallop fans): Sl st into the first sc. On every side, work: sc in first st, sk 2 sts, 7 dc in next st, sk 2 sts, sc in next st. Rep from * to the corner, ending with the sc in the last st before the corner. Then work 9 dc in the corner ch-2 sp. Continue the same way around and join to the first sc.
– Top and bottom: 42 fans and 43 sc each
– Sides: 44 fans and 45 sc each
– Corners:* 4 corner fans
Round 2 count: 176 side fans + 4 corner fans, 176 sc.
Round 3 (outline): Ch 1. Sl st in sc, (sc in next dc, ch 1) 6 times, sc in next dc. Rep from * around. Work each corner fan as (sc in next dc, ch 1) 8 times, sc in next dc. Join and fasten off.
Count: 7 sc per side fan, 9 sc per corner fan.*
Why the math works: each scallop uses 6 stitches (sk 2, fan, sk 2, sc). That is 2 in (5.1 cm) at border gauge, and every scallop sequence needs 6 × (scallops) + 1 stitches.
- Top and bottom: 253 = 6 × 42 + 1. That gives 42 scallops × 2 in = 84 in (213.4 cm), which matches the body width exactly.
- Sides: 265 = 6 × 44 + 1, which gives 44 scallops across 89 in (226.1 cm) of edge. The 2 sc worked into each end row, plus the corner ch-2 spaces, take up the slight difference. This keeps the long edges flat instead of ruffled.
The border adds 2 in (5.1 cm) on every side. Width: 84 + 4 = 88 in (223.5 cm). Length: 89 + 4 = 93 in (236.2 cm).
Final Blocking
- Weave in all ends along solid fan stitches, not chains, so they stay hidden.
- Soak the bedspread in cool water with a little wool or cotton wash for 15 minutes.
- Press out the water. Do not wring the piece. Roll it in towels to remove more moisture.
- Lay it flat on mats or a sheet-covered carpet, RS up.
- Pin the four corners first, to 88 x 93 in (223.5 x 236.2 cm).
- Pin every scallop point along each edge, at about 2 in (5.1 cm) intervals.
- Gently open the lattice diamonds with your fingers, so the fans sit flat and evenly spaced.
- Let the piece dry completely, which can take 24–48 hours, before unpinning.
Final Quality-Control Checklist
- [ ] The body has 89 rows and ends with a lattice row.
- [ ] Each fan row has 21 full fans, or 20 full fans plus 2 half fans.
- [ ] Every lattice sc sits in the 7th (center) dc of a fan.
- [ ] Round 1 counts are 253 / 265 / 253 / 265 sc.
- [ ] There are 42 scallops on the top and bottom and 44 on each side, plus 4 corner fans.
- [ ] The blocked size is 88 x 93 in (223.5 x 236.2 cm).
- [ ] All ends are woven in securely, and none show on the RS.
Troubleshooting
Fans cup instead of lying flat: Your dc are too tight. Loosen your tension or go up a hook size for the fan rows only.
The lattice sags or looks loose: Your ch-5 spans are too relaxed. Keep your chains even and slightly firm.
The fans drift off-center: You have miscounted the 6 skipped dc. Mark the center (7th) dc of each fan before you work the next row.
The foundation edge pulls in: Your foundation chain was too tight. Rework it with a larger hook. Mild pulling can also be blocked out.
The border ruffles: Recount Round 1. Too many sc per row end is the usual cause.
The border cups: You have too few sc in Round 1. Add them evenly, keeping each side at 6 × (scallops) + 1.
Care
Hand wash or machine wash on a cool, gentle cycle inside a large mesh bag. Dry flat, and reshape the scallops while the bedspread is damp.
Final Notes
The measurement chain is simple:
- 12 foundation ch = 4 in (10.2 cm), so 21 repeats give 84 in (213.4 cm).
- 89 rows at about 1 in (2.5 cm) each give 89 in (226.1 cm).
- Round 1 sets 253 sc on the top and bottom and 265 sc on each side. These counts divide evenly into 6-stitch scallops.
- The 2 in (5.1 cm) border brings the finished bedspread to 88 x 93 in (223.5 x 236.2 cm).
Check your swatch, count your fans, and block patiently, and the ginkgo lace will open up beautifully. The matching pillow covers shown with the bedspread are separate pieces and are not part of this pattern.
Happy crocheting!