

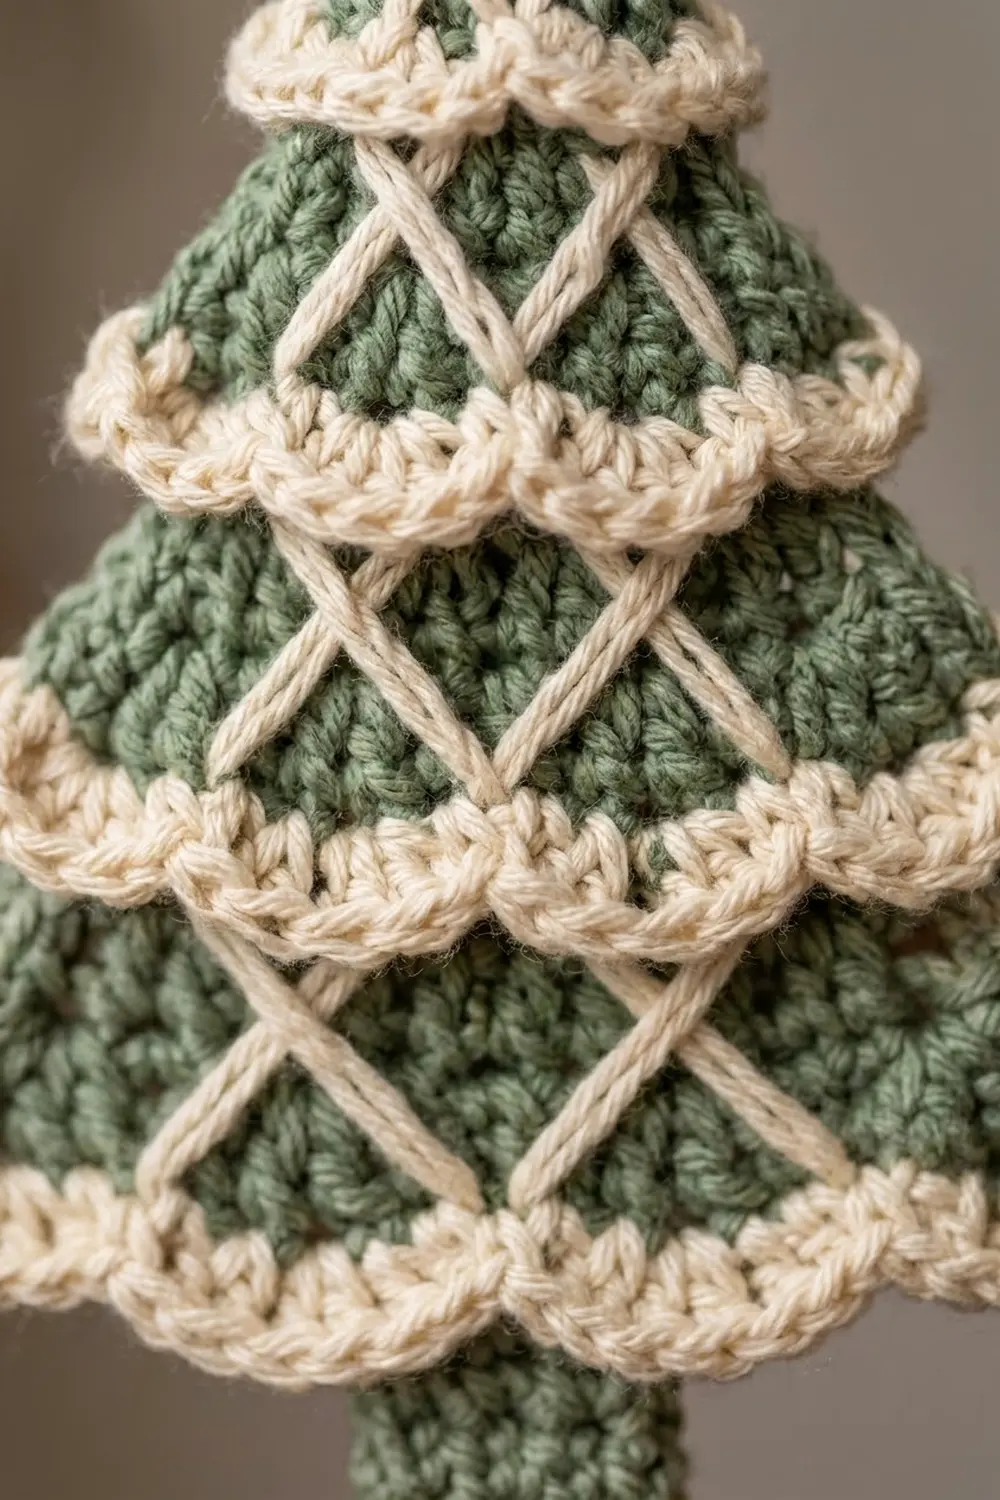
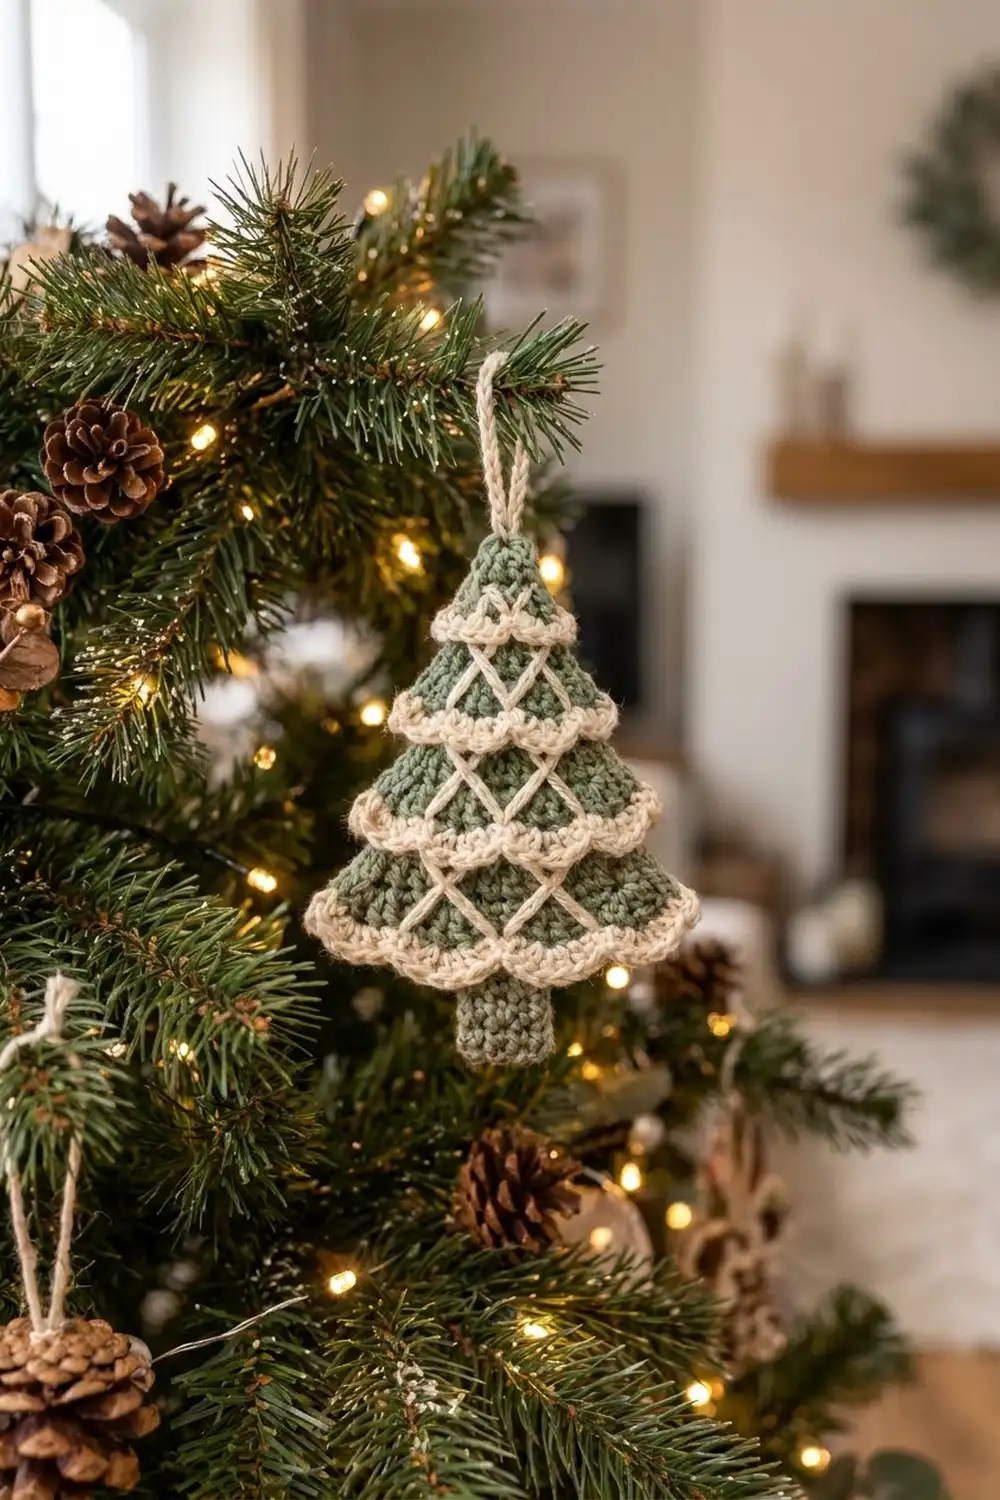
This little tree ornament pairs a soft sage green body with cream scalloped tiers and a cream lattice stitched across the front. It looks like a snow-dusted tree. It suits a wreath, a garland, gift wrapping, or the tree itself.
The pattern uses US crochet terms. The finished ornament is about 4.2 in (10.7 cm) wide across the widest scallops and about 4.3 in (10.9 cm) tall from the top point to the bottom of the trunk. The hanging loop adds about 1.5 in (3.8 cm).
You work the tree flat in one piece from the top point down, in single crochet rows that increase evenly. At each tier change you work one row through the back loops only. This leaves a line of free front loops on the right side, and later you crochet the cream scallops into them. You then work the trunk straight down from the last row, add the bottom scallops, embroider the cream lattice, and attach the loop.
Every part is worked directly onto the tree, so there is no sewing of separate pieces. Most of the work is counting stitches, and the counts are given at every stage.
Finished Size and Construction
- Finished size: 4.2 in (10.7 cm) wide x 4.3 in (10.9 cm) tall, plus a 1.5 in (3.8 cm) loop
- Skill level: Easy-intermediate
- Terminology: US crochet terms
- Yarn weight: DK (#3, light)
- Hook: 3.25 mm (US D/3)
- Number of pieces: 1
- Layout: One standalone ornament
- Green body (Rows 1–18): 3.8 in (9.7 cm) wide at the base x 3 in (7.6 cm) tall
- Trunk: 0.9 in (2.3 cm) wide x 1.3 in (3.3 cm) long
- Size before scallop trim: 3.8 in (9.7 cm) wide
- Scallop trim depth: about 0.4 in (1.0 cm), with about 0.2 in (0.5 cm) of overhang on each side
Materials
Use a smooth DK yarn so the scallops and lattice show clearly. Cotton or a cotton blend gives crisp shells, and acrylic is softer and lighter on a branch. Avoid fuzzy or highly textured yarn because it hides the embroidery.
- Sage green (Color A): 10 g, about 25 m
- Cream (Color B): 5 g, about 15 m
Both quantities include a safety margin for gauge swatching and weaving in ends.
Tools:
– 3.25 mm (US D/3) crochet hook
– Tapestry needle with a blunt tip
– Scissors
– 2 locking stitch markers
– Ruler or tape measure
– Blocking mat and rust-proof pins
– Spray bottle with water
Abbreviations (US Terms)
- ch – chain
- sc – single crochet
- dc – double crochet
- sl st – slip stitch
- st(s) – stitch(es)
- sk – skip
- BLO – back loop only
- FL – front loop
- RS / WS – right side / wrong side
- inc – 2 sc in the same stitch
Special stitch – Shell: 5 dc in the same stitch or loop.
Gauge and Checkpoints
Gauge: 22 sc and 24 rows = 4 in (10.2 cm) in sc worked flat, which works out to 5.5 sts and 6 rows per 1 in (2.5 cm).
Gauge matters because the tree sits next to the others on a wreath, and the scallop math depends on the stitch counts rather than on size. Make one test ornament first and measure it at each checkpoint below.
- After Row 6: 9 sts, 1.6 in (4.1 cm) wide, 1 in (2.5 cm) tall
- After Row 10: 13 sts, 2.4 in (6.1 cm) wide, 1.7 in (4.3 cm) tall
- After Row 14: 17 sts, 3.1 in (7.9 cm) wide, 2.3 in (5.8 cm) tall
- After Row 18: 21 sts, 3.8 in (9.7 cm) wide, 3 in (7.6 cm) tall
If the piece is too big: go down to a 3.0 mm hook or tighten your tension. If it is too small: go up to a 3.5 mm hook. Never change the stitch counts, because the scallop bands need exactly the counts given.
Tree Body
With Color A. Start every row with ch 1 and turn. The ch 1 does not count as a stitch. Row 1 is the RS. Place a marker on it and keep the RS facing you whenever you work a BLO row.
Tier 1 (Top Cap)
Row 1 (RS): Ch 4, sc in the 2nd ch from the hook and in the next 2 ch. (3 sts)
Row 2 (WS): Ch 1, turn. Inc in the first st, sc in the next st, inc in the last st. (5 sts)
Tier 2
Row 3 (RS): Ch 1, turn. Working in BLO throughout: inc in the first st, sc in the next 3 sts, inc in the last st. (7 sts) The 5 front loops of Row 2 are now free on the RS.
Row 4: Ch 1, turn. Sc in each st across. (7 sts)
Row 5: Ch 1, turn. Inc in the first st, sc in the next 5 sts, inc in the last st. (9 sts)
Row 6: Ch 1, turn. Sc in each st across. (9 sts)
Checkpoint: 1.6 in (4.1 cm) wide.
Tier 3
Row 7 (RS): Ch 1, turn. Working in BLO: inc, sc in the next 7 sts, inc. (11 sts) The 9 front loops of Row 6 are now free.
Row 8: Sc across. (11 sts)
Row 9: Inc, sc in the next 9 sts, inc. (13 sts)
Row 10: Sc across. (13 sts)
Checkpoint: 2.4 in (6.1 cm) wide.
Tier 4
Row 11 (RS): Working in BLO: inc, sc in the next 11 sts, inc. (15 sts) The 13 front loops of Row 10 are now free.
Row 12: Sc across. (15 sts)
Row 13: Inc, sc in the next 13 sts, inc. (17 sts)
Row 14: Sc across. (17 sts)
Checkpoint: 3.1 in (7.9 cm) wide.
Tier 5
Row 15 (RS): Working in BLO: inc, sc in the next 15 sts, inc. (19 sts) The 17 front loops of Row 14 are now free.
Row 16: Sc across. (19 sts)
Row 17: Inc, sc in the next 17 sts, inc. (21 sts)
Row 18 (WS): Sc across. (21 sts) Fasten off.
Checkpoint: 3.8 in (9.7 cm) wide and 3 in (7.6 cm) tall.
The green body is a straight-sided triangle. The stepped outline comes later from the scallops, which flare past the edges.
Trunk
Turn the piece so the RS faces you, with Row 18 along the top. Count the 21 sts of Row 18 and mark sts 9 and 13. These are the center 5 sts, with 8 sts on each side.
Trunk Row 1 (RS): Join Color A in the BLO of st 9. Ch 1, then sc in the BLO of sts 9–13. (5 sts) All 21 front loops of Row 18 stay free for the bottom scallops.
Trunk Rows 2–8: Ch 1, turn, sc in each st across. (5 sts)
Fasten off. The trunk is 0.9 in (2.3 cm) wide and 1.3 in (3.3 cm) long, and about 0.4 in (1.0 cm) of it will sit behind the bottom scallops.
Scallop Trim (Border)
The cream scallop bands work as this ornament’s border. There are 5 bands, and each is worked into one line of free front loops with the RS facing.
Border gauge: each shell plus the sc next to it uses 4 free loops and spans about 0.7 in (1.8 cm). The bands hang about 0.4 in (1.0 cm) deep.
Band pattern: Join Color B in the first free FL at the right edge. Shell in the current loop, sk 1 loop, sc in the next loop, sk 1 loop. Repeat from * until 1 loop remains, then work a shell in the last loop. Fasten off.
So that the shells hang down over the tier below, tip the top of the tree away from you as you work. Each shell then falls toward the next tier.
Band 1 (FLs of Row 2, 5 loops): 2 shells + 1 sc. (10 dc + 1 sc = 11 sts)
Band 2 (FLs of Row 6, 9 loops): 3 shells + 2 sc. (15 dc + 2 sc = 17 sts)
Band 3 (FLs of Row 10, 13 loops): 4 shells + 3 sc. (20 dc + 3 sc = 23 sts)
Band 4 (FLs of Row 14, 17 loops): 5 shells + 4 sc. (25 dc + 4 sc = 29 sts)
Band 5 (FLs of Row 18, 21 loops, bottom edge): 6 shells + 5 sc. (30 dc + 5 sc = 35 sts) This band runs across the top of the trunk and covers the join.
Why the math works: each repeat uses 4 loops (shell, skip, sc, skip), and the final shell uses 1 more, so every band needs 4n + 1 loops. The free-loop counts of 5, 9, 13, 17, and 21 are each 4n + 1, where n = 1, 2, 3, 4, and 5. Because the tiers grow by exactly 4 sts each, every band gains exactly one shell. Each band also starts and ends with a shell, so both ends stick out past the edges. That gives a matching overhang of about 0.2 in (0.5 cm) on each side.
Cream Lattice Embroidery
Thread a 24 in (61.0 cm) length of Color B onto the tapestry needle. Each X is made of two long straight stitches over the 4 rows of one tier, and each stitch runs diagonally across 4 sts. Leave the top cap plain green.
Count stitches on the bottom row of each tier (Rows 6, 10, 14, and 18). For each X, take one stitch from 2 sts left of center at the tier’s top row down to 2 sts right of center at its bottom row, then a second stitch in the mirror direction. On the top row, which has 2 fewer sts, use the stitch directly above.
- Tier 2 (Row 6, 9 sts): 2 X’s centered on sts 3 and 7
- Tier 3 (Row 10, 13 sts): 3 X’s centered on sts 3, 7, and 11
- Tier 4 (Row 14, 17 sts): 4 X’s centered on sts 3, 7, 11, and 15
- Tier 5 (Row 18, 21 sts): 5 X’s centered on sts 3, 7, 11, 15, and 19
The X’s are spaced 4 sts apart, so neighboring arms meet tip to tip and form the diamond lattice. Keep the stitches flat but not tight. Bring the needle up and down just under the scallops so the ends are hidden, and weave in the ends on the WS.
Hanging Loop
With Color B, join with a sl st in the center st of Row 1 at the top point. Ch 20, then sl st into the same st. Fasten off and weave the tail back through the chain to firm it up. The loop is about 1.5 in (3.8 cm) tall.
Final Blocking
- Weave in all remaining ends on the WS before blocking.
- Pin the tree RS up to a blocking mat.
- Pin the base straight to 3.8 in (9.7 cm) wide and the height to 4.3 in (10.9 cm), trunk included.
- Pin each shell at the band ends so it overhangs the edge by about 0.2 in (0.5 cm).
- Fan the center shells evenly and point them downward.
- Mist lightly until damp, not soaked.
- Let it dry completely, which takes about 6 hours, before you unpin.
- For extra crisp scallops, mist with a light fabric stiffener before drying.
Final Quality-Control Checklist
- Row 18 has 21 sts and measures 3.8 in (9.7 cm).
- The bands have 2, 3, 4, 5, and 6 shells from top to bottom.
- Every band starts and ends with a shell.
- The trunk is centered, with 8 sts on each side.
- There are 2, 3, 4, and 5 lattice X’s in Tiers 2–5, and the top cap is plain.
- The loop is secure and centered at the top point.
- No ends are visible on the RS.
- The overall size is 4.2 in (10.7 cm) x 4.3 in (10.9 cm).
Troubleshooting
The sides curl or bow: your increases are too tight. Work the inc stitches a little looser, then block flat.
There are no free loops for a band: a tier-start row wasn’t worked in BLO, or you worked it with the WS facing. Frog back and rework that row with the RS facing.
A band ends in a sc instead of a shell: the loop count is off. Recount the tier’s last row (it should be 5, 9, 13, 17, or 21 sts).
The scallops stand up instead of hanging down: tip the work more as you crochet the band, then pin the shells downward when blocking.
The lattice puckers: the straight stitches are too tight. Loosen them so they lie flat on the fabric.
The trunk is off-center: recount Row 18 from the edge and make sure the trunk starts in st 9.
Care
Hand wash in cool water and lay flat to dry, reshaping the scallops while damp. Store the ornament flat or hanging, not crushed in a box.
Final Notes
The measurements build on each other. At 22 sc per 4 in (10.2 cm), the tiers reach 9, 13, 17, and 21 sts, and the base measures 3.8 in (9.7 cm). The free-loop counts of 5, 9, 13, 17, and 21 give bands of 2–6 shells with clean shells at both ends. Those shells add about 0.2 in (0.5 cm) per side, for a finished width of 4.2 in (10.7 cm). The 3 in (7.6 cm) body plus the 1.3 in (3.3 cm) trunk gives a height of 4.3 in (10.9 cm). If the first ornament meets every checkpoint, the rest of a matching set will too.
Happy crocheting!