

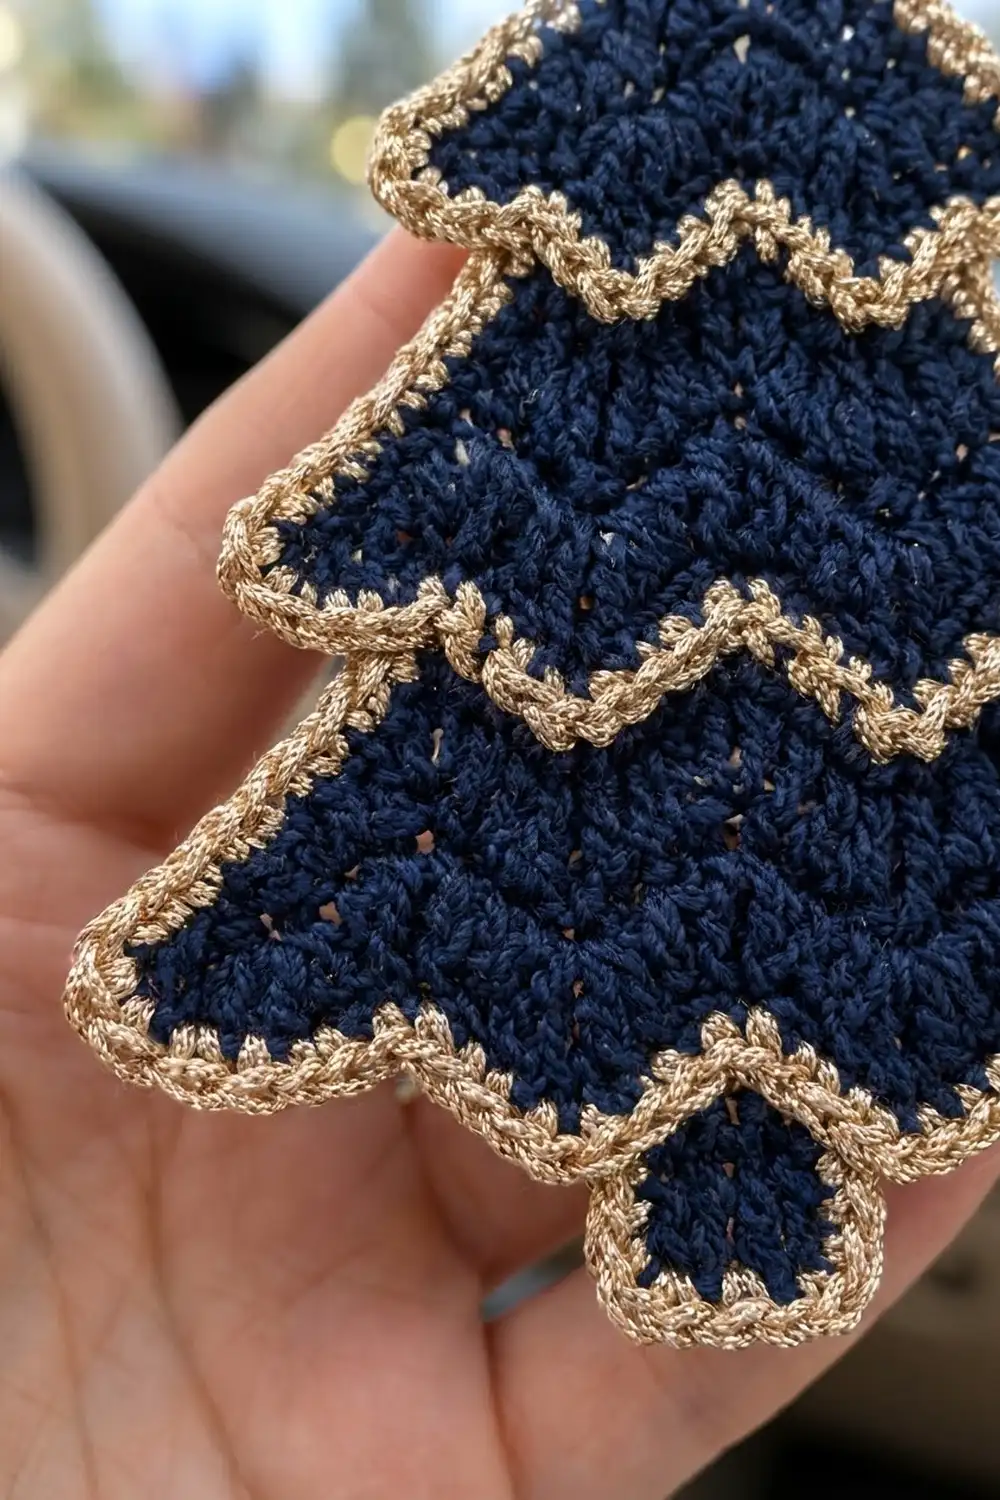
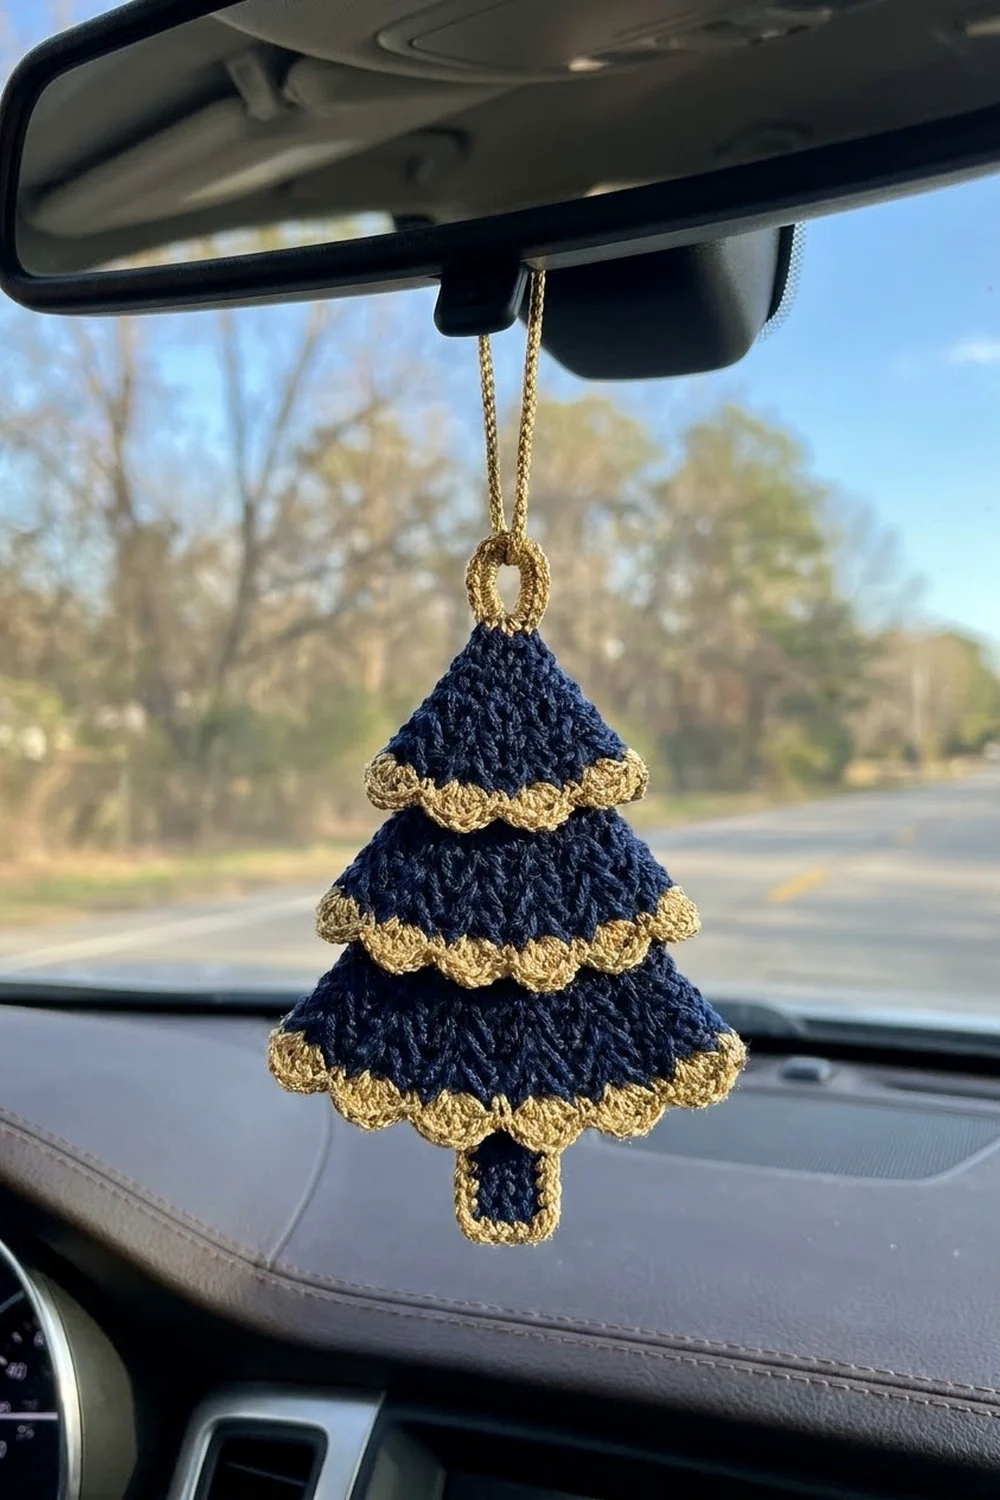
This little tree is made to hang from a rearview mirror, a hook, or a Christmas tree branch. It has three layered navy tiers with scalloped hems and a small square trunk. Every edge has a gold beaded outline, so the shape is easy to see even from across the car.
The navy fabric is worked in herringbone half double crochet. If you work it back and forth in rows, it forms a fine zigzag texture that looks a bit like pine needles. The metallic gold border is a single crochet round followed by a reverse single crochet round, which gives it a twisted, cord-like finish. The style is classic and a little elegant: deep winter blue against warm champagne.
All instructions use US crochet terms. The finished tree is 4.7 in (11.9 cm) wide and 6.15 in (15.6 cm) tall, not counting the loop. Including the loop, it hangs about 8.15 in (20.7 cm).
You make the four parts separately. Each tier is worked top-down as a triangle, finished with a scallop row, and edged in gold. The trunk is a small rectangle with the same border. You then stack the tiers, sew them together from the back, and add the hanging loop.
Finished Size and Construction
- Finished size: 4.7 in (11.9 cm) wide x 6.15 in (15.6 cm) tall; 8.15 in (20.7 cm) including loop
- Skill level: Easy-intermediate
- Terminology: US
- Yarn weight: DK (3 / light)
- Hook: 3.5 mm (E-4)
- Number of pieces: 4 (top tier, middle tier, bottom tier, trunk), joined into one ornament
- Layout: Vertical stack, with each tier overlapping the next by 1.5 in (3.8 cm)
- Piece sizes (bordered): top tier 3.1 x 2.3 in (7.9 x 5.8 cm); middle tier 3.9 x 2.8 in (9.9 x 7.1 cm); bottom tier 4.7 x 3.3 in (11.9 x 8.4 cm); trunk 1.5 x 1.5 in (3.8 x 3.8 cm)
- Size before border: top tier 2.6 x 1.8 in (6.6 x 4.6 cm); middle tier 3.4 x 2.3 in (8.6 x 5.8 cm); bottom tier 4.2 x 2.8 in (10.7 x 7.1 cm); trunk 1 x 1 in (2.5 x 2.5 cm)
- Border depth: 0.25 in (0.6 cm) on every edge
Materials
Use a smooth DK yarn with good stitch definition, so the herringbone texture shows. Cotton or a cotton blend keeps the ornament firm and flat. For the border, use a metallic or sparkle DK in light gold or champagne. If your metallic yarn is thin, hold it together with a strand of matching cream lace-weight yarn.
- Color A, navy: 10 g, about 23 m (25 yd)
- Color B, metallic gold: 8 g, about 18 m (20 yd)
These quantities include a margin of roughly 30%, enough to work a gauge swatch and redo a border once.
Tools:
– 3.5 mm (E-4) crochet hook
– Tapestry needle
– 6 rust-proof pins
– Scissors
– Ruler or tape measure
– Spray bottle and a foam blocking mat
Abbreviations (US Terms)
- ch: chain
- sl st: slip stitch
- sc: single crochet
- hdc: half double crochet
- hhdc: herringbone half double crochet
- rev sc: reverse single crochet (crab stitch)
- st(s): stitch(es)
- RS: right side
Herringbone half double crochet (hhdc): Yarn over and insert your hook into the stitch. Yarn over and pull up a loop, drawing it straight through the stitch AND the first loop on the hook (2 loops remain). Yarn over and pull through both loops.
Reverse single crochet (rev sc): Working from left to right (right-handed), insert your hook into the next stitch to the right. Pull up a loop, yarn over, and pull through both loops.
Gauge and Checkpoints
Gauge: 20 sts and 16 rows of hhdc = 4 in (10.2 cm). That means 5 sts and 4 rows = 1 in (2.5 cm).
Make the top tier first and use it as your gauge piece. It is small, and every measurement after it depends on it.
Checkpoints:
– Top tier after Row 6: 2.6 in (6.6 cm) wide, 1.5 in (3.8 cm) tall
– Top tier after the scallop row: 1.8 in (4.6 cm) tall
– Middle tier after Row 8: 3.4 in (8.6 cm) wide, 2 in (5.1 cm) tall
– Bottom tier after Row 10: 4.2 in (10.7 cm) wide, 2.5 in (6.4 cm) tall
– Each border adds 0.25 in (0.6 cm) on every edge
If your piece is too big: Go down to a 3.25 mm (D-3) hook. If it’s too small: Go up to a 3.75 mm (F-5) hook. Being off by 0.1 in (0.3 cm) is fine. If you’re off by more than 0.2 in (0.5 cm) on the top tier, change hooks before you go on.
Tier Pattern
All three tiers use the same method. You start at the apex with 3 sts. Every row adds 1 st at each end, which gives straight sloped sides at a pleasing tree angle. The rule for every growth row is:
Growth row: Ch 2 (does not count as a st), turn. Work 2 hhdc in first st, hhdc in each st across to last st, then 2 hhdc in last st. (+2 sts)
Scallop row: Ch 1, turn. Sc in first st, *skip 1 st, 5 hdc in next st, skip 1 st, sc in next st; repeat from * across.
The scallop row needs a multiple of 4 plus 1 sts. Each tier ends on a count that fits.
Top Tier (Color A)
Row 1: Ch 3, 3 hhdc in 3rd ch from hook (the skipped ch 2 does not count as a st). (3 sts)
Row 2: Growth row. (5 sts)
Row 3: Growth row. (7 sts)
Row 4: Growth row. (9 sts)
Row 5: Growth row. (11 sts)
Row 6: Growth row. (13 sts)
Checkpoint: 2.6 in (6.6 cm) across Row 6, 1.5 in (3.8 cm) tall.
Row 7 (scallop row): 13 sts = 1 + (3 x 4), giving 3 scallops. Count: 1 sc + 3 x (5 hdc + 1 sc) = 19 sts.
Fasten off. Weave in the starting tail.
Middle Tier (Color A)
Rows 1-6: Work as for the top tier. (13 sts)
Row 7: Growth row. (15 sts)
Row 8: Growth row. (17 sts)
Checkpoint: 3.4 in (8.6 cm) wide, 2 in (5.1 cm) tall.
Row 9 (scallop row): 17 sts = 1 + (4 x 4), giving 4 scallops. Count: 1 + 4 x 6 = 25 sts.
Fasten off.
Bottom Tier (Color A)
Rows 1-8: Work as for the middle tier. (17 sts)
Row 9: Growth row. (19 sts)
Row 10: Growth row. (21 sts)
Checkpoint: 4.2 in (10.7 cm) wide, 2.5 in (6.4 cm) tall.
Row 11 (scallop row): 21 sts = 1 + (5 x 4), giving 5 scallops. Count: 1 + 5 x 6 = 31 sts.
Fasten off. Each scallop row adds about 0.3 in (0.8 cm) of height, so the unbordered tiers measure 1.8 in (4.6 cm), 2.3 in (5.8 cm), and 2.8 in (7.1 cm) tall.
Trunk (Color A)
Row 1: Ch 7, hhdc in 3rd ch from hook and in each ch across. (5 sts)
Rows 2-4: Ch 2 (does not count), turn, hhdc in each st across. (5 sts)
Checkpoint: 1 x 1 in (2.5 x 2.5 cm). Fasten off.
Make All Pieces
You need one of each piece, for 4 pieces in total:
- Color A: top tier x1, middle tier x1, bottom tier x1, trunk x1
- Color B: border on all 4 pieces, plus the hanging loop
Layout from top to bottom (each tier overlaps the one below):
        [ LOOP ]
       [ TOP TIER ]
     [ MIDDLE TIER ]
    [  BOTTOM TIER  ]
        [ TRUNK ]
Border
Border each piece before you join them, so every tier gets its own complete gold outline. That outline is what makes the gold hem line visible where each tier crosses the one below.
Border gauge: 5 sc = 1 in (2.5 cm) along any edge.
Side-edge rule: Work 2 sc into the end of each odd-numbered hhdc row and 1 sc into the end of each even-numbered row. Work 1 sc into the end of the scallop row.
Top Tier Border
Round 1 (Color B): With RS facing, join in the last sc of the scallop row (a bottom corner). Work 3 sc in this st. Sc in each st along the scallops, working 2 sc in the center hdc of each scallop, to the last st, then 3 sc in the last st.
– Bottom: 6 corner sts + 17 sts worked once + 3 extra = 26
– Side: 1 (scallop row end) + 9 (Rows 6-1) = 10
– Apex: sc in first st of Row 1, 3 sc in center st, sc in last st = 5
– Other side: 10
Sl st to first sc. Total: 51 sts.
Round 2: Ch 1, rev sc in each st around. (51 sts) Sl st to join and fasten off.
Middle Tier Border
Round 1: Same method.
– Bottom: 6 + 23 + 4 extra = 33
– Each side: 1 + 12 = 13
– Apex: 5
Total: 64 sts.
Round 2: Rev sc around. (64 sts)
Bottom Tier Border
Round 1:
– Bottom: 6 + 29 + 5 extra = 40
– Each side: 1 + 15 = 16
– Apex: 5
Total: 77 sts.
Round 2: Rev sc around. (77 sts)
Trunk Border
Round 1: Join at a corner of Row 4. Work 3 sc in the first st, sc in the next 3 sts, then 3 sc in the last st (9). Down the side, work 1, 2, 1, 2 sc into the row ends of Rows 4-1 (6). Along the foundation, work 3 sc in the first ch, sc 3, then 3 sc in the last ch (9). Up the other side (6). Total: 30 sts.
Round 2: Rev sc around. (30 sts)
Why the Math Works
Each side edge of a tier slopes outward 1 st, or 0.2 in (0.5 cm), per row and rises 0.25 in (0.6 cm) per row.
On the top tier, that sloped edge measures about 1.8 in (4.6 cm). At 5 sc per inch, it needs 9 sc, which is exactly what the 2-1 rule gives over 6 rows. The middle tier’s edge is about 2.4 in (6.1 cm), which needs 12 sc. The bottom tier’s is about 3 in (7.6 cm), which needs 15 sc.
The extra stitches at the corners and the scallop centers let the border turn curves without cupping. The rev sc round uses 1 st per st, so it adds depth without adding width.
Joining
Method: Sew from the back with Color A and a tapestry needle, using small running stitches.
Placement:
1. Lay the bottom tier RS up. Center the middle tier on top so its scallop tips sit over the bottom tier and the middle tier’s apex is 1.5 in (3.8 cm) higher than the bottom tier’s apex. Put the same overlap between the top tier and the middle tier.
2. Pin at the apex and at both bottom corners of each upper tier.
Stitch-to-stitch logic: Turn the stack over. Sew through the back loops of the upper tier’s Round 1 border along its scallop row, catching only the back layer of the tier underneath. Work 1 sewing stitch per border sc. Sew the upper tier’s sloped sides down the same way, so the layers don’t shift.
Slide the trunk 0.75 in (1.9 cm) under the bottom tier’s hem, centered, and sew it along the back of the bottom tier’s border.
Tension: Keep your sewing loose enough that the front stays smooth. Pulling tight will pucker the scallops.
Size checkpoint: The tree should measure 4.7 in (11.9 cm) at its widest and 6.15 in (15.6 cm) from apex to trunk.
Hanging loop (Color B): Join in the center sc of the top tier’s apex. Ch 20, then sl st in the same st. Ch 1 and work 26 sc into the loop. Sl st to join and fasten off. The loop stands about 2 in (5.1 cm) tall.
Final Blocking
- Weave in all ends on the back and trim them.
- Lay the ornament RS up on the blocking mat.
- Mist it until damp, but not soaked.
- Pin the bottom tier’s two corners 4.7 in (11.9 cm) apart, and pin the trunk base straight below the apex.
- Smooth each scallop with your fingertips so the gold hems lie in even waves.
- Leave it to dry completely, which takes about 6-12 hours. If your gold yarn is acrylic, don’t steam it.
Final Quality-Control Checklist
- [ ] Stitch counts: tiers 19, 25, and 31 sts in their scallop rows
- [ ] Borders total 51, 64, 77, and 30 sts
- [ ] Sloped sides are straight, with no bumps at the row ends
- [ ] Scallops are even: 3, 4, and 5 per tier
- [ ] Each tier overlaps the next by 1.5 in (3.8 cm)
- [ ] Trunk shows 0.75 in (1.9 cm) below the bottom tier and is centered
- [ ] Overall size is 4.7 x 6.15 in (11.9 x 15.6 cm)
- [ ] No sewing stitches show on the front
- [ ] Loop is secure and centered
Troubleshooting
Sides ripple: You have too many border sc. Follow the 2-1 rule exactly, or go down half a hook size for the border only.
Sides pull in or curl: You have too few border sc, or your rev sc is too tight. Loosen up, or add 1 sc in one row end on each side.
Scallops look flat: Make sure you skip exactly 1 st on each side of every 5-hdc group.
Tier is lopsided: You missed an increase. Count each row; it should be an odd number.
Herringbone texture is hidden: Your yarn is too fuzzy, or your gauge is too loose. Switch to a smoother yarn.
Ornament twists on the mirror: Re-center the loop on the apex sc.
Care
Spot clean with cool water and mild soap, then lay flat to dry. Keep the ornament out of strong, prolonged sun in the car to stop the navy from fading.
Final Notes
Every measurement builds on the one before it. If the top tier blocks to 2.6 in (6.6 cm) wide at Row 6, the middle and bottom tiers will reach 3.4 in (8.6 cm) and 4.2 in (10.7 cm). The 0.25 in (0.6 cm) border brings these to 3.1, 3.9, and 4.7 in (7.9, 9.9, and 11.9 cm). Stacking with 1.5 in (3.8 cm) overlaps and adding a trunk that shows 0.75 in (1.9 cm) gives a finished tree of 4.7 x 6.15 in (11.9 x 15.6 cm). If you check gauge on the first tier, the rest will fall into place.
Happy crocheting!