

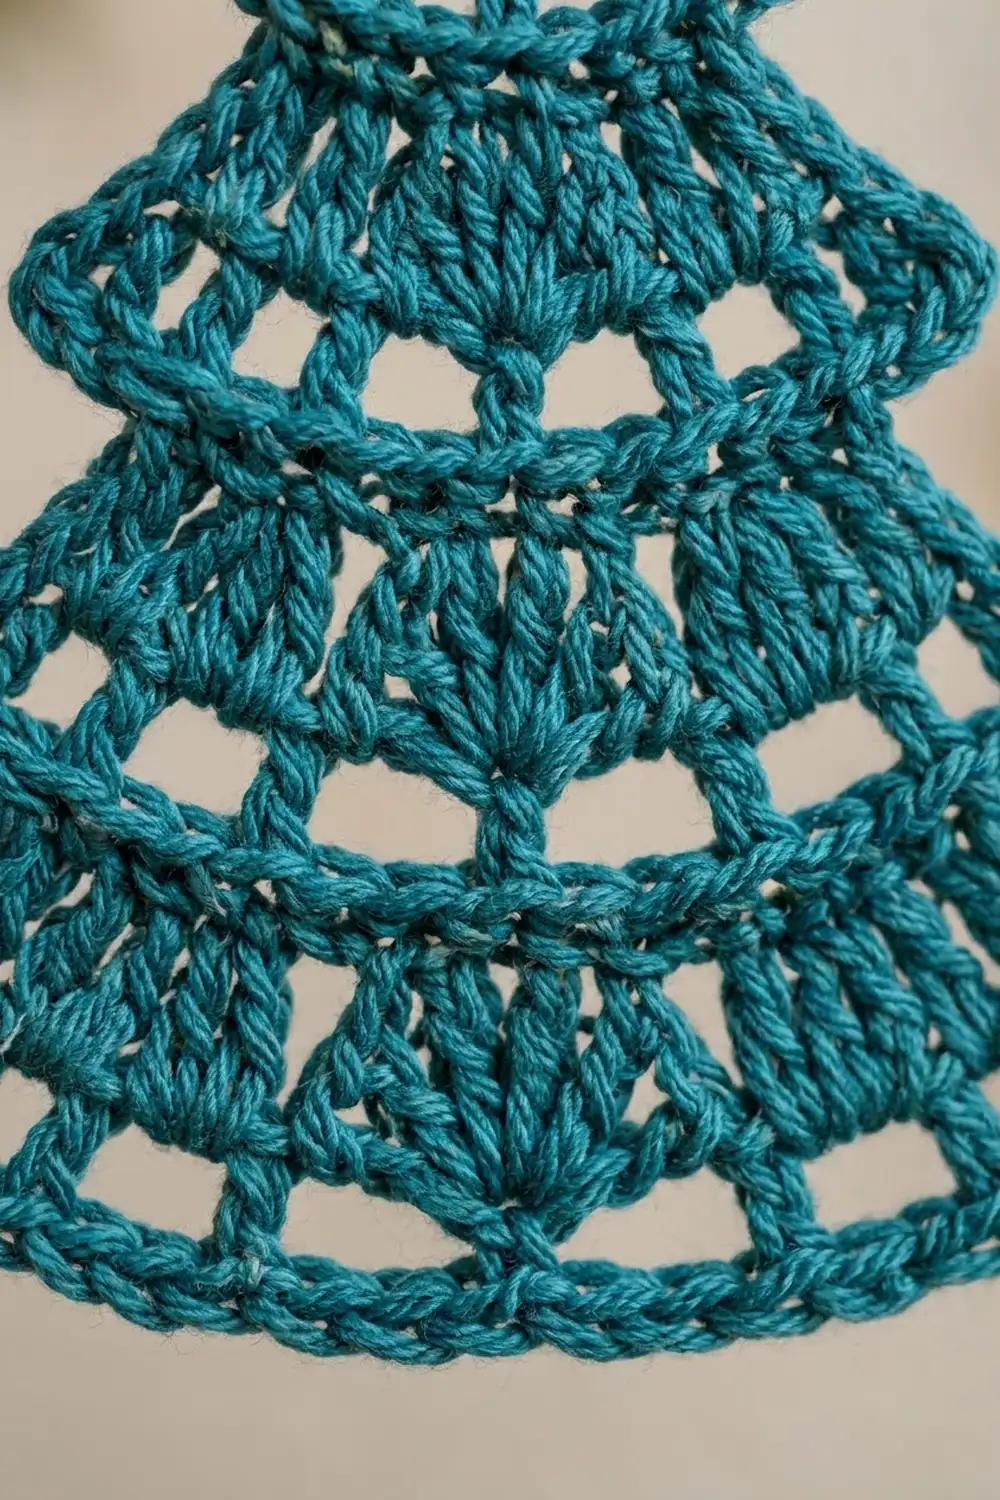
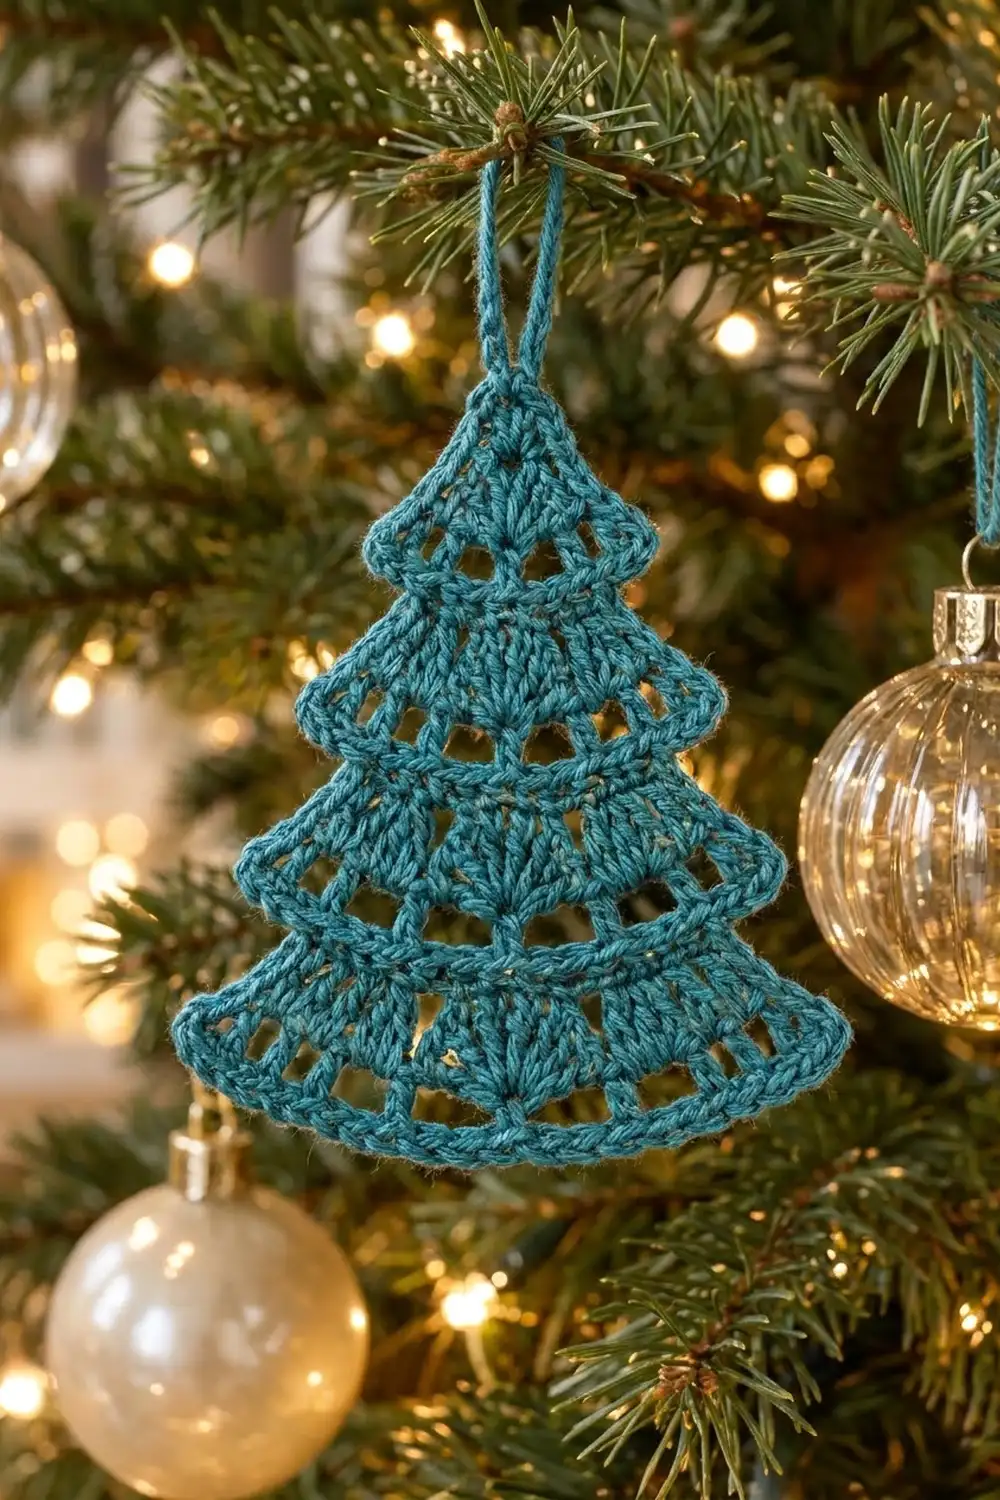
The Frosted Spruce ornament is a small, flat lace Christmas tree with four stepped tiers. Each tier has a raised ridge at the top, a fan of double crochet in the center, a row of open windows, and a softly flared hem. A covered hanging loop at the top makes it ready for the tree.
The sample uses one color, a deep teal mercerized cotton. Teal reads as festive without being the usual Christmas red or green, and it shows off the lace well against both green branches and gold baubles. Any smooth, light color will show the stitch detail clearly.
This pattern uses US crochet terms. The finished ornament measures about 4.2 in (10.7 cm) wide by 4.4 in (11.2 cm) tall, plus a hanging loop about 1 in (2.5 cm) tall.
The tree is one piece worked flat in turned rows from the top down. You start with a small ring that holds the top fan. Each new tier begins in the back loops of the previous hem and skips 2 stitches at each side to create the step. One round of single crochet then outlines the whole shape and builds the hanging loop.
Finished Size and Construction
- Finished size: 4.2 in (10.7 cm) wide x 4.4 in (11.2 cm) tall, plus a 1 in (2.5 cm) loop
- Skill level: Easy-Intermediate
- Terminology: US crochet terms
- Yarn weight: Sport / fine (#2) mercerized cotton
- Hook: 2.75 mm (US C-2)
- Number of pieces: 1
- Layout: Single flat tree, four tiers, worked top-down
- Piece size before border: 3.8 in (9.7 cm) wide x 4.0 in (10.2 cm) tall
- Border depth: 1 round of sc, about 0.2 in (0.5 cm) on each edge
Materials
Yarn: Use a smooth, tightly plied mercerized cotton in sport weight. It gives crisp stitches, open windows, and an ornament that holds its shape. Avoid fuzzy or loosely spun yarns, because they blur the lace.
- Teal (main color): 10 g, about 31 m (34 yd)
Tools:
– 2.75 mm (US C-2) crochet hook
– Tapestry needle
– Scissors
– Stitch marker
– Rust-proof pins and a blocking mat or folded towel
– Spray bottle with water
– Optional: diluted fabric stiffener
The quantity includes a generous margin for your gauge swatch and weaving in ends.
Abbreviations (US Terms)
- ch – chain
- sl st – slip stitch
- sc – single crochet
- dc – double crochet
- sk – skip
- sp – space
- st(s) – stitch(es)
- BLO – back loop only
- RS / WS – right side / wrong side
Special stitch: 7-dc fan. Work 7 dc into the same stitch. This makes the center fan of each tier and adds 6 stitches to the row.
Gauge and Checkpoints
Gauge: 22 sc x 20 rows = 4 in (10.2 cm) in sc. In dc, 3 rows = 1 in (2.5 cm).
The ornament is small, so it works as its own gauge test. Make Tier 1, measure it, and only then carry on.
Checkpoints (measured flat, before border):
- After Row 3 (Tier 1): 9 sc wide = 1.6 in (4.1 cm); height about 0.9 in (2.3 cm)
- After Row 7 (Tier 2): 13 sc wide = 2.4 in (6.1 cm); height about 1.9 in (4.8 cm)
- After Row 11 (Tier 3): 17 sc wide = 3.1 in (7.9 cm); height about 3.0 in (7.6 cm)
- After Row 15 (Tier 4): 21 sc wide = 3.8 in (9.7 cm); height about 4.0 in (10.2 cm)
Too big? Go down to a 2.5 mm hook. Too small or stiff? Go up to a 3.0 mm hook. If only the height is off, check your dc. Pull the first loop up to the height of the hook shaft before you yarn over.
Tier 1 (Top)
Foundation: Ch 4, sl st in first ch to form a ring.
Row 1 (fan): Ch 3 (counts as dc), 6 dc in ring, turn. (7 dc)
The 7 stitches sit on one half of the ring and fan downward. The other half of the ring stays bare and becomes the top of the tree.
Row 2 (windows): Ch 4 (counts as dc + ch 1), sk next dc, dc in next dc, ch 1, sk next dc, dc in next st; repeat from * once more, working the last dc in the top of the turning ch, turn. (4 dc + 3 ch-1 sp = 7 sts)
Row 3 (hem): Ch 1, 2 sc in first dc, sc in each ch-1 sp and each dc across to the last dc, 2 sc in 3rd ch of beginning ch-4, turn. (7 sts + 2 added = 9 sc)
The 2 extra sc at each end make the slight flare at the tips of the hem.
Tier 2
Row 4 (ridge): Sl st in BLO of first 2 sc, ch 1, sc in BLO of next 5 sc, leave last 2 sc unworked, turn. (5 sc)
Working in back loops leaves the front loops of Row 3 showing as a raised band across the tier. The 2 stitches left unworked at each end are the step.
Row 5 (fan): Ch 3 (counts as dc), dc in next sc, 7-dc fan in next sc (center), dc in last 2 sc, turn. (1 + 1 + 7 + 2 = 11 dc)
Row 6 (windows): Ch 4 (counts as dc + ch 1), sk next dc, dc in next dc, ch 1, sk next dc, dc in next st; repeat from * across, ending in the top of the turning ch, turn. (6 dc + 5 ch-1 sp = 11 sts)
Row 7 (hem): Ch 1, 2 sc in first dc, sc in each sp and dc across to the last dc, 2 sc in 3rd ch of beginning ch-4, turn. (11 sts + 2 added = 13 sc)
Tier 3
Row 8 (ridge): Sl st in BLO of first 2 sc, ch 1, sc in BLO of next 9 sc, leave last 2 sc unworked, turn. (9 sc)
Row 9 (fan): Ch 3 (counts as dc), dc in next 3 sc, 7-dc fan in next sc (center), dc in last 4 sc, turn. (1 + 3 + 7 + 4 = 15 dc)
Row 10 (windows): Work as Row 6. (8 dc + 7 ch-1 sp = 15 sts)
Row 11 (hem): Work as Row 7. (15 sts + 2 added = 17 sc)
Tier 4 (Bottom)
Row 12 (ridge): Sl st in BLO of first 2 sc, ch 1, sc in BLO of next 13 sc, leave last 2 sc unworked, turn. (13 sc)
Row 13 (fan): Ch 3 (counts as dc), dc in next 5 sc, 7-dc fan in next sc (center), dc in last 6 sc, turn. (1 + 5 + 7 + 6 = 19 dc)
Row 14 (windows): Work as Row 6. (10 dc + 9 ch-1 sp = 19 sts)
Row 15 (hem): Work as Row 7. (19 sts + 2 added = 21 sc)
Fasten off. Each tier follows the same steps. The ridge row is 4 stitches narrower than the hem above it. The fan adds 6, and the hem adds 2, so each hem is 4 stitches wider than the last: 9, 13, 17, 21.
Border
Border gauge: The border is worked at the same sc gauge, 22 sc = 4 in (10.2 cm). It follows these rules:
- sc row end: 1 sc
- dc row end: 2 sc
- Outer corner: 3 sc in one stitch
- Inner step stitch: 1 sc
Because the stitches grow downward, the 2 unworked hem stitches at each step have their tops facing down, under the step. Work into those tops. On the side where you slip stitched, insert the hook under the sc and the sl st together. The counts are the same on both sides.
Round 1: Choose the neater side as RS. Join with a standing sc in the first sc of Row 15 at the bottom right corner, and work 2 more sc in the same st.
- Bottom edge: sc in next 19 sc, 3 sc in last sc. (3 + 19 + 3 = 25 sc, including both corners)
- Left side, going up:
- Tier 4: 2 sc in end of Row 14, 2 sc in end of Row 13, 1 sc in end of Row 12. (5)
- Step: sc in inner unworked sc of Row 11, 3 sc in outer unworked sc. (4)
- Tier 3: Rows 10, 9, and 8 as for Tier 4. (5)
- Step at Row 7. (4)
- Tier 2: Rows 6, 5, and 4. (5)
- Step at Row 3. (4)
- Tier 1: 2 sc in end of Row 2, 2 sc in end of Row 1. (4)
- Left side total: 5 + 4 + 5 + 4 + 5 + 4 + 4 = 31 sc
- Top and hanging loop:
- Sc in the bare top of the ring.
- Ch 18, then sl st in the same sc to form the loop.
- Work 24 sc into the ch-18 loop, then sl st in the base of the loop.
- Sc in the ring again.
This gives 2 sc on the ring, plus a loop covered by 24 sc.
– Right side, going down: Mirror the left side. Tier 1 gets 4, then each step gets 4 and each tier gets 5. (31 sc)
Sl st in the first sc to join. (25 + 31 + 2 + 31 = 89 sc around, plus 24 sc on the loop) Fasten off.
Why the math works: At this gauge, one sc is about as tall as it is wide, so 1 sc fits each sc row end. A dc is about twice as tall, so it takes 2 sc. The 3-sc corners turn each outer point without pulling. The single sc on each inner step keeps the steps crisp. Adding 0.2 in (0.5 cm) on each side brings the tree from 3.8 x 4.0 in (9.7 x 10.2 cm) to 4.2 x 4.4 in (10.7 x 11.2 cm).
Final Blocking
- Weave in ends before blocking. Run them along the hem rows so they stay out of the windows.
- Wet the ornament with a spray bottle until it is damp all the way through, or dip it and press it in a towel.
- Pin the outline. Pin the bottom edge straight at 4.2 in (10.7 cm). Center the top so the tree measures 4.4 in (11.2 cm) tall, not counting the loop.
- Open the lace. Put one pin into each tier’s step tips. Use a blunt needle to square up the ch-1 windows.
- Shape the fans. Gently spread each 7-dc fan so it opens evenly from its center stitch.
- Shape the loop. Slip a pencil through the hanging loop so it dries round.
- Optional stiffening: For an ornament that stays crisp for years, brush on diluted fabric stiffener while it is pinned.
- Dry fully, then unpin.
Final Quality-Control Checklist
- Each tier has a visible front-loop ridge band across the top
- Stitch counts per row match: hems 9, 13, 17, 21; fan rows 7, 11, 15, 19
- Each tier has 2 stitches of step overhang on each side
- The fans sit centered, with the same number of dc on each side
- The windows are open and evenly spaced
- The border has 89 sc around, with 3-sc corners at every outer point
- The hanging loop is fully covered, sits at the center top, and is firmly attached
- Size after blocking is 4.2 x 4.4 in (10.7 x 11.2 cm)
Troubleshooting
The fan is off-center. Recount the ridge row. It must be an odd number (5, 9, or 13), and the fan goes in the middle stitch.
The tiers have no step. Make sure you slip stitched over the first 2 sc and left the last 2 sc unworked in each ridge row.
The windows close up. Your ch-1 is too tight. Make the chains a little looser, or use a ch 2 in the windows only.
The hem ruffles. You may have added extra sc in the chain spaces. Work exactly 1 sc per space.
The sides pucker after the border. Use 2 sc per dc row end, not 3. Also check that each step corner has 3 sc.
The hanging loop twists. Untwist the ch-18 before you sl st to close it.
Care
Hand wash in cool water with mild soap, press out the water in a towel, and lay flat to dry, re-pinning if needed. Between seasons, store the ornament flat in tissue paper.
Final Notes
The measurements build step by step. Tier 1 hems at 9 sc, 1.6 in (4.1 cm). Each new tier adds 4 stitches, to 13, 17, and finally 21 sc, 3.8 in (9.7 cm). The body before the border is 4.0 in (10.2 cm) tall. One round of 89 sc brings the ornament to 4.2 x 4.4 in (10.7 x 11.2 cm), with a 1 in (2.5 cm) loop on top. Check your size at each tier, and the ornament will finish true. Happy crocheting!