

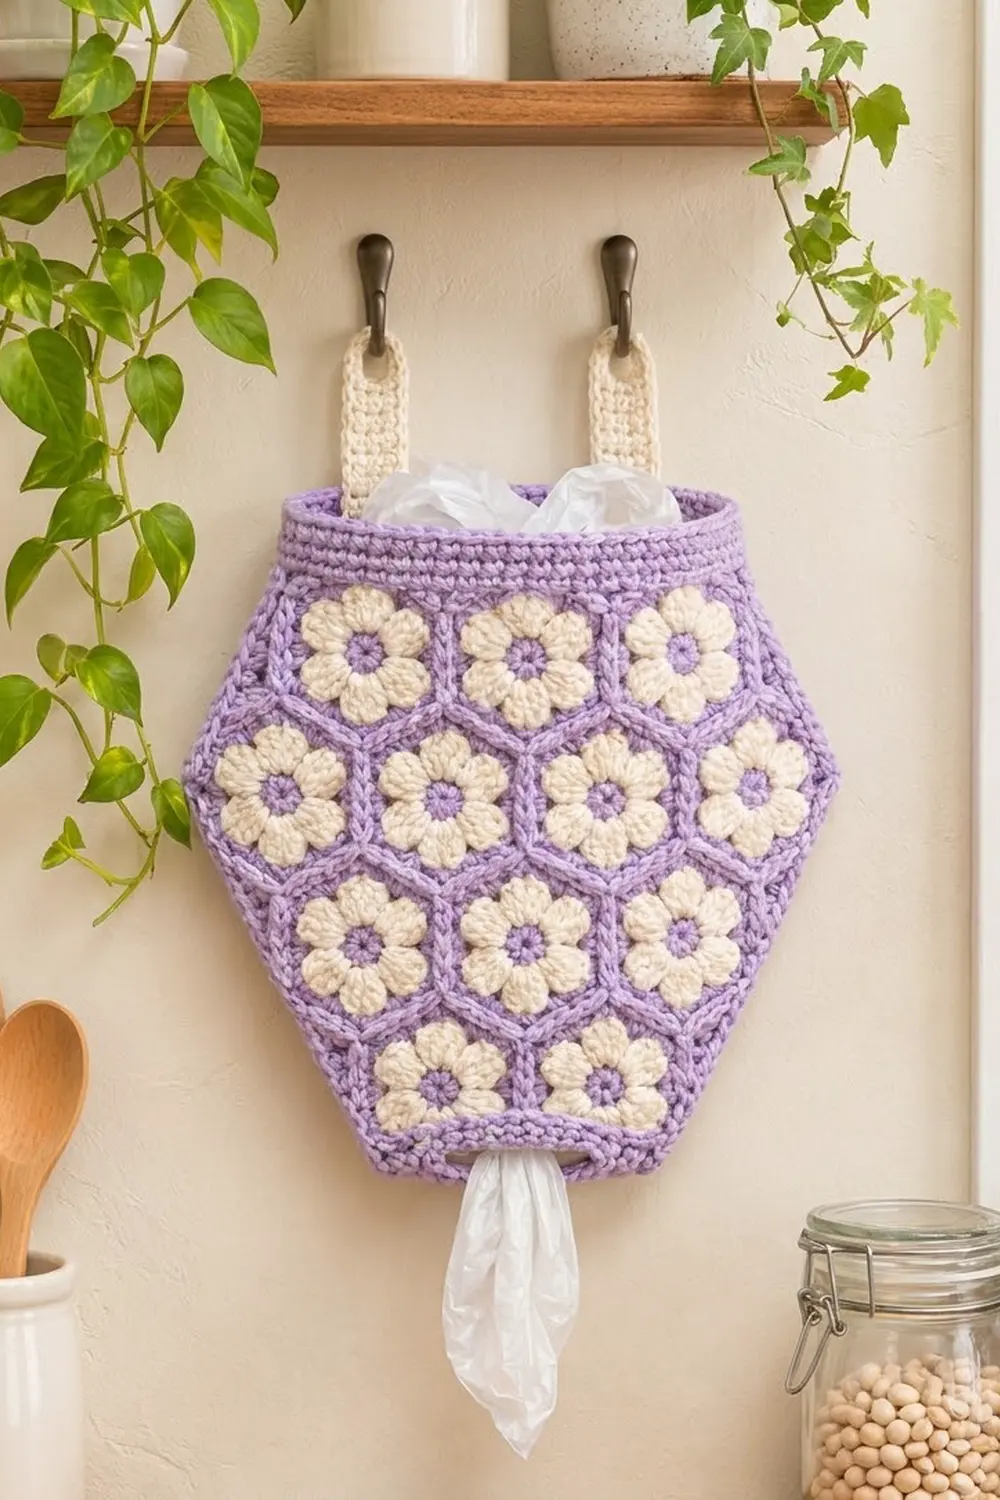
This bag holder is a soft lilac pouch covered in cream daisies. Each daisy sits in its own hexagon, and the hexagons fit together in a honeycomb of 3, 4, 3 and 2 motifs. A firm lilac cuff finishes the opening at the top. Two cream tabs hang the holder from wall hooks, and a slot in the bottom border lets you pull bags out one at a time.
There are only two colors. Lilac is used for the flower centers, hexagon frames, border and cuff. Cream is used for the puff-stitch petals and the tabs. It’s practical, cottage-kitchen style that looks good enough to leave on display.
This pattern uses US crochet terms. The finished holder measures 15 in (38.1 cm) wide at its widest point and 15.4 in (39.1 cm) tall to the top of the cuff. The tabs add another 3.6 in (9.1 cm), so the total hanging length is 19 in (48.3 cm).
How it’s made:
1. Crochet 24 motifs and join them into two 12-motif panels.
2. Fill in the zigzag edges with shaped wedges.
3. Work a 3-round border. The front border includes the bag slot.
4. Join the two panels, add the cuff, and sew on the tabs.
Finished Size and Construction
- Finished size: 15 in (38.1 cm) x 15.4 in (39.1 cm), plus tabs
- Skill level: Intermediate
- Terminology: US
- Yarn weight: DK (weight 3)
- Hook: 4 mm (G-6)
- Pieces: 24 hexagon motifs (12 per panel), plus 2 tabs
- Layout per panel: 4 rows of 3, 4, 3 and 2 motifs
- Motif size: 3.5 in (8.9 cm) from flat side to flat side, about 4 in (10.2 cm) from point to point
- Panel size before border: 14 in (35.6 cm) x 13.1 in (33.3 cm)
- Border depth: 0.5 in (1.3 cm)
- Cuff depth: 1.25 in (3.2 cm)
Materials
Use a smooth DK cotton or cotton blend. Cotton holds its shape when the pouch is full and shows off the puff petals. Avoid fuzzy yarns, which hide the seam ridges.
- Lilac: 120 g, about 276 m (302 yd)
- Cream: 50 g, about 115 m (126 yd)
These amounts assume about 230 m per 100 g and include a margin of about 20%.
Tools: 4 mm (G-6) hook, tapestry needle, 10 stitch markers, scissors, tape measure, blocking mat, rust-proof pins, spray bottle.
Abbreviations (US Terms)
- ch: chain
- sl st: slip stitch
- sc: single crochet
- hdc: half double crochet
- dc: double crochet
- tr: treble crochet (yarn over twice)
- dtr: double treble crochet (yarn over 3 times)
- sc2tog / sc3tog: single crochet 2 / 3 stitches together
- sp: space
- st(s): stitch(es)
- RS / WS: right side / wrong side
Puff stitch (puff): (Yarn over, insert hook in st, yarn over, pull up a loop) 3 times, then yarn over and draw through all 7 loops.
Waistcoat stitch: A sc worked by inserting the hook between the two vertical legs of the st below. It gives a knit-look column.
Gauge and Checkpoints
Sc gauge: 22 sts and 24 rows = 4 in (10.2 cm).
Make one motif first and check it after each round:
- Round 1: 1 in (2.5 cm) across
- Round 2: 2 in (5.1 cm) across the petal tips
- Round 3: 2.75 in (7.0 cm) from flat side to flat side
- Round 4: 3.5 in (8.9 cm) from flat side to flat side, with each side 2 in (5.1 cm) long
If your motif measures more than 3.6 in (9.1 cm), go down 0.5 mm. If it measures less than 3.4 in (8.6 cm), go up 0.5 mm. The panel is four motifs wide, so any error is multiplied by four.
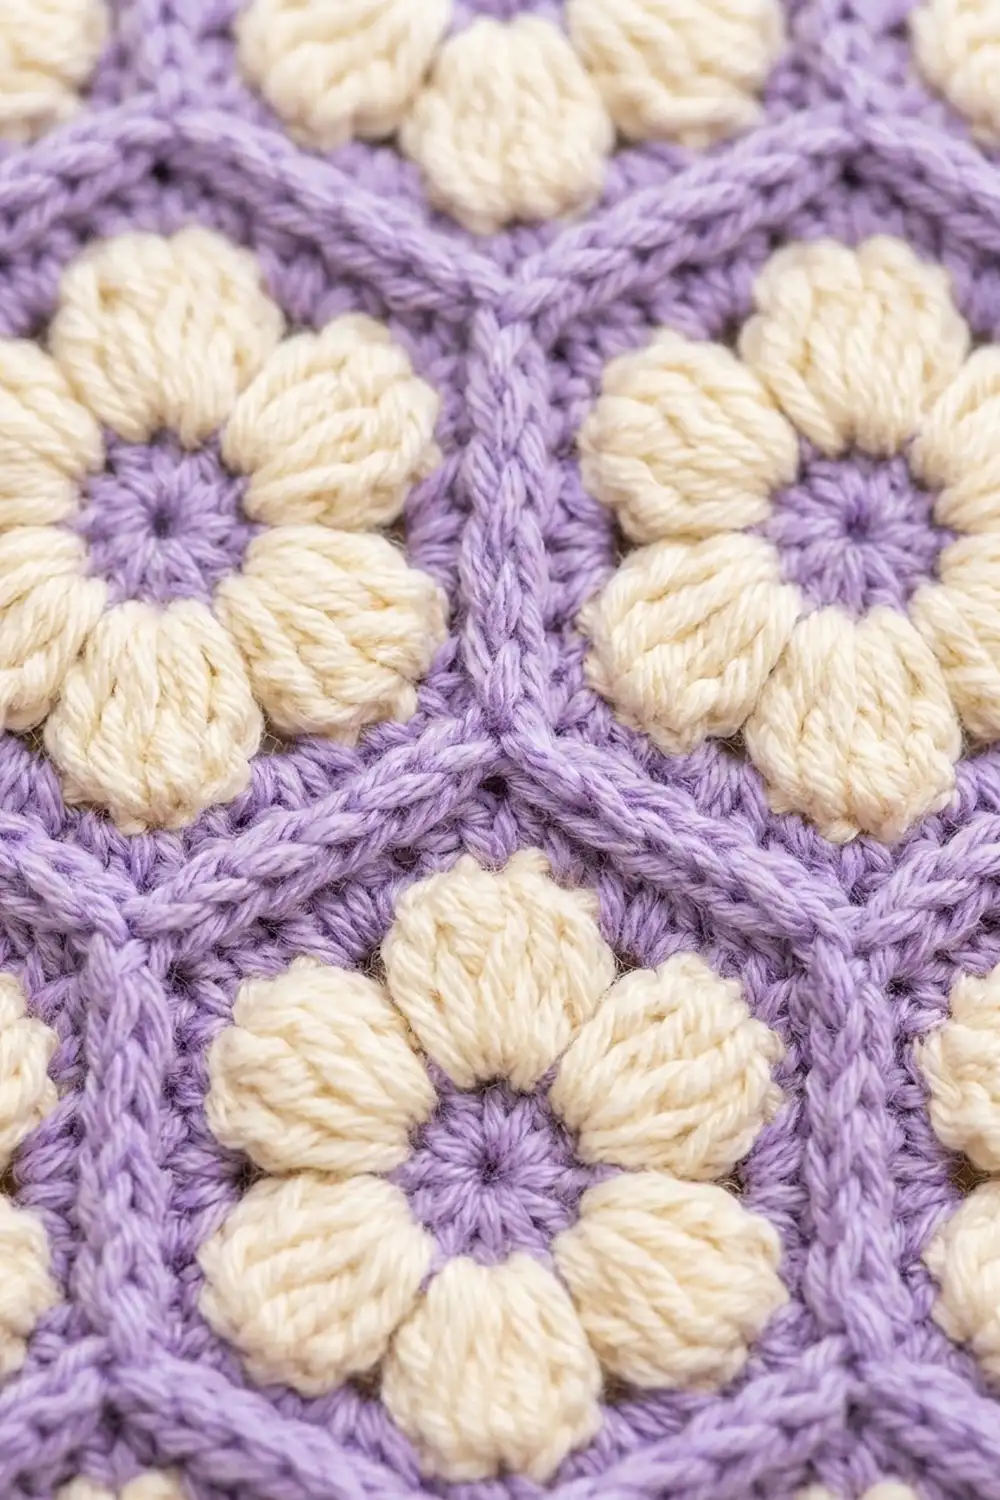
Hexagon Daisy Motif (make 24)
Round 1 (lilac): Make a magic ring, ch 2 (does not count as a st), work 12 hdc in the ring, and sl st to the first hdc. Fasten off. (12 hdc)
Round 2 (cream): Join with a sl st in any hdc, ch 1, and puff in the same st. Ch 3 and skip the next hdc. Puff in the next hdc, ch 3, skip the next hdc; repeat from * 4 more times. Sl st to the first puff and fasten off. (6 puffs, 6 ch-3 sps)*
Round 3 (lilac): Join with a sl st in any ch-3 sp. Ch 3 (counts as dc), then work (dc, ch 2, 2 dc) in the same sp and dc in the next puff. Work (2 dc, ch 2, 2 dc) in the next ch-3 sp, dc in the next puff; repeat from * 4 more times. Sl st to the top of the ch-3. (30 dc: 5 per side, 6 ch-2 corners)*
Round 4 (lilac): Sl st into the next dc and then into the ch-2 sp. Ch 3, (dc, ch 2, 2 dc) in the same sp, then dc in each of the next 5 dc. Work (2 dc, ch 2, 2 dc) in the next ch-2 sp, dc in each of the next 5 dc; repeat from * 4 more times. Sl st to the top of the ch-3 and fasten off. (54 dc: 9 per side, 6 ch-2 corners)*
In this pattern, a “side” means the 9 dc between two corner sps. Corner sps are counted separately.
Hanging Tabs (make 2, cream)
Row 1: Ch 8, sc in the 2nd ch from the hook and in each ch across. (7 sc)
Rows 2–21: Ch 1, turn, sc across. (7 sc)
Row 22: Ch 1, turn, sc 2, ch 3, skip 3, sc 2. (4 sc, 1 ch-3 sp)
Row 23: Ch 1, turn, sc 2, work 3 sc in the ch-3 sp, sc 2. (7 sc)
Rows 24–25: Ch 1, turn, sc across. (7 sc)
Row 26: Ch 1, turn, sc2tog, sc 3, sc2tog. (5 sc)
Row 27: Ch 1, turn, sc2tog, sc 1, sc2tog. (3 sc)
Edging: Ch 1 and do not turn. Work 27 sc down the row ends, 3 sc in the corner, 5 sc across the foundation, 3 sc in the next corner, 27 sc up the other side, and 3 sc across the top. Sl st to the first sc. (68 sc)
Each tab measures 1.6 in (4.1 cm) x 4.8 in (12.2 cm).
Make All Pieces
- Motifs: Make 24: 12 for the front and 12 for the back. Each one uses lilac for Rounds 1, 3 and 4 and cream for Round 2.
- Tabs: Make 2 in cream.
Row 1:      [M] [M] [M]
Row 2:    [M] [M] [M] [M]
Row 3:      [M] [M] [M]
Row 4:        [M] [M]
Place the motifs point-up. Each row nests into the gaps of the row above it.
Joining
Method: Join with a lilac slip-stitch seam, RS facing, through the inside loops of both edges. This makes a raised ridge between the motifs.
Stitch-to-stitch logic: Each seam is 1 sl st in the matching corner sps, 9 sl sts (one for each pair of dc), and 1 sl st in the next pair of corner sps. That makes 11 sl sts per seam, and each panel has 24 seams.
Order: First join the motifs within each row along their vertical sides. Then join Row 1 to Row 2, Row 2 to Row 3, and Row 3 to Row 4, following the zigzag edge.
Tension: Keep the sl sts as loose as the dc. If the seams are too tight, the panel will cup.
Size checkpoint: Each panel should measure 14 in (35.6 cm) across Row 2 and 13.1 in (33.3 cm) from the top point to the bottom point.
Border
Border gauge: 22 sc = 4 in (10.2 cm), and 3 rounds = 0.5 in (1.3 cm).
Step 1: Leveling Wedges (each panel)
The honeycomb edge has 9 V-shaped notches. Each notch is formed by two exposed 9-dc sides meeting at a joined corner, and is about 1 in (2.5 cm) deep and 3.5 in (8.9 cm) across.
Valley wedge (9 per panel): RS facing, join lilac with a sl st in the first dc of the right-hand side, next to its outer corner. This sl st counts as a st. Work sc, hdc, hdc, dc, dc, tr, tr, tr in the next 8 dc. Work 1 dtr through both joined corner sps at the bottom of the V. Then work tr, tr, tr, dc, dc, hdc, hdc, sc, sl st across the second side. Fasten off. (19 sts)
Place the valley wedges like this: 2 along the top, 1 on each upper side, 2 on each lower slant, and 1 on the bottom.
Corner wedges (2 per panel): These square off the outer top corners of the end motifs in Row 1.
– Right: Join with a sl st in the upper-right corner sp, ch 5 (counts as dtr), then work tr, tr, tr, dc, dc, hdc, hdc, sc, sl st across that side. (10 sts)
– Left: Join with a sl st in the first dc next to the top point, work sc, hdc, hdc, dc, dc, tr, tr, tr, then dtr in the upper-left corner sp. (10 sts)
Step 2: Border Rounds (each panel)
The leveled panel now has 10 edges with 10 outward corners: 2 square top corners and 8 gentle 30-degree corners.
Round 1: Sc around the panel, working these counts:
– Top: 59 (9 + 1 in the top point + 19 + 1 + 19 + 1 + 9)
– Each upper side: 22 (3 sc around the dtr post, skip the corner sp beneath it, then 19 sc across the wedge)
– Each vertical side: 9
– Each lower slant: 39 (19 + 1 in the joined corner sp + 19)
– Each lower chamfer: 9
– Bottom: 19
– Corners: 3 sc in the top of each dtr at the square corners, and 2 sc in each 30-degree corner sp
Sl st to the first sc. (236 edge + 22 corner = 258 sc)
Round 2: Ch 1 and sc in each st, with these changes:
– Square corners: sc, 3 sc in the center st, sc (5 sts).
– 30-degree corners: sc, then 2 sc in the next st (3 sts).
– Each upper side: sc2tog at the bend between the dtr post and the wedge (21 sts).
– Front panel only: across the bottom, work sc 4, ch 11, skip 11, sc 4. This makes the bag slot.
(234 edge + 34 corner = 268 sts)
Round 3: Ch 1 and sc in each st, with these changes:
– Square corners: sc 2, 3 sc in the center st, sc 2 (7 sts).
– 30-degree corners: sc, 2 sc in the center st, sc (4 sts).
– Each upper side: sc2tog at the bend again (20 sts).
– Front panel only: work 11 sc in the ch-11 sp.
Fasten off. (232 edge + 46 corner = 278 sc)
Why the math works: Each edge count comes from whole motif sides: 9 + 1 + 9 = 19 per wedge. The 9 notches use 18 of the panel’s 24 exposed sides. The other 6 sides are the vertical sides, the chamfers, and the two sides under the corner wedges. No side is counted twice. The top’s 59 sts span 10.5 in (26.7 cm), which matches the gauge. The outward corners gain stitches each round, and the two inward bends lose one each round, so the border lies flat.
Step 3: Assembly and Cuff
Join the panels: Hold the panels WS together with the front facing you. Sc through both layers, one sc for each pair of matching sts. Start just after the top-right corner group and work down, across the bottom and up the other side, stopping before the top-left corner group. (205 sc = 278 − 59 − 7 − 7)
Cuff Round 1: Join lilac at a side seam. On each panel, work sc2tog, sc3tog, sc2tog over the first corner group (3 sts), sc 59 across the top, then sc2tog, sc3tog, sc2tog over the next corner group (3 sts). (65 per panel, 130 sts total)
Cuff Rounds 2–7: Waistcoat stitch in each st around. (130 sts)
Cuff Round 8: Sl st loosely in each st around and fasten off. (130 sts)
The cuff measures 11.8 in (30.0 cm) when laid flat.
Tabs: Place each tab inside the back panel with the hole at the top. Overlap 1.25 in (3.2 cm) of the tab with the cuff, and center each tab 3 in (7.6 cm) from a side seam. Whipstitch the tabs to the back layer only.
Final Blocking
- Weave in all ends along the seam ridges.
- Put a towel loosely inside the holder.
- Pin it to 15 in (38.1 cm) wide by 15.4 in (39.1 cm) tall.
- Pin the bottom and the slanted sides straight.
- Mist until damp, not soaked.
- Round out the petals with your fingertips.
- Let it dry completely, then pin and mist the tabs.
Final Quality-Control Checklist
- Each of the 24 motifs measures 3.5 in (8.9 cm) and has 9 dc per side.
- Each seam has 11 sl sts, with 24 seams per panel.
- Each panel has 9 valley wedges and 2 corner wedges.
- Both panels have 278 sts in Border Round 3.
- The slot is 11 sts, or 2 in (5.1 cm), wide.
- The joining round has 205 sc, and the cuff has 130 sts.
- The tabs are level and their holes are open.
Troubleshooting
- The petals look flat: Pull the puff loops up to about 0.5 in (1.3 cm).
- The motif cups: Work Round 4 with a hook one size larger.
- A wedge bulges: Change the tr next to the dtr to a dc.
- A wedge dips: Change the outer hdc to a dc.
- The corners ruffle: Leave out the Round 3 increases at the 30-degree corners.
- The cuff flares: Work Round 8 with a hook 0.5 mm smaller.
Care
Machine wash cold on a gentle cycle in a laundry bag, then reshape and dry flat. Don’t tumble dry.
Final Notes
All the measurements build on each other. A 3.5 in (8.9 cm) motif makes a panel 14 in (35.6 cm) x 13.1 in (33.3 cm). The wedges straighten the edges, and the 0.5 in (1.3 cm) border brings the panel to 15 in (38.1 cm) x 14.1 in (35.8 cm). The 1.25 in (3.2 cm) cuff brings the finished height to 15.4 in (39.1 cm). Check each measurement as you go, and the holder will hang straight.
Happy crocheting!