

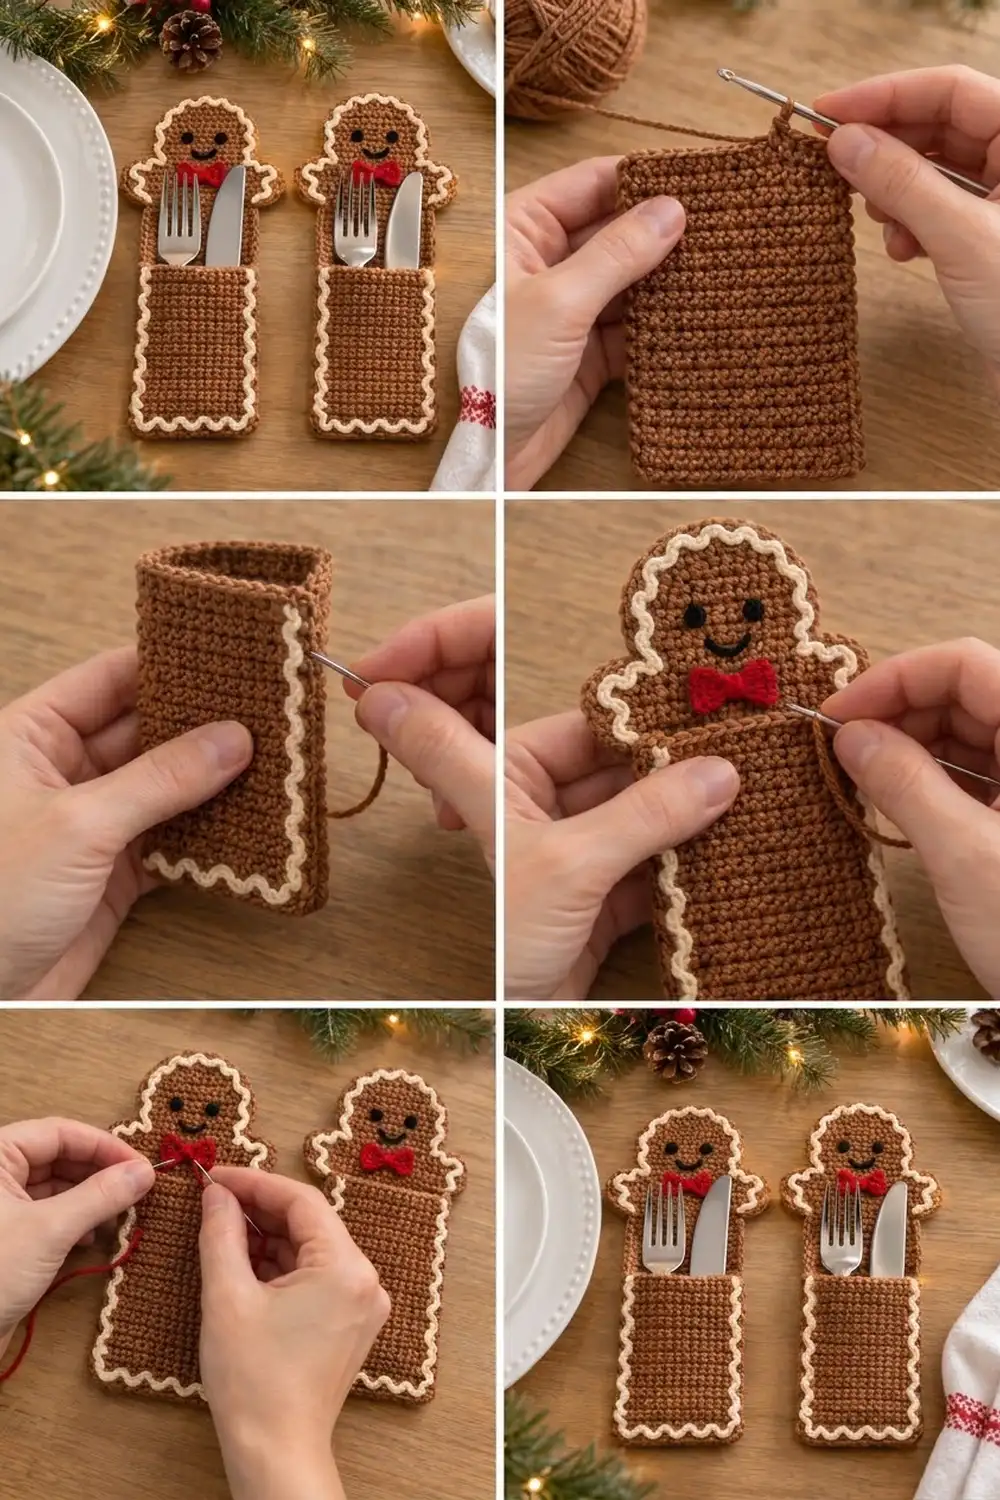
Ginger Jack is a cheerful gingerbread man who holds a fork and knife at every place setting. He has a round head, little rounded arms and a deep front pocket for the cutlery. A wavy cream “icing” line runs around his outline, and a red bow sits at his neck.
The palette is classic cookie: cinnamon brown, cream icing, a red bow and a simple black face. The fabric is firm single crochet, so the holder stays flat and lets the cutlery stand upright.
This pattern uses US crochet terms. One finished holder measures 5.6 in (14.2 cm) wide across the arms and 11.6 in (29.5 cm) tall.
Here is how it goes together. You crochet a flat back piece shaped like a gingerbread man and a rectangular pocket. You align the two layers and join them with one brown border round worked through both layers. Last, you sew on two cream icing cords, embroider the face and add the crocheted bow.
Finished Size and Construction
- Finished size: 5.6 x 11.6 in (14.2 x 29.5 cm)
- Skill level: Easy
- Terminology: US crochet terms
- Yarn weight: DK (light #3), cotton or cotton blend
- Hook: 3.25 mm (US D/3)
- Number of pieces: 1 back piece, 1 pocket, 1 bow, 2 icing cords, plus embroidery
- Layout: pocket stacked on the lower back piece, sides and bottom edges aligned
- Back piece before border: 5.2 x 11.2 in (13.2 x 28.4 cm)
- Pocket before border: 3.6 x 6.0 in (9.1 x 15.2 cm)
- Border depth: 0.2 in (0.5 cm) all around
Materials
Use a smooth, mercerized or matte DK cotton. Cotton holds its shape, washes well and shows the stitch texture clearly. Avoid fuzzy acrylics, because they blur the icing line.
Yarn for one holder:
- Brown (cinnamon): 25 g / 55 m
- Cream (icing): 5 g / 12 m
- Red (bow): 2 g / 5 m
- Black (face): 1 g / 2 m
For a pair, double every amount. All quantities include a margin of about 15%.
Tools:
- 3.25 mm (US D/3) crochet hook
- Tapestry needle
- Rust-proof pins or clips
- 4 stitch markers
- Scissors
- Tape measure
Abbreviations (US Terms)
- ch – chain
- sc – single crochet
- sc2tog – single crochet 2 together: (insert hook in next st, yo, pull up a loop) twice, yo, pull through all 3 loops
- sl st – slip stitch
- st(s) – stitch(es)
- yo – yarn over
- RS – right side
Special technique – slip-stitch cord: Make a chain, then work 1 sl st into the back bump of each chain. This gives a firm, round cord that keeps its wave when you sew it down.
Gauge and Checkpoints
Gauge: 20 sc and 20 rows = 4 in (10.2 cm) in sc worked in rows.
This square gauge matters. Every row end becomes exactly 1 border stitch, so stitch width and row height need to match for the edge to lie flat.
Make the pocket first and use it as your gauge test. It is a plain 18-stitch rectangle.
Checkpoints:
- Pocket after Row 30: 3.6 x 6.0 in (9.1 x 15.2 cm)
- Back after Row 30: 3.6 x 6.0 in (9.1 x 15.2 cm), the same as the pocket
- Back after Row 34: 5.2 in (13.2 cm) across the arms
- Back after Row 56: 11.2 in (28.4 cm) tall
- After the border: 5.6 x 11.6 in (14.2 x 29.5 cm)
If your pocket is too big, go down a hook size. If it is too small, go up a hook size. If the width is right but the height is off, adjust your loop height rather than the row count. The back and pocket must have the same row count to match stitch-for-stitch.

Work with brown. Start each row with ch 1, which does not count as a stitch, and turn at the end of each row.
Foundation: Ch 19.
Row 1 (RS): Sc in the 2nd ch from the hook and in each ch across. (18 sc)
Rows 2–30: Ch 1, turn, sc in each st across. (18 sc)
Fasten off and weave in the ends. Mark the RS. The pocket measures 3.6 x 6.0 in (9.1 x 15.2 cm).
Back Piece
Work with brown in turning rows, as for the pocket.
Body
Foundation: Ch 19.
Row 1 (RS): Sc in the 2nd ch from the hook and in each ch across. (18 sc)
Rows 2–30: Sc in each st across. (18 sc)
Checkpoint: 3.6 x 6.0 in (9.1 x 15.2 cm). Lay the pocket on top; the two should match exactly.
Arms
Row 31: 2 sc in the first st, sc in the next 16 sts, 2 sc in the last st. (20 sc)
Row 32: 2 sc in the first st, sc in the next 18 sts, 2 sc in the last st. (22 sc)
Row 33: 2 sc in the first st, sc in the next 20 sts, 2 sc in the last st. (24 sc)
Row 34: 2 sc in the first st, sc in the next 22 sts, 2 sc in the last st. (26 sc)
Checkpoint: 5.2 in (13.2 cm) wide. Each arm sticks out 0.8 in (2.0 cm) past the body.
Rows 35–36: Sc in each st across. (26 sc)
Row 37: Sc2tog, sc in the next 22 sts, sc2tog. (24 sc)
Row 38: Sc2tog, sc in the next 20 sts, sc2tog. (22 sc)
Row 39: Sc2tog, sc in the next 18 sts, sc2tog. (20 sc)
Row 40: Sc2tog, sc in the next 16 sts, sc2tog. (18 sc)
The arms take up Rows 31–40, which is 2.0 in (5.1 cm). The 1-stitch slope on every row gives them a soft, rounded look.
Neck
Row 41: Sc2tog, sc in the next 14 sts, sc2tog. (16 sc)
Row 42: Sc2tog, sc in the next 12 sts, sc2tog. (14 sc)
The neck is 2.8 in (7.1 cm) wide at its narrowest.
Head
Row 43: 2 sc in the first st, sc in the next 12 sts, 2 sc in the last st. (16 sc)
Row 44: 2 sc in the first st, sc in the next 14 sts, 2 sc in the last st. (18 sc)
Rows 45–52: Sc in each st across. (18 sc)
Row 53: Sc2tog, sc in the next 14 sts, sc2tog. (16 sc)
Row 54: Sc2tog, sc in the next 12 sts, sc2tog. (14 sc)
Row 55: Sc2tog, sc in the next 10 sts, sc2tog. (12 sc)
Row 56: Sc2tog, sc in the next 8 sts, sc2tog. (10 sc)
The head takes up Rows 43–56, which is 2.8 in (7.1 cm) tall and 3.6 in (9.1 cm) wide. Fasten off and weave in the ends.
Checkpoint: The back piece measures 5.2 x 11.2 in (13.2 x 28.4 cm).
Bow
Work with red.
Foundation: Ch 7.
Row 1: Sc in the 2nd ch from the hook and in each ch across. (6 sc)
Rows 2–4: Ch 1, turn, sc in each st across. (6 sc)
Fasten off and leave a 12 in (30.5 cm) tail. The rectangle measures 1.2 x 0.8 in (3.0 x 2.0 cm).
Wrap the tail tightly around the center 6 times to pinch the rectangle into a bow. Secure the wraps with 2 stitches through the back. Keep the rest of the tail for sewing.
Icing Cords (Make 2)
Work with cream.
Foundation: Ch about 110, until the chain measures 22 in (55.9 cm) when gently straightened.
Cord: Sl st in the back bump of the 2nd ch from the hook and in each ch across. (109 sl st)
Fasten off and leave an 18 in (45.7 cm) tail for sewing.
Each icing path needs about 20 in (50.8 cm) of cord once it is waved, so 22 in gives you room to adjust. If a cord is long, unravel the extra stitches from the free end. If it is short, add a few stitches.
Make All Pieces
For one holder you need:
- Brown: 1 back piece, 1 pocket
- Red: 1 bow
- Cream: 2 icing cords
- Black: embroidery only
For a pair, make 2 of everything.
Stacking layout, front view:
        [ HEAD  + face ]
   [ARM]  [ NECK + bow ]  [ARM]
        [ POCKET (front) ]
        [ BODY  (behind) ]
The pocket lies directly over Rows 1–30 of the back piece. Its top edge sits at the underarm.
Joining
The pocket joins to the back piece in Border Round 1. You work sc through both layers along the bottom and both sides, and the pocket’s top edge stays open.
Setup:
- Lay the back piece RS up.
- Lay the pocket on top, RS up, with the foundation edges together.
- Clip the side edges every 5 rows. Pocket Row 30 should sit exactly on back Row 30.
Stitch-to-stitch logic:
- Bottom: the 18 pocket foundation stitches match the 18 back foundation stitches, 1 to 1.
- Sides: pocket row ends 1–30 match back row ends 1–30, 1 to 1, on each side.
Both pieces have the same stitch and row counts, so you never skip or add a stitch to make the layers fit.
Tension: Insert the hook under a full row-end strand on each layer. Pull each loop up to the normal height of a sc. Joining stitches pulled too tight will make the edge cup.
Size checkpoint: After joining, the body section should still measure 3.6 in (9.1 cm) wide inside the border.
Border
Border gauge: 5 border sc = 1 in (2.5 cm). This matches both the stitch gauge and the row gauge.
Border Round 1 (brown, RS facing):
- Bottom edge, both layers: Join yarn in the first foundation ch at the bottom right corner. Ch 1, 3 sc in that ch, sc in the next 16 chs, 3 sc in the last ch. (22 sc)
- Left side: Sc in each row end up the side, 1 sc per row. Rows 1–30 go through both layers, and Rows 31–56 go through the back only. (56 sc)
- Top of head: 2 sc in the first st of Row 56, sc in the next 8 sts, 2 sc in the last st. (12 sc)
- Right side: Sc in each row end down the side, 1 sc per row. Rows 56–31 go through the back only, and Rows 30–1 go through both layers. (56 sc)
- Sl st to the first sc. Total: 146 sc. Fasten off.
Why the math works:
- The bottom is 18 foundation stitches plus 2 extra in each corner (3 sc in 1 st), which gives 22. The 3-sc groups turn 90° without pulling.
- Each side has 56 rows, so 56 sc. The row height is 0.2 in (0.5 cm), the same as one sc width, so the border neither ruffles nor pulls.
- The head top is 10 stitches plus 1 extra at each end, which gives 12 and rounds the crown.
- Check the total: 22 + 56 + 12 + 56 = 146.
The border adds 0.2 in (0.5 cm) on every side. Width goes from 5.2 to 5.6 in (13.2 to 14.2 cm), and height goes from 11.2 to 11.6 in (28.4 to 29.5 cm).
Applying the icing:
- Pocket cord: Start at the pocket’s top left corner. Pin the cord 1 stitch inside the border, down the side, across the bottom and up the other side, ending at the top right corner.
- Wave: Make the wave as you pin. Put a peak every 0.5 in (1.3 cm), about 0.2 in (0.5 cm) deep.
- Sew the pocket cord: Whipstitch it on with the cream tail, catching the pocket layer only. Leave the pocket top bare.
- Back cord: Start at one underarm, just above the pocket corner. Pin it in the same wave 1 stitch inside the border, over the arm, around the head and down the other arm to the opposite underarm.
- Sew the back cord: Whipstitch it in place.
Face and bow:
- Eyes: Work black French knots (3 wraps) in Row 50, in stitches 7 and 11 counted from the edge.
- Smile: Backstitch a curved smile across Rows 47–48, from stitch 7 to stitch 11, dipping 1 row in the middle.
- Bow: Sew the bow centered over Rows 41–43.
Final Blocking
- Mist the holder lightly with water until it is damp.
- Pin it flat to 5.6 x 11.6 in (14.2 x 29.5 cm).
- Ease the arm tips and the head into smooth curves with your fingers.
- Keep the pocket opening flat; don’t stretch it.
- Let it dry completely, at least 6 hours, before you unpin it.
Final Quality-Control Checklist
- [ ] Border Round 1 has 146 sc: 22 bottom, 56 per side, 12 on top.
- [ ] The pocket top is open and lines up with back Row 30.
- [ ] The icing waves are even, and the brown rim shows outside them all around.
- [ ] The pocket top has no icing.
- [ ] The eyes are level and the smile is centered.
- [ ] The bow is centered over the neck.
- [ ] All ends are woven in on the back.
- [ ] A fork and knife slide in easily.
Troubleshooting
- The border ruffles: Your row gauge is shorter than your stitch gauge. Make the border loops shorter, or go down a hook size for the border only.
- The border cups: Your border stitches are too tight. Redo the border with looser loops or a hook one size up.
- The pocket is shorter than the body: Count your rows. Both pieces need exactly 30 rows to Row 30.
- The icing looks flat: Tighten the wave so the peaks are closer together, about 0.4 in (1.0 cm) apart.
- The holder looks lopsided: Check that every shaping row changed by 2 stitches, then block again.
Care
Hand wash in cool water with mild soap, and lay flat to dry. Reshape the icing waves while the holder is damp.
Final Notes
Each stage builds on the one before:
- The 20 x 20 gauge gives a 3.6 x 6.0 in (9.1 x 15.2 cm) pocket.
- That pocket matches back Rows 1–30 exactly.
- The arms widen the back to 5.2 in (13.2 cm), and the head brings it to 11.2 in (28.4 cm) tall.
- The 146-stitch border joins both layers and brings Ginger Jack to 5.6 x 11.6 in (14.2 x 29.5 cm).
Make a pair or a whole table full, tuck in the cutlery, and set out your holiday table.
Happy crocheting!