

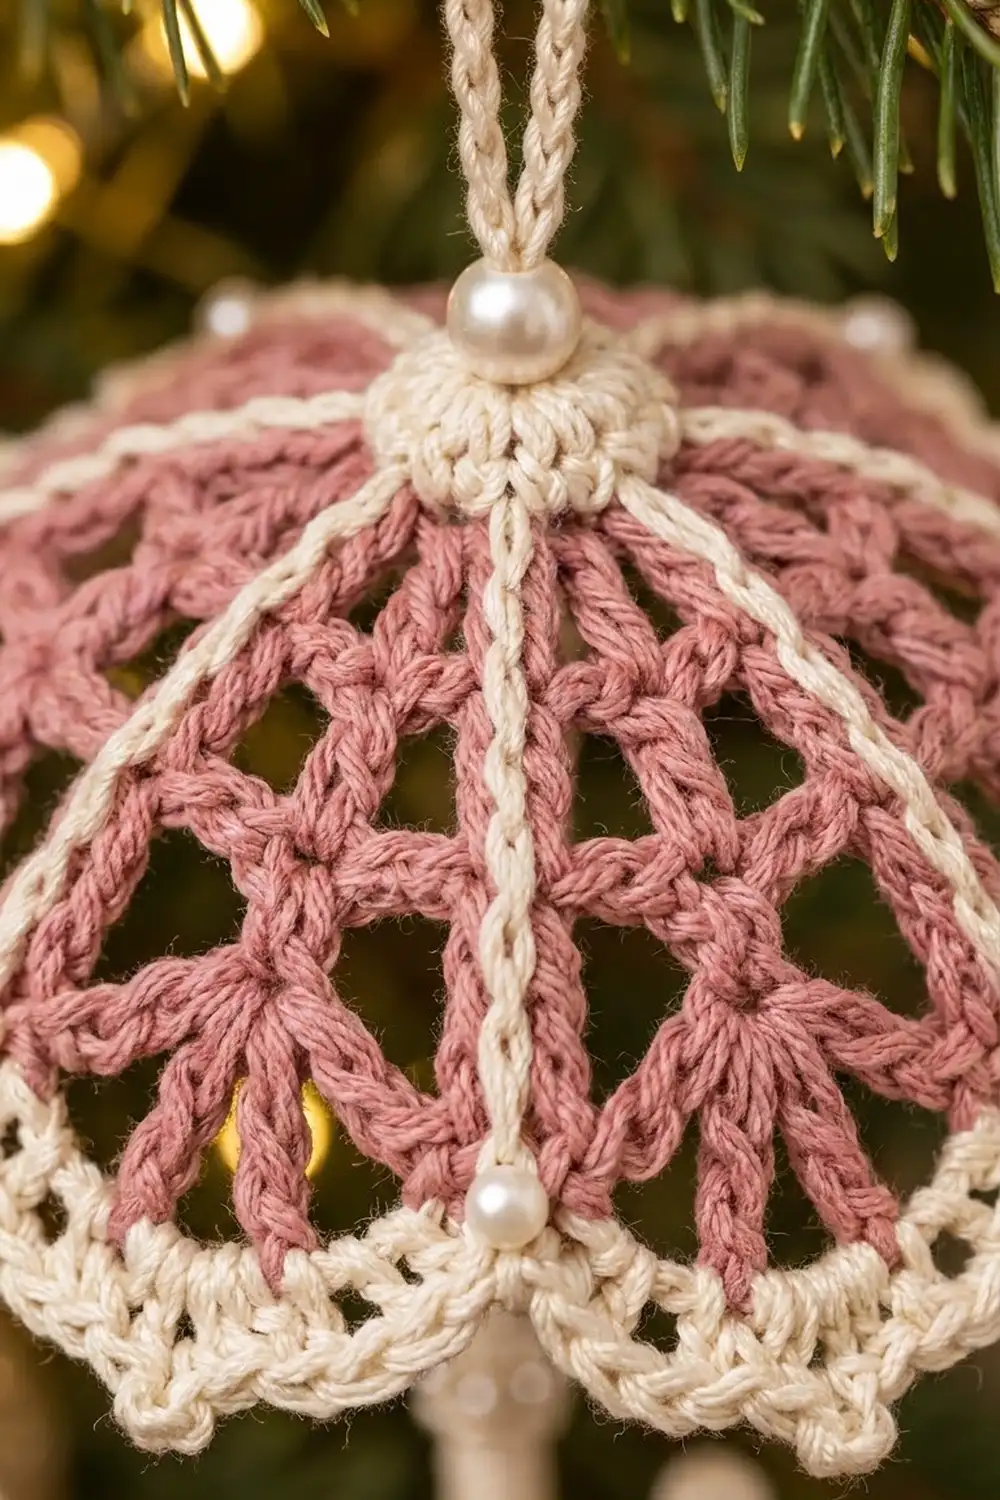
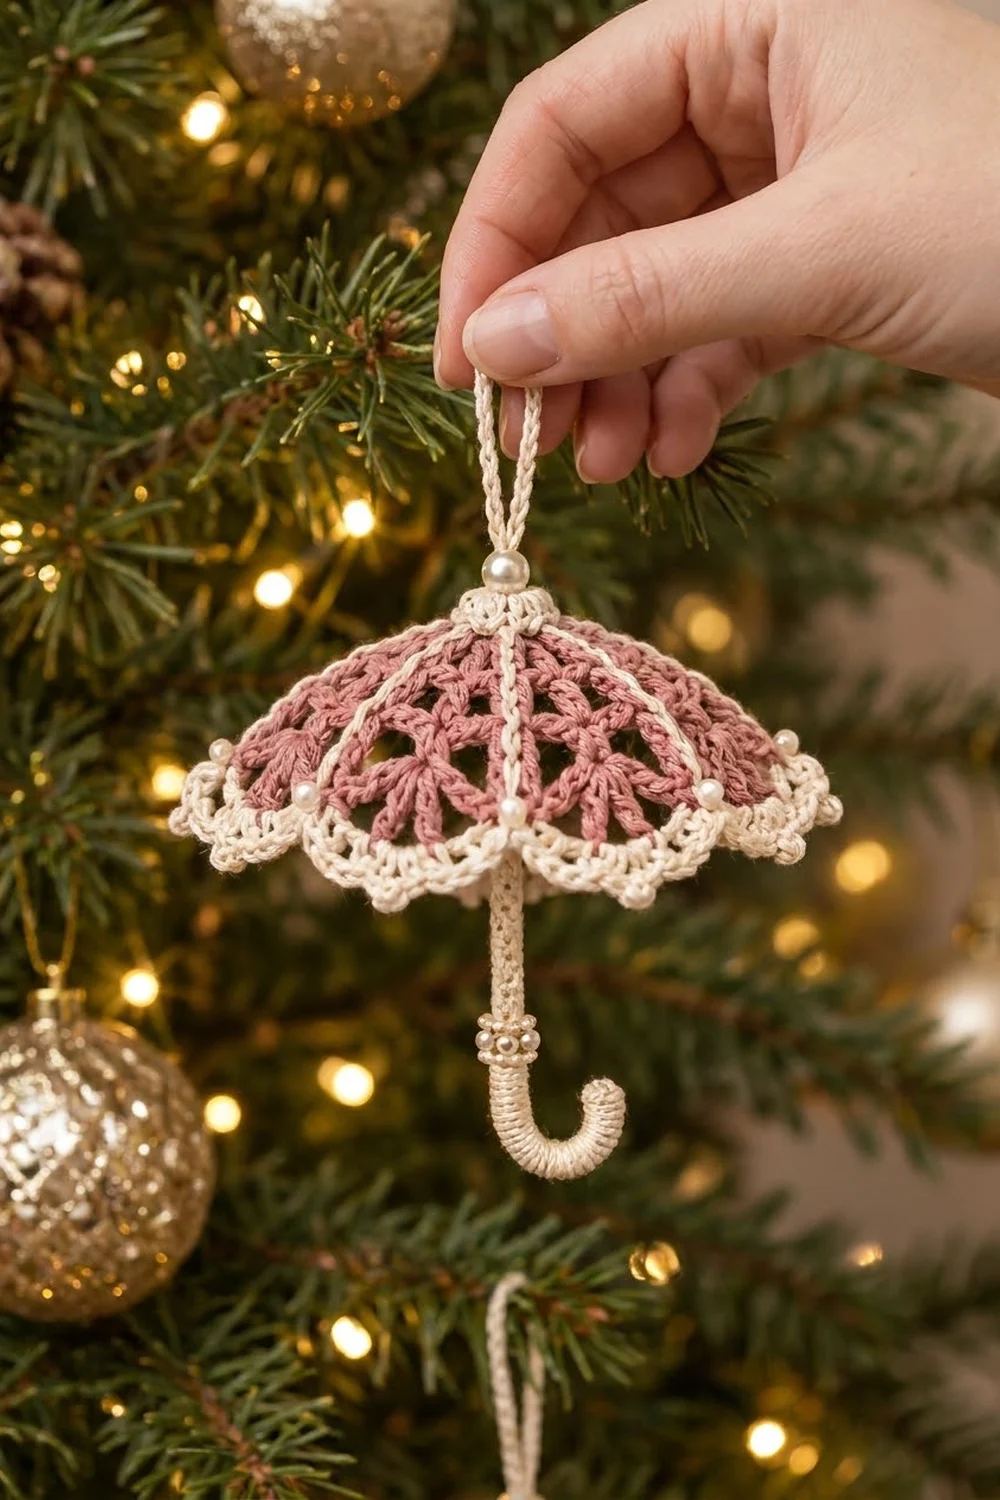
This little parasol is a lace umbrella ornament made for the Christmas tree. The canopy is dusty rose lace with ivory ribs. Its lower edge has a soft scalloped border, and the handle curves into a classic J-hook.
There are two colors: dusty rose for the lace panels and ivory cream for everything else. Pearl beads go at the top, at the bottom of each rib and around the handle. The finished ornament is about 3.75 in (9.5 cm) across the canopy and 4.5 in (11.4 cm) tall, plus a 2.5 in (6.4 cm) hanging loop.
This pattern uses US crochet terms throughout.
You crochet five small fan-shaped panels from the tip down and join them into a ring with raised single crochet seams. Then you close the top with a tiny cap and work a three-round scalloped border around the hem. To finish, add the hanging cord and a covered handle, then starch the canopy into a dome.
Finished Size and Construction
- Finished size: canopy 3.75 in (9.5 cm) across; ornament 4.5 in (11.4 cm) tall without the loop
- Skill level: Intermediate
- Terminology: US
- Yarn weight: Super fine (#1) or size 3 mercerized cotton
- Hook: 2.0 mm
- Number of pieces: 5 canopy panels, 1 hanging cord, 1 handle
- Layout: 5 panels joined side to side in a closed ring
- Panel size: 1.9 in (4.8 cm) wide × 1.75 in (4.4 cm) tall
- Canopy size before the border: hem 9.5 in (24.1 cm) around, about 3 in (7.6 cm) across
- Border depth: 0.5 in (1.3 cm)
Materials
Use a smooth mercerized cotton. It shows the lace clearly and holds starch well. Avoid fuzzy or very stretchy fibers.
- Color A, Dusty Rose: 8 g, about 27 m
- Color B, Ivory Cream: 10 g, about 34 m
These amounts include a margin of roughly 30%.
Tools and notions:
– 2.0 mm crochet hook
– Tapestry needle and a fine beading needle
– 1 pearl bead, 6 mm (top)
– 5 pearl beads, 4 mm (bottom of each rib)
– 12 pearl beads, 3 mm (handle rings)
– 1 chenille stem (pipe cleaner), 7 in (17.8 cm) long
– Fabric stiffener or heavy starch
– A 3 in (7.6 cm) foam ball or plastic egg, plastic wrap and rustproof pins
– Scissors
Abbreviations (US Terms)
- ch – chain
- sl st – slip stitch
- sc – single crochet
- sc2tog – single crochet 2 together
- dc – double crochet
- sp – space
- tch – turning chain
- RS / WS – right side / wrong side
Special stitches:
– V-st: (dc, ch 1, dc) in the same stitch.
– Shell: 5 dc in the same stitch.
– Picot: (sc, ch 3, sc) in the same stitch.
Gauge and Checkpoints
Gauge: 20 sc and 10 dc rows = 2 in (5.1 cm), or 10 sc and 5 dc rows per 1 in (2.5 cm).
Make one complete panel before making the others. It is your real gauge swatch. Check it at these points:
- After Row 5: about 1.7 in (4.3 cm) wide across the top.
- After Row 7: 1.9 in (4.8 cm) wide and about 1.4 in (3.6 cm) tall.
- After Row 10 edging: 1.9 in (4.8 cm) wide × 1.75 in (4.4 cm) tall.
If your panel is more than 0.25 in (0.6 cm) too big, go down 0.25 mm in hook size. If it is too small, go up 0.25 mm. Panel size controls every later measurement. Five panels that are too wide will flatten the dome; five that are too narrow will cup it too deeply.
Canopy Panel (Make 5)
Use Color A. Work in rows from the tip down to the hem, and turn at the end of each row.
Row 1 (RS): Ch 4, 2 dc in 4th ch from hook. The 3 skipped ch count as the first dc. Turn. (3 dc)
Row 2 (WS): Ch 4 (counts as dc + ch 1), dc in same st, ch 1, dc in next dc, ch 1, (dc, ch 1, dc) in top of the beginning ch. Turn. (5 dc, 4 ch-1 sps)
Row 3: Ch 5 (counts as dc + ch 2), [dc in next dc, ch 2] 3 times, dc in 3rd ch of tch. Turn. (5 dc, 4 ch-2 sps)
Row 4: Repeat Row 3. (5 dc, 4 ch-2 sps)
Row 5: Ch 6 (counts as dc + ch 3), [dc in next dc, ch 3] 3 times, dc in 3rd ch of tch. Turn. (5 dc, 4 ch-3 sps)
These three rows of chain spokes make the long stems of the Y shapes.
Row 6 (V row): Ch 4 (counts as dc + ch 1), dc in same st, [ch 1, skip ch-3 sp, V-st in next dc] 4 times. Work the last V-st in the 3rd ch of tch. Turn. (5 V-sts: 10 dc, 9 ch-1 sps = 19 sts)
Each V sits on top of a spoke, which completes the Y.
Row 7 (solid band): Ch 3 (counts as dc), dc in next ch-1 sp, [dc in next dc, dc in next ch-1 sp] 8 times, dc in 3rd ch of tch. Turn. (19 dc)
Row 8 (mesh): Ch 4 (counts as dc + ch 1), skip next dc, dc in next dc, [ch 1, skip next dc, dc in next dc] 8 times. Work the last dc in the top of tch. Turn. (10 dc, 9 ch-1 sps)
Row 9 (RS, trim row): Ch 1, sc in first dc, [sc in next ch-1 sp, sc in next dc] 9 times. Work the last sc in the 3rd ch of tch. (10 sc worked into dc + 9 sc worked into spaces = 19 sc)
Do not turn.
Row 10 (side edging, RS): Ch 1. Rotate the work and go down the side: 2 sc in the end of each of Rows 8 through 1 (16 sc). Work (sc, ch 1, sc) in the foundation ch at the tip. Then work 2 sc in the end of each of Rows 1 through 8 (16 sc). Sl st in the first sc of Row 9. Fasten off and weave in the ends.
Panel counts:
– Each side: 17 sts (16 edge sc + 1 tip sc). The tip ch-1 sp is left free.
– Bottom edge: the 19 sc of Row 9, including both corner sc.
Make All Pieces
- Color A: 5 panels
- Color B: seams, cap, border, hanging cord and handle cover
Layout (seen from above, RS out):
P1 | P2 | P3 | P4 | P5 | → back to P1
(5 seams, closed ring, tips meet at center)
Lay the panels out with all the RS facing up. All tips point to the center.
Joining
Method: Raised single crochet seams in Color B.
Hold two panels WS together, so the RS faces out on both sides. Line up their side edges, from the bottom corner to the tip. With Color B, join at the bottom corner through both layers.
Work 1 sc through each matching pair of side stitches: 17 sc per seam, ending in the tip sc pair. Fasten off. The sc ridge sits on the outside and makes the cream rib.
Join P1 to P2, P2 to P3, P3 to P4 and P4 to P5. Then close the ring by joining P5 to P1. That makes 5 seams and 85 seam sc in total.
Tension: Keep the seams snug but no tighter than your panel stitches. Tight seams pucker the lace, and loose ones make wavy ribs. Each seam should lie flat at 1.75 in (4.4 cm), the same length as the panel side.
Top cap (Color B):
– Rnd 1: With RS facing, join in any tip ch-1 sp. Ch 1, sc in the same sp, then sc in each of the remaining 4 tip ch-1 sps. Join. (5 sc)
– Rnd 2: Ch 1, sc2tog twice, sc in last st. (3 sts) Fasten off. Thread the tail through all 3 sts and pull tight.
Size checkpoint: The hem should measure 9.5 in (24.1 cm) around (95 sts at 10 sts per inch), or about 3 in (7.6 cm) across.
Border
Use Color B. Border gauge is the same as the panel: 10 sts per 1 in (2.5 cm).
Starting count: 5 panels × 19 bottom sts = 95 sts. The seams add no stitches to the hem, because the seam sc sit on the side edges, not on Row 9.
Rnd 1 (trim round): With RS facing, join at any seam. Sc2tog over the last sc of one panel and the first sc of the next. *[Sc in each of the next 17 sts, sc2tog across the next seam] 4 times, sc in each of the last 17 sts. Join to the first sc2tog.
(85 sc worked 1 per st + 5 sc2tog = 90 sts; 18 per panel)
Rnd 2 (scallops): Ch 1, sc in the first st (the seam sc2tog), skip 2 sts, shell in next st, skip 2 sts. *[Sc in next st, skip 2, shell in next st, skip 2] 14 times. Join to the first sc.
(15 scallops: 15 sc + 75 dc = 90 sts; 3 scallops per panel)
Rnd 3 (picots): Ch 1. *[Sc in sc, sc in each of the next 2 dc, picot in the center dc, sc in each of the next 2 dc] 15 times. Join and fasten off.
(90 sts worked 1 per st + 15 extra sc = 105 sc, plus 15 ch-3 picots)
Why the math works: Rnd 1 removes exactly 1 stitch at each of the 5 seams, which takes 95 down to 90. Each scallop repeat uses 6 stitches, and 90 ÷ 6 = 15 scallops with nothing left over. Each panel has 18 sts, so it holds exactly 3 scallops. The seam sts sit at stitch 1, 19, 37 and so on (1 more than a multiple of 18), and all of them land on a scallop’s sc. That puts a dip at every rib, where the pearls go.
The border is 0.5 in (1.3 cm) deep.
Pearls: Sew one 4 mm pearl to each seam sc of Rnd 2, right at the bottom of each rib.
Hanging cord (Color B): Ch 45, about 5 in (12.7 cm). Sl st in the back bump of the 2nd ch from the hook and in each ch across (44 sl st). Fold the cord in half to make a 2.5 in (6.4 cm) loop. Sew both ends to the top cap. Sew the 6 mm pearl over the base of the loop.
Handle:
1. Fold the chenille stem in half and twist it into a 3.5 in (8.9 cm) core.
2. With Color B, work sc over the core, packing about 14 sc per 1 in (2.5 cm). Cover 3 in (7.6 cm), about 42 sc in total, and leave 0.5 in (1.3 cm) bare at the top.
3. Bend the bottom 1 in (2.5 cm) into a J-curve about 0.75 in (1.9 cm) wide.
4. String six 3 mm pearls onto thread, wrap them around the handle 1 in (2.5 cm) above the curve, and tie. Add a second ring of 6 pearls 0.25 in (0.6 cm) above the first.
5. From inside the canopy, push the bare end up through the center under the cap. Stitch it securely to the cap.
Final Blocking
- Remove the handle temporarily if it is still loose, or wrap it in plastic.
- Dip the canopy in fabric stiffener and squeeze out the excess. The lace holes should be clear, not filmed over.
- Cover the 3 in (7.6 cm) foam ball with plastic wrap.
- Place the canopy over the ball with the cap centered on top.
- Straighten each rib so it runs from the cap to a pearl.
- Pull the border outward and pin each picot so the scallops flare evenly. The finished canopy should be about 3.75 in (9.5 cm) across.
- Let it dry completely, usually 24 hours.
- Unpin the canopy, then reattach the handle or check its stitching.
Final Quality-Control Checklist
- 5 panels, each 1.9 in (4.8 cm) × 1.75 in (4.4 cm)
- 5 seams of 17 sc, ribs raised on the RS
- Cap closed with no hole at the center
- Rnd 1: 90 sts; Rnd 2: 15 scallops; Rnd 3: 105 sc + 15 picots
- A pearl at the bottom of every rib
- Loop is 2.5 in (6.4 cm) and centered; 6 mm pearl at the top
- Handle fully covered, J-curve even, 2 pearl rings tied tight
- Canopy about 3.75 in (9.5 cm) across; ornament 4.5 in (11.4 cm) tall
- All ends woven in and trimmed
Troubleshooting
- The canopy lies flat instead of doming. Your panels are too wide. Check the Row 9 count (19 sc) and gauge, and go down a hook size if needed.
- The canopy is pointed or cone-shaped. Your panels are too tall. Make sure the chain spokes are exactly ch 2, ch 2 and ch 3, and that you aren’t making the dc rows taller.
- The ribs are wavy. The seam stitches are too loose. Rework the seam with a firmer tension, keeping 17 sc.
- The scallops don’t line up with the ribs. Rnd 1 is off. Count 18 sts per panel and make sure the sc2tog lands exactly on each seam.
- Row 6 has the wrong count. You missed the edge V. The ch 4 and the dc in the same st together make the first V-st.
- The handle core shows through. Pack the sc tighter, or add a second pass of sl st over any gaps.
Care
Spot clean gently with a damp cloth only, because washing will remove the starch. Store the ornament in a small box so the dome doesn’t get crushed.
Final Notes
The measurement chain is short:
- Panel: 19 sts × 17 sts per side, 1.9 in (4.8 cm) × 1.75 in (4.4 cm)
- Five panels: a 95-stitch hem, 9.5 in (24.1 cm) around
- Rnd 1: brings that to 90 stitches
- Rnds 2 and 3: add 15 scallops and 15 picots for a 0.5 in (1.3 cm) border
- Finished ornament: canopy 3.75 in (9.5 cm) across, 4.5 in (11.4 cm) tall
If the first panel matches gauge, every later count will fall into place. Happy crocheting!