

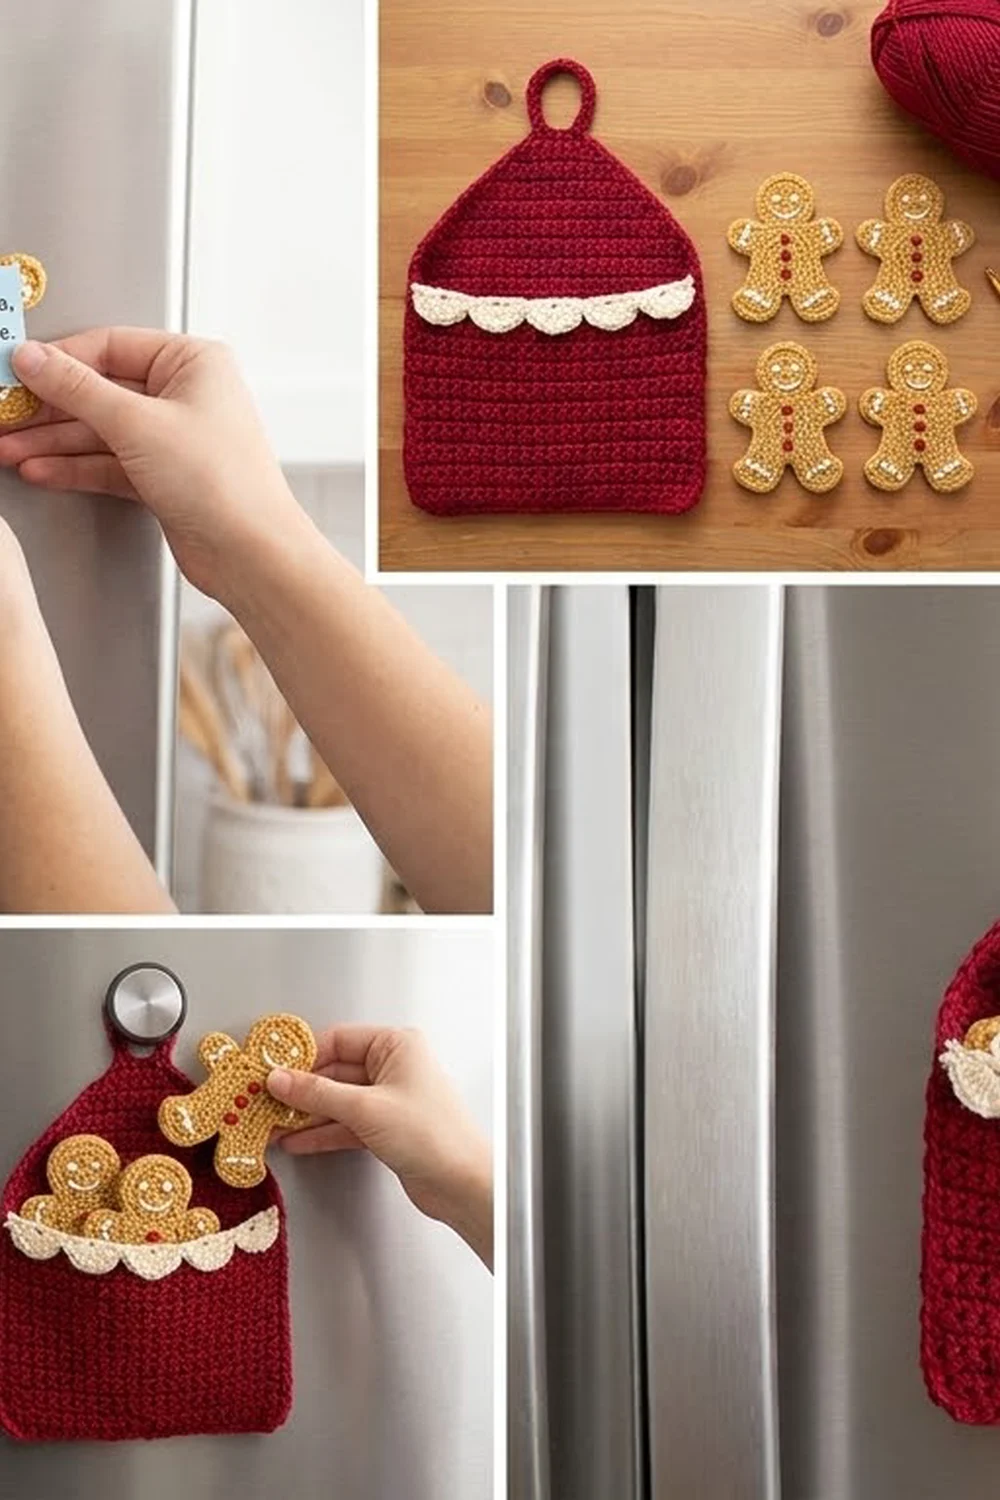
This set is made for the fridge door. It has a cranberry-red pocket that hangs from a loop and four little gingerbread men that work as magnets. Three ride in the pocket, and one can be out holding up a note.
The colors are classic holiday bakery: deep cranberry red for the pocket, golden tan for the cookies, and cream “icing” for the scalloped pocket edge and the gingerbread outlines. Small red buttons and an embroidered face finish each cookie.
The pattern uses US crochet terms. The finished pocket measures 7.8 in (19.8 cm) wide by 6.4 in (16.3 cm) tall, plus a loop of about 1 in (2.5 cm). Each gingerbread man measures 3.5 in (8.9 cm) tall by 3.1 in (7.9 cm) wide.
You work the back panel flat in rows, with shaped shoulders and a loop at the top. The front panel is a shorter rectangle that ends in cream shells. One red border round joins the two panels. You work each gingerbread man flat from the feet up, sew on a round head, and then outline the whole shape with a cream edging round.
Finished Size and Construction
- Pocket: 7.8 in (19.8 cm) x 6.4 in (16.3 cm), plus 1 in (2.5 cm) loop
- Gingerbread man: 3.5 in (8.9 cm) x 3.1 in (7.9 cm)
- Skill level: Advanced beginner
- Terminology: US terms
- Yarn weight: DK (#3)
- Hook: 3.5 mm (E-4)
- Number of pieces: 2 pocket panels joined into 1 pocket, and 4 gingerbread men (each with a body, a head and 2 buttons)
- Layout: the front panel sits flush with the bottom and sides of the back panel
- Back panel before border: 7.4 in (18.8 cm) x 6 in (15.2 cm)
- Front panel: 7.4 in (18.8 cm) x 4 in (10.2 cm)
- Gingerbread before edging: 3 in (7.6 cm) x 2.6 in (6.6 cm)
- Border depth: 0.2 in (0.5 cm) on the pocket; 0.25 in (0.6 cm) on the gingerbread men
Materials
Use a smooth DK yarn with good stitch definition. Cotton or a cotton blend gives crisp cookie edges and a firm pocket, but soft acrylic also works.
- Cranberry red: 35 g / 80 m (pocket, loop, border, buttons)
- Golden tan: 15 g / 35 m (4 gingerbread men)
- Cream: 10 g / 23 m (shells, edgings)
- Black embroidery floss: about 1 m per face
- Pink yarn or floss: about 0.5 m per face
These quantities include a margin of about 30 percent for looser tension.
Tools:
- 3.5 mm (E-4) hook
- Tapestry needle and sharp embroidery needle
- 4 round magnets, 0.75 in (1.9 cm) across
- Four patches of cream cotton fabric or felt, each 1.25 x 1 in (3.2 x 2.5 cm)
- Cream sewing thread
- Stitch markers, scissors, tape measure, pins
Abbreviations (US Terms)
- ch – chain
- sl st – slip stitch
- sc – single crochet
- hdc – half double crochet
- dc – double crochet
- sc2tog – single crochet 2 together
- fsc – foundation single crochet
- MR – magic ring
- inc – 2 sc in same stitch
- sk – skip
- st(s) – stitch(es)
Special stitches:
- Icing bump: (hdc, dc, hdc) in the same stitch or row-end.
- Shell: 5 dc in the same stitch.
- fsc: insert the hook into the base of the last stitch, yarn over, pull up a loop, yarn over and pull through 1 loop, then yarn over and pull through 2 loops.
Gauge and Checkpoints
Gauge: 20 sc and 24 rows = 4 in (10.2 cm). That works out to 5 sc and 6 rows per 1 in (2.5 cm).
Make one gingerbread man first. It is a quick way to test your gauge.
Checkpoints:
- Body after Row 12: 2 in (5.1 cm) tall, 2.6 in (6.6 cm) across the arms
- Head after Round 3: 1.25 in (3.2 cm) across
- Gingerbread man after edging: 3.5 in (8.9 cm) tall
- Back panel after Row 30: 7.4 in (18.8 cm) x 5 in (12.7 cm)
- Front panel after Row 22: 4 in (10.2 cm) tall
If your pieces are too big, go down 0.25 mm in hook size. If they are too small, go up 0.25 mm. Use the same hook for every piece so the cookies fit the pocket.
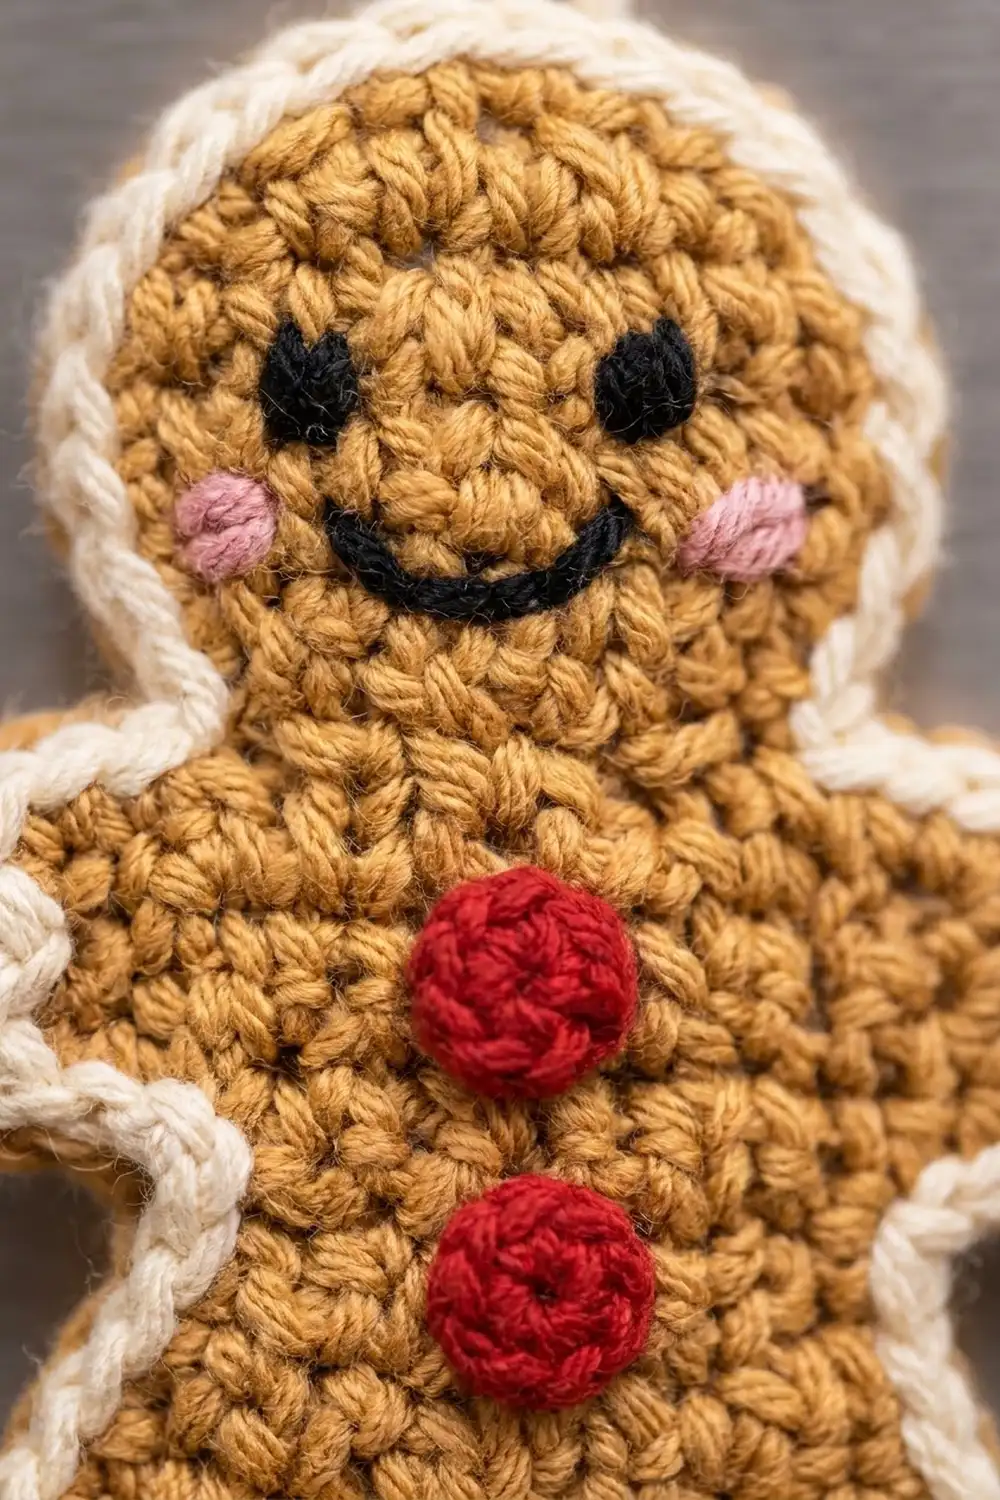
Gingerbread Man
Legs (make 2)
With tan, ch 4.
Row 1: Sc in 2nd ch from hook and in next 2 ch, turn. (3 sc)
Rows 2–5: Ch 1, sc in each st, turn. (3 sc)
Fasten off the first leg. Keep the second leg on the hook.
Body
Row 6 (join legs): Ch 1, sc in 3 sts of the second leg, ch 1, sc in 3 sts of the first leg, turn. (6 sc + 1 ch = 7 sts)
Row 7: Ch 1, sc in each of 7 sts, including the ch-1, turn. (7 sc)
Row 8: Ch 1, sc in each st, turn. (7 sc)
Row 9 (arms): Ch 4, sc in 2nd ch from hook and in next 2 ch (3 sc), sc in 7 body sts, then 3 fsc off the last st, turn. (3 + 7 + 3 = 13 sc)
Rows 10–11: Ch 1, sc in each st, turn. (13 sc)
Row 12 (shoulders and neck): Ch 1, sl st in first 3 sts, sc2tog, sc in next 3 sts, sc2tog, sl st in last 3 sts. (5 neck sts + 6 sl st)
Fasten off. Checkpoint: 2 in (5.1 cm) tall and 2.6 in (6.6 cm) wide.
Head
With tan, work in continuous rounds.
Round 1: 6 sc in MR. (6)
Round 2: Inc in each st. (12)
Round 3: (Sc in next st, inc) 6 times. (18)
Sl st to the first sc. Fasten off, leaving a 10 in (25.4 cm) tail.
Center the head over the neck so 4 of its stitches overlap the neck by 0.25 in (0.6 cm). Whipstitch the overlap from the back. The piece should now be 3 in (7.6 cm) tall.
Buttons (make 2 per gingerbread man)
With red, work 6 sc in a MR, pull the ring tight and sl st to the first sc. Fasten off. Each button is about 0.3 in (0.8 cm) across. Sew one at the center of Row 7 and one at the center of Row 10.
Face
With black floss, make two French-knot eyes on Round 2 of the head, 3 stitches apart. Backstitch a curved smile in 3 short stitches across Round 3. With pink, add 2 small straight stitches on each cheek.
Make All Pieces
- Tan: 4 bodies and 4 heads
- Red: 1 back panel, 1 front panel (Rows 1–20), 8 buttons
- Cream: Rows 21–22 of the front panel, 4 edgings
Pocket layout (front view):
      [ loop ]
   /  back top  \
  |  back panel  |
  |~~~~~~~~~~~~~~|  <- cream shells (opening)
  |  front panel |
  |______________|
The front panel covers the bottom 4 in (10.2 cm) of the back panel. The top 2 in (5.1 cm) of the back panel shows behind the cookies.
Pocket Panels
Back Panel
With red, ch 38.
Row 1: Sc in 2nd ch from hook and in each ch across, turn. (37 sc)
Rows 2–30: Ch 1, sc in each st, turn. (37 sc)
Checkpoint: 7.4 in (18.8 cm) x 5 in (12.7 cm).
Row 31: Ch 1, (sc2tog) twice, sc to last 4 sts, (sc2tog) twice, turn. (33 sc)
Row 32: Repeat Row 31. (29 sc)
Row 33: Repeat Row 31. (25 sc)
Row 34: Repeat Row 31. (21 sc)
Rows 35–36: Ch 1, sc in each st, turn. (21 sc)
The top edge is now 4.2 in (10.7 cm) wide, and the panel is 6 in (15.2 cm) tall.
Row 37 (loop): Ch 1, sl st in first 8 sts, ch 12, sk 5 sts, sl st in next st, sl st in last 7 sts. (8 + 5 + 1 + 7 = 21 sts) Fasten off.
Reinforce the loop: Join red in the ch-12 space next to the 14th st. Work 18 sc into the space, then sl st into the 8th st. Fasten off. The loop stands about 1 in (2.5 cm) above the top edge.
Front Panel
With red, ch 38.
Row 1: Sc in 2nd ch from hook and in each ch across, turn. (37 sc)
Rows 2–20: Ch 1, sc in each st, turn. (37 sc)
Checkpoint: about 3.3 in (8.4 cm) tall. Fasten off red.
Row 21: Join cream. Ch 1, sc in each st, turn. (37 sc)
Row 22 (shells): Ch 1, sc in first st, *sk 2, shell in next st, sk 2, sc in next st; repeat from * 5 more times. (6 shells and 7 sc: 30 dc + 7 sc = 37 sts)
The repeat uses 6 sts, and 1 + (6 x 6) = 37, so the row ends exactly on the last stitch. Fasten off. Checkpoint: 4 in (10.2 cm) tall.
Joining
Lay the back panel right side up. Place the front panel on top, also right side up, with the foundation chains and side edges lined up.
The border round does the joining. Along the bottom and the lower sides, insert the hook through the front panel and then the back panel, and pull up the loop through both layers.
Keep your tension even and slightly relaxed, because a tight join will curve the bottom edge. The joined pocket should still lie flat at 7.4 in (18.8 cm) wide.
Border
Pocket Border
Border gauge: 5 sc per 1 in (2.5 cm), the same as the fabric.
With the front facing, join red at the bottom left corner, through both layers.
Round 1:
- Bottom: 3 sc in corner st, sc in next 35 sts, 3 sc in last corner st. (41 sc)
- Side 1, lower (working up): 20 sc evenly through both layers along the front panel, covering back Rows 1–24. (20 sc)
- Side 1, upper: 5 sc evenly along back Rows 25–30. (5 sc)
- Shoulder 1: 2 sc in each row-end of Rows 31–34, then 1 sc in each row-end of Rows 35–36. (10 sc)
- Top: 2 sc in first st, sc in next 19 sts (behind the loop over the skipped sts), 2 sc in last st. (23 sc)
- Shoulder 2: 1 sc in each row-end of Rows 36–35, then 2 sc in each row-end of Rows 34–31. (10 sc)
- Side 2, upper: 5 sc along Rows 30–25. (5 sc)
- Side 2, lower: 20 sc through both layers. (20 sc)
Sl st to the first sc and fasten off.
Total: 41 + 2 x (20 + 5 + 10) + 23 = 134 sc.
Why the math works: Each straight side is 30 rows, or 5 in (12.7 cm). At 5 sc per inch that needs 25 sc, not 30, so you work 20 sc along the 4 in (10.2 cm) front panel and 5 sc above it. Each sloped row-end is about 0.4 in (1 cm) long, so it takes 2 sc. The bottom is 37 sts plus 2 extra sc at each corner (41). The top is 21 sts plus 1 extra at each end (23). Leave the cream shell edge unworked, because that is the pocket opening. The finished pocket is 7.8 in (19.8 cm) x 6.4 in (16.3 cm).
Gingerbread Icing Edging
Edging gauge: 1 sc per stitch or row-end. On this small outline, which curves outward, that ratio lies flat.
With the right side facing, join cream in the first foundation st of either foot.
Round 1:
- Foot A: sc, icing bump in middle st, sc. (5 sts)
- Outer side A: sc in each row-end of Rows 1–8. (8 sc)
- Underarm A: sc in 3 sts of the arm underside. (3 sc)
- Hand A: sc in Row 9 end, icing bump in Row 10 end, sc in Row 11 end. (5 sts)
- Arm top A: sc in 3 sl sts. (3 sc)
- Shoulder A: sc in the sc2tog. (1 sc)
- Head: working into the 14 exposed sts of Round 3, (sc in next st, 2 sc in next st) 7 times. (21 sc)
- Shoulder B: sc in the sc2tog. (1 sc)
- Arm top B: sc in 3 sl sts. (3 sc)
- Hand B: sc, icing bump, sc. (5 sts)
- Underarm B: sc in 3 fsc bases. (3 sc)
- Outer side B: sc in each row-end of Rows 8–1. (8 sc)
- Foot B: sc, icing bump, sc. (5 sts)
- Inner legs: sc in 4 row-ends up one leg, sl st at the base of the ch-1, sc in 4 row-ends down the other leg. (9 sts)
Sl st to the first sc and fasten off.
Total: 5 + 8 + 3 + 5 + 3 + 1 + 21 + 1 + 3 + 5 + 3 + 8 + 5 + 9 = 80 sts.
The 7 increases on the head match the growth of a circle’s next round, so the head stays flat. The edging adds 0.25 in (0.6 cm) on every side: 3 + 0.5 = 3.5 in (8.9 cm) tall and 2.6 + 0.5 = 3.1 in (7.9 cm) wide.
Magnet
Center a magnet on the back of the body. Cover it with a fabric patch and whipstitch all 4 edges with cream thread. Don’t stitch through to the front.
Final Blocking
- Lightly mist all pieces with water.
- Pin the pocket to 7.8 in (19.8 cm) x 6.4 in (16.3 cm), with straight sides and the shells evenly spread.
- Pin each gingerbread man to 3.5 in (8.9 cm) x 3.1 in (7.9 cm), opening out the arms and the icing bumps.
- Let everything dry completely.
- If you used acrylic, you can steam lightly without pressing. Keep the steam away from the magnets.
Final Quality-Control Checklist
- Back panel: 37 sts at the bottom and 21 at the top
- Front panel: 6 even shells, sitting flush with the bottom
- Pocket border: 134 sc, with no ripple
- Loop centered over the 5 skipped stitches
- Each edging: 80 sts with 4 icing bumps
- Buttons centered and faces matching
- Magnets fully covered
- Three cookies fit side by side in the pocket
Troubleshooting
- Pocket sides ripple: You probably worked 1 sc per row-end. Use 25 sc on each straight side.
- Bottom curls: The join is too tight. Rework it more loosely.
- Shells crowd: Check that Row 21 has exactly 37 sc.
- Head cups: Check that you worked all 7 increases in the edging.
- Uneven arms: Make sure you worked exactly 3 fsc to match the 3 chain-side stitches.
- Weak hold: Use a stronger magnet or a thinner patch.
Care
Spot clean with a damp cloth. Remove the magnets before washing, and dry everything flat.
Final Notes
Everything depends on a gauge of 5 sc and 6 rows per 1 in (2.5 cm). That gauge gives a 3 in (7.6 cm) gingerbread body, which becomes 3.5 in (8.9 cm) with its edging. It also gives a 7.4 in (18.8 cm) x 6 in (15.2 cm) back panel and a 4 in (10.2 cm) front panel. The 134-stitch border joins the panels and brings the pocket to 7.8 in (19.8 cm) x 6.4 in (16.3 cm). If you check each stage, everything fits together on the fridge.
Happy crocheting!