

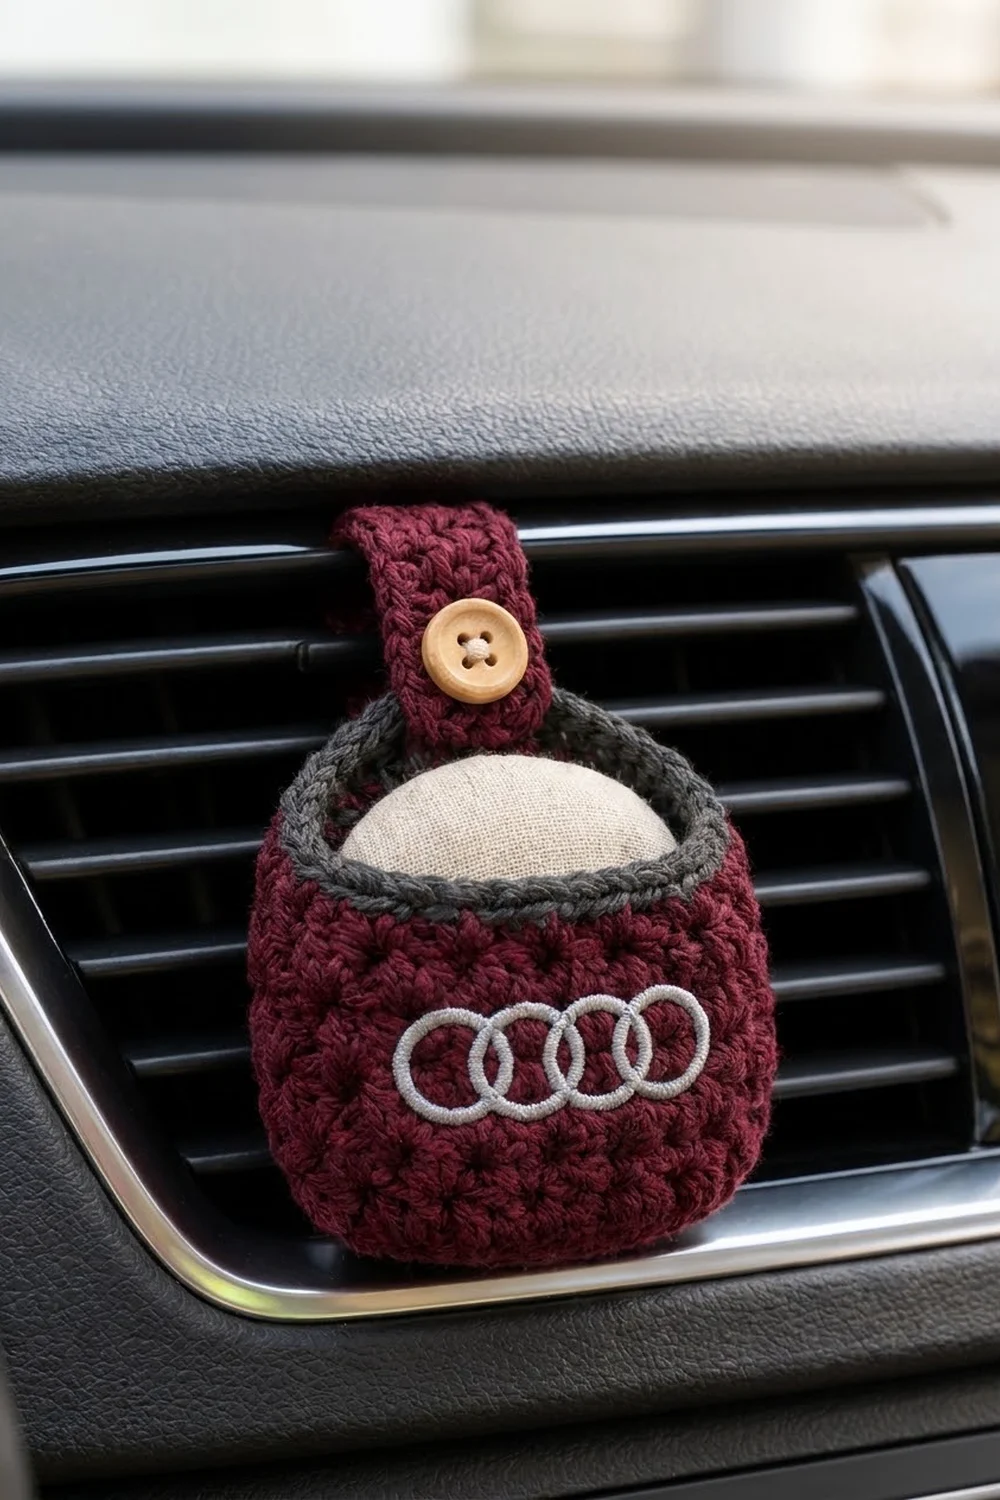
This little pouch hangs from a car air vent and holds a scented sachet. It has an oval base, straight textured sides in deep burgundy, a smooth charcoal-gray rim, and a burgundy strap that wraps around a vent slat and fastens with a wooden button. A row of four interlocking rings is embroidered across the front in silver-gray.
The texture comes from a simple (sc, dc) pattern stitch worked in the round. It makes a pebbly, star-dotted fabric that is dense enough to hold its shape. The charcoal rim frames the opening, and the silver rings add a clean, modern accent.
The pattern uses US crochet terms. The finished pouch measures about 3.75 in (9.5 cm) wide when flattened and 3.3 in (8.4 cm) tall. A 4 in (10.2 cm) strap rises from the back rim.
The whole pouch is made in one piece. You crochet an oval base, turn the sides up with a back-loop round, and work the textured body. Then you add a two-round gray rim and work the strap in rows directly off the back of the rim. Finally, you embroider the rings and sew on the button.
Finished Size and Construction
- Finished size: 3.75 in (9.5 cm) wide flattened x 3.3 in (8.4 cm) tall, plus a 4 in (10.2 cm) strap
- Skill level: Easy / advanced beginner
- Terminology: US crochet terms
- Yarn weight: Worsted (#4), cotton or cotton blend
- Hook: 4.0 mm (US G-6)
- Number of pieces: 1 (strap worked directly onto the rim)
- Layout: Single pouch, flattened with 17 stitches on the front and 17 on the back
- Base size: about 3 in x 1.75 in (7.6 cm x 4.4 cm)
- Size before border: 3.75 in (9.5 cm) wide x 2.9 in (7.4 cm) tall
- Border depth: 0.4 in (1.0 cm), 2 rounds of gray sc
Materials
Choose a smooth worsted cotton. Cotton keeps the texture crisp and doesn’t fuzz in a warm car. It also holds up to sun better than many acrylics.
- Burgundy (main color): 25 g, about 39 m
- Charcoal gray (rim): 5 g, about 8 m
- Silver-gray (embroidery): 2 g, about 4 m of sport-weight yarn, or one skein of 6-strand embroidery floss used at full thickness
These amounts include a margin of about 20 percent for swatching and weaving in ends.
Tools and notions:
- 4.0 mm (US G-6) crochet hook
- Tapestry needle
- Sharp embroidery needle
- One 5/8 in (1.6 cm) wooden 4-hole button
- Sewing thread to match the button
- Stitch marker
- Water-soluble fabric pen or chalk
- A round scent sachet, about 2.75 in (7.0 cm) across and no more than 1 in (2.5 cm) thick
Abbreviations (US Terms)
- ch – chain
- sc – single crochet
- dc – double crochet
- sl st – slip stitch
- sk – skip
- st(s) – stitch(es)
- BLO – back loop only
- sp – space
- rnd(s) – round(s)
Special stitch – Texture Group (TG): Work (sc, dc) in the same stitch. Each TG counts as 2 stitches: the sc and the dc. In every texture round after the first, work one TG into the sc of each TG below and skip the dc. This keeps the count steady and stacks the bumps into the dotted texture.
Gauge and Checkpoints
- Sc gauge: 18 sts and 20 rnds = 4 in (10.2 cm)
- Texture gauge: 18 sts (9 TG) and 16 rnds = 4 in (10.2 cm)
This is a small item, so the pouch itself is your test piece. Work the base and measure it before you continue.
Checkpoints:
- After Rnd 4, the base measures about 3 in x 1.75 in (7.6 cm x 4.4 cm) and lies flat.
- After Rnd 10, the side measures about 1.5 in (3.8 cm) up from the base edge.
- After Rnd 15, the side measures about 2.7 in (6.9 cm).
- After Rnd 18, the pouch is 3.3 in (8.4 cm) tall and 3.75 in (9.5 cm) wide flattened.
If your base is too big (longer than 3.25 in / 8.3 cm), go down to a 3.75 mm hook. If it is too small (shorter than 2.75 in / 7.0 cm), go up to a 4.5 mm hook. A difference of 0.25 in (0.6 cm) in base length changes the inside circumference by about 0.5 in (1.3 cm). That decides whether the sachet fits.
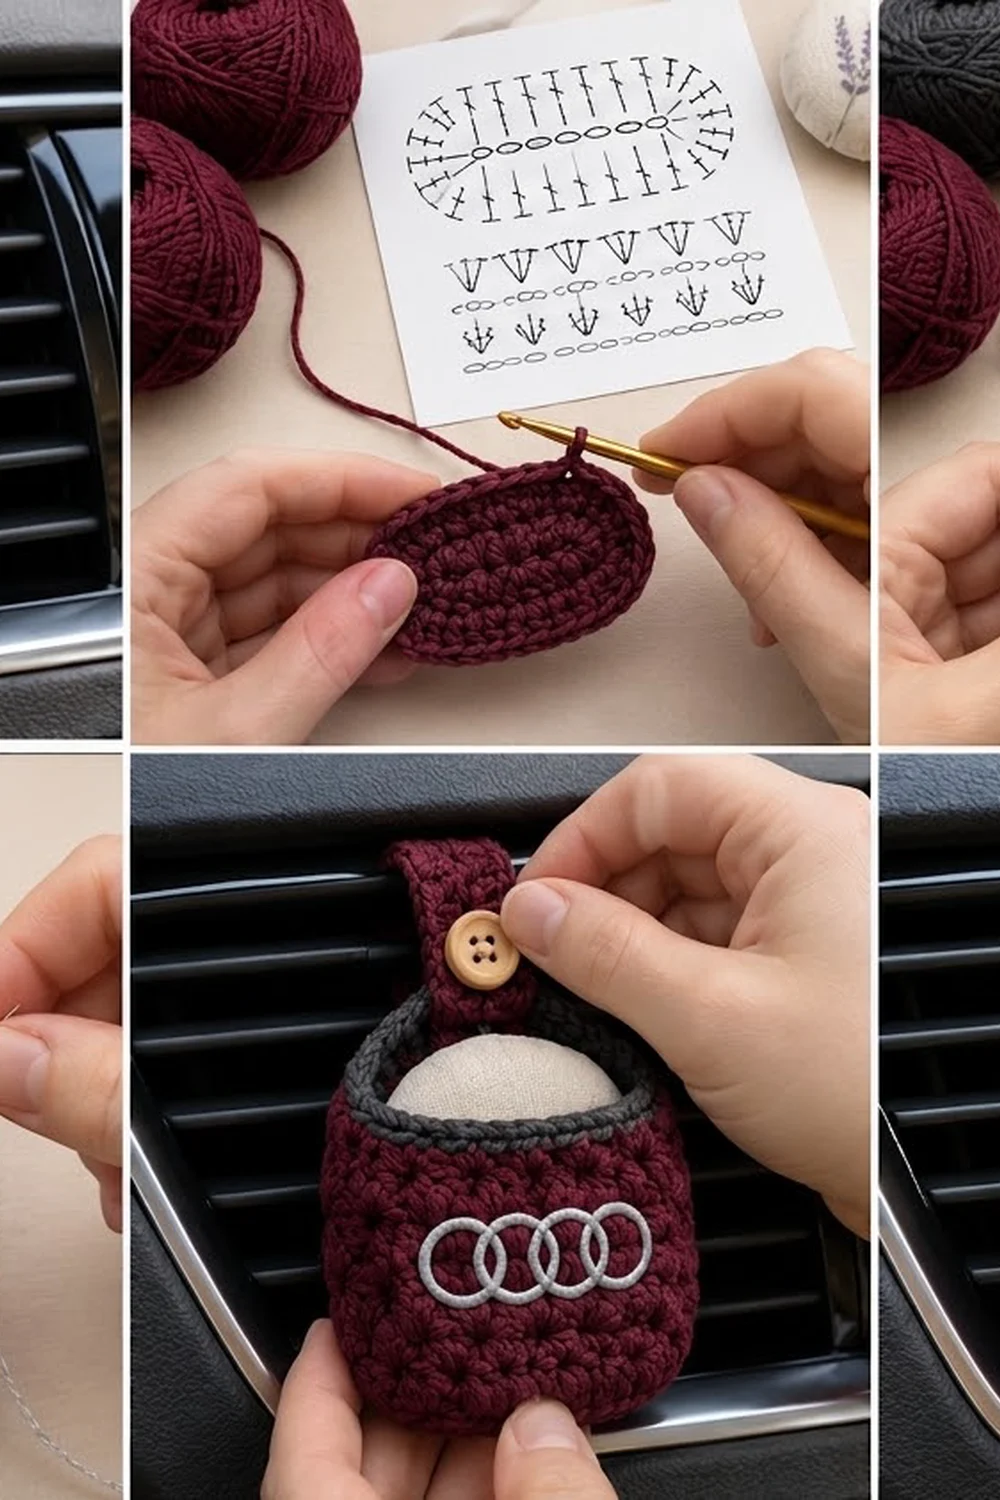
Pattern: Base
With burgundy, ch 8.
Rnd 1: Sc in 2nd ch from hook, sc in next 5 ch, 3 sc in last ch. Rotate to work along the other side of the chain: sc in next 5 ch, 2 sc in the same ch as the first sc. Join with sl st to first sc. (16 sts)
Each end of the oval now has 3 stitches, and each straight side has 5.
Rnd 2: Ch 1, 2 sc in first st, sc in next 5, 2 sc in each of next 3, sc in next 5, 2 sc in each of last 2. Join. (22 sts)
Rnd 3: Ch 1, 2 sc in first st, sc in next st, sc in next 5, (2 sc in next st, sc in next st) 3 times, sc in next 5, (2 sc in next st, sc in next st) 2 times. Join. (28 sts)
Rnd 4: Ch 1, 2 sc in first st, sc in next 2 sts, sc in next 5, (2 sc in next st, sc in next 2 sts) 3 times, sc in next 5, (2 sc in next st, sc in next 2 sts) 2 times. Join. (34 sts)
Each round adds exactly 6 stitches, 3 at each end. The straight sides stay 5 stitches long while the ends round out evenly. Check checkpoint 1 now.
Pattern: Sides
Rnd 5 (turning round): Ch 1, sc in BLO of each st around. Join. (34 sts)
The unused front loops form a neat ridge on the outside. This gives the pouch a defined bottom edge and turns the sides upward.
Rnd 6 (first texture round): Ch 1, TG in first st, sk next st, TG in next st, sk next st; repeat from * around. Join to first sc. (17 TG = 34 sts)
Rnds 7–15: Ch 1, TG in the sc of each TG around, skipping each dc. Join to first sc. (17 TG = 34 sts in each round)
That makes 10 texture rounds (Rnds 6–15). Check checkpoints 2 and 3. The bumps should sit in loose columns and give a dotted, star-like surface.
Rnd 16 (conversion round): Ch 1, sc in each sc and in each dc around. Join. (17 sc + 17 sc = 34 sts; 0 extra stitches added)
This round turns the texture back into a smooth sc edge so the rim sits level. Fasten off burgundy.
Flatten the pouch so the join line sits on one side fold. You’ll have 17 stitches across the front and 17 across the back. Place a marker in the 7th stitch of the back. The strap starts there.
Border: Charcoal Rim
Border gauge: 18 sc = 4 in (10.2 cm); 2 rnds = 0.4 in (1.0 cm).
Rnd 17: Join charcoal gray in the stitch at the side fold. Ch 1, sc in each st around. Join. (34 sts: 17 front + 17 back)
Rnd 18: Ch 1, sc in each st around, keeping your tension slightly firmer than usual. Join. (34 sts: 17 front + 17 back) Fasten off.
The firmer second round makes the rim roll inward slightly, so it looks rounded and thick.
Why the math works: The rim is worked 1 stitch into each stitch of the 34-stitch body, so it adds height without changing the width. At 4.5 sts per inch, 17 stitches per flattened side gives 3.75 in (9.5 cm). The full 34-stitch circle is about 7.5 in (19.1 cm) around. A sachet 2.75 in (7.0 cm) wide and 1 in (2.5 cm) thick measures about 7.5 in (19.1 cm) around its cross-section. That means it slides in snugly and stays put.
Finishing: Strap
The strap is worked in rows off the top of Rnd 18 at the back of the pouch.
Row 1: With the inside of the pouch facing you, join burgundy in the marked 7th st of the back. Ch 1, sc in the same st and in the next 3 sts. Turn. (4 sts)
This leaves 6 rim stitches on one side of the strap and 7 on the other. That is as close to centered as an odd stitch count allows.
Rows 2–17: Ch 1, sc in each st across. Turn. (4 sts)
Row 18 (buttonhole): Ch 1, sc in first st, ch 2, sk next 2 sts, sc in last st. Turn. (2 sc + ch-2 sp)
Row 19: Ch 1, sc in first st, 2 sc in ch-2 sp, sc in last st. Turn. (4 sts)
Row 20: Ch 1, sc in each st across. (4 sts)
Edging: Ch 1 and sl st down one long edge to the rim, about 1 sl st per row. Fasten off. Join at the rim on the other long edge, sl st up to the tip, and fasten off. This edging firms the strap so it doesn’t curl.
The strap is 0.9 in (2.3 cm) wide and 4 in (10.2 cm) long.
Button: Sew the button to Row 6, centered, on the side of the strap that faces the front of the pouch. This puts it about 1.2 in (3.0 cm) above the rim. Sew through all four holes several times and knot securely on the back.
Hanging: Bring the strap up past one horizontal vent slat, over its top, and down behind it. Then bring the tip forward underneath the slat and fold it down over the button. Push the button through the buttonhole. The folded tip sits over the button on the front.
Finishing: Interlocking Rings
Each of the four rings measures 0.75 in (1.9 cm) across. Each ring overlaps the next by 0.2 in (0.5 cm), so the whole row of rings is 2.4 in (6.1 cm) wide.
- Flatten the pouch with the front facing you.
- Use the fabric pen to mark a horizontal center line across Rnds 9–11. These three texture rounds cover about 0.75 in (1.9 cm) of height.
- Trace four overlapping circles along this line, centered side to side. A coin or bottle cap 0.75 in (1.9 cm) wide makes a good template.
- With silver-gray yarn or floss, work a close chain stitch or split stitch along each circle. Keep the stitches about 0.12 in (0.3 cm) long so the curves stay smooth.
- Work the rings one at a time. Where two rings overlap, stitch straight over the earlier ring.
- Keep one hand inside the pouch so you don’t stitch through to the back.
Any small motif works here: initials, a single ring, or a design of your own. If you plan to sell pouches, use your own motif rather than a brand emblem.
Final Blocking
- Weave in all ends on the inside, running each end through a few stitches of the same color.
- Mist the pouch lightly with water until it is just damp.
- Stuff it firmly with a folded washcloth or a small plastic bag of rice so it holds an oval shape.
- Pat the base flat and straighten the side walls.
- Measure the pouch: it should be 3.75 in (9.5 cm) wide flattened and 3.3 in (8.4 cm) tall.
- Lay the strap flat and pin it straight at 4 in (10.2 cm).
- Let everything dry completely, then remove the stuffing.
If you used acrylic floss, don’t steam the embroidered area directly.
Final Quality-Control Checklist
- The base is a smooth oval of 34 stitches with no ruffling.
- The back-loop ridge runs cleanly around the bottom edge.
- Every texture round has 17 TG (34 stitches).
- The rim is 2 even gray rounds of 34 stitches each.
- The strap is 4 stitches wide, 20 rows long, and nearly centered on the back.
- The buttonhole takes the button with a gentle push.
- The button is sewn on firmly at Row 6.
- The rings are even, round, and centered on the front.
- The sachet fits snugly and doesn’t fall out when the pouch is tipped.
Troubleshooting
The base cups upward. Your tension is too tight or you missed an increase. Recount Rnds 2–4 and make sure each one adds exactly 6 stitches.
The base ruffles. You added too many stitches. Frog back and check that each end follows the pattern.
The stitch count drifts in the texture rounds. You worked into a dc by mistake. Each TG goes only into the sc of the group below.
The pouch slants. The joins shift a little each round. This is normal, but try to keep the join on the same side fold.
The rim flares. Work Rnd 18 tighter, or use a 3.75 mm hook for the gray rounds.
The button slips out. Sew a few stitches at the corners of the buttonhole to make it smaller, or use a 3/4 in (1.9 cm) button.
The strap is too short for your vent. Add rows before Row 18. Each extra row adds 0.2 in (0.5 cm).
The sachet is too loose. Tuck a small piece of felt behind it.
Care
Remove the sachet and hand wash the pouch in cool water with mild soap. Press out the water, reshape, and lay flat to dry.
Final Notes
Every measurement comes from the gauge of 4.5 stitches per inch. That gives a 34-stitch base 3 in x 1.75 in (7.6 cm x 4.4 cm) and sides 3.75 in (9.5 cm) wide flattened. The body is 2.9 in (7.4 cm) tall before the rim, and the 0.4 in (1.0 cm) gray border brings it to 3.3 in (8.4 cm). The 4-stitch strap is 0.9 in (2.3 cm) wide and 4 in (10.2 cm) long. Check each stage against these numbers, and your pouch will hold its sachet neatly in place.
Happy crocheting!