

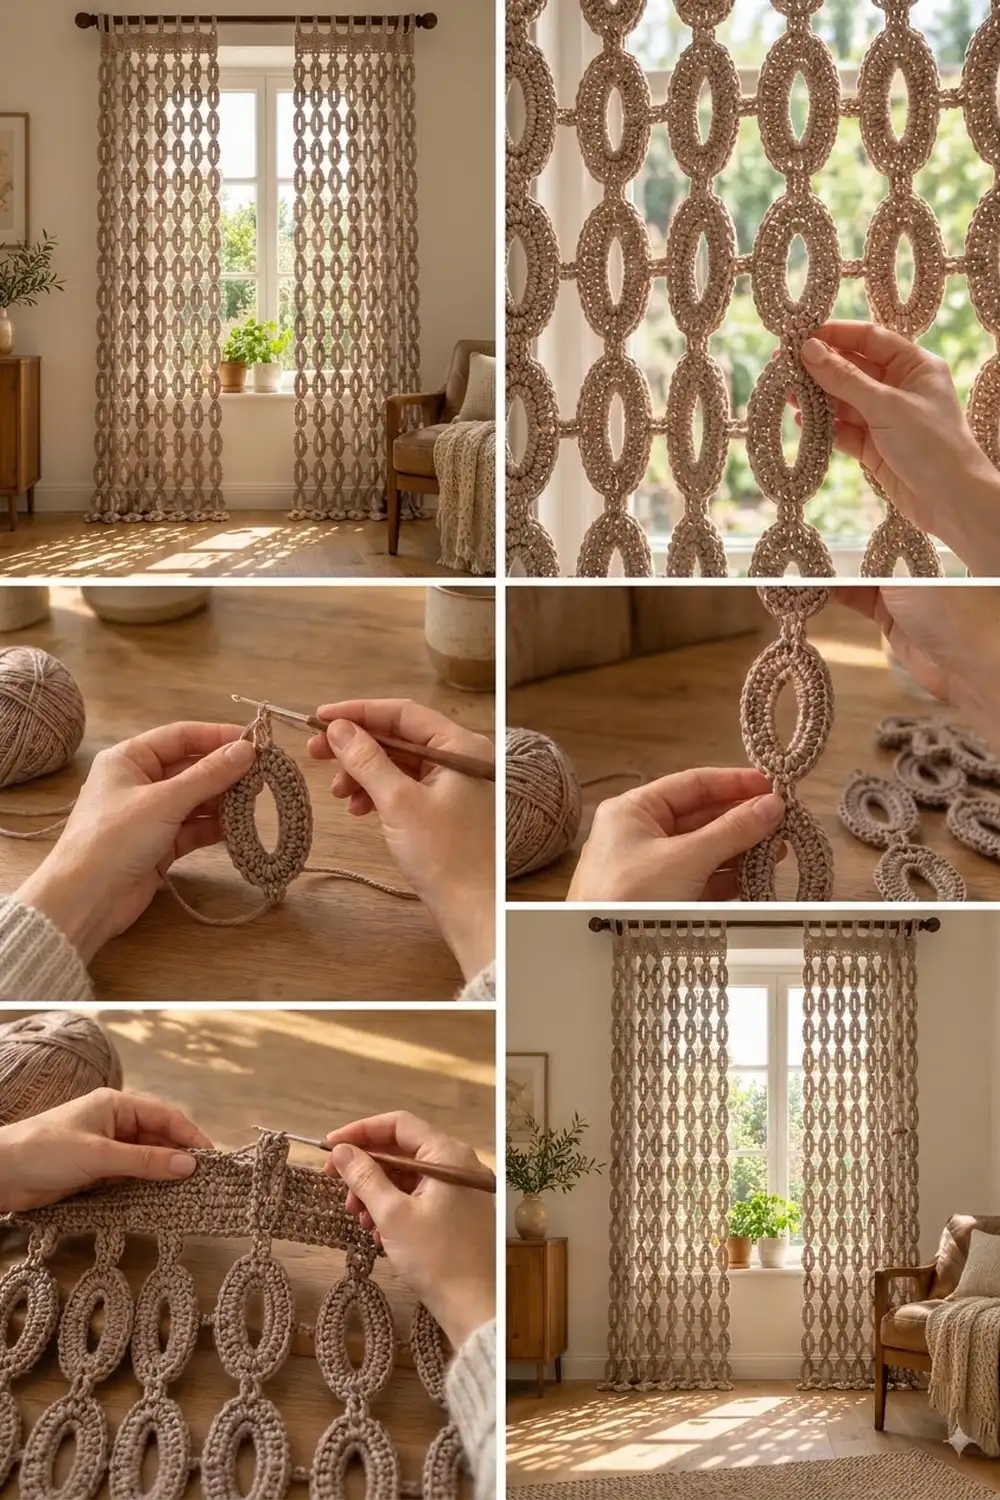
Sunlit Links is a pair of airy curtain panels made from stacked crochet oval rings. Each oval is a thick, textured ring with a long open center. The rings link top to bottom into vertical chains, and short crochet bars tie neighboring chains together at mid-height. Light falls through the open centers and casts a soft lattice of shadows across the floor.
The whole curtain uses one warm mushroom-taupe color, a muted beige-brown that suits linen, wood, and leather. The look is relaxed boho with a clean, graphic repeat. This pattern uses US crochet terms throughout.
Each finished panel measures 23.5 in (59.7 cm) wide. It is 83.5 in (212.1 cm) tall from the top of the header band to the bottom of the last oval, and the tab loops sit above that. One oval measures 2.5 in (6.4 cm) wide by 4 in (10.2 cm) tall.
Construction is modular. You crochet each oval in three rounds around a chain ring and join it to its neighbors as you go in the last round. When the grid is complete, you work a solid header band across the top row, then add seven tabs for the rod.
Finished Size and Construction
- Finished panel size: 23.5 in x 83.5 in (59.7 cm x 212.1 cm), plus tab loops
- Skill level: Easy to intermediate
- Terminology: US crochet terms
- Yarn weight: Medium (#4, worsted/aran) cotton blend
- Hook: 5.0 mm (H-8)
- Number of pieces: 144 ovals per panel (288 for the pair), plus one header band and 7 tabs per panel
- Layout: 8 columns x 18 rows of ovals per panel
- Piece size: 2.5 in x 4 in (6.4 cm x 10.2 cm) per oval
- Gap between ovals: 0.5 in (1.3 cm), both vertically and horizontally
- Size before header: 23.5 in x 80.5 in (59.7 cm x 204.5 cm)
- Header depth: 3 in (7.6 cm). Tabs are 1 in (2.5 cm) wide.
Materials
Choose a smooth, firm cotton or cotton-blend yarn in medium (#4) weight. Cotton gives the rings crisp definition and holds the oval shape. Avoid very soft or splitty yarns, because the rings will sag and lose their open centers. A yarn with about 170 m (186 yd) per 100 g ball is ideal.
Yarn (one color):
- Mushroom taupe: 600 g, about 1,020 m (1,116 yd) for the pair
- For one panel: 300 g, about 510 m (558 yd)
These amounts include a margin of about 15 percent for swatching, gauge differences, and weaving in ends. Buy all balls from the same dye lot.
Tools:
- 5.0 mm (H-8) crochet hook
- Tapestry needle
- Stitch markers (at least 4)
- Scissors and measuring tape
- Blocking mats and rust-proof pins
- Spray bottle
Abbreviations (US Terms)
- ch – chain
- sl st – slip stitch
- sc – single crochet
- hdc – half double crochet
- st(s) – stitch(es)
- RS / WS – right side / wrong side
- rnd – round
Special stitch – Link Bar (LB): Sc in the next st, ch 2, sl st in the named st of the neighboring oval, ch 2, then sl st in the sc you just made. The Link Bar counts as 1 st (the sc). The chains and slip stitches are never counted.
Gauge and Checkpoints
Make one complete oval before you start the panel. Gauge matters here, because 144 small errors add up to inches across the curtain.
- Oval gauge: After Rnd 3, one lightly blocked oval measures 2.5 in x 4 in (6.4 cm x 10.2 cm).
- Header gauge: 16 hdc = 4 in (10.2 cm) wide. Header Rows 1–8 = 3 in (7.6 cm) tall.
Checkpoints for the test oval:
- After Rnd 2: about 1.9 in x 3.4 in (4.8 cm x 8.6 cm), with a center opening of about 1 in x 2.5 in (2.5 cm x 6.4 cm).
- After Rnd 3: 2.5 in x 4 in (6.4 cm x 10.2 cm).
If your oval is too big, go down to a 4.5 mm hook. If it is too small, go up to a 5.5 mm hook. Change the hook size, not the chain count, so the stitch counts and join points stay correct. Check the header gauge separately, because many crocheters need a different hook for flat hdc rows than for rounds.
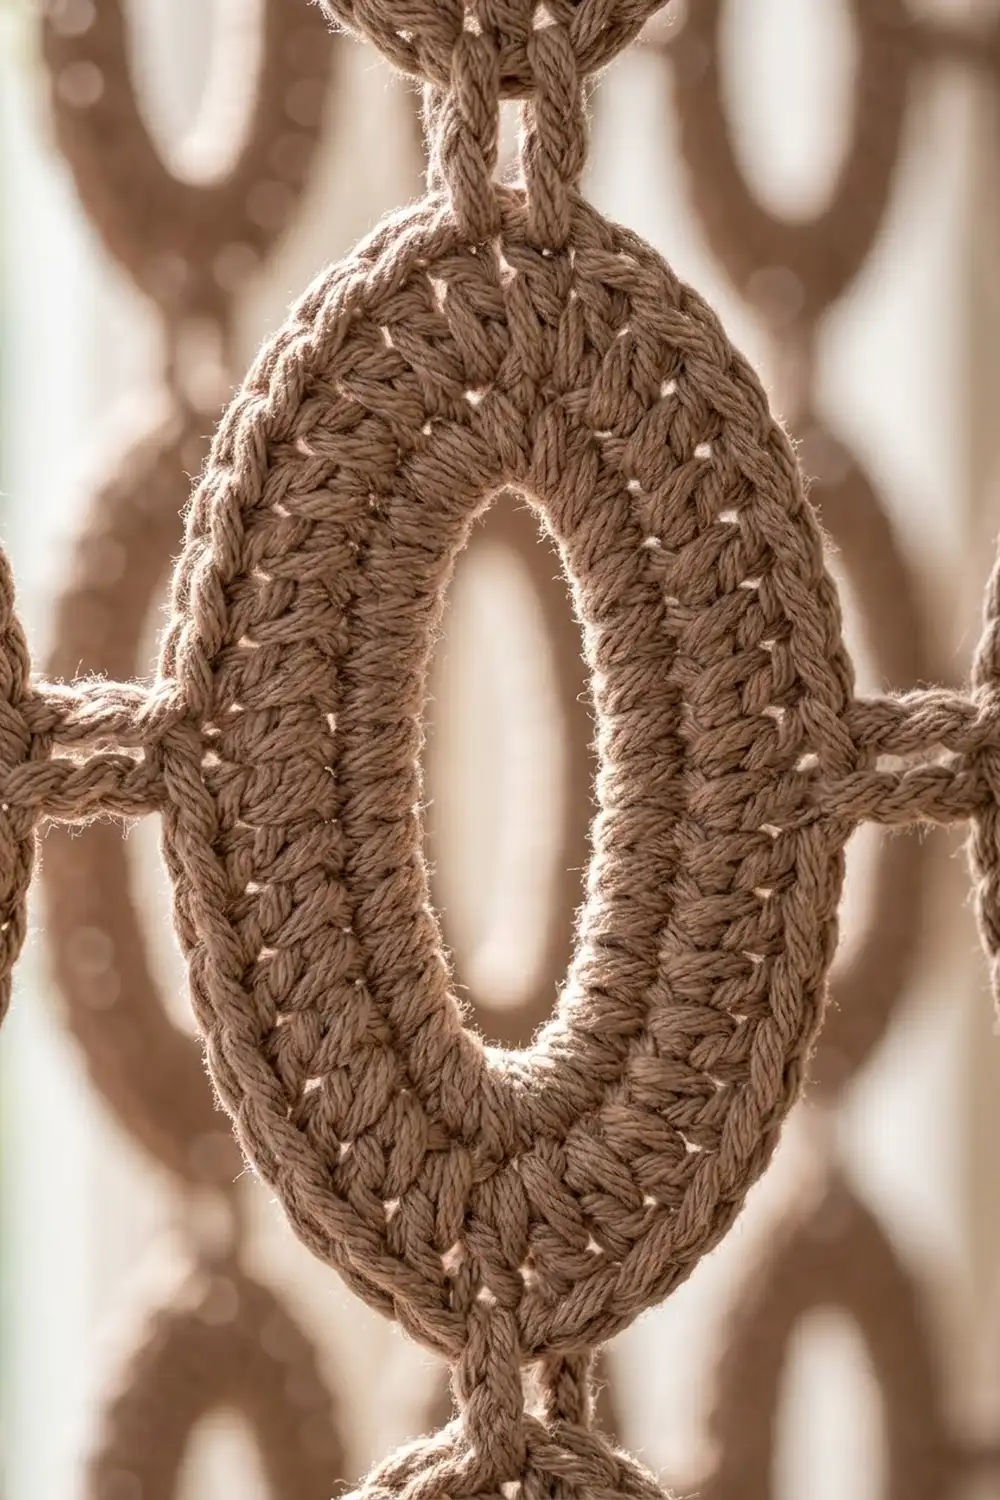
Oval Motif
The foundation ring has four zones: End A (top), Side 1 (left), End B (bottom), and Side 2 (right). With RS facing, rounds travel counterclockwise from the top, so you work End A, then Side 1, End B, and Side 2.
Rnd 1: Ch 20 and sl st in the first ch to form a ring, taking care not to twist. Place a marker in the first ch. Counting from the marker, chs 1–3 are End A, chs 4–10 are Side 1, chs 11–13 are End B, and chs 14–20 are Side 2. (20 ch)
Rnd 2 (growth round): Ch 1 (does not count as a st).
– End A: 2 sc in each of the next 3 ch (6 sts).
– Side 1: hdc in each of the next 7 ch (7 sts).
– End B: 2 sc in each of the next 3 ch (6 sts).
– Side 2: hdc in each of the next 7 ch (7 sts).
Sl st in the first sc to join. (26 sts = 20 worked 1-per-ch + 6 increases)
All the increases sit at the ends, so the ends round out while the sides stay straight. This is what makes the long oval opening.
Rnd 3 (growth round): Ch 1 (does not count as a st).
– End A: (sc in next st, 2 sc in next st) 3 times (9 sts).
– Side 1: sc in each of the next 7 sts (7 sts).
– End B: (sc in next st, 2 sc in next st) 3 times (9 sts).
– Side 2: sc in each of the next 7 sts (7 sts).
Sl st in the first sc to join. (32 sts = 26 worked 1-per-st + 6 increases)
Fasten off, leaving a 4 in (10.2 cm) tail.
Join points on Rnd 3:
- Top: 5th st of End A (the center of 9)
- Bottom: 5th st of End B (the center of 9)
- Left: 4th st of Side 1 (the center of 7)
- Right: 4th st of Side 2 (the center of 7)
Make All Pieces
Each panel has 144 ovals in mushroom taupe, arranged as 8 columns x 18 rows. Make 288 ovals for the pair. You can work Rnds 1–2 of every oval in advance. Then work Rnd 3 as a join-as-you-go round, in the order below.
Layout grid (one panel, viewed from RS):
          C1  C2  C3  C4  C5  C6  C7  C8
Header  [=================================]
Row 1     O - O - O - O - O - O - O - O
          |   |   |   |   |   |   |   |
Row 2     O - O - O - O - O - O - O - O
          |   |   |   |   |   |   |   |
 ...     (repeat to Row 18)
Row 18    O - O - O - O - O - O - O - O
O = oval, – = side Link Bar at mid-height, | = vertical Link Bar.
Work each row from C1 to C8, then move down to the next row.
Joining
All joining happens in Rnd 3 with the Link Bar. Work Rnd 3 as written, but at each join point, work an LB instead of the regular sc. Each oval still has 32 sts.
- Row 1, C1: No joins.
- Row 1, C2–C8: At the 4th st of Side 1, work an LB into the 4th st of Side 2 of the oval to the left.
- Rows 2–18, C1: At the 5th st of End A, work an LB into the 5th st of End B of the oval above.
- Rows 2–18, C2–C8: Work both joins: an LB into the oval above and an LB into the oval to the left.
Stitch-to-stitch logic: Every join connects the center st of one oval to the center st of its neighbor. Vertical joins meet at the centers of the 9-st ends, so the columns hang straight. Side joins meet at the centers of the 7-st sides, so every horizontal bar sits at mid-height and the rows stay level.
Tension advice: Keep the Link Bar chains the same size as your regular chains. Tight bars pull the ovals together and shrink the panel. Loose bars make the grid droop. Each bar should measure 0.5 in (1.3 cm).
Size checkpoints (lay flat without stretching):
- Width of any full row: 8 x 2.5 in + 7 x 0.5 in = 23.5 in (59.7 cm)
- After Row 6: 6 x 4 in + 5 x 0.5 in = 26.5 in (67.3 cm) tall
- After Row 12: 12 x 4 in + 11 x 0.5 in = 53.5 in (135.9 cm) tall
- After Row 18: 18 x 4 in + 17 x 0.5 in = 80.5 in (204.5 cm) tall
If you are off by more than 0.5 in (1.3 cm) at Row 6, check your Link Bars before you go on.
Header Band (Border)
The header is this curtain’s only border, and you work it across the top edge of Row 1. The sides and bottom stay as open ovals.
Header gauge: 16 hdc = 4 in (10.2 cm), or 4 sts per inch.
Row 1 (RS): With RS facing, join yarn in the last st of Side 2 of the oval at Row 1, C8 (top right). Ch 1. Sc in that st and in each of the 9 End A sts (10 sts). Ch 2. In the next oval to the left, sc in the last st of Side 2 and in each of the 9 End A sts (10 sts). Repeat from * 6 more times. (94 sts = 8 ovals x 10 sts + 7 gaps x 2 ch)*
Row 2: Ch 2 (does not count as a st), turn. Hdc in each sc and each ch. (94 hdc)
Rows 3–8: Ch 2, turn, hdc in each st across. (94 hdc in each row)
The header should now measure 23.5 in (59.7 cm) wide and 3 in (7.6 cm) tall. Fasten off.
Why the math works: Each oval is 2.5 in wide, and 2.5 in x 4 sts per inch = 10 sts. Each gap is 0.5 in, and 0.5 in x 4 sts per inch = 2 sts. So 8 x 10 + 7 x 2 = 94 sts, and 94 ÷ 4 = 23.5 in. The header exactly matches the width of the oval field, with no gathering or flaring.
Tabs (make 7): With RS facing, number the Row 8 sts 1–94 from right to left. Work tabs over sts 1–4, 16–19, 31–34, 46–49, 61–64, 76–79, and 91–94. That leaves 11 sts between tabs: 7 x 4 + 6 x 11 = 94.
For each tab, join yarn in the tab’s first st. Ch 2, then hdc in the same st and in the next 3 sts (4 hdc). Ch 2, turn, and hdc in each st (4 hdc). Repeat that row 14 more times, for 16 rows in total. The tab measures about 1 in x 6 in (2.5 cm x 15.2 cm). Fasten off, leaving a 12 in (30.5 cm) tail.
Fold each tab to the WS and whipstitch its last row to the back of header Row 4. The loop fits a rod up to 1.5 in (3.8 cm) in diameter.
Make the second panel the same way, including the header and tabs.
Final Blocking
- Weave in all ends along the backs of the stitches, never across an open center.
- Lay the panel RS up on blocking mats. If space is short, work in sections.
- Spray the ovals until they are damp, not soaked.
- Pin each column straight, and pin the header to 23.5 in (59.7 cm) wide.
- Shape each oval opening with your fingers so the centers are long and even.
- Check that the side Link Bars line up across the panel.
- Let the panel dry completely before you unpin it.
- Hang the panel for 24 hours, then measure again. Cotton stretches downward a little under its own weight.
Final Quality-Control Checklist
- Every oval has 32 sts in Rnd 3.
- Vertical joins sit at the centers of End A and End B.
- Side joins sit at mid-height, at the 4th st of each side.
- All Link Bars measure about 0.5 in (1.3 cm).
- Each row of ovals measures 23.5 in (59.7 cm) wide.
- The oval field measures 80.5 in (204.5 cm) tall.
- The header has 94 sts in every row and is 3 in (7.6 cm) tall.
- All 7 tabs are evenly spaced and the same length.
- Both panels match in size.
Troubleshooting
Ovals look round instead of long: You may be increasing on the sides. Increase only on End A and End B.
Ovals cup or ruffle: Rnd 3 is too tight or too loose. Change the hook size and keep 32 sts.
Columns twist or lean: A vertical join is off-center. Count to the 5th st of the end and redo the join.
Rows of ovals tilt: A side join is not on the 4th st of the side. Unpick it and rejoin.
Panel is too narrow: Your Link Bars are tight. Loosen your chains.
Header flares or gathers: Your hdc gauge is off. Change the hook size for the header and keep 94 sts.
Panel grows longer after hanging: This is normal for cotton. Block it again, or leave out one row of ovals before the header.
Care
Hand wash in cool water with a mild detergent, roll the panel in a towel to remove water, and dry it flat. Don’t hang the curtain while it is wet, because the weight will stretch the ovals.
Final Notes
Every measurement in this curtain starts from one oval. Ovals of 2.5 in x 4 in (6.4 cm x 10.2 cm), joined with 0.5 in (1.3 cm) Link Bars in an 8 x 18 grid, make an oval field of 23.5 in x 80.5 in (59.7 cm x 204.5 cm). The 94-st header matches that width at 4 sts per inch and adds 3 in (7.6 cm). Each panel finishes at 23.5 in x 83.5 in (59.7 cm x 212.1 cm). Check your first oval carefully and measure at every checkpoint.
Happy crocheting!