

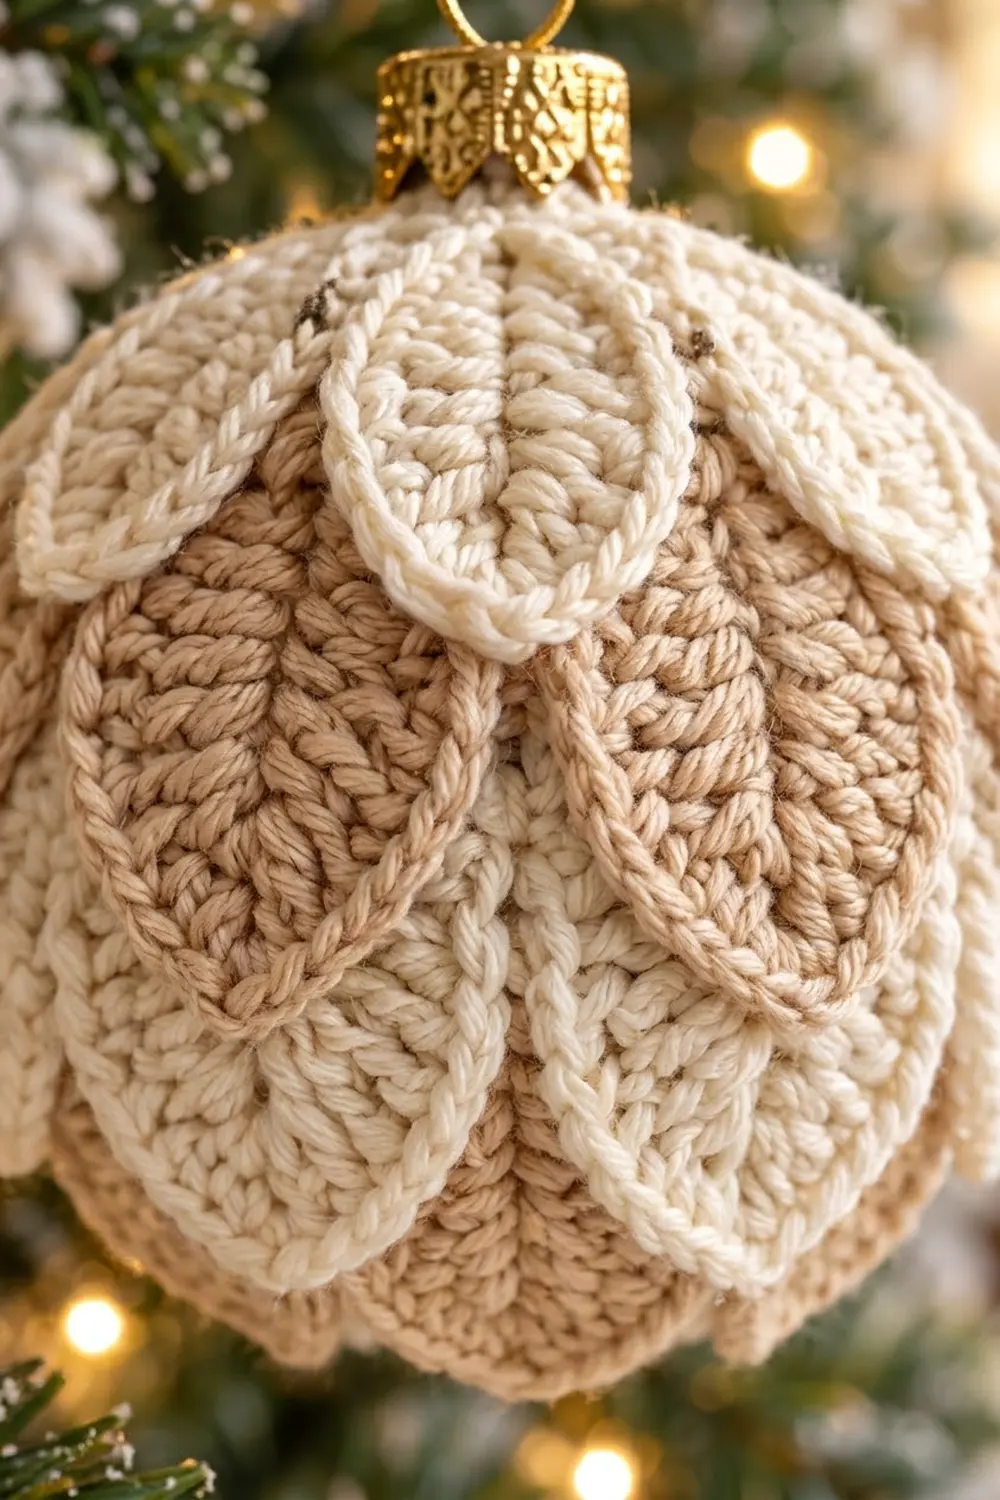
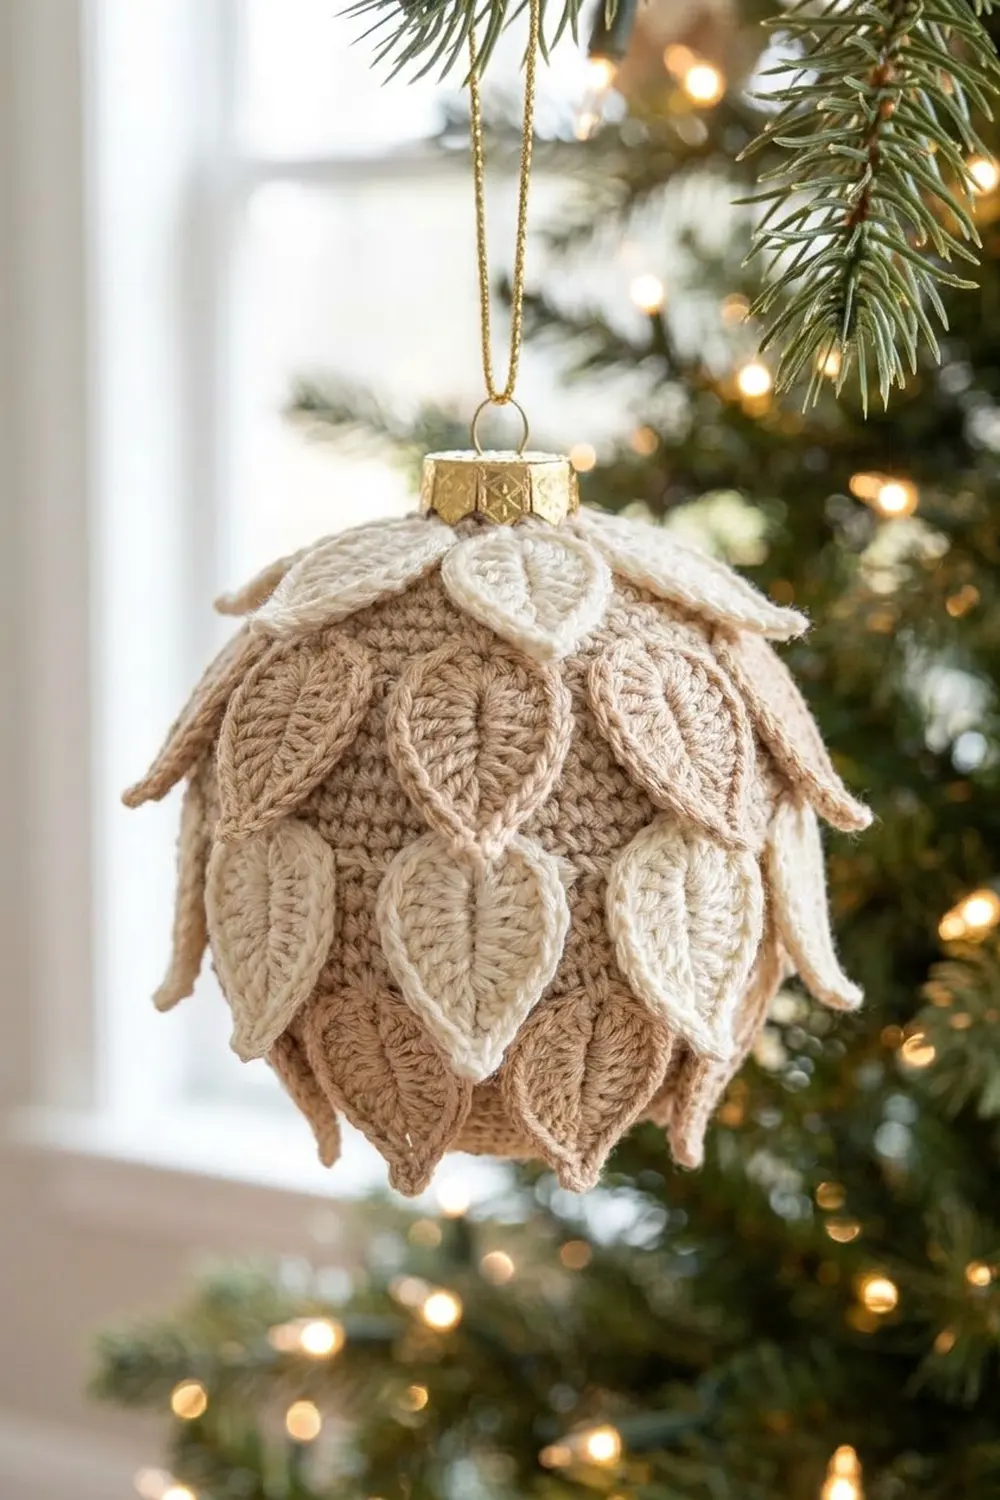
The Golden Grove Leaf Bauble is a round Christmas ornament wrapped in layers of overlapping crocheted leaves. Each leaf has a raised outline and a center vein. The tiers alternate between warm cream and soft beige, so the ball looks like a pinecone or a closed winter flower.
The colors are quiet and neutral: cream and beige yarn with a gold ornament cap and a gold hanging cord. It suits a natural, Scandinavian or gold-and-white tree.
This pattern uses US crochet terms. The finished ornament is about 3.5 in (8.9 cm) across at the widest point. It is about 4.25 in (10.8 cm) tall including the cap, not counting the hanging loop.
First you crochet a beige sc cover around a 3 in (7.6 cm) foam ball. Then you make 32 leaves worked around a foundation chain and add a sc border and a surface vein to each one. Finally, you sew the leaves on in four staggered tiers and glue on the cap.
Finished Size and Construction
- Finished size: about 3.5 in (8.9 cm) across, 4.25 in (10.8 cm) tall with cap
- Skill level: Intermediate
- Terminology: US crochet terms
- Yarn weight: DK / light worsted (CYC 3)
- Hook: 3.25 mm (US D/3)
- Number of pieces: 1 ball cover + 32 leaves (8 small cream, 8 large cream, 16 large beige)
- Layout: 4 tiers of 8 leaves, each tier shifted by half a leaf
- Piece size: large leaf 2.25 in x 1.25 in (5.7 x 3.2 cm); small leaf 1.6 in x 1.1 in (4.1 x 2.8 cm)
- Size before border: large leaf 2 in x 1 in (5.1 x 2.5 cm); small leaf 1.4 in x 0.8 in (3.6 x 2.0 cm)
- Border depth: about 1/8 in (0.3 cm) on every edge of each leaf
Materials
Choose a smooth DK or light worsted cotton or cotton blend with clear stitch definition. Fuzzy yarns hide the leaf veins, while mercerized cotton keeps the outlines crisp.
- Beige (Color A): 35 g, about 80 m (87 yd) – ball cover and 16 large leaves
- Cream (Color B): 25 g, about 58 m (63 yd) – 8 large and 8 small leaves
These amounts include about 20 percent extra for swatching and sewing tails.
Tools and notions:
- 3.25 mm (US D/3) crochet hook
- 3 in (7.6 cm) foam or lightweight plastic ball
- Gold metal ornament cap with hanging loop, about 0.75 in (1.9 cm) across
- About 6 in (15.2 cm) of gold cord
- Tapestry needle
- Stitch markers (at least 5)
- Fabric glue or clear craft glue
- Scissors and a soft tape measure
- Pins
Abbreviations (US Terms)
- ch – chain
- sl st – slip stitch
- sc – single crochet
- hdc – half double crochet
- dc – double crochet
- sc2tog – single crochet 2 together
- MR – magic ring
- st(s) – stitch(es)
- rnd(s) – round(s)
Special technique – surface slip stitch vein: Hold the yarn behind the leaf. Insert the hook from front to back between stitches, yarn over, and pull a loop through the fabric and the loop on the hook. Repeat in a straight line to make a raised chain on the surface.
Gauge and Checkpoints
Gauge: 11 sc x 12 rnds = 2 in (5.1 cm), worked in a continuous spiral.
Make one large leaf first. It shows your gauge quickly, and you can use it in the ornament.
Checkpoints:
- Large leaf after Rnd 1: 2 in x 1 in (5.1 x 2.5 cm)
- Large leaf after border: 2.25 in x 1.25 in (5.7 x 3.2 cm)
- Small leaf after Rnd 1: 1.4 in x 0.8 in (3.6 x 2.0 cm)
- Small leaf after border: 1.6 in x 1.1 in (4.1 x 2.8 cm)
- Ball cover after Rnd 8: flat circle about 1.5 in (3.8 cm) across
- Ball cover at Rnds 9-20: about 8.75 in (22.2 cm) around, stretching snugly over the ball’s 9.4 in (23.9 cm) circumference
If your pieces are too big, go down to a 3.0 mm hook. If they are too small, go up to a 3.5 mm hook. A leaf that is 1/8 in (0.3 cm) off is fine. If it is 1/4 in (0.6 cm) off or more, the tiers will overlap differently.
Ball Cover
Work in a continuous spiral with Color A. Mark the first st of each rnd.
Rnd 1: 6 sc in MR. (6 sts)
Rnd 2: 2 sc in each st around. (12 sts)
Rnd 3: *Sc in next st, 2 sc in next st; repeat from * 6 times. (18 sts)
Rnd 4: *Sc in next 2 sts, 2 sc in next st; repeat from * 6 times. (24 sts)
Rnd 5: *Sc in next 3 sts, 2 sc in next st; repeat from * 6 times. (30 sts)
Rnd 6: *Sc in next 4 sts, 2 sc in next st; repeat from * 6 times. (36 sts)
Rnd 7: *Sc in next 5 sts, 2 sc in next st; repeat from * 6 times. (42 sts)
Rnd 8: *Sc in next 6 sts, 2 sc in next st; repeat from * 6 times. (48 sts)
Rnds 9-20: Sc in each st around. (48 sts per rnd, 12 rnds)
Rnd 21: *Sc in next 6 sts, sc2tog; repeat from * 6 times. (42 sts)
Insert the foam ball now. The 42-st opening stretches enough to ease it in. The MR should sit at the bottom center.
Rnd 22: *Sc in next 5 sts, sc2tog; repeat from * 6 times. (36 sts)
Rnd 23: *Sc in next 4 sts, sc2tog; repeat from * 6 times. (30 sts)
Rnd 24: *Sc in next 3 sts, sc2tog; repeat from * 6 times. (24 sts)
Rnd 25: *Sc in next 2 sts, sc2tog; repeat from * 6 times. (18 sts)
Rnd 26: *Sc in next st, sc2tog; repeat from * 6 times. (12 sts)
Rnd 27: Sc2tog 6 times. (6 sts)
Fasten off, leaving a 6 in (15.2 cm) tail. Weave it through the front loops of the last 6 sts, pull the opening closed and secure the tail. Measured over the surface from bottom center to top center, the cover is about 4.5 in (11.4 cm).
Tier guides: As you work, place a contrasting marker in the first st of Rnds 10, 15, 20 and 24.
Large Leaf (make 24)
Make 16 in Color A and 8 in Color B. Each leaf is worked around both sides of a foundation chain.
Foundation: Ch 12.
Rnd 1: Sc in 2nd ch from hook, hdc in next ch, dc in next 6 ch, hdc in next ch, sc in next ch, 3 sc in last ch (tip). Rotate and work along the opposite side of the foundation ch: sc in next ch, hdc in next ch, dc in next 6 ch, hdc in next ch, sc in last ch. Sl st to first sc. (23 sts: 10 on side one, 3 at the tip, 10 on side two)
The tall dc stitches sit in the middle and the short sc stitches sit at each end. This gives the pointed leaf shape.
Checkpoint: 2 in x 1 in (5.1 x 2.5 cm). Don’t fasten off. Go straight to the Leaf Border (Rnd 2) in the Border section, then add the vein.
Small Leaf (make 8)
Make all 8 in Color B for the top tier.
Foundation: Ch 9.
Rnd 1: Sc in 2nd ch from hook, hdc in next ch, dc in next 3 ch, hdc in next ch, sc in next ch, 3 sc in last ch (tip). Rotate and work along the opposite side: sc in next ch, hdc in next ch, dc in next 3 ch, hdc in next ch, sc in last ch. Sl st to first sc. (17 sts: 7 on side one, 3 at the tip, 7 on side two)
Checkpoint: 1.4 in x 0.8 in (3.6 x 2.0 cm). Go straight to the Leaf Border.
Make All Pieces
- Ball cover: 1 in Color A
- Large leaves, Color A (beige): 16
- Large leaves, Color B (cream): 8
- Small leaves, Color B (cream): 8
- Total leaves: 32
Leave an 8 in (20.3 cm) tail on every leaf for sewing.
Tier layout (top to bottom):
Top     [gold cap + cord]
Tier 1  Bs   Bs   Bs   Bs   Bs   Bs   Bs   Bs    (Rnd 24)
Tier 2    A    A    A    A    A    A    A    A   (Rnd 20)
Tier 3  B    B    B    B    B    B    B    B     (Rnd 15)
Tier 4    A    A    A    A    A    A    A    A   (Rnd 10)
Bottom  [beige cover; leaf tips curve toward center]
A = large beige leaf, B = large cream leaf, Bs = small cream leaf.
Joining
Sew the tiers from the bottom up so that each new tier covers the stems of the tier below.
Method: Whipstitch with the leaf’s own tail. Use small stitches through the stem point and the top third of the leaf, catching only the surface of the cover.
Stitch-to-stitch logic (count from the marked first st of each guide round):
- Tier 4 (Rnd 10, 48 sts): stems at sts 4, 10, 16, 22, 28, 34, 40, 46 (8 leaves x 6 sts = 48)
- Tier 3 (Rnd 15, 48 sts): stems at sts 1, 7, 13, 19, 25, 31, 37, 43, each over a gap in Tier 4 (8 x 6 = 48)
- Tier 2 (Rnd 20, 48 sts): stems at sts 4, 10, 16, 22, 28, 34, 40, 46 (8 x 6 = 48)
- Tier 1 (Rnd 24, 24 sts): stems at sts 1, 4, 7, 10, 13, 16, 19, 22 (8 x 3 = 24)
Spiral rounds drift slightly, so use the counts as a guide and check by eye. Each leaf should sit centered over a gap in the tier below.
Pin the ch-2 stem point to its stitch and sew 3-4 small stitches through the stem. Then tack along the vein for about 0.75 in (1.9 cm). Leave the lower half and tip free.
Tension: Pull just firmly enough to hide each stitch. If you sew too tightly, the cover puckers and the leaves flatten.
Size checkpoint: With all four tiers sewn on, the ornament should measure about 3.5 in (8.9 cm) across. The tiers are 5 rnds apart, about 0.83 in (2.1 cm), so each large leaf overlaps the tier below by about 1.4 in (3.6 cm).
Top: Knot the gold cord through the cap loop. Glue the cap over Rnds 25-27, covering the small leaf stems.
Border
The border is Rnd 2 of every leaf. Work it right after Rnd 1, before joining.
Border gauge: Working 1 sc in each st, with 3 sc in the tip st, adds about 1/8 in (0.3 cm) to every edge at 11 sc = 2 in (5.1 cm).
Large leaf, Rnd 2: Ch 1, sc in first 11 sts, 3 sc in next st (center tip st), sc in next 11 sts, ch 2, sl st to first sc. Fasten off. (25 sc + ch-2 stem point)
- Side one: 12 sc
- Tip: 1 center sc
- Side two: 12 sc
Small leaf, Rnd 2: Ch 1, sc in first 8 sts, 3 sc in next st (center tip st), sc in next 8 sts, ch 2, sl st to first sc. Fasten off. (19 sc + ch-2 stem point)
- Side one: 9 sc
- Tip: 1 center sc
- Side two: 9 sc
Why the math works: Rnd 1 of the large leaf has 10 + 3 + 10 = 23 sts. In Rnd 2:
- The first 11 sc cover side one (10) and the first tip st (1).
- The 3 sc in the center tip st add 2 sts.
- The last 11 sc cover the last tip st and side two.
That is 23 sts worked once + 2 added = 25. The small leaf works the same way: 17 + 2 = 19. The 2 added sts keep the tip sharp, and the ch-2 makes the stem point.
Vein: With the right side facing, use a 10 in (25.4 cm) length of the same color. Work surface slip stitches from stem to tip along the foundation chain: about 10 on a large leaf and 7 on a small leaf. Fasten off on the back.
Final Blocking
- Before sewing, pin each leaf flat on a foam board with both ends pointed.
- Mist lightly until damp.
- Shape each tip into a clean point and straighten the vein.
- Let the leaves dry completely, about 2-3 hours.
- After joining, roll the ornament gently between your palms to even out the cover.
- Curl the free half of each leaf slightly outward so the tiers stand out.
Final Quality-Control Checklist
- Cover is smooth, with no foam showing
- MR is at the bottom center and the closing is hidden under the cap
- There are 32 leaves: 16 large beige, 8 large cream and 8 small cream
- Every leaf has a complete border and a straight vein
- Tiers are evenly spaced, with each leaf centered over a gap
- Leaf tips are free and lift slightly
- Cap is straight and the hanging loop is secure
- All tails are woven in
Troubleshooting
Leaves cup or curl: The border is too tight. Work Rnd 2 with a hook half a size larger, or block again.
Leaf tips look rounded: Work the 3 sc into the center tip st.
Cover is baggy: Go down a hook size.
Foam shows through: Use a smaller hook, or paint the ball beige before covering it.
Gaps between leaves: Move the leaf 1 st left or right.
Tiers don’t overlap enough: Your leaves are too short. Check the 2 in (5.1 cm) Rnd 1 checkpoint.
Cap sits crooked: Stand the ornament upright in a small cup while the glue dries.
Care
Spot clean with a damp cloth and mild soap. Store the ornament in a box with tissue paper so the leaves keep their shape.
Final Notes
Here is how the measurements connect:
- A gauge of 11 sc x 12 rnds = 2 in (5.1 cm) makes a 48-st cover that fits snugly over a 3 in (7.6 cm) ball.
- With the border, large leaves grow from 2 in x 1 in (5.1 x 2.5 cm) to 2.25 in x 1.25 in (5.7 x 3.2 cm).
- Eight leaves sit 6 sts apart on each 48-st tier round.
- Four tiers spaced 5 rnds apart give a finished bauble about 3.5 in (8.9 cm) across.
Happy crocheting!