

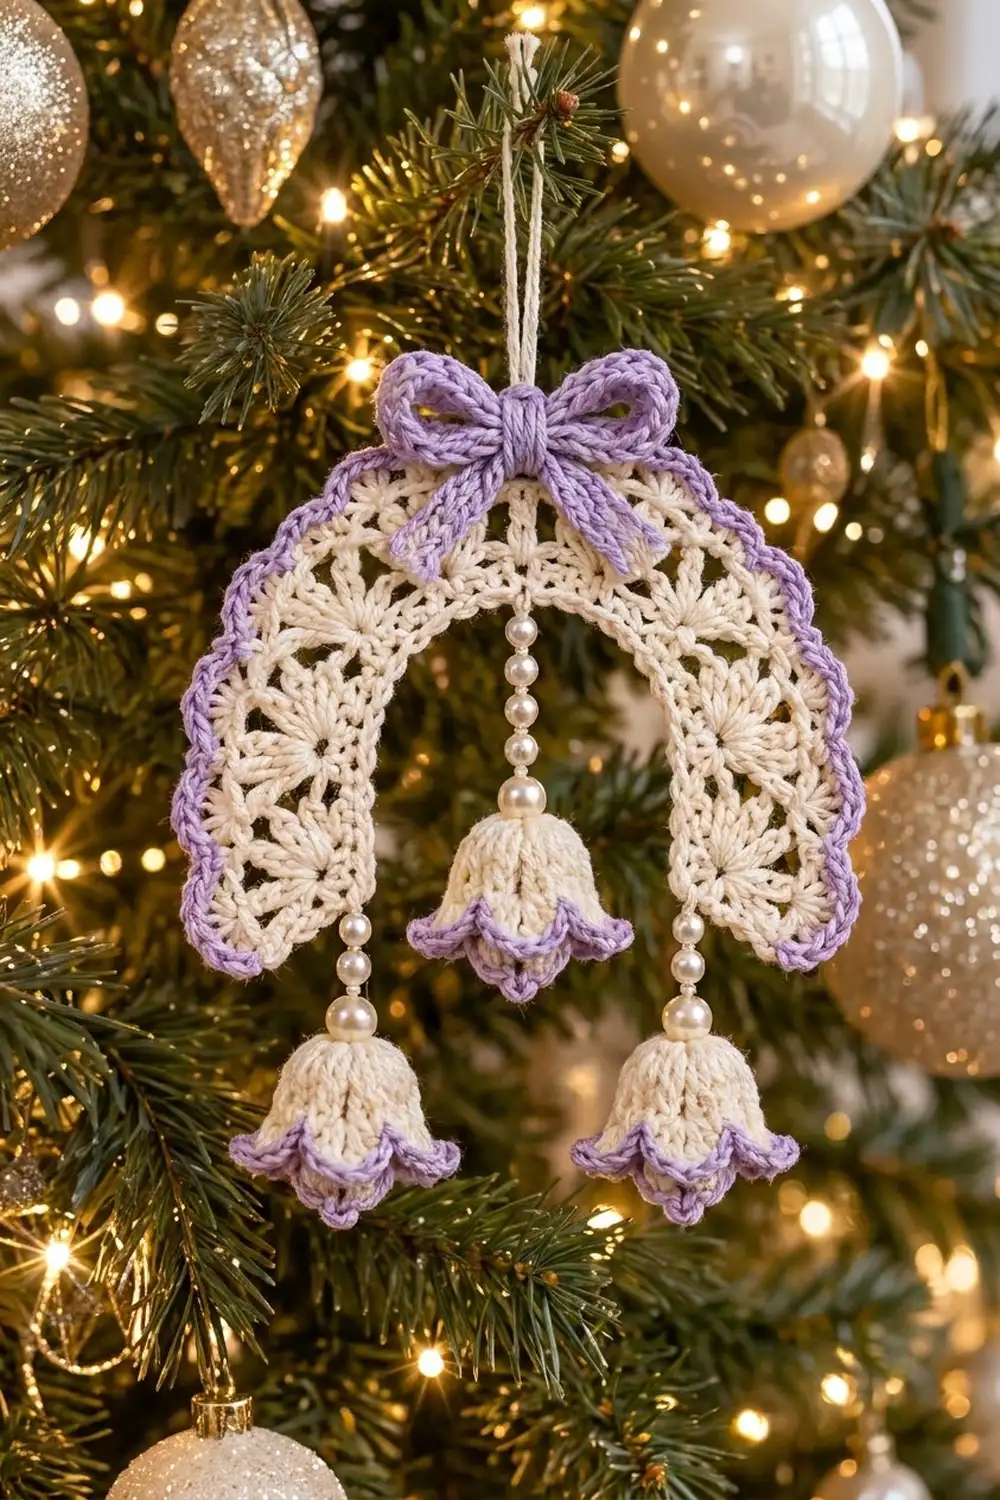
This delicate ornament combines a cream lace horseshoe arch, a soft lavender bow and three tiny bells that sway on pearl strands. It looks vintage and bridal, and it looks good on a Christmas tree, a window latch or a gift box.
The palette has two colors. Cream makes up the lace arch and the bell bodies, and lavender is used for the scalloped edging, the bell rims and the bow. Pearl beads add a little shine between the bells and the arch.
The pattern uses US crochet terms. The finished ornament is about 5 in (12.7 cm) wide and 5.5 in (14.0 cm) tall, not counting the hanging loop. The arch alone is 5 in × 3.5 in (12.7 × 8.9 cm).
Construction is simple. You crochet the arch flat in five concentric rows, then add a two-row lavender border along the outer curve and both leg ends. Next you work three bells in the round, make a slip-stitch cord, and tie it into a bow. Finally you join everything with beaded thread.
Finished Size and Construction
- Finished size: 5 in × 5.5 in (12.7 × 14.0 cm) overall
- Skill level: Intermediate
- Terminology: US crochet terms
- Yarn weight: Super fine (#1) cotton, fingering weight
- Hook: 2.25 mm (US B-1)
- Number of pieces: 1 ornament (1 arch, 1 bow, 3 bells, joined)
- Layout: A horseshoe arch with legs pointing down. One bell hangs at the center and one at each leg end.
- Arch size before border: 4.5 in × 3 in (11.4 × 7.6 cm)
- Border depth: 0.25 in (0.6 cm)
- Arch size after border: 5 in × 3.5 in (12.7 × 8.9 cm)
- Bell size: 1.25 in (3.2 cm) tall × 1.25 in (3.2 cm) across the rim
Materials
Use a smooth mercerized cotton in fingering weight. It shows the lace clearly and blocks crisply. Avoid fuzzy or very stretchy yarn, because the fans will lose their starburst shape.
- Cream: 12 g, about 41 m (45 yd)
- Lavender: 5 g, about 17 m (19 yd)
These quantities include a margin of about 20% for gauge swatching and weaving in ends.
Tools and notions:
– 2.25 mm (US B-1) crochet hook
– Tapestry needle
– Beading needle and strong cream sewing thread
– 12 pearl beads, 4 mm
– 3 pearl beads, 6 mm
– A small pinch of fiberfill or cotton scrap (optional, for the bell tops)
– Blocking mat, rust-proof pins, spray bottle
– Spray starch (optional)
– Scissors
Abbreviations (US Terms)
- ch – chain
- sl st – slip stitch
- sc – single crochet
- dc – double crochet
- FPdc – front post double crochet
- st(s) – stitch(es)
- sp – space
- RS – right side
Special stitches:
– Fan: 7 dc in the same stitch or space.
– V-stitch (V): (dc, ch 2, dc) in the same stitch.
– FPdc: Yarn over and insert the hook from front to back to front around the post of the stitch. Complete a dc.
– Scallop: 5 dc in the same stitch.
Gauge and Checkpoints
Gauge: 14 sc and 16 sc rows = 2 in (5.1 cm). One dc row is about 0.25 in (0.6 cm) tall.
Make one arch before making the bells. It is the piece that shows your gauge most clearly.
Checkpoints:
– After Row 1: the strip of 33 sc measures 4.7 in (11.9 cm).
– After Row 2: the band is 0.4 in (1.0 cm) deep, and the center starts to curve while the legs stay straight.
– After Row 5: the band is 1.25 in (3.2 cm) deep. The arch lies at 4.5 in × 3 in (11.4 × 7.6 cm), with an inner opening of 2 in (5.1 cm).
– After the border: 5 in × 3.5 in (12.7 × 8.9 cm).
If your piece is too big, go down to a 2 mm hook. If it is too small, go up to a 2.5 mm hook. Change the hook rather than the stitch counts, because the fan repeats depend on exact numbers.
Arch
Work with cream. Turn at the end of each row.
Row 1 (inner edge): Ch 34. Sc in the 2nd ch from the hook and in each ch across. Turn. (33 sc)
This row becomes the plain cream inner edge of the horseshoe.
Row 2 (growth row): Ch 3 (counts as dc), then dc in each of the next 5 sts. That is 6 dc for the first leg. Dc in the next st, 2 dc in the next st 10 times. Dc in the next st. Dc in each of the last 6 sts. Turn. (43 dc)
Check the count: 6 leg sts + 31 curve sts + 6 leg sts = 43. The 21 center sts became 31 sts. Because the increases sit only in the center, the top curves and the legs stay straight.
Row 3 (fan row): Ch 1. Sc in the first dc. Skip 2 dc, fan in the next dc, skip 2 dc, sc in the next dc. Repeat from * 7 times. Turn. (7 fans and 8 sc = 57 sts)
Check: 1 + (7 × 6) = 43 sts used.
Row 4 (V-stitch row): Ch 5 (counts as dc and ch 2). Dc in the same sc to make the first V. Ch 2, sc in the 4th (center) dc of the next fan, ch 2, V in the next sc. Repeat from * 7 times. Turn. (8 V-stitches and 7 sc)
Row 5 (offset fan row): Ch 3 (counts as dc). Work 3 dc in the first V-sp to make a half fan. Sc in the next sc, fan in the next V-sp. Repeat from * 6 times. Sc in the next sc. Work 4 dc in the last V-sp. Do not turn. Fasten off. (57 sts)
Check: 4 + (6 × 8) + 1 + 4 = 57.
The fans in Row 5 sit between the fans in Row 3. Together with the V-stitches, they make the starburst look. The arch now measures 4.5 in × 3 in (11.4 × 7.6 cm).
Bells (Make 3)
Work in continuous joined rounds with cream. The RS faces you throughout.
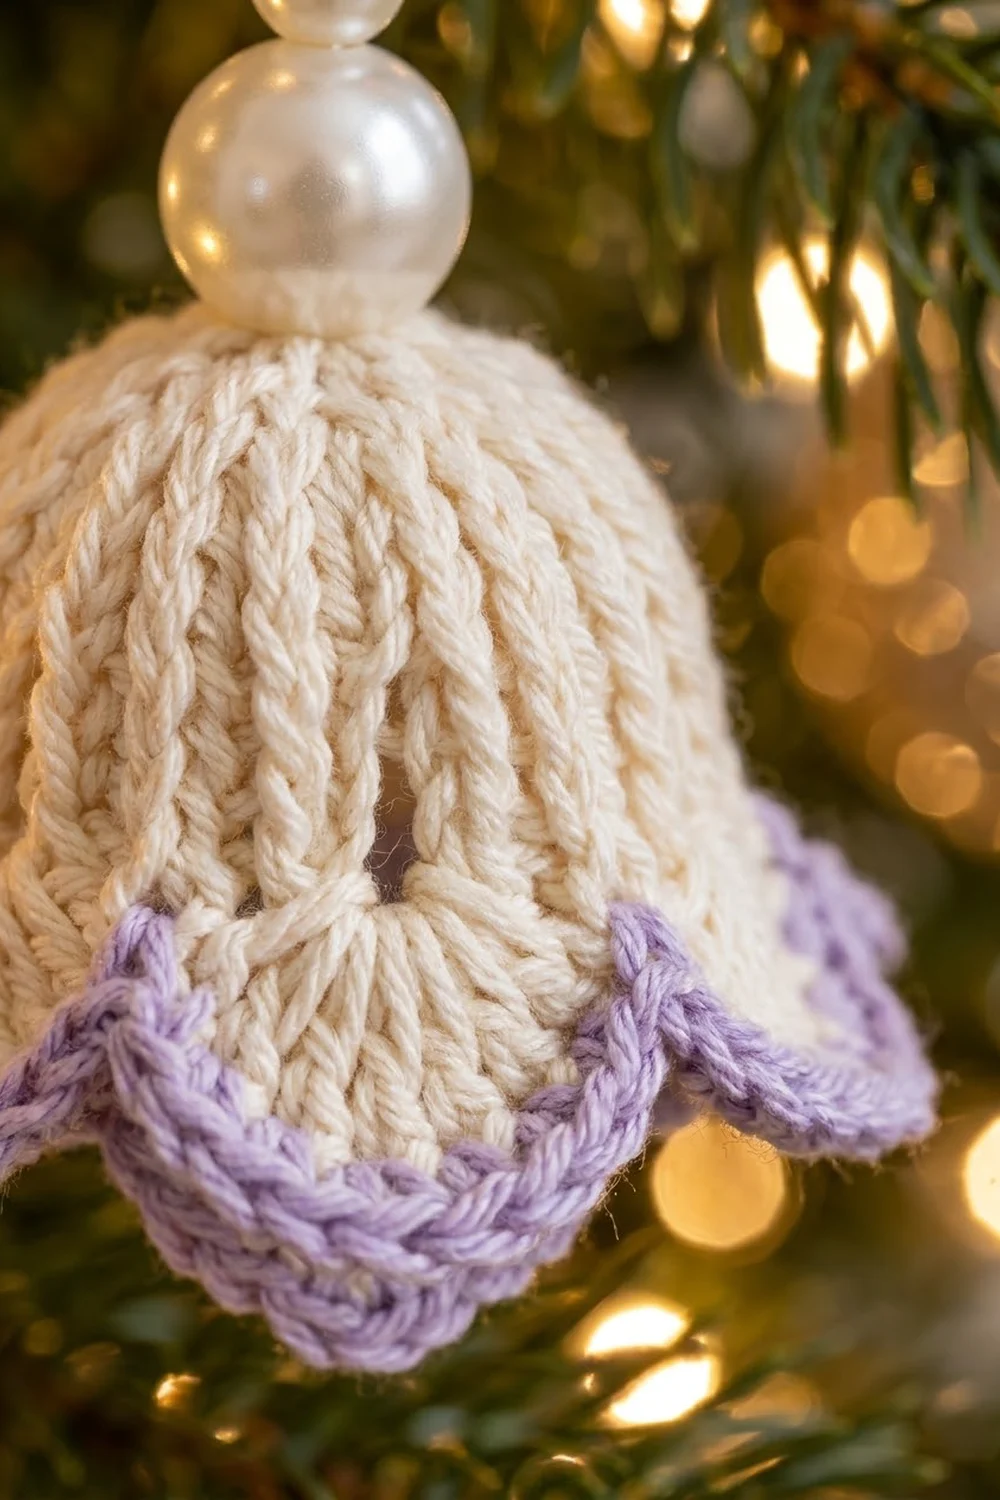
Rnd 1: Make a magic ring. Ch 1 and work 6 sc in the ring. Sl st to the first sc to join. (6 sc)
Rnd 2: Ch 1. Work 2 sc in each st around and join. (12 sc)
Rnd 3: Ch 1. Sc in the next st, 2 sc in the next st 6 times, then join. (18 sc)
Rnd 4 (rib setup): Ch 3 (counts as dc). Dc in the next st, then FPdc around the next st. Dc in each of the next 2 sts, FPdc around the next st 5 times. Join. (12 dc and 6 FPdc = 18 sts)
Rnd 5: Ch 3 (counts as dc). Dc in the next st, then FPdc around the next FPdc. Dc in each of the next 2 sts, FPdc around the next FPdc 5 times. Join. (18 sts)
Rnd 6 (flare): Ch 3 and dc in the same st (this counts as 2 dc). Work 2 dc in the next st, then FPdc around the next FPdc. 2 dc in each of the next 2 sts, FPdc around the next FPdc 5 times. Join. (18 sts worked + 12 added = 30 sts)
Fasten off the cream yarn.
Rnd 7 (lavender): Join lavender with sc in any st. Sc in each st around and join. (30 sc)
Rnd 8 (scalloped rim): Sc in the next st, skip 1 st, scallop in the next st, skip 1 st, sl st in the next st 6 times. Fasten off. (6 scallops; 42 sts)
Each repeat uses 5 sts, and 6 × 5 = 30.
Push a tiny pinch of fiberfill into the dome so the top keeps a rounded shape. Each bell measures 1.25 in (3.2 cm) tall and 1.25 in (3.2 cm) across the rim.
Bow
Cord: With lavender, ch 61. Sl st in the back bump of the 2nd ch from the hook and in each back bump across. Fasten off. (60 sl sts)
The cord should be about 8.5 in (21.6 cm) long. Tie it in a bow with two loops of 0.75 in (1.9 cm) and tails of about 1 in (2.5 cm). Trim the tails and knot each end. The finished bow is about 1.5 in (3.8 cm) wide.
Border
The border goes along the first leg end, around the outer curve and down the second leg end. The inner edge stays cream.
Border gauge: The sc row matches the arch gauge of 7 sts per 1 in (2.5 cm). The scallop row adds 0.25 in (0.6 cm) of depth.
Border Row 1 (lavender): With the RS facing, join lavender at the inner corner of the leg where Row 1 began.
- Leg end A: 1 sc in the end of Row 1, 2 sc in the end of Row 2, 2 sc in the end of Row 3, 3 sc in the end of Row 4, and 2 sc in the end of Row 5. (10 sc)
- Outer curve: 3 sc in the first st of Row 5, sc in each of the next 55 sts, and 3 sc in the last st. (57 sts worked + 4 added = 61 sc)
- Leg end B: Work the same row ends in reverse order: 2, 3, 2, 2, 1. (10 sc)
Turn. (Total: 10 + 61 + 10 = 81 sc)
Border Row 2 (scallops): Ch 1. Sc in the first sc. Skip 1 st, scallop in the next st, skip 1 st, sc in the next st. Repeat from * 20 times. Fasten off. (20 scallops and 21 sc = 121 sts)
Why the math works: Each scallop repeat uses 4 sts, plus 1 sc to begin, so the row needs a multiple of 4 + 1. Row 1 gives 81 = (20 × 4) + 1, so the scallops end exactly on the last sc at the inner corner of leg B. The 3-sc corners give the turn at each outer corner enough room to lie flat. The 10 sc on each leg end match the height of each row, so the leg ends don’t pucker or flare.
Assembly
- Hanging loop: Cut a 6 in (15.2 cm) strand of cream. Thread it through the top center of the arch and knot it into a 2.5 in (6.4 cm) loop.
- Bow: Sew the bow to the front at the top center so that it covers the base of the loop.
- Center strand: Thread the beading needle with doubled sewing thread and anchor it at the inner edge, directly below the bow. String five 4 mm pearls, then one 6 mm pearl. Pass the thread into the top of a bell, secure it inside, and come back up through the beads. The strand between the arch and the bell should be 1.75 in (4.4 cm).
- Outer strands: At the center sc of each leg end, string three 4 mm pearls and one 6 mm pearl, then attach a bell the same way. Each strand should be 0.75 in (1.9 cm) long.
- Weave in all ends. Knot the thread twice inside each bell.
The outer bells hang lowest, which brings the overall height to 5.5 in (14.0 cm). The center bell hangs inside the opening.
Final Blocking
- Lightly mist the arch and the bells with water or spray starch.
- Pin the arch to 5 in × 3.5 in (12.7 × 8.9 cm). Keep the legs parallel and the inner opening at 2 in (5.1 cm).
- Pin out each scallop at its center point.
- Pull each Row 3 and Row 5 fan open into a sunburst, and pin the center of each fan if needed.
- Shape the bells over a fingertip or the cap of a pen, and spread each rim to 1.25 in (3.2 cm).
- Let everything dry completely before handling. If you block before assembly, do the beading afterward.
Final Quality-Control Checklist
- The arch measures 5 in × 3.5 in (12.7 × 8.9 cm).
- The legs are straight and the same length, and the curve is centered.
- There are 7 full fans in Row 3, plus 6 full and 2 half fans in Row 5.
- There are 20 lavender scallops, and the inner edge is all cream.
- The outer corners lie flat without cupping.
- Each bell has 6 visible ribs and 6 scallops.
- The center strand is 1.75 in (4.4 cm), and the outer strands are 0.75 in (1.9 cm).
- The bow is centered and the ornament hangs level.
Troubleshooting
- The legs curve instead of staying straight: You placed increases outside the center 21 sts in Row 2. Recount 6 + 31 + 6.
- The fan count is off: Row 2 must have exactly 43 dc. Fix it before you start Row 3.
- The arch ruffles: Your tension is loose, or the hook is too large. Go down one size.
- The arch cups: Your tension is tight. Go up one size, or relax your fans.
- The scallops end early: Border Row 1 must total 81 sts. Check the 10 sc on each leg end and the 3 sc at each corner.
- The bells look flat: Add more filling to the dome, and shape them while damp.
- The ornament tilts: Adjust the hanging loop until the ornament balances, then re-knot.
Care
Hand wash in cool water with mild soap, press out the water in a towel, and reshape the ornament flat to dry. Store it flat in tissue paper so the bells and bow keep their shape.
Final Notes
The measurement chain is short and reliable. Row 1 measures 4.7 in (11.9 cm), the Row 5 arch measures 4.5 in × 3 in (11.4 × 7.6 cm), and the bordered arch measures 5 in × 3.5 in (12.7 × 8.9 cm). Add bells of 1.25 in (3.2 cm) on strands of 0.75 in (1.9 cm), and the finished ornament is 5.5 in (14.0 cm) tall. Check each stage, and the ornament will hang light, lacy and balanced.
Happy crocheting!