

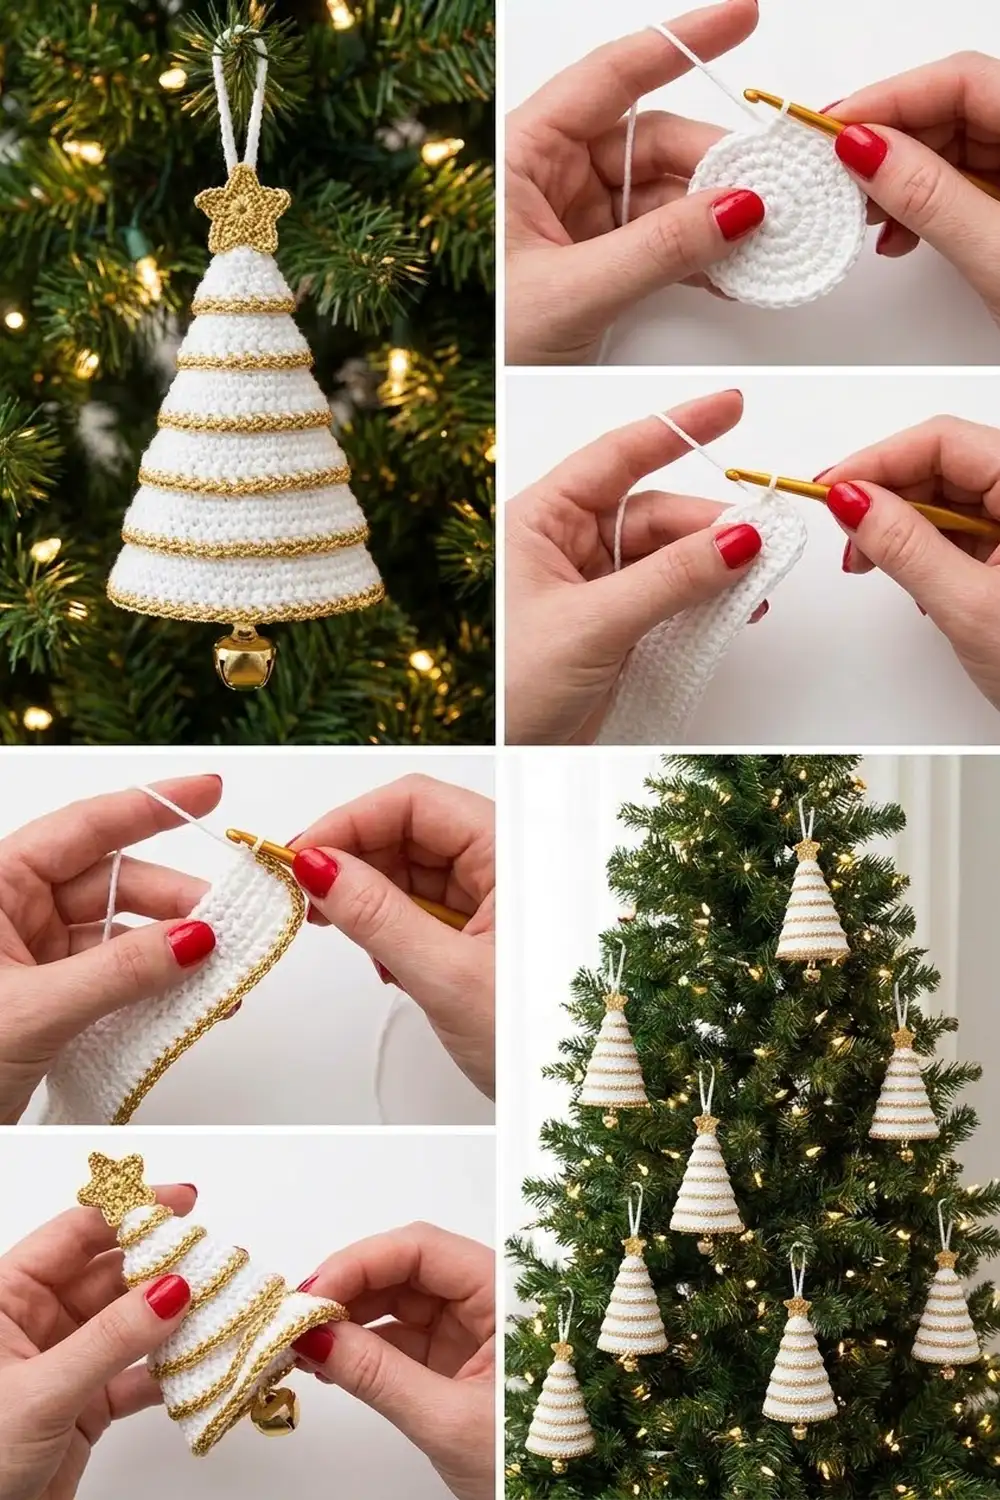
This ornament looks like a small tiered Christmas tree. One long strip of white single crochet is coiled into a cone, and a gold edging runs along the lower edge of every tier. A gold star sits at the top, a white loop lets it hang, and a gold jingle bell finishes the base.
The palette is white with metallic gold. The style is classic and elegant, so the ornament suits a white-and-gold tree, a gift topper, or a mantel garland hook. It also makes a good gift because it packs flat in a small box once the shape has set.
This pattern uses US crochet terms. The finished tree body is 5 in (12.7 cm) tall and 3.3 in (8.4 cm) across the base. With the star and bell, it measures about 6.75 in (17.1 cm), plus a 1.5 in (3.8 cm) hanging loop.
Here is how it’s built. First, crochet a straight strip 6 stitches wide and 252 rows long. Next, add two rows of gold edging along one long edge. Then block the strip, coil it into a seven-tier spiral, and tack it in place. Finally, sew on a two-layer star, a loop, and a bell on a central cord.
Finished Size and Construction
- Finished size: body 5 in (12.7 cm) tall × 3.3 in (8.4 cm) base diameter; about 6.75 in (17.1 cm) with star and bell
- Skill level: Easy / advanced beginner
- Terminology: US crochet terms
- Yarn weight: DK (light, #3) cotton; metallic gold of similar weight
- Hook: 3.5 mm (E-4)
- Number of pieces: 1 ornament (1 body strip, 2 star layers, 1 loop cord)
- Layout: one strip coiled into 7 spiral tiers
- Piece size: strip before border 1.2 in × 42 in (3.0 cm × 106.7 cm)
- Size before border: 6 sc wide × 252 rows
- Border depth: 0.2 in (0.5 cm), 2 gold rows on one long edge
Materials
Choose a smooth, mercerized DK cotton for the white. Cotton holds the tier shape well and shows each stitch clearly. Avoid fuzzy or very soft acrylic, because the tiers will droop. For the gold, use a metallic yarn or a metallic blend close to DK weight. Very thin metallic thread will make the edging look sparse. If your only gold is thin, hold two strands together.
- White DK cotton: 35 g (about 80 m)
- Metallic gold, DK weight: 15 g (about 35 m)
- 3.5 mm (E-4) crochet hook
- Gold jingle bell, 3/4 in (1.9 cm)
- Tapestry needle
- 8 locking stitch markers
- Rustproof pins and a foam blocking mat
- Scissors and a tape measure
- Optional: a paper cone or rolled cardstock for shaping
All quantities include a margin of about 20 percent for the gauge swatch and tails.
Abbreviations (US Terms)
- ch – chain
- sc – single crochet
- hdc – half double crochet
- sl st – slip stitch
- st(s) – stitch(es)
- MR – magic ring
- RS – right side
- Edge A – the long edge of the strip that gets the gold border
- Edge B – the plain long edge that gets hidden inside the coil
Special stitch – sc in row end: Insert the hook under the outermost strand of the end stitch of a row, so the hook goes through a full stitch and not just one thread. Then complete a normal sc.
Gauge and Checkpoints
Gauge: 20 sc and 24 rows = 4 in (10.2 cm) in rows of sc with the 3.5 mm hook. That’s 5 sc and 6 rows per 1 in (2.5 cm).
Width gauge controls how wide the strip is. Row gauge controls its length, and the length sets the size of every tier. Measure your row gauge carefully.
Test first: Work the first 24 rows of the strip and measure them before you go on. This short piece is your swatch, so you don’t need to make a separate one.
Checkpoints:
- After Row 1: strip is 1.2 in (3.0 cm) wide.
- After Row 24: 4 in (10.2 cm) long.
- After Row 126: 21 in (53.3 cm) long.
- After Row 252: 42 in (106.7 cm) long.
- After the gold border: strip is 1.4 in (3.6 cm) wide.
- Star: 1.25 in (3.2 cm) from point to point.
If your strip is too long (fewer than 6 rows per inch), switch to a 3.25 mm hook. If it’s too short (more than 6 rows per inch), switch to a 3.75 mm hook. If you can’t match gauge, always work 252 rows anyway. The tiers will grow or shrink in proportion, and the tree will still look right.
Body Strip
Use white yarn. You work the strip in short rows across its width. One long side is edge A and the other is edge B.
Row 1 (RS): Ch 7, sc in 2nd ch from hook and in each ch across. Turn. (6 sc)
Row 2: Ch 1 (doesn’t count as a st), sc in each sc across. Turn. (6 sc)
Rows 3–252: Repeat Row 2. (6 sc in every row)
Before you turn, mark the row ends on one side as edge A. Use the side where you work the first sc of the odd-numbered rows, and add a marker there now.
Place turn markers. As you work, put a marker in the edge A row end of these rows: 9, 27, 54, 90, 135, 189, and 252. Each marker ends one tier:
| Tier (top to bottom) | Rows | Rows in tier | Length | Approx. diameter |
|---|---|---|---|---|
| 1 | 1–9 | 9 | 1.5 in (3.8 cm) | 0.5 in (1.3 cm) |
| 2 | 10–27 | 18 | 3 in (7.6 cm) | 1 in (2.5 cm) |
| 3 | 28–54 | 27 | 4.5 in (11.4 cm) | 1.4 in (3.6 cm) |
| 4 | 55–90 | 36 | 6 in (15.2 cm) | 1.9 in (4.8 cm) |
| 5 | 91–135 | 45 | 7.5 in (19.1 cm) | 2.4 in (6.1 cm) |
| 6 | 136–189 | 54 | 9 in (22.9 cm) | 2.9 in (7.4 cm) |
| 7 | 190–252 | 63 | 10.5 in (26.7 cm) | 3.3 in (8.4 cm) |
Each tier is 9 rows longer than the tier above it. 9 + 18 + 27 + 36 + 45 + 54 + 63 = 252 rows. That steady step makes the cone taper evenly.
Fasten off and leave an 8 in (20.3 cm) tail at Row 252 for sewing.
Star (Make 2)
Use gold yarn.
Round 1: Work 10 sc in a MR. Pull the ring closed and sl st to the first sc. (10 sc)
Round 2 (points): *Ch 4, sl st in 2nd ch from hook, sc in next ch, hdc in next ch, skip next sc of Round 1, sl st in next sc. Repeat from * 4 more times. The last sl st lands in the joining sc. (5 points; each point uses 2 sc of Round 1)
Fasten off. Leave a 10 in (25.4 cm) tail on one star only. The star should measure 1.25 in (3.2 cm) from point to point, with a center about 0.6 in (1.5 cm) wide.
Hanging Loop
Use white yarn.
Ch 22, sl st in 2nd ch from hook and in each ch across. (21 sl st)
Fasten off. The cord measures about 3.5 in (8.9 cm). Fold it in half to make a 1.5 in (3.8 cm) loop.
Border
The gold border runs only along edge A. When the strip is coiled, it forms the chain-link trim on every tier.
Border gauge: 6 gold sc per 1 in (2.5 cm) of row ends, which matches the row gauge of 6 rows per inch.
Border Row 1: With RS facing, join gold in the edge A row end of Row 1. Ch 1, then work 1 sc in each row end along edge A, ending at Row 252. (252 sc) Move each turn marker up into the gold sc worked into its row.
Border Row 2: Ch 1, turn. Working loosely, sl st in each sc across. (252 sl st)
Fasten off and weave in the ends.
Why the math works: The strip has 252 rows, and you work exactly 1 sc into each row end, giving 252 sc. Because the border gauge equals the row gauge, the edge stays the same length. It won’t ruffle or pull in. Row 2 matches 1 sl st per sc, so it also stays 252 stitches long. The slip stitches sit on top of the sc and form the braided, chain-like ridge. The border adds 0.2 in (0.5 cm), bringing the strip to 1.4 in (3.6 cm) wide.
Keep Row 2 loose. If the slip stitches are tight, edge A gets shorter than edge B and the strip will curl.
Final Blocking
- Block the strip. Pin the strip straight on the mat, RS up, with the gold edge straight. Mist it until it’s damp, but not soaked.
- Let it relax. Leave it for about 10 minutes, but don’t let it dry fully. A damp strip coils more smoothly.
- Form tier 1. Starting at Row 1, roll rows 1–9 into a small tube with edge A at the bottom. Using a white strand, run a gathering stitch through edge B of rows 1–9. Pull it closed to make the tip, then knot it.
- Coil downward. Wind the strip around and down, with each new tier sitting slightly lower and wider. Rows 10–27 go around tier 1, and so on. Each marker should land directly under the start of its tier.
- Set the tier drop. Slide each lower tier up inside the one above until 0.6 in (1.5 cm) of the lower tier shows below the gold edge above it. Edge B of the lower tier then rests on the wrong side of the tier above.
- Tack the tiers. Use the Row 252 tail, plus extra white strands as needed. Whipstitch edge B of each tier to the wrong side of the tier above it, about 3 sts in from that tier’s edge A. Tack every 3 rows, and don’t let the stitches show on the RS.
- Check the size. The body should be 5 in (12.7 cm) tall: the top tier is 1.4 in (3.6 cm), plus 6 drops of 0.6 in (1.5 cm). The base should be about 3.3 in (8.4 cm) across.
- Shape and dry. Slip a paper cone inside, or stuff the tree lightly with tissue. Let it dry completely.
- Add the bell and loop. Thread the bell onto a 12 in (30.5 cm) white strand and fold the strand in half. Pass both ends up through the inside of the cone and out through the gathered tip. Adjust the strand so the top of the bell sits 0.25 in (0.6 cm) below the bottom tier, then tack it at the tip. Fold the loop cord in half and lay its ends against the tip. Tie the bell strand firmly around them.
- Add the star. Place one star in front of the tip and one behind it, with points matching and a bottom point straddling the tip. Use the long gold tail to whipstitch the two stars together around their edges and through the tip. This covers the loop ends. Weave in all ends.
Final Quality-Control Checklist
- The strip has 6 sc in every row and 252 rows in total.
- Border Row 1 has 252 sc and Border Row 2 has 252 sl st.
- The gold edge lies flat, with no ruffles and no curling.
- Seven tiers taper evenly, with 0.6 in (1.5 cm) of each lower tier showing.
- No tacking stitches show on the RS.
- The body is 5 in (12.7 cm) tall and 3.3 in (8.4 cm) across the base.
- The star is 1.25 in (3.2 cm) wide, with its points matched front and back.
- The bell hangs straight under the center, and the loop is secure.
- All ends are woven in.
Troubleshooting
Gold edge ruffles: You probably worked 2 sc into some row ends. Rip back and work exactly 1 per row.
Strip curls toward the gold edge: The slip stitch row is too tight. Rework it with a 4 mm hook.
Strip edges look wavy: You may have skipped or added a stitch in some rows. Count 6 sc in each row and fix any rows that are off.
The tree leans: The tier drop isn’t even. Re-tack so each tier shows 0.6 in (1.5 cm) all the way around.
Gaps between tiers: Add tacking stitches every 2 rows instead of every 3.
Tip is floppy: Pull the gathering at the tip tighter, and add a few stitches through the tube.
Star points curl: Pin the stars flat, mist them, and let them dry before sewing.
Bell hangs off-center: Recenter the cord inside the cone, then retie it at the tip.
Care
Spot clean with cool water and mild soap, then reshape the tiers and dry flat. Don’t put it in the dryer, and store it in a box so the cone doesn’t get crushed.

Final Notes
The measurement chain is simple. A gauge of 6 rows per inch makes a strip 1.2 in (3.0 cm) wide and 42 in (106.7 cm) long. The 252 sc border matches the 252 rows, so the strip stays flat at 1.4 in (3.6 cm) wide. Seven tiers that step up by 9 rows each, with a 0.6 in (1.5 cm) drop between them, give a 5 in (12.7 cm) cone with a 3.3 in (8.4 cm) base. Check each link in that chain and your tree will match.
Happy crocheting!