

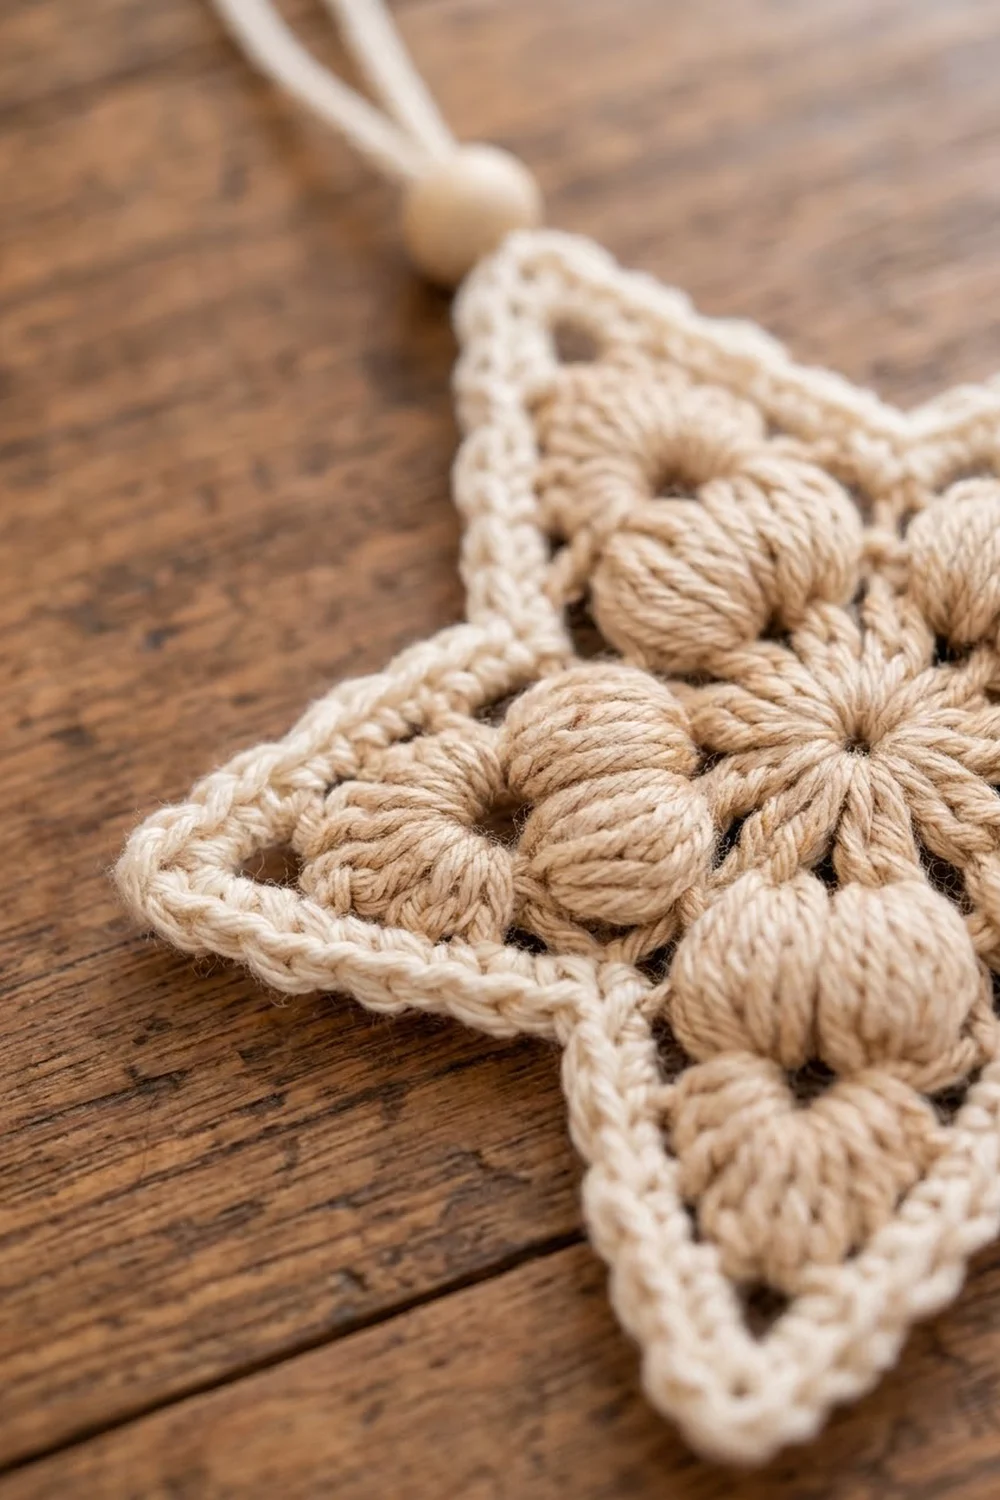
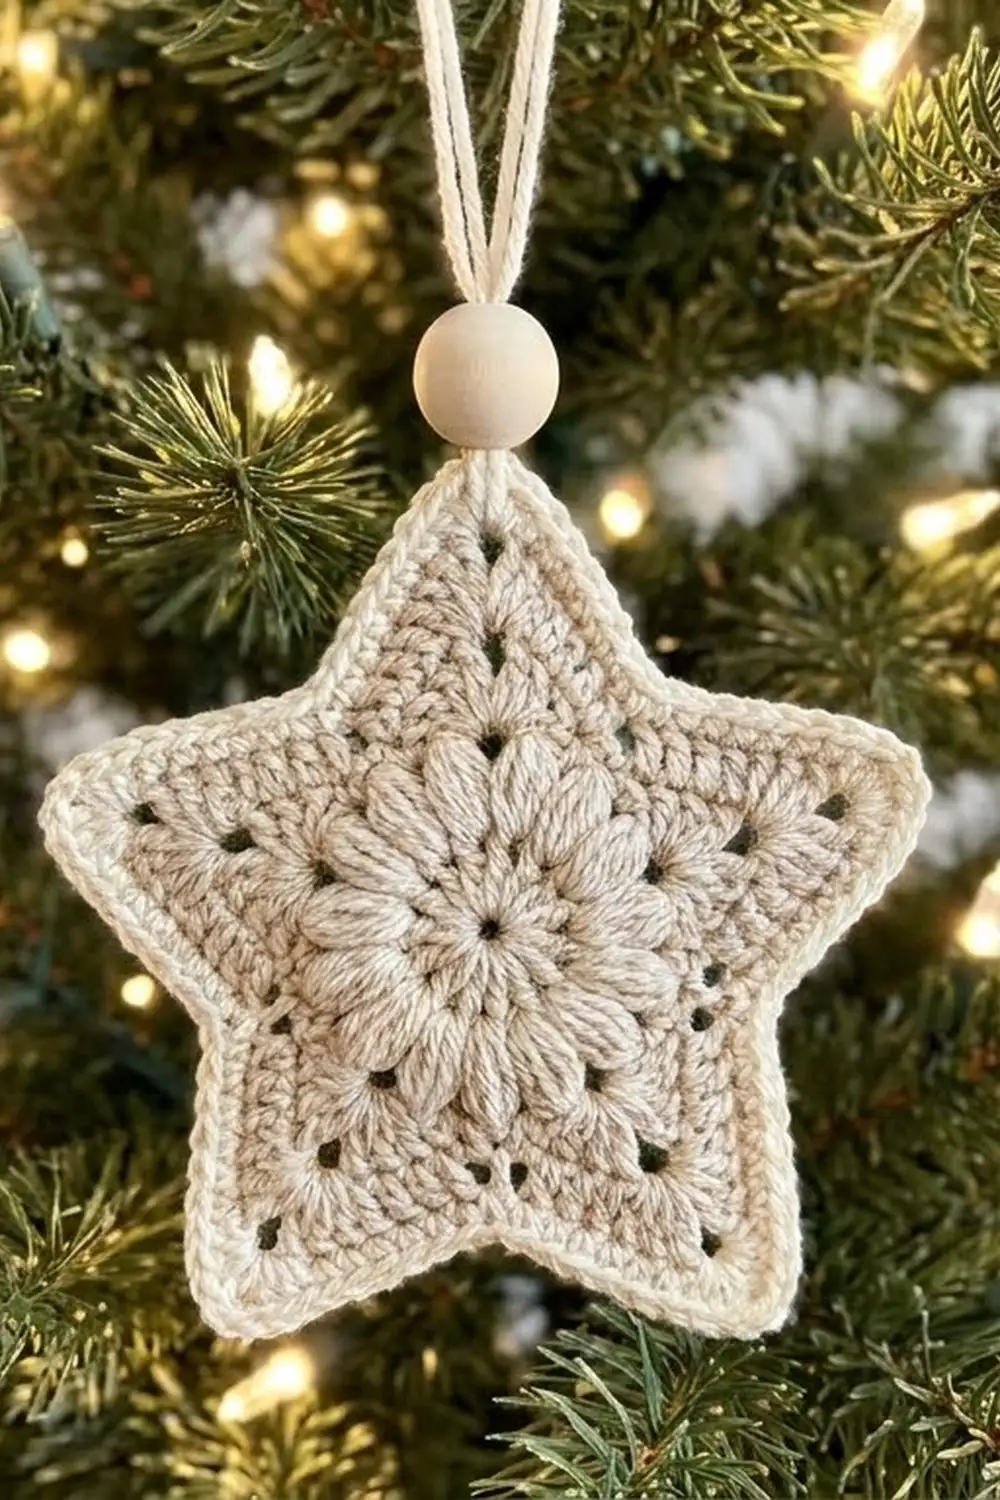
The Hearthside Puff Star is a soft, textured Christmas ornament with a lot of character. A flower of slim puff stitches sits at the center, surrounded by a ring of plump puffs. Five lacy points grow out from there, and the whole star is outlined with a corded cream edge.
The palette is simple and cozy: an oatmeal beige body, a cream border, and a natural wooden bead on the hanging loop. It suits Scandinavian, farmhouse, and neutral tree themes, and it makes a good gift tag topper.
This pattern uses US crochet terms. The finished star is 5 in (12.7 cm) tall from the top tip to the line between the two bottom tips, and 5.25 in (13.3 cm) wide.
You start with a round center made of puff stitches. Each point is then worked in short rows straight off the center. Finally, you work a two-round cream border around the whole star and add a beaded hanging loop.
Finished Size and Construction
- Finished size: 5 in (12.7 cm) tall × 5.25 in (13.3 cm) wide
- Skill level: Easy-intermediate (puff stitches, short rows, crab stitch)
- Terminology: US crochet terms
- Yarn weight: DK (light worsted / #3), cotton or cotton blend
- Hook: 4.0 mm (G-6)
- Number of pieces: 1 (single star motif)
- Layout: Round puff center with 5 points worked directly off it
- Center size (after Rnd 3): 2.5 in (6.4 cm) diameter
- Size before border: 4.5 in (11.4 cm) tall × 4.75 in (12.1 cm) wide
- Border depth: 0.25 in (0.6 cm)
Materials
Yarn: Use a smooth DK cotton or cotton blend so the puffs show clearly. Fuzzy or very splitty yarns hide the texture. Check the label for roughly 112 m per 50 g (about 2.2 m per gram).
- Color A (Oatmeal / light beige), body: 9 g, about 20 m
- Color B (Cream / ivory), border and loop: 5 g, about 11 m
These quantities include a margin of about 15% for gauge swatching and tails. One 50 g ball of each color makes several stars.
Tools:
- 4.0 mm (G-6) crochet hook
- One natural wooden bead, 12 mm (0.5 in / 1.3 cm), with a hole large enough for two strands of yarn
- Tapestry needle
- Scissors
- Stitch marker
- Blocking mat or foam board, rustproof pins, and a spray bottle
- Optional: fabric stiffener or spray starch
Abbreviations (US Terms)
- ch: chain
- sl st: slip stitch
- sc: single crochet
- sc2tog: single crochet 2 together
- dc: double crochet
- rev sc: reverse single crochet (crab stitch)
- sp(s): space(s)
- st(s): stitch(es)
- sk: skip
- MR: magic ring
- tch: turning chain
Special stitches:
- Small puff: (Yo, insert hook in the stitch or space, yo, pull up a loop to about 0.5 in / 1.3 cm) 3 times; 7 loops on hook. Yo, pull through all 7 loops, then ch 1 to lock.
- Puff: Same as the small puff, but repeat 4 times (9 loops on hook). Yo, pull through all 9 loops, then ch 1 to lock.
- Large puff: Same as the small puff, but repeat 5 times (11 loops on hook). Yo, pull through all 11 loops, then ch 1 to lock.
The locking ch 1 is part of each puff. It never counts as a chain space.
- Rev sc: Work single crochet from left to right (right-handed). Insert the hook into the next stitch to the right, pull up a loop, yo, and pull through both loops.
Gauge and Checkpoints
The whole project is one small star, so your first star works as your gauge test. Measure at every checkpoint below and adjust before you go further.
- After Rnd 1: 1.25 in (3.2 cm) across
- After Rnd 2: 2.25 in (5.7 cm) across
- After Rnd 3: 2.5 in (6.4 cm) across. This is your key gauge.
- Each point (Rows 1–3): 1.25 in (3.2 cm) tall, measured from the Rnd 3 edge to the tip
- Before border: 4.5 in (11.4 cm) tall × 4.75 in (12.1 cm) wide
- After border: 5 in (12.7 cm) tall × 5.25 in (13.3 cm) wide
If your Rnd 3 is too big (over 2.75 in / 7 cm), go down to a 3.75 mm hook, or pull your puff loops up a little shorter.
If it is too small (under 2.25 in / 5.7 cm), go up to a 4.5 mm hook, or pull the puff loops up a little taller.
If Rnd 3 cups, your puff loops are too long. If it ruffles, they are too short.
Center
Use Color A for the center.
Rnd 1: Make an MR, ch 2 (does not count as a stitch). Work 1 small puff into the ring, then ch 1. Work 1 small puff into the ring, ch 1. Repeat from * 8 more times. Pull the ring closed, leaving a small hole about 0.125 in (0.3 cm) wide. Join with a sl st to the top of the first puff.
(10 small puffs, 10 ch-1 sps)
Rnd 2: Sl st into the first ch-1 sp, ch 2 (does not count). Work 1 large puff in the same sp, ch 2. Work 1 large puff in the next ch-1 sp, ch 2. Repeat from * 8 more times. Join with a sl st to the top of the first large puff.
(10 large puffs, 10 ch-2 sps)
Each large puff sits between two of the slim center petals. This makes the round “flower around a flower” look.
Rnd 3 (conversion round): Ch 1. Sc in the top of the same puff, then 2 sc in the next ch-2 sp. Sc in the top of the next puff, 2 sc in the next ch-2 sp. Repeat from * 8 more times. Join with a sl st to the first sc.
(10 sc worked into puffs + 20 sc worked into ch-2 sps = 30 sc)
Fasten off Color A and check the 2.5 in (6.4 cm) checkpoint.
Divide into points: The 30 sts make five groups of 6 sts, one group per point. Starting with the sc on top of any puff, place a marker in every 6th st (sts 1, 7, 13, 19, 25). Each marked st is the first stitch of a point.
Points (Make 5)
Each point is worked in rows over its own 6 sts. Keep the right side facing you for Row 1.
Row 1 (RS): Join Color A with a sl st in the marked st 1, then ch 4 (counts as dc + ch 1). Sk st 2. Work 1 puff in st 3, ch 1, 1 puff in st 4, ch 1. Sk st 5. Dc in st 6. Turn.
(2 dc, 2 puffs, 3 ch-1 sps)
Row 2 (WS): Ch 4 (counts as dc + ch 1). Sk the first ch-1 sp and the first puff. Work 1 puff in the center ch-1 sp, ch 1. Sk the next puff and ch-1 sp. Dc in the 3rd ch of the tch. Turn.
(2 dc, 1 puff, 2 ch-1 sps)
Row 3 (RS, tip): Ch 1. Sc in the first dc, sc in the ch-1 sp. Work (sc, ch 2, sc) in the top of the puff. Sc in the next ch-1 sp, sc in the 3rd ch of the tch.
(6 sc, 1 ch-2 tip sp)
Fasten off, leaving a 4 in (10.2 cm) tail.
Repeat for the remaining four points, starting each one at the next marker. Neighboring points share no stitches: point 1 ends in st 6 and point 2 begins in st 7. This gives you a clean inner valley between every pair of points.
Checkpoint: Each point should measure 1.25 in (3.2 cm) from the Rnd 3 edge to the tip, and about 1.5 in (3.8 cm) wide at the base. Weave in all Color A tails now, along the backs of the dc stitches so they are hidden by the border.
Border
Border gauge: In Color B, 5 sc = 1 in (2.5 cm) along the edge. The two rounds add 0.25 in (0.6 cm) all around.
Edge math: Each side of a point has three row ends or stitch groups to work into:
- 3 sc tops from Row 3
- 1 dc row end from Row 2, which takes 2 sc
- 1 dc row end from Row 1, which takes 2 sc, one of which becomes half of the valley sc2tog
That gives 6 sc plus half a valley along every side.
Rnd 1: With the RS facing, join Color B with a sl st in the ch-2 tip sp of any point. Ch 1, then work (sc, ch 2, sc) in the same sp.
Down the left side of this point:
– Sc in each of the next 3 sc of Row 3.
– Work 2 sc around the post of the Row 2 dc.
– Work 1 sc around the post of the Row 1 dc.
– Sc2tog: insert the hook for the first leg in the same Row 1 row end, and for the second leg in the Row 1 row end of the next point.
Up the right side of the next point:
– Work 1 sc around the post of its Row 1 dc (beginning ch).
– Work 2 sc around its Row 2 row end.
– Sc in each of its 3 Row 3 sc.
– Work (sc, ch 2, sc) in its ch-2 tip sp.
Repeat from * (down, valley, up) 3 more times. Then work the final down side, valley, and up side to return to the start. Skip the last (sc, ch 2, sc), since it was already worked at the start. Join with a sl st to the first sc.
Count for Rnd 1:
- Each side, tip to valley: 1 tip sc + 6 sc = 7 sts
- Each point: 7 + 7 + 1 sc2tog = 15 sts
- Total: 5 × 15 = 75 sts and 5 ch-2 tip sps
Rnd 2 (crab stitch): Ch 1. Working from left to right, rev sc in each st around. At each tip, work (rev sc, ch 1, rev sc) into the ch-2 sp. At each valley, work 1 rev sc into the sc2tog. Join with a sl st to the first rev sc and fasten off.
(75 sts worked 1 per st + 10 extra rev sc in the tip sps = 85 rev sc, and 5 ch-1 tip sps)
Why the math works:
- The sc2tog in each valley pulls the inner angle in, so the star stays crisp instead of rounding off.
- The tip increases (2 extra sts plus a chain) let the outline turn the sharp outer corner without pulling.
- Along the straight sides, 1 sc per row-end unit keeps the edge flat.
- The crab stitch round adds no fullness on the sides, so it stays flat and corded.
Hanging Loop
- Cut a 12 in (30.5 cm) strand of Color B.
- Thread it through the ch-1 tip sp of the top point and even out the ends.
- Pass both ends together through the wooden bead and slide the bead down until it sits against the tip.
- Tie both ends in an overhand knot about 3 in (7.6 cm) above the bead.
- Trim the ends to 0.5 in (1.3 cm).
Final Blocking
- Weave in all remaining Color B tails through the back of the border. Do not cut flush until after blocking.
- Lightly spray the star with water until it is damp but not soaking. For a stiffer ornament, use diluted fabric stiffener or spray starch instead.
- Lay the star right side up on the blocking mat.
- Pin each of the 5 tips through the ch-1 tip sp, pulling gently outward until the star measures 5 in (12.7 cm) tall and 5.25 in (13.3 cm) wide.
- Pin each of the 5 valleys so all inner angles sit at the same depth, about 1.25 in (3.2 cm) in from the line between neighboring tips.
- Press each puff with a fingertip so it sits domed and round. Do not flatten it.
- Let it dry completely, at least 6 hours (overnight if you used stiffener).
- Unpin the star and trim the woven tails.
Final Quality-Control Checklist
- Rnd 1 has 10 small puffs, and the center hole is small and neat.
- Rnd 2 has 10 large puffs; Rnd 3 has 30 sc.
- Each point has 2 puffs in Row 1, 1 puff in Row 2, and a ch-2 tip in Row 3.
- Border Rnd 1 has 75 sts and 5 ch-2 sps; Rnd 2 has 85 rev sc and 5 ch-1 sps.
- The star measures 5 in (12.7 cm) tall × 5.25 in (13.3 cm) wide.
- All five points are the same length.
- The cream edge lies flat with no ruffling or cupping.
- The bead sits snugly on the top tip, and the loop knot is secure.
- No tails show from the front.
Troubleshooting
The center cups: Your puff loops are too long, or Rnd 2’s ch-2 sps are too tight. Loosen the chains or shorten the loops.
The center ruffles: Your puffs are too short, or your chains are too loose. Pull the puff loops up a little taller.
Puffs look stringy: Pull up all the loops to the same height before the final yo, and always finish with the locking ch 1.
The points lean: Check that each point uses exactly 6 sts from Rnd 3, and that the markers sit on the sc above a puff.
The tips are blunt: Make sure you worked the ch-2 in Row 3 and the (sc, ch 2, sc) in border Rnd 1, then pin the tips firmly while blocking.
The border ruffles: Your crab stitch is too loose. Go down 0.5 mm for Rnd 2 only.
The border pulls the star smaller: Use the full 2 sc in each dc row end. Do not substitute 1.
The valleys are rounded: Make sure you used the sc2tog at each valley, not 2 separate sc.
Care
Hand wash the star in cool water with mild soap, press out excess water in a towel, and reshape it flat to dry. If you used stiffener, reapply it after washing.
Final Notes
Every measurement in this star builds on the one before it:
- The center reaches 1.25 in (3.2 cm) after Rnd 1, 2.25 in (5.7 cm) after Rnd 2, and 2.5 in (6.4 cm) after the 30-stitch Rnd 3.
- Five points of 6 sts each add 1.25 in (3.2 cm) per tip, bringing the star to 4.5 in (11.4 cm) × 4.75 in (12.1 cm).
- The 75-stitch sc round and the 85-stitch crab stitch round add 0.25 in (0.6 cm) all around, finishing at 5 in (12.7 cm) × 5.25 in (13.3 cm).
Hit each checkpoint and your star will come out balanced and crisp every time.
Happy crocheting!