

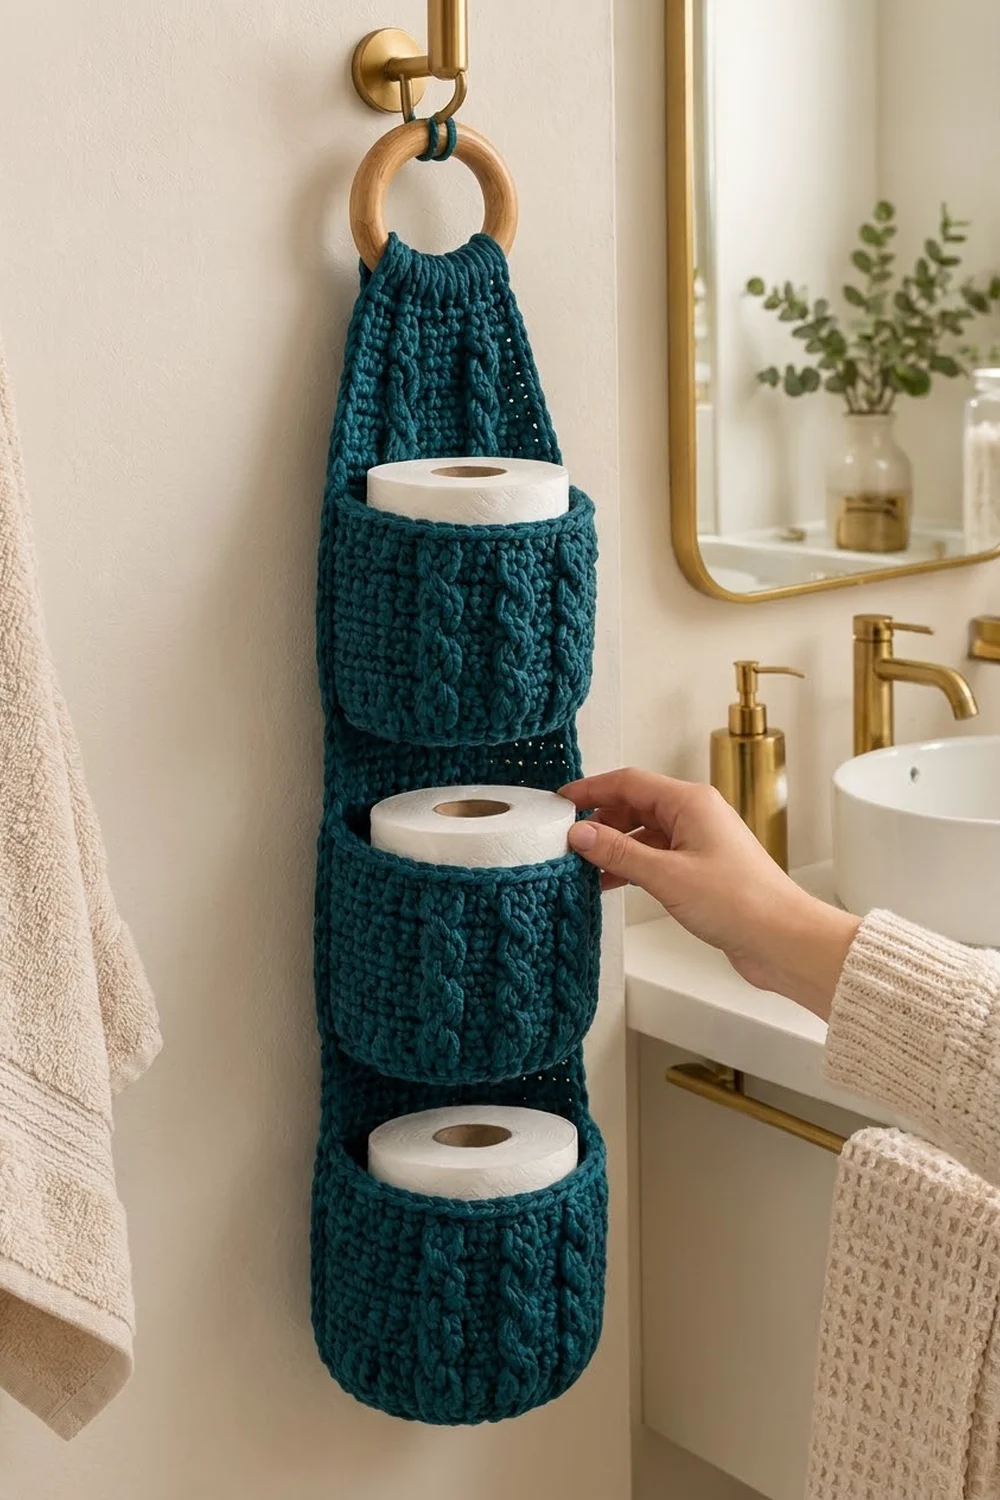
The Teal Harbor Cable holder is a tall hanging organizer that stores three spare toilet rolls in round cabled pockets. It hangs from a wooden ring, so it fits on a towel hook, a door hook or a small wall peg next to the sink.
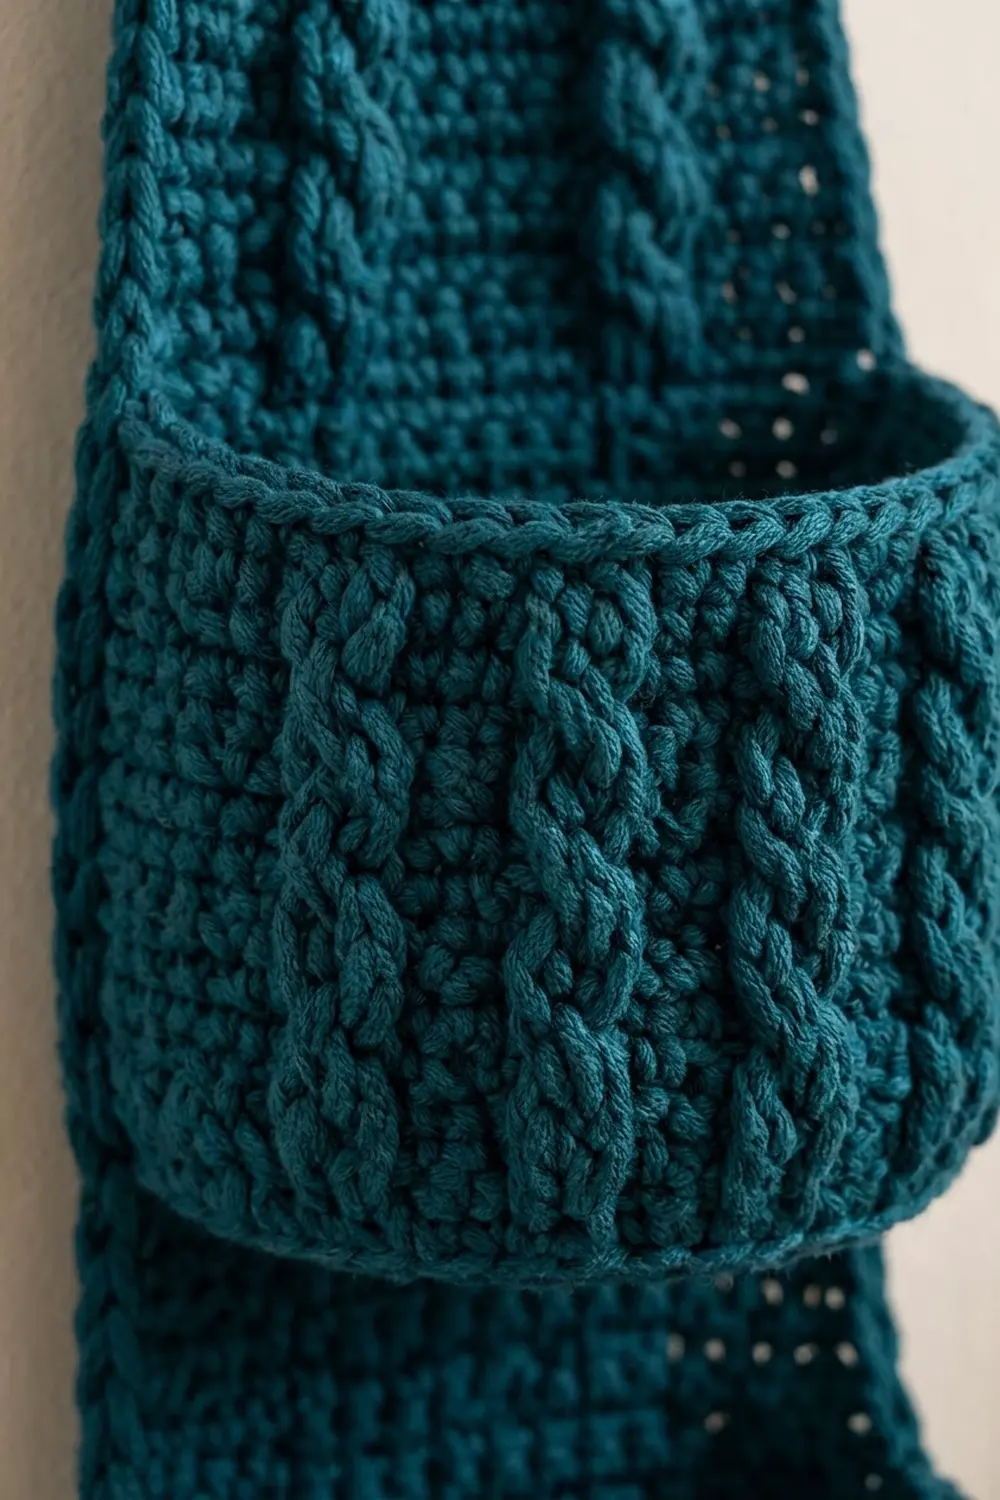
The sample is worked in one deep teal yarn. That single color lets the texture carry the design: braided cables run up the back panel and around each pocket, and the plain half double crochet between them shows them off. The look is cozy and a little cottage-style, and it sits well next to brass fixtures and natural wood.
This pattern uses US crochet terms. The finished holder is 6.5 in (16.5 cm) wide and 22.5 in (57.2 cm) long before you fold it over the ring, and about 20.25 in (51.4 cm) long as it hangs below the ring.
You will work one flat back panel in rows, add a single crochet border, and crochet three pockets in the round from the base up. Then you sew the pockets to the panel and fold the gathered top over the wooden ring.
Finished Size and Construction
- Finished size: 6.5 in x 22.5 in (16.5 cm x 57.2 cm) flat; about 20.25 in (51.4 cm) hanging length below the ring
- Skill level: Intermediate (front post and back post stitches, cable crosses, working in rounds)
- Terminology: US crochet terms
- Yarn weight: Bulky (#5)
- Hook: 6.0 mm (US J-10)
- Number of pieces: 4 (1 back panel and 3 pockets), plus the wooden ring
- Layout: 3 pockets stacked in one vertical column on the panel
- Pocket size: 4.75 in (12.1 cm) base diameter, 3.75 in (9.5 cm) tall
- Panel size before border: 6 in x 22 in (15.2 cm x 55.9 cm)
- Border depth: 0.25 in (0.6 cm) on each edge
Materials
Yarn: Use a bulky cotton or cotton blend for this project. Cotton holds its shape when filled and stands up well to bathroom humidity. A firm, round yarn shows the cables most clearly. The quantities below assume about 130 m (142 yd) per 100 g.
- Teal, back panel: 90 g, about 117 m (128 yd)
- Teal, 3 pockets: 180 g (60 g each), about 234 m (256 yd)
- Teal, border and seaming: 30 g, about 39 m (43 yd)
- Total: 300 g, about 390 m (427 yd)
These quantities include a margin of about 10% for swatching and seaming.
Tools:
- 6.0 mm (US J-10) crochet hook
- Wooden ring, 3 in (7.6 cm) outer diameter and about 2.25 in (5.7 cm) inner diameter
- Tapestry needle
- 8 locking stitch markers
- Scissors
- Measuring tape
- Blocking mat and pins
- Spray bottle
Abbreviations (US Terms)
- ch: chain
- sl st: slip stitch
- sc: single crochet
- hdc: half double crochet
- FPdc: front post double crochet
- BPdc: back post double crochet
- FPtr: front post treble crochet
- BLO: back loop only
- st(s): stitch(es)
- RS / WS: right side / wrong side
- Rnd: round
Special stitch: C4F (cable 4 front). Skip the next 2 sts. Work FPtr around each of the next 2 sts. Then, working in front of the stitches you just made, work FPtr around each of the 2 skipped sts. This uses 4 sts and makes 4 sts.
Post stitch rule: Each post stitch replaces the stitch behind it. Never work an extra hdc into the stitch behind a post stitch. This keeps every row and round at its stated count.
Gauge and Checkpoints
Gauge: 12 hdc and 10 rows = 4 in (10.2 cm) in hdc. In sc rounds, 12 sc = 4 in (10.2 cm).
Make one pocket base first as your test piece. A pocket is quick to make, and its base diameter tells you right away whether your gauge is right.
Checkpoints:
- Pocket, after Rnd 4: 24 sts, about 2.25 in (5.7 cm) across
- Pocket, after Rnd 8: 48 sts, 4.75 in (12.1 cm) across, lying flat
- Finished pocket: 3.75 in (9.5 cm) tall; a toilet roll should slide in snugly
- Panel, after Row 10: 6 in (15.2 cm) wide and 4 in (10.2 cm) tall
- Panel, after Row 55: 6 in x 22 in (15.2 cm x 55.9 cm)
If your pieces come out too big, go down one hook size. If they come out too small, or a roll won’t fit the pocket, go up one hook size. Cables pull the fabric inward, so always measure a finished pocket, not just the flat base.
Back Panel
Ch 20.
Row 1 (RS): Hdc in the 3rd ch from the hook and in each ch across. Turn. (18 hdc)
Row 2 (WS): Ch 2 (does not count as a st, here and throughout). Hdc in each st across. Turn. (18)
Row 3 (RS): Ch 2. Hdc in the next 3 sts, FPdc around each of the next 4 sts, hdc in the next 4 sts, FPdc around each of the next 4 sts, hdc in the last 3 sts. Turn. (18)
Row 4 (WS): Ch 2. Hdc in the next 3 sts, BPdc around each of the next 4 sts, hdc in the next 4 sts, BPdc around each of the next 4 sts, hdc in the last 3 sts. Turn. (18)
Working the BPdc from the WS pushes the cable posts to the RS, so both cables stay raised.
Row 5 (RS, cross row): Ch 2. Hdc in the next 3 sts, C4F, hdc in the next 4 sts, C4F, hdc in the last 3 sts. Turn. (18)
Row 6 (WS): Work as for Row 4. (18)
Rows 7–50: Repeat Rows 3–6 eleven more times. (18 sts in each row)
The cables cross on Rows 5, 9, 13 and so on up to Row 49, for 12 crosses per column. Each braid repeat is 4 rows, or 1.6 in (4.1 cm). Row 50 is a WS BPdc row.
Checkpoint: The panel should be 6 in (15.2 cm) wide and 20 in (50.8 cm) tall.
Rows 51–55: Ch 2. Hdc in each st across. Turn. (18 sts in each row)
These 5 plain rows, 2 in (5.1 cm) in total, are the fold-over section for the ring. Fasten off at the end of Row 55, which is a RS row.
Checkpoint: The panel should measure 6 in x 22 in (15.2 cm x 55.9 cm) before the border.
Pockets (Make 3)
Each pocket is worked in joined rounds with the RS always facing. Do not turn.
Rnd 1: Make a magic ring and work 6 sc into it. Join with a sl st to the first sc. (6)
Rnd 2: Ch 1. Work 2 sc in each st. Join. (12)
Rnd 3: Ch 1. Sc in the next st, 2 sc in the next st; repeat from * around. Join. (18)
Rnd 4: Ch 1. Sc in the next 2 sts, 2 sc in the next st; repeat around. Join. (24)
Rnd 5: Ch 1. Sc in the next 3 sts, 2 sc in the next st; repeat around. Join. (30)
Rnd 6: Ch 1. Sc in the next 4 sts, 2 sc in the next st; repeat around. Join. (36)
Rnd 7: Ch 1. Sc in the next 5 sts, 2 sc in the next st; repeat around. Join. (42)
Rnd 8: Ch 1. Sc in the next 6 sts, 2 sc in the next st; repeat around. Join. (48)
Checkpoint: The base should be 4.75 in (12.1 cm) across and lie flat.
Rnd 9 (turning round): Ch 1. Sc in the BLO of each st around. Join. (48)
This round turns the work upward to start the walls. It also leaves a ridge of unused front loops around the base edge, which you will use for seaming later.
Rnd 10: Ch 2. Hdc in the next 4 sts, FPdc around each of the next 4 sts; repeat from * 5 more times. Join with a sl st to the first hdc. (48: 24 hdc and 24 FPdc, 6 cable columns)
Rnd 11: Ch 2. Hdc in the next 4 sts, FPdc around each of the next 4 FPdc; repeat around. Join. (48)
Rnd 12 (cross round): Ch 2. Hdc in the next 4 sts, C4F; repeat around. Join. (48)
Rnds 13–14: Work as for Rnd 11. (48 in each round)
Rnd 15 (cross round): Work as for Rnd 12. (48)
Rnds 16–17: Work as for Rnd 11. (48 in each round)
Rnd 18: Ch 1. Sc in each st around. Join. (48)
Rnd 19: Sl st loosely in each st around. Join. (48)
This round makes the chain-look rim. Fasten off, leaving a 30 in (76.2 cm) tail for sewing.
Checkpoint: The pocket should be 3.75 in (9.5 cm) tall, and a standard roll should stand inside with about 0.5 in (1.3 cm) showing above the rim.
Make All Pieces
Totals (all teal):
- Back panel: 1
- Pockets: 3
Layout grid (front view, top to bottom):
   [ wooden ring ]
   [ gathered fold, Rows 51–55 ]
   [ panel, Rows 44–50 ]
   [ POCKET C: base Row 34 / rim Row 43 ]
   [ panel, Rows 28–33 ]
   [ POCKET B: base Row 18 / rim Row 27 ]
   [ panel, Rows 12–17 ]
   [ POCKET A: base Row 2 / rim Row 11 ]
   [ border, bottom edge ]
Border (Back Panel)
Border gauge: 3 sc per 1 in (2.5 cm).
With the RS facing, join yarn at the first st of Row 55 (top right corner).
Rnd 1:
- Top edge: Ch 1. Work 3 sc in the first st (corner), sc in each of the next 16 sts, 3 sc in the last st (corner). (22 sc, including both corner groups)
- Left long side: Work 6 sc across every 5 row ends, 11 times. (66 sc)
- Bottom edge: Working into the free loops of the foundation chain, work 3 sc in the first ch (corner), sc in each of the next 16 ch, 3 sc in the last ch (corner). (22 sc)
- Right long side: Work 6 sc across every 5 row ends, 11 times. (66 sc)
Join with a sl st to the first sc. Fasten off and weave in the end. (176 sc total: 22 + 66 + 22 + 66)
Why the math works:
- Short edges: 18 sts at 3 sts per in = 6 in (15.2 cm), so 1 sc per st keeps the edge flat. The extra 2 sc in each corner turn the corner cleanly.
- Long sides: The panel has 55 rows at 2.5 rows per in = 22 in (55.9 cm). The border needs 3 sc per in, which works out to 6 sc for every 5 rows. 55 rows ÷ 5 = 11 groups x 6 = 66 sc, and 66 ÷ 3 = 22 in. The sides neither ruffle nor pull in.
- Size: The border adds 0.25 in (0.6 cm) on each edge, so the bordered panel is 6.5 in x 22.5 in (16.5 cm x 57.2 cm).
Joining (Pockets to Panel)
Method: Whipstitch with the yarn tail, using a tapestry needle. Sew each pocket in two seams: one along its rim and one along its base ridge.
Prepare each pocket:
- Flatten the pocket gently. The round join should sit at the center back.
- Place a marker 8 sts to each side of the join on Rnd 19. Those 16 rim sts form the back of the rim.
- Mark the matching 16 sts in the front-loop ridge of Rnd 9. Those form the back of the base.
Stitch-to-stitch logic: On the panel, skip the first st of the row (plus the border), sew across the next 16 sts, and leave the last st free. Match 1 pocket st to 1 panel st, so the 16 pocket sts meet the 16 center sts of the panel row.
Placement:
| Base ridge sewn along | Rim sewn along | |
|---|---|---|
| A (bottom) | Row 2 | Row 11 |
| B (middle) | Row 18 | Row 27 |
| C (top) | Row 34 | Row 43 |
The pocket wall is 3.75 in (9.5 cm) tall, but the two seams are 9 rows, or 3.6 in (9.1 cm), apart. That small difference makes the front of each pocket bow outward slightly, which gives the roll room.
Tension: Make each whipstitch snug enough that the seam lies flat without puckering the panel. Sew through both loops of the panel st every time so the seam can carry the weight of a roll.
Checkpoint: The pockets should be 16 rows, or 6.4 in (16.3 cm), apart center to center, with 7 rows, or 2.8 in (7.1 cm), of panel showing between the rim of one pocket and the base of the next. The panel should still measure 6.5 in (16.5 cm) wide at every pocket.
Attaching the Ring
- Thread a 20 in (50.8 cm) strand through every st of Row 51.
- Pull the strand to gather the row to 2 in (5.1 cm) wide, then tie it securely.
- Pass the top section (Rows 52–55 and the border) through the ring from front to back.
- Fold the top section down behind the panel so the top border sits against the WS at Row 50.
- Whipstitch the border to Row 50 across its full gathered width.
The fold takes up 2.25 in (5.7 cm), so the holder hangs about 20.25 in (51.4 cm) below the ring.
Final Blocking
- Lay the holder face up on a blocking mat.
- Pin the panel to 6.5 in x 22.5 in (16.5 cm x 57.2 cm), measured flat before the fold. Pin the sides straight but leave the cables raised.
- Mist the piece lightly with water. Don’t press the cables flat.
- Put a toilet roll, or a 4.5 in (11.4 cm) jar wrapped in a towel, inside each pocket so the walls dry round.
- Let everything dry completely, then remove the pins and forms.
Final Quality-Control Checklist
- [ ] Every panel row has 18 sts.
- [ ] Every pocket round from Rnd 8 to Rnd 19 has 48 sts.
- [ ] Each panel cable has 12 crosses, and each pocket has crosses on Rnds 12 and 15.
- [ ] The border has 176 sc, and all 4 corners lie flat.
- [ ] The pockets are level, centered and 6.4 in (16.3 cm) apart.
- [ ] All pocket seams are secure and all ends are woven in.
- [ ] The gathered top is stitched firmly around the ring.
- [ ] The holder hangs straight at about 20.25 in (51.4 cm) below the ring.
Troubleshooting
- The cables look flat. Check that you worked BPdc (not FPdc) on WS panel rows, and that you didn’t add an extra hdc behind any post stitch.
- The panel gets wider as you go. You may be working into the stitch behind a post stitch. Count to 18 at the end of every row.
- The pocket base cups or ruffles. If it cups, go up a hook size for Rnds 1–8. If it ruffles, go down a hook size.
- The roll won’t fit. Go up one hook size for the pocket walls, or loosen your FPdc.
- The pockets sag forward. Add a few extra stitches at each end of the rim seam.
- The border waves. You picked up more than 6 sc per 5 rows. Rip back and recount along each long side.
- The ring slips. Tighten the gathering strand and add a second line of whipstitch.
Care
Hand wash in cool water and lay flat to dry, with rolls or jars inside the pockets so they keep their shape. Don’t hang the holder up wet, because the weight of the water will stretch the panel.
Final Notes
Every measurement in this design builds on the one before it:
- Gauge is 12 sts and 10 rows = 4 in (10.2 cm).
- That gauge gives a panel of 18 sts and 55 rows, 6 in x 22 in (15.2 cm x 55.9 cm).
- A 176-sc border brings the panel to 6.5 in x 22.5 in (16.5 cm x 57.2 cm).
- Three 48-st pockets, 4.75 in (12.1 cm) across and 3.75 in (9.5 cm) tall, sit 16 rows apart on the panel.
- A 2.25 in (5.7 cm) fold over the ring leaves 20.25 in (51.4 cm) of hanging length.
If you check each stage as you go, the holder will hang straight and hold three rolls neatly.
Happy crocheting!