

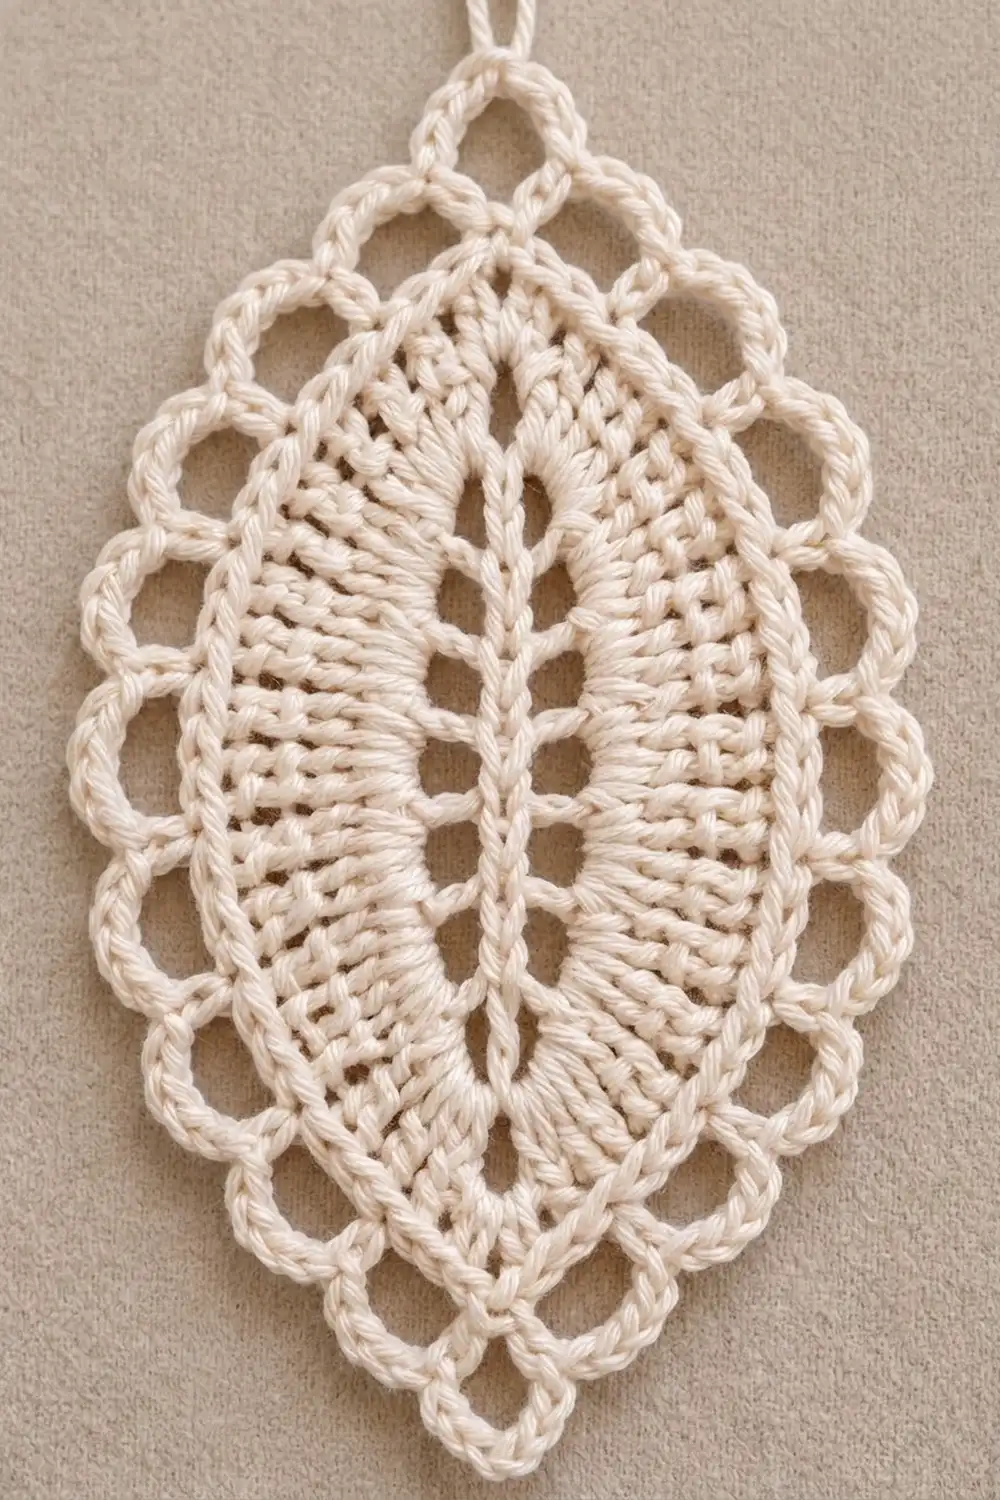
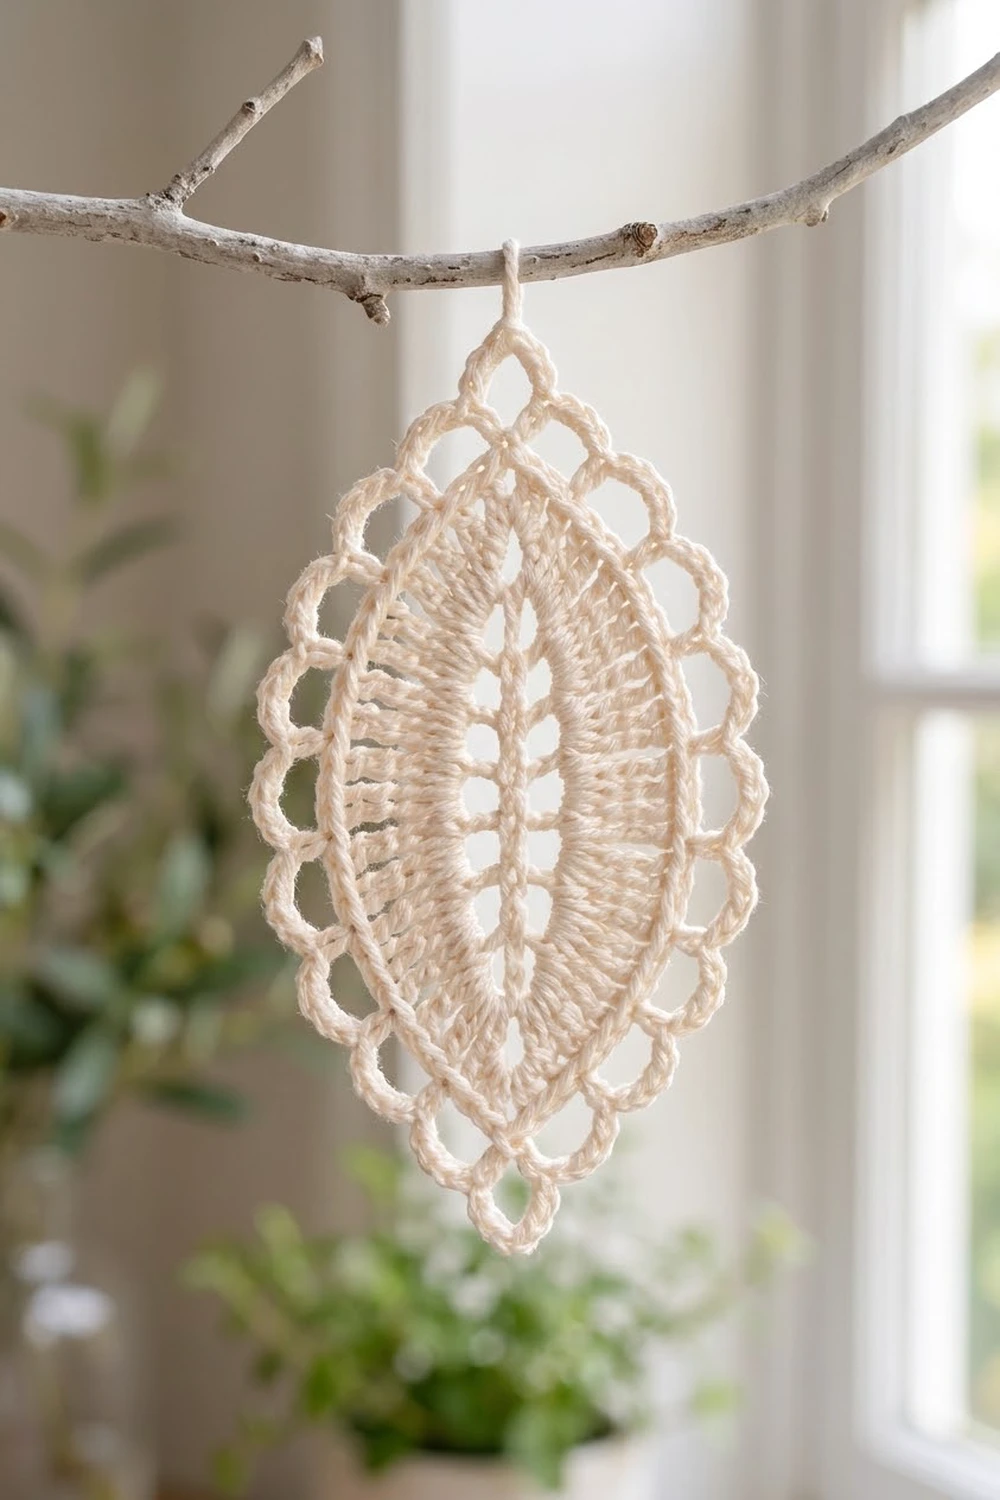
The Ivory Almond Leaf is a single lace motif shaped like a pointed oval, a bit like an almond or a leaf. A line of narrow chain windows runs down the center like a leaf vein. Ribbed rays of graduated stitches fan out from it, a smooth single crochet outline goes around them, and a scalloped edge of picot arches finishes the outside. A short chain point sits at the bottom tip and a chain hanging loop at the top.
The sample is worked in one color, a soft ivory mercerized cotton. Plain cream shows the stitch texture clearly, so the motif reads as classic heirloom lace. You can use it as an ornament, a bookmark-style charm, a gift tag, or a sachet front.
This pattern uses US crochet terms. The finished motif measures 5 in (12.7 cm) tall by 3¼ in (8.3 cm) wide, not counting the hanging loop. With the loop, it measures 5¾ in (14.6 cm) tall.
You work the whole motif in joined rounds around both sides of a short foundation chain, and you never turn your work. Rounds 1–3 build the center: the chain-window spine, then two rounds of fanned stitches. Rounds 4–5 make the border: a single crochet band, then the picot arches and both tips. There’s only one piece to make, so there’s no assembly.
Finished Size and Construction
- Finished size: 5 in (12.7 cm) tall × 3¼ in (8.3 cm) wide, excluding the hanging loop
- Skill level: Intermediate (the stitches are easy, but you need to keep careful counts)
- Terminology: US crochet terms
- Yarn weight: Fingering / super fine (#1) mercerized cotton
- Hook: 2.75 mm (US C-2)
- Number of pieces: 1 motif
- Layout: Single motif, worked in joined rounds, pointed at both ends
- Piece size: 5 in × 3¼ in (12.7 cm × 8.3 cm)
- Size before border (after Round 3): 4 in × 2¼ in (10.2 cm × 5.7 cm)
- Border depth: about ½ in (1.3 cm) on every side (Rounds 4–5 together)
Materials
Yarn: Use a smooth, mercerized fingering-weight cotton with a clear twist. Picots and ribbed rays look crisp in mercerized cotton. Fuzzy or brushed yarns blur the chain windows. A typical ball is 50 g / about 185 m.
- Ivory (main and only color): 8 g, about 30 m
One motif uses about 6 g. The amount above includes a margin for your gauge strip, for ripping back, and for weaving in ends.
Tools:
– 2.75 mm (US C-2) crochet hook
– Tapestry needle
– Scissors
– Rust-proof pins
– Blocking mat or folded towel
– Spray bottle with clean water
– Ruler or tape measure
– Two stitch markers
Abbreviations (US Terms)
- ch – chain
- sl st – slip stitch
- sc – single crochet
- hdc – half double crochet
- dc – double crochet
- tr – treble crochet
- BLO – back loop only
- sk – skip
- sp(s) – space(s)
- st(s) – stitch(es)
- beg – beginning
Special stitch – picot: Ch 3, sl st in the 3rd ch from hook (the first ch you made). This makes a small closed bump.
Gauge and Checkpoints
The motif itself is your gauge test. Make Rounds 1–2 and measure before you go any further. Lay the piece flat and don’t stretch it. Measure the length from tip to tip along the spine. Measure the width across the widest point, at the middle of each side.
- Base gauge: 8 sc = 1 in (2.5 cm) in a short test strip with the 2.75 mm hook.
- After Round 1: 2¾ in (7.0 cm) long × ½ in (1.3 cm) wide.
- After Round 2: 3¼ in (8.3 cm) long × 1¼ in (3.2 cm) wide.
- After Round 3: 4 in (10.2 cm) long × 2¼ in (5.7 cm) wide.
- After Round 4: 4¼ in (10.8 cm) long × 2½ in (6.4 cm) wide.
- After Round 5 (blocked): 5 in (12.7 cm) long × 3¼ in (8.3 cm) wide.
If you’re within ⅛ in (0.3 cm) of a checkpoint, keep going. If your piece is larger, go down to a 2.5 mm hook. If it’s smaller, go up to a 3.0 mm hook.
Check the foundation chain first. A tight chain makes the center pucker even when your other stitches are on gauge. If that happens, make the chain with a hook one size larger, then switch back.
Pattern
Foundation
Ch 16.
Round 1 – Center Spine with Chain Windows
First side: Sc in 2nd ch from hook. [Ch 2, sk next ch, dc in next ch] 6 times. Ch 2, sk next ch, sc in last ch.
Far tip: Ch 3, sc in the same last ch.
Second side: Rotate the work so you’re working along the underside of the foundation chain. [Ch 2, sk next ch, dc in next ch] 6 times. Each dc goes into the same ch as a dc on the first side, so they sit back to back. Ch 2, sk next ch, sc in the same ch as the very first sc.
Starting tip: Ch 3, sl st to the first sc to join. This starting tip becomes the bottom point of the motif.
Count: 16 sts (4 sc + 12 dc), 14 ch-2 sps (7 per side), and 2 ch-3 tip sps.
The back-to-back dc form a firm center vein, and the ch-2 spaces form 7 pairs of narrow windows. Keep your ch-2 spaces relaxed so the windows stay open.
Round 2 – First Fan Round
Sl st into the starting-tip ch-3 sp you just closed. Ch 3 (counts as dc). Work (dc, ch 2, 2 dc) in the same sp.
3 dc in each of the next 7 ch-2 sps. (2 dc, ch 2, 2 dc) in the far-tip ch-3 sp. Repeat from * to * once. Sl st to the top of the beg ch-3 to join.
Count: 50 dc (21 per side + 4 at each tip) and 2 ch-2 tip sps. Between the two tip sps, each side has 25 sts: 2 tip dc + 21 + 2 tip dc.
Place a marker in each ch-2 tip sp. The ch-2 in each tip group keeps the points sharp instead of rounding them off.
Round 3 – Ribbed Rays (Conversion Round)
This round changes stitch height along each side. Short stitches near the tips and treble crochet in the middle give the motif its almond swell. Working in BLO leaves the front loops as a fine ridge that outlines the center.
Sl st in the next dc and into the marked starting-tip ch-2 sp. Ch 3 (counts as dc). Work (dc, ch 2, 2 dc) in the same sp.
Side (worked in BLO over 25 sts): Sc in next 3 sts, hdc in next 3 sts, dc in next 3 sts. Tr in next st, 2 tr in next st, tr in next st, 2 tr in next st, tr in next st, 2 tr in next st, tr in next st. Dc in next 3 sts, hdc in next 3 sts, sc in next 3 sts.
Far tip: (2 dc, ch 2, 2 dc) in the ch-2 tip sp.
Work the side sequence once more. The last 2 sts of this side are the dc and the beg ch-3 that you slipped across at the start. Work into their back loops underneath the sl sts. Sl st to the top of the beg ch-3 to join.
Count: 64 sts = (50 sts worked 1 per existing st) + (6 increases, 3 per side) + (8 tip dc), and 2 ch-2 tip sps. Each side now has 28 worked sts. Between tip sps, each side has 32 sts: 2 + 28 + 2.
Count each side as soon as you finish it. If the height sequence is off by one, the swell moves off center.
Checkpoint: 4 in × 2¼ in (10.2 cm × 5.7 cm).
Border
The border has two rounds: a sc band that evens out the edge, then the picot arches.
Border gauge: 8 sc = 1 in (2.5 cm). Each picot arch spans 3 sc, about ⅜ in (1.0 cm) along the edge.
Round 4 – Single Crochet Band
Ch 1. Sc in the same st as the join and in the next dc. (Sc, ch 3, sc) in the ch-2 tip sp. Sc in each of the next 32 sts. (Sc, ch 3, sc) in the far-tip ch-2 sp. Sc in each of the next 30 sts. Your first 2 sc already cover the last 2 sts of this side. Sl st to the first sc to join.
Count: 68 sc and 2 ch-3 tip loops. Between the tip loops, each side has 34 sc: 1 tip sc + 32 + 1 tip sc.
Checkpoint: 4¼ in × 2½ in (10.8 cm × 6.4 cm).
Round 5 – Picot Arches and Tips
Sl st in the next 2 sc and into the starting-tip ch-3 loop.
Bottom tip: Ch 1, (sc, ch 5, sc) in the tip loop. This makes the pointed bottom.
Side: Sc in the first sc of the side, the one next to the tip loop. Ch 2, picot, ch 2, sk next 2 sc, sc in next sc. Repeat from * to * 10 more times, for 11 arches. Your last sc lands in the 34th sc, next to the far-tip loop.
Top tip: (Sc, ch 10, sc) in the far-tip ch-3 loop. This makes the hanging loop, about ¾ in (1.9 cm) long.
Second side: Work as for the first side. The final arch spans the sc you slipped across at the start of this round, so work into those sc underneath the sl sts. Sl st to the first sc to join. Fasten off.
Pull each picot’s sl st snug but not tight, so it stands upright rather than collapsing into the arch.
Count per side: 12 sc and 11 picot arches. Total: 28 sc (24 on the sides + 2 at each tip), 22 picot arches, 1 ch-5 point, and 1 ch-10 loop.
Why the Border Math Works
Each side of Round 4 has 34 sc, including both tip-adjacent sc. Round 5 starts with 1 sc in the first st. Each arch then uses 3 sts: it skips 2 and lands 1 sc. So 1 + (11 × 3) = 34, and every side ends exactly next to its tip loop with no leftover stitches. Both sides use the same count, so the scallops mirror each other.
The 11 arches at about ⅜ in (1.0 cm) each cover the roughly 4¼ in (10.8 cm) curved edge of each side.
Final Blocking
- Weave in both ends along the sc band of Round 4, not through the picots, so the ends don’t show.
- Pin the motif face up on your mat. Put one pin through the ch-5 bottom point and one through the base of the hanging loop, 5 in (12.7 cm) apart.
- Pin each side at its widest point, at the middle tr group, so the motif measures 3¼ in (8.3 cm) across.
- Check symmetry: the spine should run straight between the two tip pins, with equal width on both sides.
- Pin each picot out a little so every arch forms a round scallop. Work from the center of each side toward the tips.
- Spray until the motif is damp all the way through. Pat the center windows open with a fingertip.
- Let it dry completely, usually 4–6 hours, before you unpin it.
- Measure again. It should be 5 in × 3¼ in (12.7 cm × 8.3 cm).
Final Quality-Control Checklist
- 7 pairs of chain windows run down the center vein.
- Each side of Round 3 rises smoothly from sc to tr and back to sc.
- The BLO ridge is visible on the front all the way around the center.
- Round 4 has 34 sc per side between tip loops.
- Each side has 11 picot arches, and every picot is closed and upright.
- The bottom tip is a neat ch-5 point, and the top has a ch-10 hanging loop.
- The motif lies flat with no cupping or ruffling.
- It measures 5 in × 3¼ in (12.7 cm × 8.3 cm), give or take ⅛ in (0.3 cm).
Troubleshooting
The motif cups like a bowl: The edge is too tight. Check that you worked all 3 increases on each side in Round 3, or go up one hook size for Rounds 4–5.
The edges ruffle: You have extra stitches. Count Round 3 again (28 per side) and Round 4 again (34 per side).
The shape looks round instead of almond-shaped: Your tip stitches are too tall. Use exactly 3 sc and 3 hdc at each end of every side in Round 3.
The arches don’t end next to the tip: Your Round 4 count is off. Rework it to 34 sc per side.
The center windows are closed up: Use a looser tension on the foundation chain, and block with a bit more water.
The picots lean or flatten: Make sure your sl st goes into the 3rd ch from the hook, and pin each picot during blocking.
The hanging loop twists: Keep the ch-10 untwisted before you work the second sc into the tip loop.
The round starts look lumpy: Keep your starting sl sts loose so you can work into the stitches underneath them easily.
Care
Hand wash in cool water with mild soap, then press out the water in a towel. Lay flat and reshape (or pin) to dry.
Final Notes
Check your measurements at every stage. With 8 sc per 1 in (2.5 cm), the foundation measures 2¾ in (7.0 cm) after Round 1. The center reaches 4 in × 2¼ in (10.2 cm × 5.7 cm) after Round 3. The sc band brings it to 4¼ in × 2½ in (10.8 cm × 6.4 cm). The picot arches and blocking bring it to 5 in × 3¼ in (12.7 cm × 8.3 cm). If your piece matches each checkpoint, the finished motif will match too.
If you make more than one later, the picot arches are natural joining points. This pattern, though, is complete as a single motif.
Happy crocheting!