

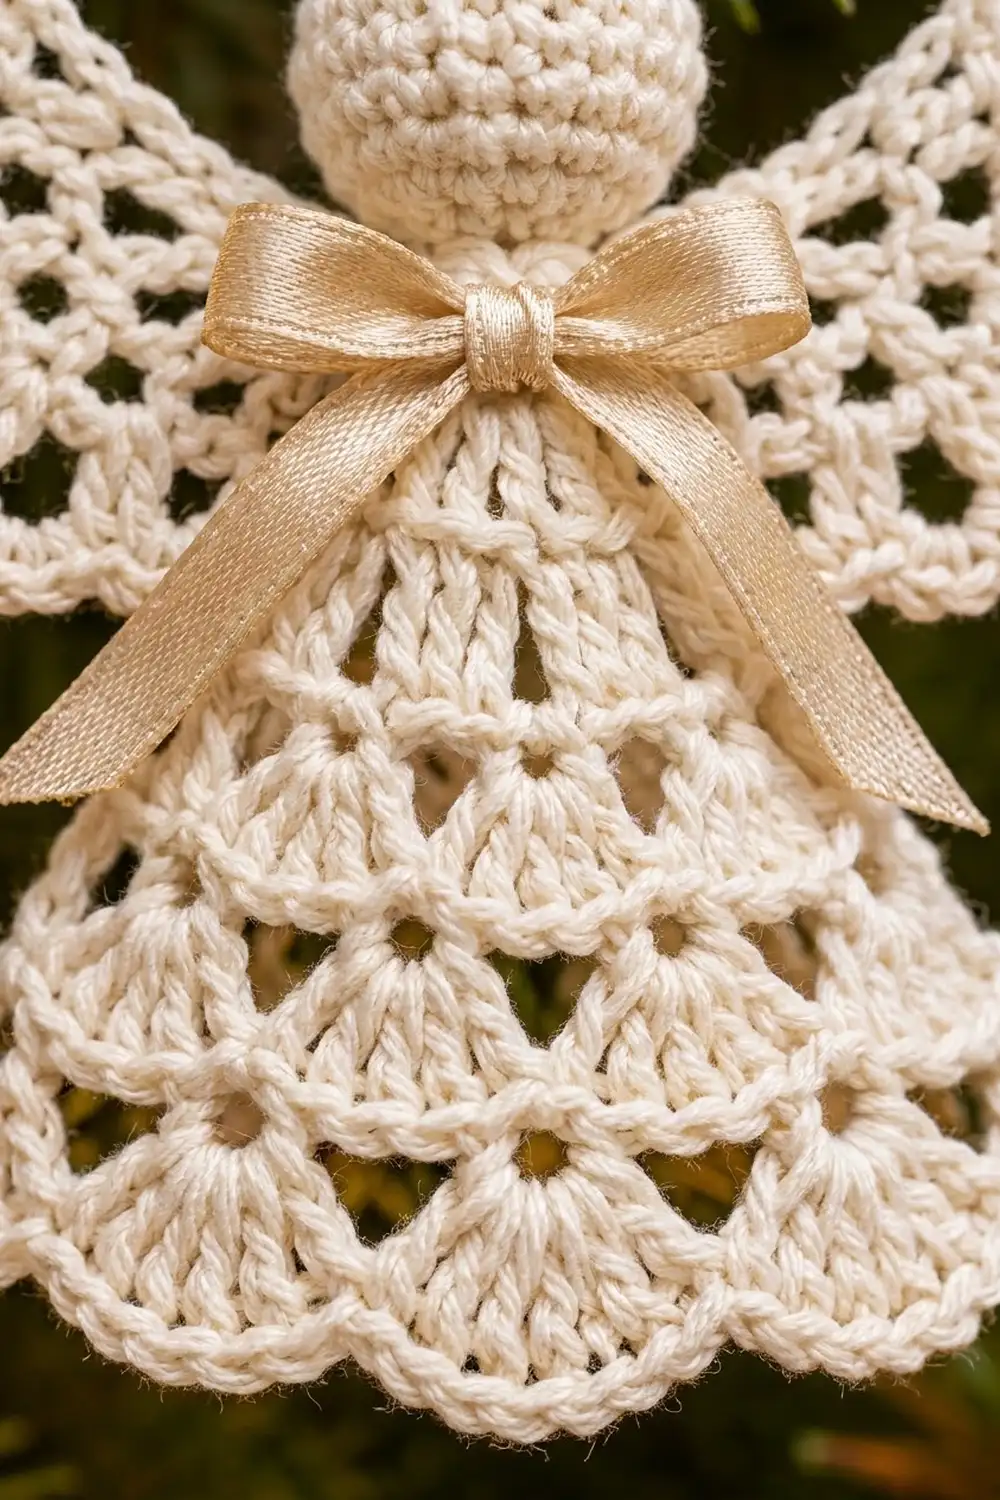
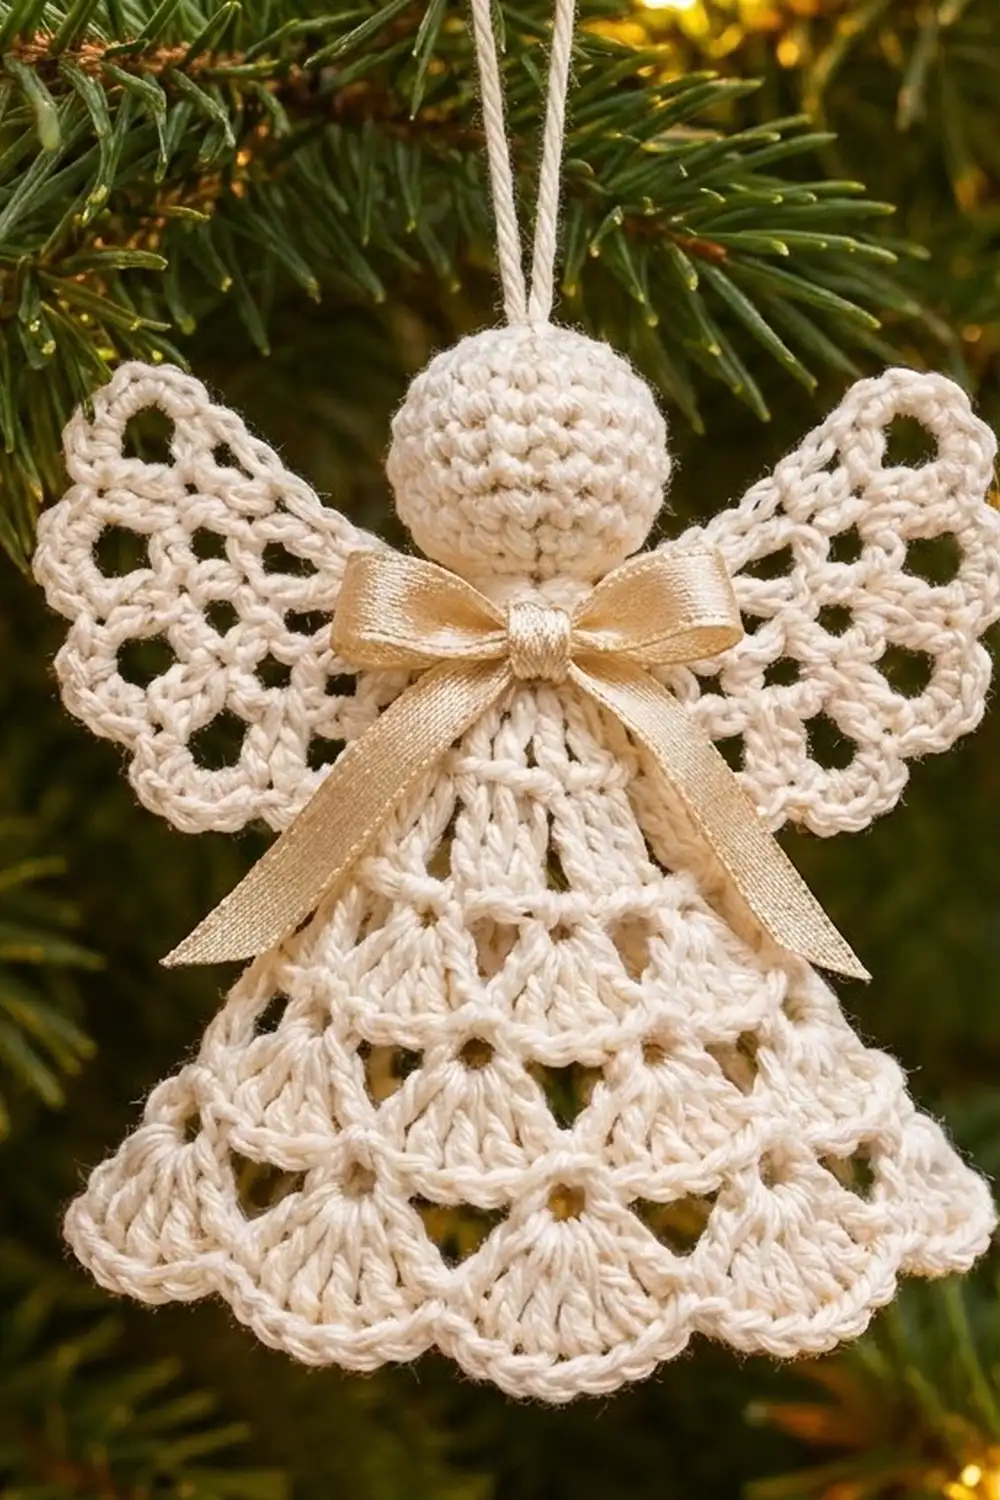
The Ivory Grace Angel is a small lace ornament for the tree. She has a firm, round head, a bell-shaped skirt made of rows of fans, and two open lace wings with scalloped edges. A champagne satin bow at the neck adds some shine against the cream thread.
The whole ornament uses one color, a soft ivory cotton crochet thread, so the stitch texture does the decorating. The look is classic and a little vintage. It suits gold baubles, white lights, or a gift package.
This pattern uses US crochet terms. The finished angel measures about 4.5 in (11.4 cm) across the wings and 3.75 in (9.5 cm) tall from the top of the head to the hem. The hanging loop is extra.
You make one ornament from four small parts: a stuffed head worked in the round, a flat skirt worked top-down in rows, and two fan-shaped wings. One round of single crochet finishes the skirt edges. Then you sew the parts together, tie on the bow, and add a hanging loop.
Finished Size and Construction
- Finished size: 4.5 in (11.4 cm) wingspan x 3.75 in (9.5 cm) tall, plus a 2.5 in (6.4 cm) hanging loop
- Skill level: Intermediate (small amigurumi plus basic lace)
- Terminology: US crochet terms
- Yarn weight: Size 3 cotton crochet thread (Lace / 0)
- Hook: 2.25 mm (US B-1)
- Number of pieces: 1 finished ornament, made from 4 parts (head, skirt, 2 wings)
- Layout: single standalone ornament, not joined to other motifs
- Skirt size before border: 3.75 in (9.5 cm) wide at the hem x 2.5 in (6.4 cm) long
- Skirt size after border: 4 in (10.2 cm) wide at the hem x 2.75 in (7.0 cm) long
- Border depth: 0.125 in (0.3 cm), one round of sc
- Head: 1 in (2.5 cm) across
- Each wing: 1.5 in (3.8 cm) wide x 1.75 in (4.4 cm) tall
Materials
Choose a mercerized cotton thread in size 3. Mercerized cotton shows each stitch clearly and holds the fan shapes well after blocking. Avoid fuzzy or very soft fibers, because the open lace will lose its outline.
- Ivory / cream size 3 cotton thread: 10 g, about 30 m (33 yd)
- Champagne satin ribbon: 3/8 in (1.0 cm) wide, 10 in (25.4 cm) long
- Polyester fiberfill: a small pinch for the head
Tools:
- 2.25 mm (US B-1) crochet hook
- Tapestry needle
- 1 locking stitch marker
- Sewing needle and matching cream thread, to sew on the bow
- Rust-proof pins and a foam blocking mat
- Optional: spray starch or fabric stiffener
The thread amount includes about 30 percent extra for a test swatch and the hanging loop. One standard ball makes several angels.
Abbreviations (US Terms)
- ch – chain
- sl st – slip stitch
- sc – single crochet
- hdc – half double crochet
- dc – double crochet
- inc – 2 sc in the same stitch
- dec – sc2tog (invisible decrease recommended)
- st(s) – stitch(es)
- sp(s) – space(s)
- RS / WS – right side / wrong side
Special stitches
- V-st: (dc, ch 2, dc) in the same stitch.
- Shell: 5 dc in the same space.
- Half shell: 3 dc in the same stitch, used at the row edges.
- Scallop: (sc, hdc, 3 dc, hdc, sc) in the same loop.
Gauge and Checkpoints
Gauge: 7 dc and 4 dc rows = 1 in (2.5 cm). In sc, 8 sts = 1 in (2.5 cm).
On a piece this small, the easiest way to check gauge is on the skirt itself. Work Rows 1–4 of the skirt first, then lay it flat and measure.
- After Row 2: 1.5 in (3.8 cm) wide
- After Row 4: 2.25 in (5.7 cm) wide at the lower edge, 1 in (2.5 cm) long
- After Row 6: 2.75 in (7.0 cm) wide, 1.5 in (3.8 cm) long
- After Row 8: 3.25 in (8.3 cm) wide, 2 in (5.1 cm) long
- After Row 10: 3.75 in (9.5 cm) wide, 2.5 in (6.4 cm) long
- Head: 1 in (2.5 cm) across after stuffing
- Wing: 1.5 in (3.8 cm) x 1.75 in (4.4 cm) after blocking
If Row 4 is more than 0.25 in (0.6 cm) too wide, change to a 2.0 mm hook. If it is more than 0.25 in (0.6 cm) too narrow, change to a 2.5 mm hook. Small differences are fine for an ornament, but keep the head tight so no stuffing shows.
Head
Work in continuous rounds without joining. Move the marker up each round.
Round 1: Make a magic ring and work 6 sc in the ring. (6 sts)
Round 2: Inc in each st around. (12 sts)
Round 3: Sc in next st, inc in next st 6 times. (18 sts)
Round 4: Sc in next 2 sts, inc in next st 6 times. (24 sts)
Rounds 5–9: Sc in each st around. (24 sts in each round)
Round 10: Sc in next 2 sts, dec 6 times. (18 sts)
Round 11: Sc in next st, dec 6 times. (12 sts)
Stuff the head firmly into a smooth ball about 1 in (2.5 cm) across.
Round 12: Dec 6 times. (6 sts)
Fasten off and leave a 12 in (30.5 cm) tail. Weave the tail through the front loops of the last 6 sts and pull it closed. Keep the tail for sewing.
Skirt
Work the skirt top-down in rows. The ch-3 at the start of each row counts as a dc throughout. Row 1 is the RS.
Row 1 (RS): Ch 9. Dc in 4th ch from hook and in each ch across. Turn. (7 dc)
Row 2: Ch 3, dc in first st, dc in next st, 2 dc in next st 3 times. Turn. (11 dc)
These two solid rows form the ribbed bodice under the bow.
Row 3: Ch 3, skip next st, V-st in next st, skip next 2 sts, V-st in next st 2 times, skip next st, dc in last st. Turn. (3 V-sts and 2 edge dc = 8 dc, 3 ch-2 sps)
The V-sts sit in sts 3, 6, and 9, so the row is exactly centered.
Row 4: Ch 3, 2 dc in first st (half shell made), ch 1, shell in ch-2 sp of next V-st 3 times, ch 1, half shell in last st. Turn. (3 shells and 2 half shells = 21 dc, 4 ch-1 sps)
Row 5: Ch 3, V-st in each ch-1 sp across, dc in last st. Turn. (4 V-sts and 2 edge dc = 10 dc, 4 ch-2 sps)
Because the V-sts go into the gaps between shells, each row of fans shifts over by half a fan. This also creates the triangular openings.
Row 6: Ch 3, 2 dc in first st, ch 1, shell in ch-2 sp of next V-st 4 times, ch 1, half shell in last st. Turn. (4 shells and 2 half shells = 26 dc, 5 ch-1 sps)
Row 7: Ch 3, V-st in each ch-1 sp across, dc in last st. Turn. (5 V-sts and 2 edge dc = 12 dc, 5 ch-2 sps)
Row 8: Ch 3, 2 dc in first st, ch 1, shell in ch-2 sp of next V-st 5 times, ch 1, half shell in last st. Turn. (5 shells and 2 half shells = 31 dc, 6 ch-1 sps)
Row 9: Ch 3, V-st in each ch-1 sp across, dc in last st. Turn. (6 V-sts and 2 edge dc = 14 dc, 6 ch-2 sps)
Row 10: Ch 3, 2 dc in first st, ch 1, shell in ch-2 sp of next V-st 6 times, ch 1, half shell in last st. Do not fasten off. (6 shells and 2 half shells = 36 dc, 7 ch-1 sps)
Each shell row has exactly one more shell than the shell row before it: 3, 4, 5, then 6. That steady growth gives the skirt its even bell shape. Check that the hem is 3.75 in (9.5 cm) wide now.
Wings (Make 2)
Each wing is a small fan worked in rows from a ring.
Foundation: Ch 6, sl st in first ch to form a ring.
Row 1 (RS): Ch 3, 9 dc in ring. Turn. (10 dc, forming a half circle)
Row 2: Ch 5 (counts as dc and ch 2), dc in next st, ch 2, dc in next st across. Turn. (10 dc, 9 ch-2 sps)
Row 3: Ch 1, sc in first dc, ch 4, sc in next dc 9 times, working the last sc in the 3rd ch of the turning ch-5. Turn. (10 sc, 9 ch-4 loops)
These chain loops make the large open “windows” in the wing.
Row 4: Ch 1, scallop in each ch-4 loop across. (9 scallops, 63 sts)
Fasten off and leave an 8 in (20.3 cm) tail for sewing. The straight edge along the ring and row ends is the edge you sew to the body.
Border
The border is one round of sc around the whole skirt. It firms up the slanted sides, sharpens the scallops, and gives a clean edge for attaching the head.
Border gauge: 8 sc = 1 in (2.5 cm). One dc row is 0.25 in (0.6 cm) tall, so working 2 sc into each dc row-end matches the sc gauge exactly.
Border Round (RS): With the loop still on your hook from Row 10, ch 1 and turn the skirt to work down the first side.
- Side 1: Work 2 sc in each of the 10 row-ends. (20 sc)
- Hem: 2 sc in the first dc of Row 10 (corner), sc in each dc across, skip every ch-1 sp, and work 2 sc in the last dc (corner). (36 sts worked once + 2 extra corner sts = 38 sc)
- Side 2: Work 2 sc in each of the 10 row-ends. (20 sc)
- Neck: Sc in each of the 7 foundation ch loops. (7 sc)
Sl st to the first sc. (20 + 38 + 20 + 7 = 85 sc)
Fasten off and weave in the end.
Why the math works: Each side is 10 rows at 0.25 in (0.6 cm), so 2.5 in (6.4 cm) long. Twenty sc at 8 sc per inch also equals 2.5 in (6.4 cm), so the sides lie flat without ruffling or pulling in. On the hem, skipping the ch-1 sps keeps the dips between fans sharp. The 2 extra corner sts let the border turn the corner without cupping. The neck gets one sc per foundation chain, so its 1 in (2.5 cm) width does not change. The border adds 0.125 in (0.3 cm) on every edge. This brings the hem to 4 in (10.2 cm) and the skirt length to 2.75 in (7.0 cm).
Assembly
- Head: Center the closed bottom of the head on the neck edge, with the RS of the skirt facing you. Use the head tail to whipstitch the 7 neck sc to the lower rounds of the head, sewing across both the front and the back. Keep the stitches small so the head sits upright.
- Wings: Place the wings on the back of the skirt with their RS facing out. Angle each wing so its straight edge lies along the bodice, about 0.5 in (1.3 cm) below the neck, with the scalloped edge pointing up and out. The wing ends should overlap at center back by about 0.375 in (1.0 cm). Sew through the back layer only so no stitches show on the front.
- Bow: Tie the ribbon into a bow with loops about 0.75 in (1.9 cm) wide. Cut the tails at an angle to about 1.5 in (3.8 cm) long. Use sewing thread to stitch the knot to the center of the neck.
- Hanging loop: Cut a 6 in (15.2 cm) length of thread. Pass it through the top of the head, knot the ends, and hide the knot inside the head. The loop should hang about 2.5 in (6.4 cm) above the head.
Final Blocking
- Before adding the bow, soak the skirt and wings in cool water for a few minutes.
- Roll them in a towel and press out the extra water.
- Pin the skirt flat, with straight sides and the hem pinned to 4 in (10.2 cm) wide.
- Pin each hem scallop and each wing scallop into a gentle point.
- If any wing loops look closed up, put a pin in each opening to hold it open.
- For a crisper finish, mist with spray starch or brush on diluted fabric stiffener.
- Let everything dry completely, for at least 8 hours.
- Unpin, then finish the assembly and bow.
The head does not need blocking. Keep it dry so the stuffing stays firm.
Final Quality-Control Checklist
- The head is round, firm, and about 1 in (2.5 cm) across
- The skirt has 4 rows of fans with 3, 4, 5, and 6 full shells
- The border has 85 sc, with 20 sc on each side
- The hem measures 4 in (10.2 cm) and the sides lie flat
- Both wings have 9 scallops and are the same size
- From the front, only the scalloped tips of the wings show
- The bow is centered and sewn on securely
- All ends are woven in, and the ornament hangs upright from the loop
Troubleshooting
The skirt curls at the sides. The border is too tight. Redo it with looser tension, or use a 2.5 mm hook for that round only.
The hem ruffles. Check that you skipped the ch-1 sps on the hem. Extra sts there add length and make the fans wave.
The fans lean to one side. Make sure each V-st goes into a ch-1 sp, not into a dc. Recount: each V-st row should have one more V-st than the shell row below it.
Stuffing shows through the head. Use a hook one size smaller for the head only, and use the invisible decrease.
The wings flop forward. Starch the wings, and add a second line of stitches higher up on the back of the bodice.
The ornament tilts when hanging. Move the hanging loop so it passes exactly through the top center of the head.
Care
Spot clean with cool water and mild soap, then reshape and dry flat. If you used starch, add more after washing.
Final Notes
The measurements build in a simple chain. The head is 1 in (2.5 cm) across. The skirt grows from 1 in (2.5 cm) at the neck to 3.75 in (9.5 cm) at Row 10, with one more shell in each row of fans. The 85-sc border adds 0.125 in (0.3 cm) on each edge, giving a 4 in (10.2 cm) hem and a 2.75 in (7.0 cm) skirt. With the head added, the angel is 3.75 in (9.5 cm) tall, and the wings span 4.5 in (11.4 cm).
Make one for your own tree, then make a few more to put on top of gifts.
Happy crocheting!