

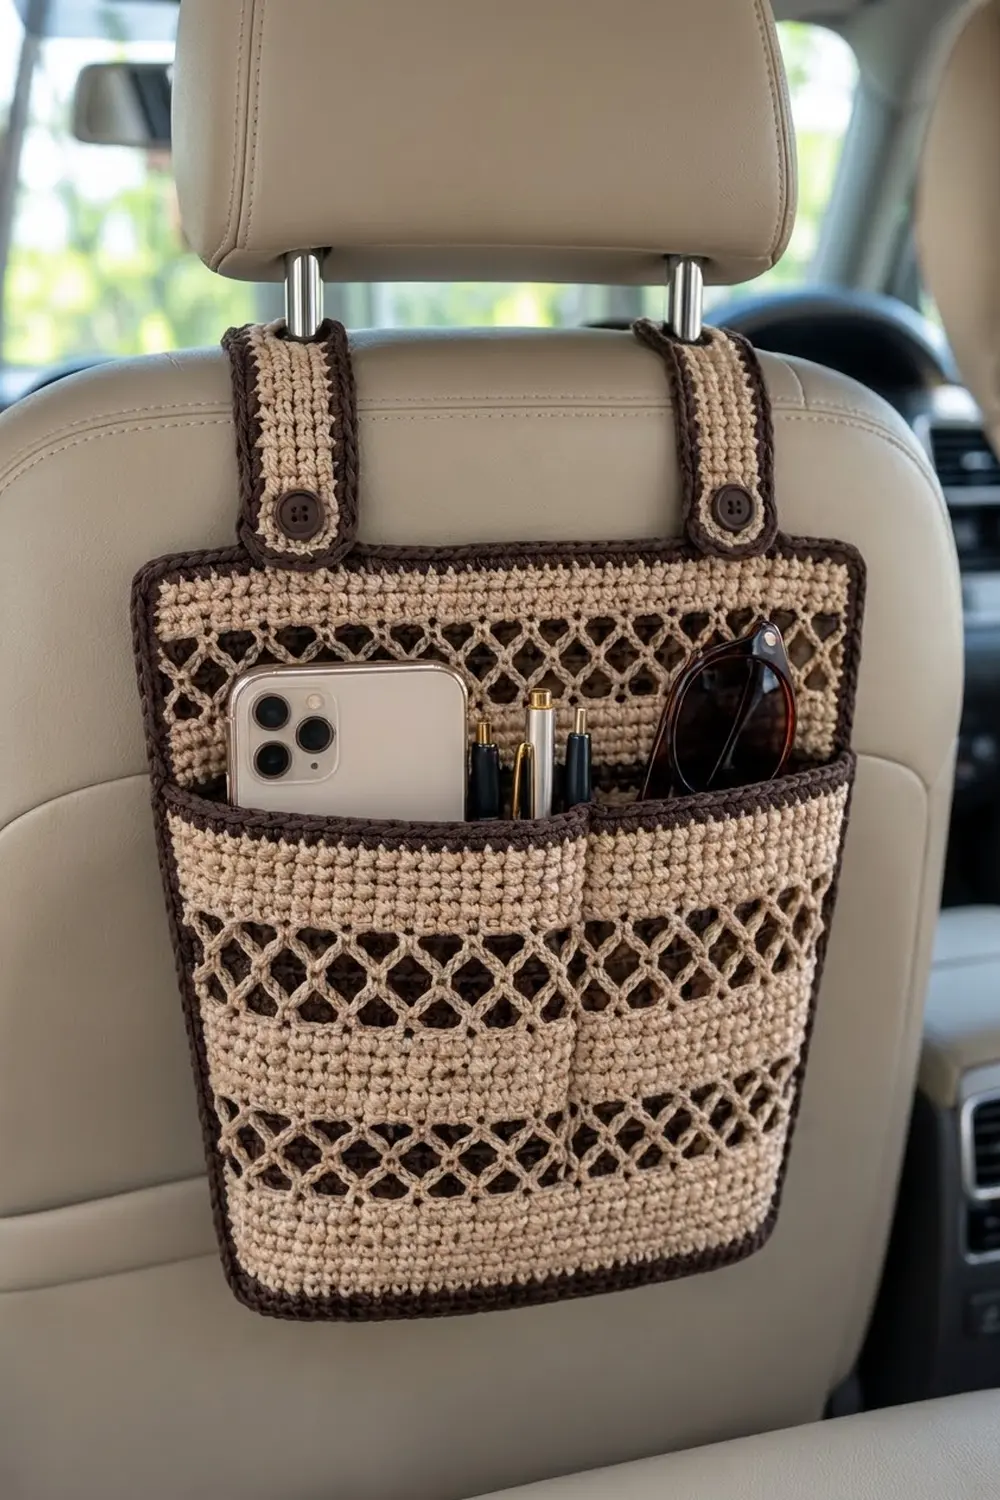
This back-seat car organizer has a beige body, dark brown trim, and bands of open diamond lattice where the brown lining shows through. It hangs from the headrest posts on two buttoned straps. A full-width pocket is stitched into a wide section and a narrow section, so a phone fits on one side and pens and sunglasses on the other.
The colors are oatmeal beige and espresso brown. Solid single crochet bands alternate with lattice bands, and a rounded reverse single crochet edge frames the panel for a clean, tailored look.
This pattern uses US crochet terms. The back panel measures 13.25 in wide x 12.25 in tall (33.7 x 31.1 cm), not counting the straps. The pocket measures 12.75 x 8.75 in (32.4 x 22.2 cm).
You work the back panel and the pocket flat from the bottom up. At the top, each piece switches to brown and keeps going to form its own lining, which folds down behind the beige fabric. The border joins the back panel to its lining. Then you sew on the edged pocket, stitch the divider, and attach the straps.
Finished Size and Construction
- Finished size: 13.25 x 12.25 in (33.7 x 31.1 cm); the straps add about 9 in (22.9 cm)
- Skill level: Intermediate
- Terminology: US
- Yarn weight: Worsted (#4) cotton or cotton blend
- Hook: 4.5 mm (US 7)
- Number of pieces: 4 (back panel with lining, pocket with lining, 2 straps)
- Layout: The pocket is sewn over the lower part of the back panel, and the straps are sewn behind the top edge.
- Piece sizes: Pocket 12.75 x 8.75 in (32.4 x 22.2 cm); each strap 2.25 x 10.5 in (5.7 x 26.7 cm)
- Back panel before border: 12.25 x 11.25 in (31.1 x 28.6 cm)
- Border depth: 0.5 in (1.3 cm) on each side
Materials
Use a firm, matte cotton or cotton-linen blend. It holds its shape in a warm car and shows the lattice clearly. Acrylic stretches more once the pocket is loaded.
- Color A, oatmeal beige: 180 g (about 340 m)
- Color B, espresso brown: 200 g (about 380 m)
These amounts assume about 190 m per 100 g. They include a margin of about 15%.
Tools:
– 4.5 mm (US 7) hook
– 2 dark brown buttons, 3/4 in (1.9 cm)
– Tapestry needle
– Locking stitch markers
– Tape measure
– Pins and a blocking surface
Abbreviations (US Terms)
- ch – chain
- sc – single crochet
- dc – double crochet
- sk – skip
- sp(s) – space(s)
- st(s) – stitch(es)
- BLO – back loop only
- rev sc – reverse single crochet
- RS / WS – right side / wrong side
Special stitch – Reverse single crochet (crab stitch): Work from left to right. Insert the hook into the next stitch to the right, yarn over, pull up a loop, then yarn over and pull through both loops. This makes the rounded, corded edge.
Turning chains: A ch 1 at the start of a row never counts as a stitch. The ch 4 in the lattice rows counts as dc + ch 1.
Gauge and Checkpoints
Gauge: 16 sc and 16 rows = 4 in (10.2 cm). That works out to 4 sts and 4 rows per inch.
Lattice gauge: One 6-row lattice band = 1.75 in (4.4 cm) tall.
Test one piece first. Make one strap before anything else. Before its edging, it should measure 1.75 x 10 in (4.4 x 25.4 cm). To check the lattice, ch 18 and work 6 rows of sc, then one lattice band. The swatch should be 4.25 in (10.8 cm) wide, and the band should be 1.75 in (4.4 cm) tall.
Checkpoints:
– Back panel after Row 6: 12.25 x 1.5 in (31.1 x 3.8 cm)
– Back panel after Row 42: 12.25 x 11.25 in (31.1 x 28.6 cm)
– Pocket after Row 32: 12.25 x 8.5 in (31.1 x 21.6 cm)
If your piece is too big, go down 0.5 mm in hook size. If it is too small, go up 0.5 mm. If only the lattice band height is off, use ch-4 loops when it’s short or ch-2 loops when it’s tall. Keep all stitch counts the same either way.
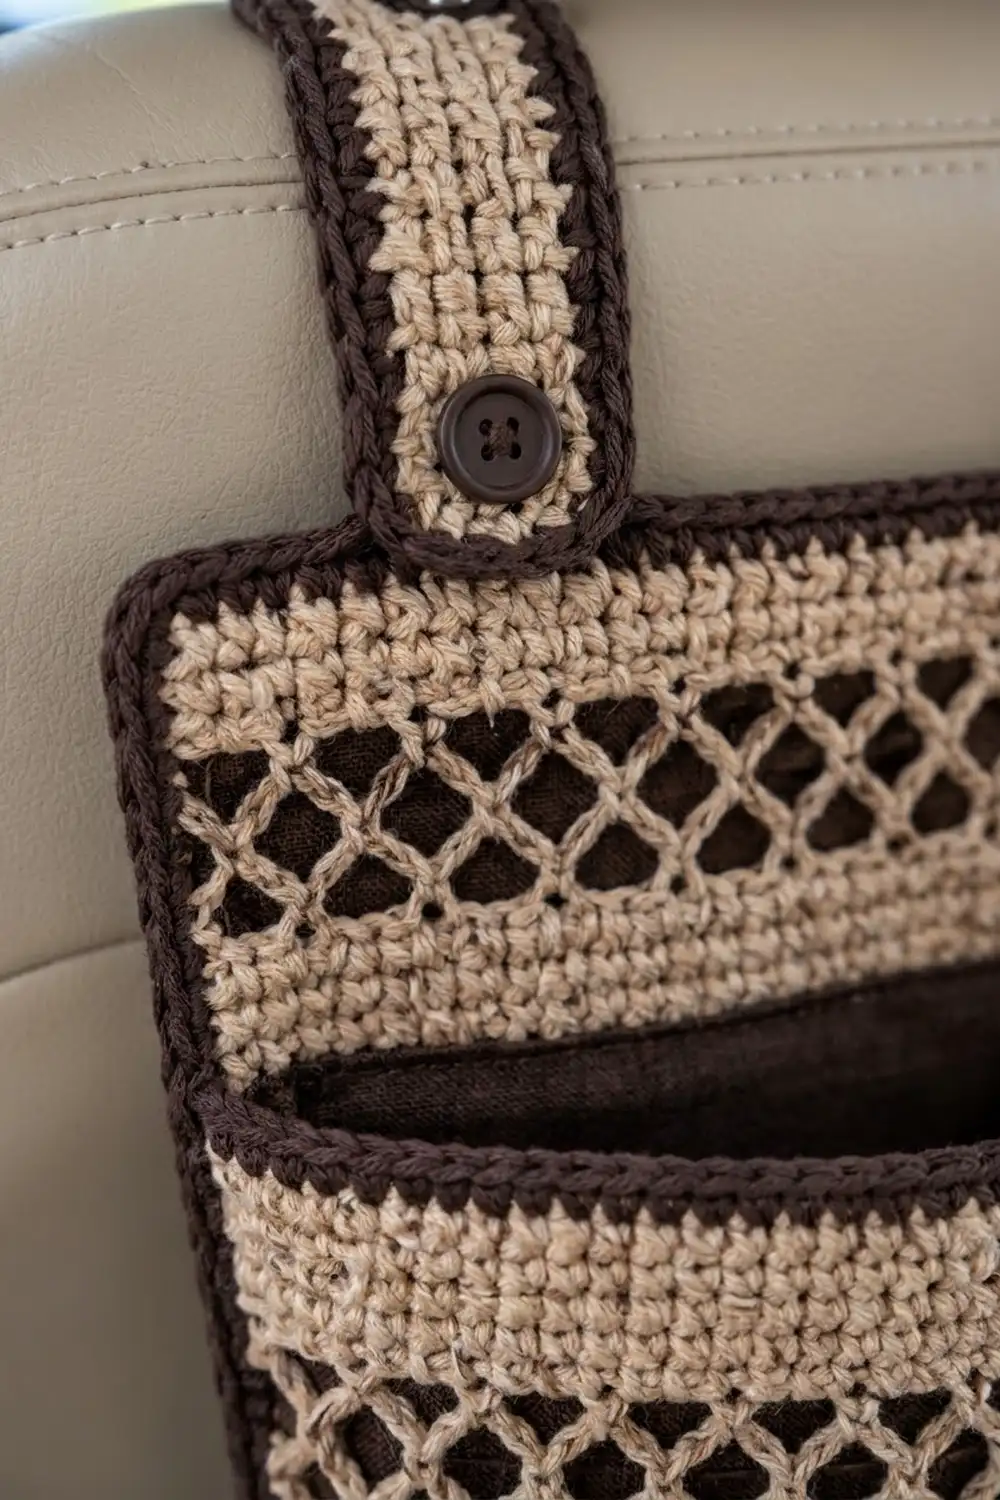
Lattice Band (Over 49 Stitches)
L1: Ch 1, sc in first st, *ch 3, sk 3, sc in next st; repeat from * 12 times. Turn. (13 sc, 12 ch-3 sps)
L2: Ch 4 (counts as dc + ch 1), sc in first ch-3 sp, *ch 3, sc in next ch-3 sp; repeat from * 11 times, ch 1, dc in last sc. Turn. (12 sc, 11 ch-3 sps, 2 dc)
L3: Ch 1, sc in first dc, *ch 3, sc in next ch-3 sp; repeat from * 11 times, ch 3, sc in 3rd ch of turning ch. Turn. (13 sc, 12 ch-3 sps)
L4: Repeat L2.
L5: Repeat L3.
L6 (conversion row): Ch 1, sc in first sc, *3 sc in next ch-3 sp, sc in next sc; repeat from * 12 times. Turn. (13 sc worked into the existing sc + 36 sc added in the spaces = 49 sc)
The ch-3 loops open into two rows of diamonds. L6 closes the band back to a solid edge.
Back Panel
With Color A, ch 50.
Row 1 (RS): Sc in 2nd ch from hook and in each ch across. Turn. (49 sc)
Rows 2–6: Ch 1, sc in each st across. Turn. (49 sc)
Rows 7–12: Lattice band. (49 sc)
Rows 13–18: Solid sc. (49 sc)
Rows 19–24: Lattice band. (49 sc)
Rows 25–30: Solid sc. (49 sc)
Rows 31–36: Lattice band. (49 sc)
Rows 37–42: Solid sc. (49 sc)
Checkpoint: 12.25 x 11.25 in (31.1 x 28.6 cm), with 4 solid bands and 3 lattice bands.
Lining: Change to Color B.
Row 43 (fold row): Ch 1, sc in BLO of each st across. Turn. (49 sc) This leaves 49 free front loops along the top of Row 42.
Rows 44–87: Ch 1, sc in each st across. Turn. (49 sc)
The lining is 45 rows, or 11.25 in (28.6 cm), long. Fold it behind the body, WS to WS, so that Row 87 lines up with the foundation chain. Pin the edges together and keep the loop live.
Front Pocket
With Color A, ch 50.
Rows 1–6: Solid sc, as in Back Panel Rows 1–6. (49 sc)
Rows 7–12: Lattice band. (49 sc)
Rows 13–18: Solid sc. (49 sc)
Rows 19–24: Lattice band. (49 sc)
Rows 25–30: Solid sc. (49 sc)
Rows 31–32: Change to Color B. Ch 1, sc in each st across. Turn. (49 sc) These 2 rows form the brown rim.
Checkpoint: 12.25 x 8.5 in (31.1 x 21.6 cm).
Row 33 (fold row): Ch 1, sc in BLO of each st across. Turn. (49 sc)
Rows 34–66: Ch 1, sc in each st across. Turn. (49 sc)
The lining is 34 rows, or 8.5 in (21.6 cm), long. Fold it behind the pocket body.
Pocket edging (Color B, through both layers):
1. Down the first side, work 34 sc into the pocket and lining row-ends together. The pocket has 32 row-ends, so add 1 extra sc into the dc row-end of the first L2 in each lattice band (32 + 2 = 34).
2. Work 3 sc in the first foundation st, sc in the next 47 sts, and 3 sc in the last foundation st.
3. Work 34 sc up the second side. Fasten off.
Count: 34 + 3 + 47 + 3 + 34 = 121 sc. The pocket now measures 12.75 x 8.75 in (32.4 x 22.2 cm).
Straps (Make 2)
With Color A, ch 8.
Row 1: Sc in 2nd ch from hook and in each ch across. Turn. (7 sc)
Rows 2–35: Ch 1, sc in each st across. Turn. (7 sc)
Row 36 (buttonhole): Ch 1, sc in next 2 sts, ch 3, sk 3, sc in last 2 sts. Turn. (4 sc, 1 ch-3 sp)
Row 37: Ch 1, sc in next 2 sts, 3 sc in ch-3 sp, sc in last 2 sts. Turn. (4 sc worked into sts + 3 sc in the space = 7 sc)
Rows 38–40: Ch 1, sc in each st across. Turn. (7 sc)
Checkpoint: 1.75 x 10 in (4.4 x 25.4 cm).
Edging: With Color B, work 1 round of sc around the strap. Work 7 sc along each short end and 40 sc along each long side (1 per row-end), with ch 1 at each corner. Join and fasten off. (94 sc + 4 corner ch-1 sps) Each strap now measures 2.25 x 10.5 in (5.7 x 26.7 cm).
Make All Pieces
- Color A: back panel body, pocket body (Rows 1–30), 2 straps
- Color B: both linings, pocket rim, all edgings and the border
   [STRAP]                 [STRAP]
 +-----------------------------------+
 |  solid band                       |
 |  lattice band                     |
 | +--------------------+----------+ |
 | | brown rim          | rim      | |
 | | wide pocket        | narrow   | |
 | | 7.5 in (19.1 cm)   | 5.25 in  | |
 | |                    | (13.3 cm)| |
 | +--------------------+----------+ |
 +-----------------------------------+
Joining
Method: Finish the back panel border first (see Border below). Then whipstitch the pocket on with Color B.
Stitch-to-stitch logic: Lay the pocket edging over Border Round 1 so the rev sc round still shows outside it. Along the bottom, the pocket’s 3 + 47 + 3 sts match Round 1’s 3 + 47 + 3 sts one to one. On each side, the pocket’s 34 sts match the lowest 34 of Round 1’s 45 side sts, counting up from the corner group. Whipstitch through the outer loop of each pocket edging st and the matching Round 1 st.
Divider: Find the line 7.5 in (19.1 cm) from the pocket’s left edge, between the 29th and 30th body stitch columns. Backstitch along it from the rim down to the bottom edging, going through every layer. The narrow section on the right is 5.25 in (13.3 cm) wide.
Tension: Make the seams snug but not tight. Tight seams make the pocket cup and gap at the top.
Straps: Center each strap 2.5 in (6.4 cm) from a side edge, so the two strap centers are 8.25 in (21.0 cm) apart. Overlap the foundation end 1.5 in (3.8 cm), or 6 rows, onto the lining at the top edge. Sew it down with two lines of backstitch. Then sew a button onto the RS of each strap, 1 in (2.5 cm) above the top edge of the panel. Loop the free end over the headrest post and down the front, and button it.
Size checkpoint: The top of the pocket sits 3.25 in (8.3 cm) below the top of the panel.
Border (Back Panel)
Border gauge: Each round adds 0.25 in (0.6 cm), so the two rounds add 0.5 in (1.3 cm) per side. The sides are worked at 4 sc per inch.
Round 1 (Color B, through both layers):
1. Top: Sc into the 49 free front loops of Row 42, working 3 sc into the first and last loops.
2. Sides: Down each side, work 45 sc through the body and lining row-ends together. The lining’s 45 row-ends match one to one. The body has 42 row-ends, so add 1 extra sc into the dc row-end of the first L2 in each of the 3 lattice bands (42 + 3 = 45).
3. Bottom: Work through the foundation ch and Row 87 together: 3 sc in the first st, sc in the next 47 sts, and 3 sc in the last st.
4. Join with a sl st.
Counts per side (corner sc to corner sc, inclusive): top 51, bottom 51, each side 49. Total: 47 + 47 + 45 + 45 + (4 x 3) = 196 sc.
Round 2: Ch 1, rev sc in each st around. Join and fasten off. (196 rev sc)
Why the math works: The body is 49 sts wide, which is 12.25 in (31.1 cm). Each side has 45 sc, which is 11.25 in (28.6 cm). Adding 0.5 in (1.3 cm) of border all around gives 13.25 x 12.25 in (33.7 x 31.1 cm). Round 2 has no increases, so the corners soften into curves.
Final Blocking
- Weave in all the ends between the layers.
- Mist the organizer lightly, or hover steam over it.
- Pin it flat to 13.25 x 12.25 in (33.7 x 31.1 cm).
- Open up each diamond so it looks even.
- Pin the pocket rim straight and level.
- Pin each strap to 2.25 x 10.5 in (5.7 x 26.7 cm).
- Let everything dry completely before you unpin it.
Final Quality-Control Checklist
- The panel is 13.25 x 12.25 in (33.7 x 31.1 cm).
- The pocket is 12.75 x 8.75 in (32.4 x 22.2 cm), and its rim is level.
- The lattice bands run horizontally.
- The divider sits 7.5 in (19.1 cm) from the left edge.
- Brown lining shows evenly through every diamond.
- Each strap is centered 2.5 in (6.4 cm) from its side edge.
- The buttons fit snugly through the buttonholes.
- No ends show on the RS.
Troubleshooting
- Lattice is narrower than the solid bands: Your ch-3 loops are too tight. Chain more loosely.
- Lining is longer than the body: Remove lining rows until they match. Don’t stretch the body to fit.
- Border ruffles: Recount the sides. Each one should have 45 sc.
- Border pulls in: Spread the extra sts out evenly along the side.
- Pocket sags: Tighten the divider and side seams.
- Button slips out: Use a slightly larger button.
Care
Hand wash in cool water and press out the water gently. Dry the organizer flat in its blocked shape, and don’t hang it while it’s wet.
Final Notes
The measurements build on each other. A gauge of 4 sts and 4 rows per inch, plus 1.75 in (4.4 cm) lattice bands, gives a 12.25 x 11.25 in (31.1 x 28.6 cm) body. The 0.5 in (1.3 cm) border brings it to 13.25 x 12.25 in (33.7 x 31.1 cm). The 12.75 x 8.75 in (32.4 x 22.2 cm) pocket then fits exactly over Border Round 1. Check your measurements at each stage, and the pieces will line up.
Happy crocheting!