

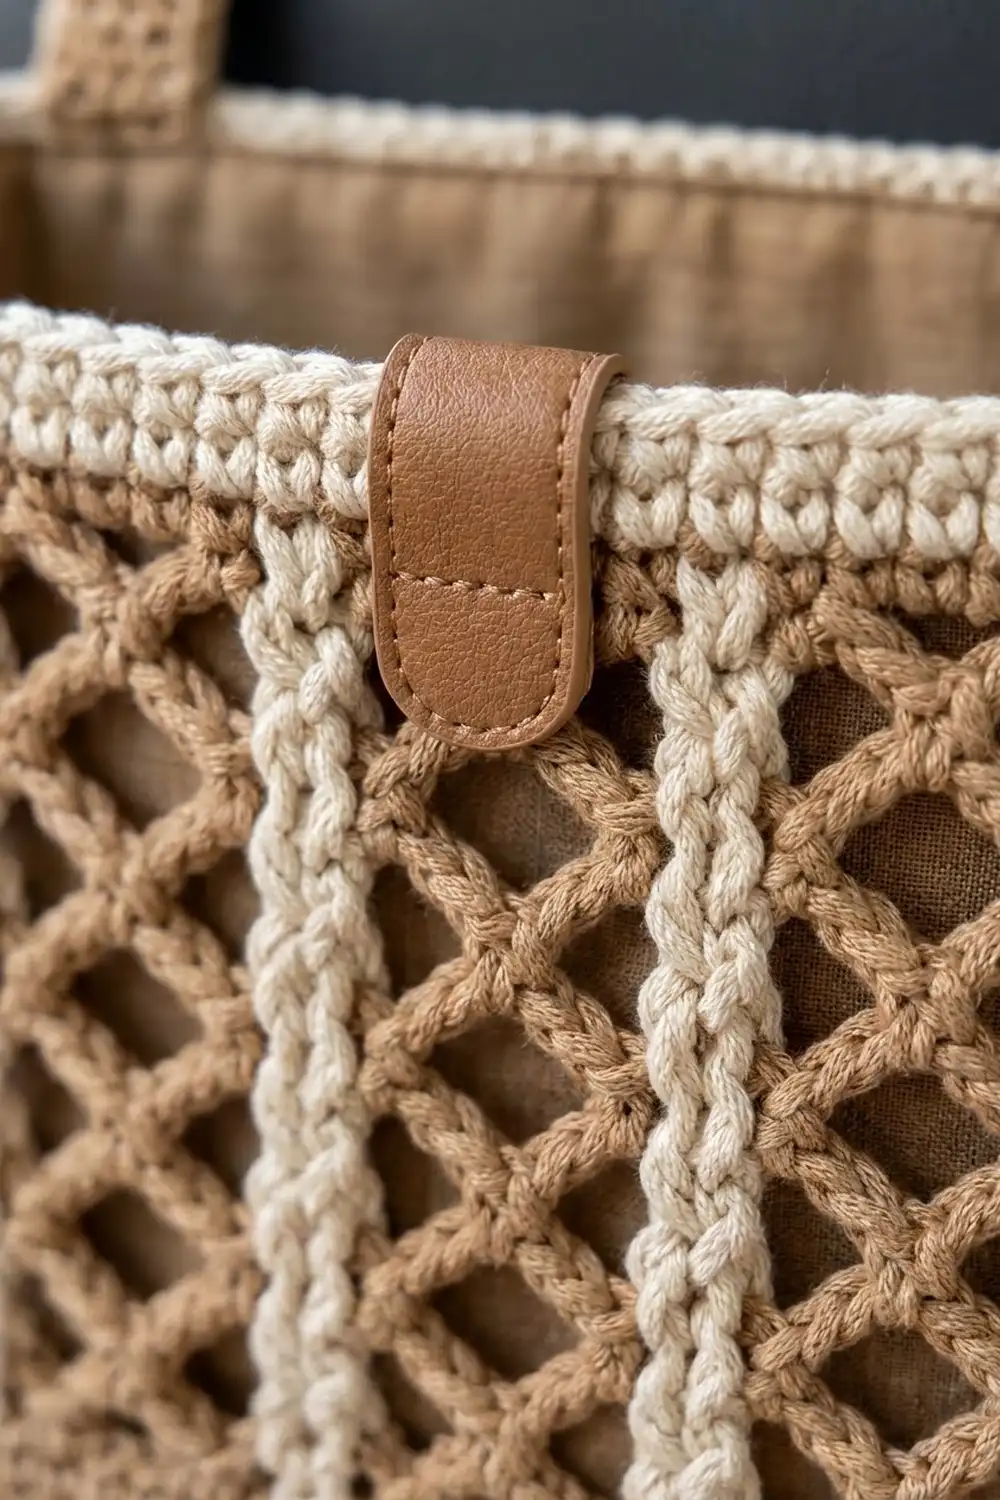
The Lattice Lane Car Seat Organizer is an oval crochet basket that hangs from the headrest posts on the back of a car seat. Its walls are an open diamond lattice in warm camel tan. Raised cream stripes divide the lattice and run from the solid bottom band up to the cream rim. A faux leather tab at center front gives it a tailored finish.
Camel tan is used for the base, bottom band, lattice and straps. Cream is used for the rim and the vertical stripes. A plain fabric lining keeps tissues, phone cases and sunglasses from slipping through the mesh. The look is clean and modern, like a small woven market basket.
This pattern uses US crochet terms. The finished basket measures about 11.5 in (29.2 cm) wide, 4 in (10.2 cm) deep and 7 in (17.8 cm) tall, not counting the straps. Each strap is 1.5 in (3.8 cm) wide and 8 in (20.3 cm) long.
You start with a flat oval base in single crochet. A back-loop round turns the walls up, then a solid band leads into the lattice. A conversion round brings the stitch count back to solid stitches. After that you add cream surface-slip-stitch stripes, work the cream rim, and finish with the straps, lining and tab.
Finished Size and Construction
- Finished size: 11.5 in (29.2 cm) wide x 4 in (10.2 cm) deep x 7 in (17.8 cm) tall
- Rim circumference: 28 in (71.1 cm), 112 stitches
- Skill level: Intermediate
- Terminology: US crochet terms
- Yarn weight: Worsted weight (#4) cotton
- Hook: 5 mm (US H-8)
- Number of pieces: 1 basket body worked in one piece, plus 2 straps, fabric lining and leather tab
- Layout: Oval basket with 14 lattice repeats around; straps sewn inside the back rim
- Base size: 11.5 in x 4 in (29.2 cm x 10.2 cm) after Base Rnd 9
- Size before rim: 6 in (15.2 cm) tall after Side Rnd 16
- Rim depth: 0.9 in (2.3 cm), 4 cream rounds
Materials
Choose a smooth, firm worsted weight cotton or cotton blend. Cotton holds the basket’s shape and keeps the lattice crisp. Very soft or fuzzy yarns make the mesh floppy and blur the diamonds.
- Color A, camel tan: 100 g, about 190 m
- Color B, cream: 50 g, about 95 m
These amounts include extra yarn for a test swatch and small differences in tension.
Tools and notions:
- 5 mm (US H-8) crochet hook
- Locking stitch markers (at least 4)
- Tapestry needle, scissors, measuring tape
- 2 sew-on snaps, about 0.5 in (1.3 cm)
- Faux leather strip, 1.25 in x 3 in (3.2 cm x 7.6 cm)
- Cotton or linen lining fabric (cutting sizes are under Assembly)
- Sewing needle and matching thread
Abbreviations (US Terms)
- ch – chain
- sc – single crochet
- dc – double crochet
- sl st – slip stitch
- sk – skip
- sp(s) – space(s)
- st(s) – stitch(es)
- BLO – back loop only
- rep – repeat
- Rnd – round
Surface slip stitch: Hold the yarn behind the work. Insert the hook from front to back through the fabric, yarn over, then pull a loop through to the front and through the loop on the hook. The stitches sit on top of the fabric like a raised chain.
Gauge and Checkpoints
Gauge: 16 sc x 18 rows = 4 in (10.2 cm) with a 5 mm hook.
Lattice gauge: One 8-stitch repeat = 2 in (5.1 cm) wide. One lattice round = about 0.44 in (1.1 cm) tall.
The base is your test piece. Work Base Rnds 1–5, then measure before you continue.
Checkpoints:
- After Base Rnd 5: about 2.2 in (5.6 cm) across the short width.
- After Base Rnd 9: 11.5 in x 4 in (29.2 cm x 10.2 cm).
- After Side Rnd 4: walls 0.9 in (2.3 cm) tall.
- After Side Rnd 15: walls about 5.8 in (14.7 cm) tall.
- After Side Rnd 16: walls 6 in (15.2 cm) tall.
- After Side Rnd 20: walls 7 in (17.8 cm) tall.
If the base is too big, go down half a hook size and start again. If it is too small, go up half a hook size. A difference of 0.25 in (0.6 cm) is fine. More than that changes the rim circumference and the lining fit. The base must lie flat.
Base
Use Color A.
Foundation: Ch 32.
Base Rnd 1: 3 sc in 2nd ch from hook (end A), sc in next 29 ch, 3 sc in last ch (end B). Rotate and work along the underside of the chain: sc in next 29 ch. Join with sl st to first sc. (64 sts: 3 + 29 + 3 + 29)
From here on, start each round with ch 1 (it does not count as a stitch) and join with sl st to the first sc. Place markers at both ends of each curved end so the straight sides are easy to see.
Base Rnd 2: 2 sc in each of next 3 sts, sc in next 29, 2 sc in each of next 3 sts, sc in next 29. (70 sts: 6 + 29 + 6 + 29)
Base Rnd 3: [Sc in next st, 2 sc in next st] 3 times, sc in next 29, [sc in next st, 2 sc in next st] 3 times, sc in next 29. (76 sts: 9 + 29 + 9 + 29)
Base Rnd 4: [Sc in next 2 sts, 2 sc in next st] 3 times, sc in next 29, [sc in next 2 sts, 2 sc in next st] 3 times, sc in next 29. (82 sts: 12 + 29 + 12 + 29)
Base Rnd 5: Same as Rnd 4, but work 3 sc before each increase. (88 sts: 15 + 29 + 15 + 29)
Base Rnd 6: Work 4 sc before each increase. (94 sts: 18 + 29 + 18 + 29)
Base Rnd 7: Work 5 sc before each increase. (100 sts: 21 + 29 + 21 + 29)
Base Rnd 8: Work 6 sc before each increase. (106 sts: 24 + 29 + 24 + 29)
Base Rnd 9: Work 7 sc before each increase. (112 sts: 27 + 29 + 27 + 29)
Each round adds 6 sts, 3 at each curved end, and both straight sides stay at 29 sts. Check that the base measures 11.5 in x 4 in (29.2 cm x 10.2 cm). Choose one straight side as the front and mark its center stitch (the 15th of its 29).
Sides
Continue with Color A. Start each round with ch 1 unless the instructions say otherwise, and join with sl st.
Side Rnd 1: Sc in BLO of each st around. (112 sts) The unused front loops form a neat ridge where the wall turns up from the base.
Side Rnds 2–4: Sc in each st around. (112 sts)
Checkpoint: the solid bottom band is 0.9 in (2.3 cm) tall.
Lattice Section
The lattice has 14 repeats of 8 sts. Each repeat is a 2-dc column, which is the base for a cream stripe, plus a diamond section of chain loops held down with sc. Two rounds alternate. Pattern A has three ch-3 loops between columns. Pattern B has four loops: ch-2, ch-3, ch-3, ch-2. Each sc sits in the middle of a loop from the round below, so the diamonds offset from round to round.
Side Rnd 5 (Pattern A set-up): Ch 3 (counts as dc), dc in next st, ch 3, sk 1 st, sc in next st, ch 3, sk 2 sts, sc in next st, ch 3, sk 1 st, *dc in next 2 sts, ch 3, sk 1 st, sc in next st, ch 3, sk 2 sts, sc in next st, ch 3, sk 1 st; rep from * 13 more times. Join to top of beginning ch-3.
Each repeat uses 2 + 1 + 1 + 2 + 1 + 1 = 8 sts. (14 repeats: 28 dc, 28 sc, 42 ch-3 sps)
Side Rnd 6 (Pattern B): Ch 3, dc in next dc, ch 2, sc in next ch-3 sp, ch 3, sc in next ch-3 sp, ch 3, sc in next ch-3 sp, ch 2, dc in next 2 dc; rep from * around, ending last rep at . Join. (28 dc, 42 sc, 28 ch-2 sps, 28 ch-3 sps)*
Side Rnd 7 (Pattern A): Ch 3, dc in next dc, ch 3, sk ch-2 sp, sc in next ch-3 sp, ch 3, sc in next ch-3 sp, ch 3, sk ch-2 sp, dc in next 2 dc; rep from * around, ending last rep at . Join. (28 dc, 28 sc, 42 ch-3 sps)*
Side Rnds 8–15: Rep Rnds 6 and 7 four more times. That makes 11 lattice rounds, ending with a Pattern A round.
Checkpoint: the walls are about 5.8 in (14.7 cm) tall. The columns should stack straight up. If they lean, check that each beginning ch-3 sits directly above the one before it.
Side Rnd 16 (conversion round): Ch 1, *sc in each of next 2 dc, sc in next ch-3 sp, sc in next sc, 2 sc in next ch-3 sp, sc in next sc, sc in next ch-3 sp; rep from * around. Join.
Count per repeat: 4 sts worked one into each existing stitch (2 dc + 2 sc) + 4 sts worked into ch-sps (1 + 2 + 1) = 8. Around: 56 + 56 = 112 sts. Fasten off Color A.
Checkpoint: walls measure 6 in (15.2 cm).
Cream Stripes
Cut 14 lengths of Color B, each about 2.7 m. Fold each one in half and work with both strands together.
- Hold the doubled yarn behind the first column, at the top of Side Rnd 4.
- Insert the hook in the gap between the 2 dc of the column and work a surface sl st.
- Work up the gap with 2 surface sl sts per lattice round: one at the base of the dc and one at mid-height. Keep them loose enough that the fabric does not pucker.
- After 22 sl sts (11 rounds x 2), work one sl st through the Side Rnd 16 sc above the column. Fasten off and pull the ends to the inside.
- Repeat on all 14 columns.
Each column now carries a raised cream braid from the bottom band to the rim. The stripes add no stitches to the basket’s stitch count.
Straps (Make 2)
Use Color A.
Foundation: Ch 7.
Row 1: Sc in 2nd ch from hook and in each ch across. Turn. (6 sts)
Rows 2–36: Ch 1, sc in each st across. Turn. (6 sts)
Each strap measures 1.5 in x 8 in (3.8 cm x 20.3 cm). Fasten off, leaving a 12 in (30.5 cm) tail for sewing.
Border (Cream Rim)
The rim is the basket’s border. Join Color B in the first stitch of Side Rnd 16, at end A.
Border gauge: 16 sc = 4 in (10.2 cm); 4 rounds = 0.9 in (2.3 cm).
The conversion round gave back exactly 8 sts per repeat, so the 112 sts fall into the same sections as Base Rnd 9:
- End A: 27 sts
- Front straight: 29 sts
- End B: 27 sts
- Back straight: 29 sts
Side Rnd 17: Ch 1, sc in each st around. Join. (112 sts: 27 + 29 + 27 + 29)
Side Rnds 18–20: Ch 1, sc in each st around. Join. (112 sts each round: 27 + 29 + 27 + 29)
Fasten off and weave in ends.
Why the math works: 14 repeats x 8 sts = 112 sts, the same as the base. The rim needs no increases or decreases, so the walls stay straight. The rim measures 112 ÷ 4 = 28 in (71.1 cm), the same as the base circumference.
Assembly
Straps: Find the center stitch of the back straight side. Count 8 sts out from center on each side to find where each strap’s inner edge goes. Pin each strap inside the rim over the next 6 sts outward, with 2 in (5.1 cm) of strap overlapping the inside wall. The straps’ inner edges are 4 in (10.2 cm) apart, and their outer edges span 7 in (17.8 cm), which fits inside the 29-st back side. Sew each strap firmly through the rim and Side Rnd 16.
Fold the top 2 in (5.1 cm) of each strap toward the back. Sew one half of a snap to each layer so the strap closes around a headrest post.
Lining: Cut an oval base piece 12.5 in x 5 in (31.8 cm x 12.7 cm) and a side strip 29 in x 8.5 in (73.7 cm x 21.6 cm). Both sizes include a 0.5 in (1.3 cm) seam allowance. Sew the short ends of the strip together, then sew the strip to the oval. Fold the top edge 1 in (2.5 cm) to the wrong side. Set the lining inside the basket and slip-stitch the fold just below the rim.
Leather tab: Fold the faux leather strip over the rim at center front, with 1.5 in (3.8 cm) on each side. Sew through all layers along the edges.
Final Blocking
- Mist the basket lightly, or hover steam 1 in (2.5 cm) above it without touching the yarn.
- Stuff it firmly with towels to set the oval shape.
- Gently ease the lattice open so the diamonds are even and the columns stand straight.
- Measure: 11.5 in (29.2 cm) wide, 4 in (10.2 cm) deep, 7 in (17.8 cm) tall.
- Let it dry completely before adding the lining.
Final Quality-Control Checklist
- The base lies flat and measures 11.5 in x 4 in (29.2 cm x 10.2 cm).
- The rim has 112 sts: 27, 29, 27, 29.
- All 14 columns stack straight up.
- Every cream stripe has even tension and ends at Side Rnd 16.
- The diamonds are the same size all the way around.
- Both straps are 1.5 in x 8 in (3.8 cm x 20.3 cm) and 4 in (10.2 cm) apart.
- The snaps close securely.
- The lining sits smoothly, and the tab is centered.
- All ends are woven in on the inside.
Troubleshooting
The base cups. The increases are too tight. Go up half a hook size, or shift the increases slightly within each curved end.
The base ruffles. Recount each round against the totals above, and keep the curved ends from getting loose.
The columns spiral. Make sure each beginning ch-3 sits directly above the one below it, and do not count the joining sl st as a stitch.
The lattice looks uneven. In Pattern A rounds, skip both ch-2 sps and work only into ch-3 sps.
The basket flares at the top. Side Rnd 16 has too many stitches. It must have exactly 8 per repeat, 112 total.
The stripes pucker. Loosen the surface slip stitches, or use a hook one size larger for this step only.
Care
Hand wash in cool water with mild soap. Press out the water and dry the basket stuffed with a towel to keep its shape. If your faux leather is not water-safe, keep the tab dry.

Final Notes
Here is the measurement chain. A gauge of 16 sts per 4 in gives a 112-st base measuring 11.5 in x 4 in (29.2 cm x 10.2 cm). Four solid rounds raise the walls to 0.9 in (2.3 cm). Eleven lattice rounds of 14 repeats bring the height to 5.8 in (14.7 cm). The conversion round restores 112 sts at 6 in (15.2 cm), and four cream rounds finish the basket at 7 in (17.8 cm). Two straps, each 1.5 in x 8 in (3.8 cm x 20.3 cm), hold it on the seat. If each checkpoint matches, the basket will come together cleanly.
Happy crocheting!