

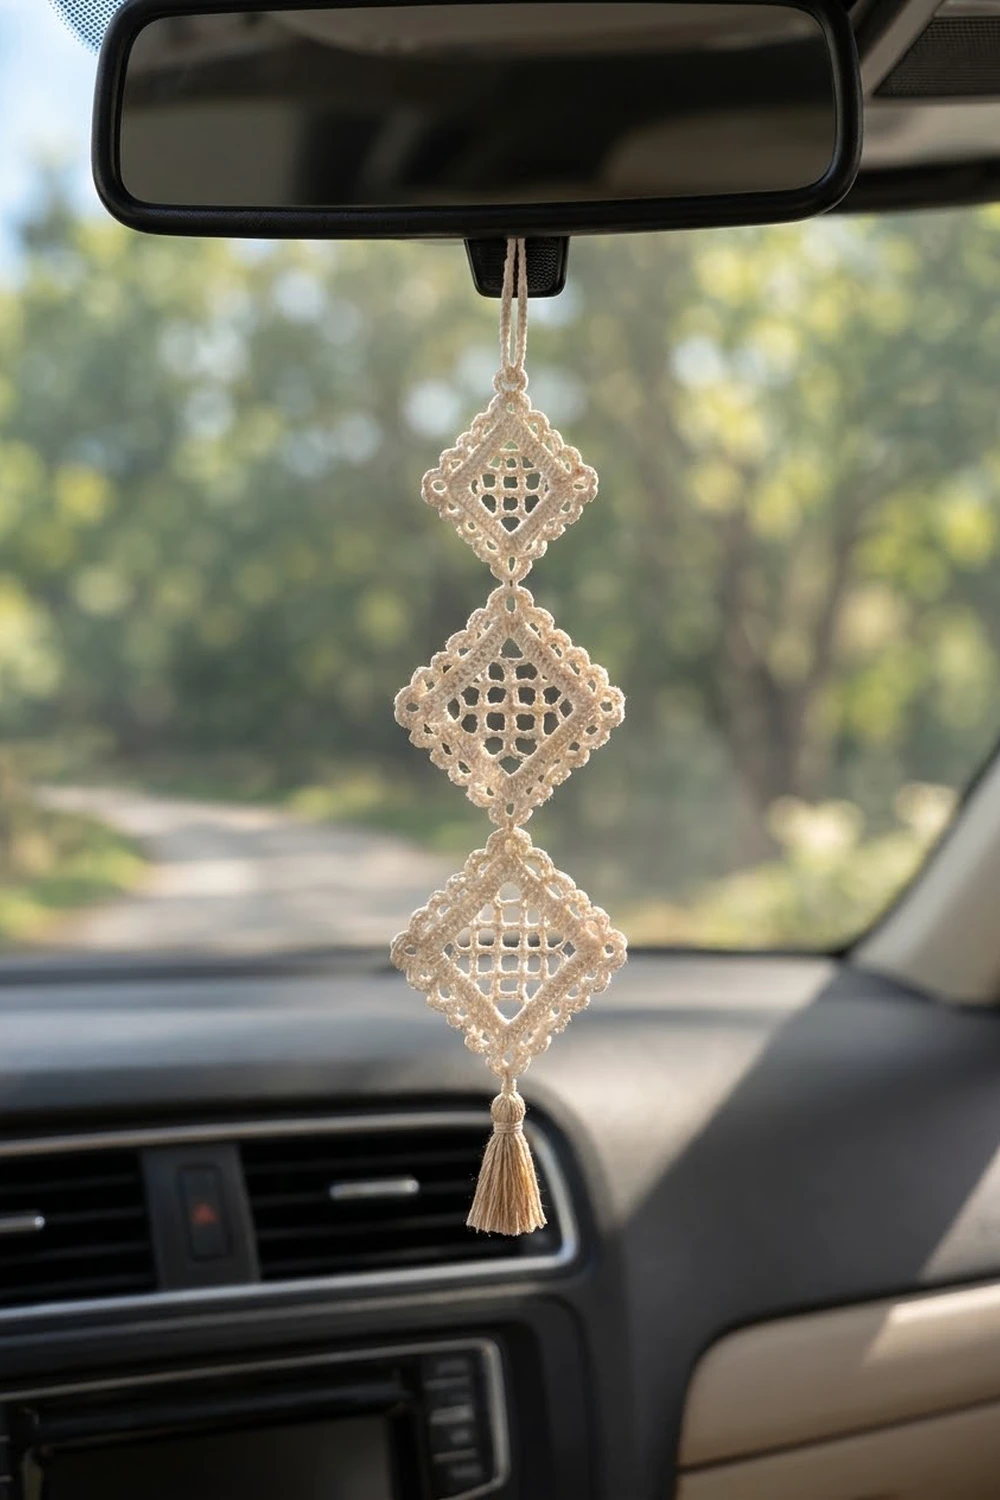
This car charm is three small lace diamonds stacked tip to tip. Each diamond has an open filet grid in the center, a solid frame around it, and a ring of small picots around the outside. A cream cord at the top hangs it from a rearview mirror, and a soft tan tassel finishes the bottom.
The whole charm is made in cream cotton thread, with only the tassel in tan. Cream shows off the open grid and the picot edge well, and it looks calm and natural against a car window. It also works in a window, on a bag strap, or on a doorknob.
This pattern uses US crochet terms. The joined and bordered charm measures about 8 in (20.3 cm) long and 3 in (7.6 cm) wide. With the hanging loop and tassel, it hangs about 13.5 in (34.3 cm) from top to bottom.
Construction is simple. You crochet a small filet square in rows, then work two rounds around it to build the frame. Motifs 2 and 3 are joined to the motif above at a single corner during their last round. One picot border round then goes around the whole strip. Last, you add the hanging loop and tie on the tassel.
Finished Size and Construction
- Finished size: about 8 in (20.3 cm) long x 3 in (7.6 cm) wide; about 13.5 in (34.3 cm) total with loop and tassel
- Skill level: Easy-intermediate (filet mesh, working into row ends, join-as-you-go)
- Terminology: US
- Yarn weight: Size 3 cotton crochet thread (Lace / 0)
- Hook: 2.25 mm (B-1)
- Number of pieces: 3 identical diamond motifs, plus 1 tassel
- Layout: 1 motif wide x 3 motifs tall, each turned on point, joined tip to tip
- Motif size: 1.75 in (4.4 cm) per side, about 2.5 in (6.4 cm) tip to tip
- Size before border: 7.5 in (19.1 cm) long x 2.5 in (6.4 cm) wide
- Border depth: about 0.25 in (0.6 cm), including picots
Materials
Use a mercerized cotton thread in size 3. It shows the mesh clearly, holds its shape when hung, and won’t fuzz in sunlight. Avoid acrylic here: a car gets hot, and acrylic lace can stretch and sag.
- Cream (main color): 15 g, about 21 m (23 yd) — motifs, border, and hanging loop
- Tan (tassel): 5 g, about 7 m (8 yd)
Quantities include a margin of roughly 30% for a gauge swatch and tails.
Tools:
- 2.25 mm (B-1) crochet hook
- Tapestry needle with an eye large enough for size 3 thread
- Small scissors
- A piece of stiff card 2.25 in (5.7 cm) wide, for the tassel
- Blocking mat and rustproof pins
- Spray bottle with water; optional light spray starch
- Ruler or tape measure
Abbreviations (US Terms)
- ch – chain
- sl st – slip stitch
- sc – single crochet
- hdc – half double crochet
- dc – double crochet
- sc2tog – single crochet 2 together
- sk – skip
- sp – space
- st(s) – stitch(es)
- RS – right side
Special stitches
- Picot: Ch 3, sl st in the 3rd ch from hook. A picot is not counted as a stitch.
- Standing sc: With a slip knot on the hook, insert hook in the stated st or sp, yarn over, pull up a loop, yarn over, pull through both loops.
- Bridge sc2tog (at joins): Insert hook in the bottom corner sp of the upper motif, yarn over, pull up a loop. Insert hook in the top corner sp of the lower motif, yarn over, pull up a loop. Yarn over and pull through all 3 loops.
Gauge and Checkpoints
Make one complete motif first and measure it before you start the others. Small gauge errors add up over three motifs and a border.
Checkpoints for one motif:
- After Row 4 (filet center): 1.25 in (3.2 cm) square, 4 mesh x 4 rows
- After Round 1 (sc frame): 1.5 in (3.8 cm) per side
- After Round 2 (hdc frame): 1.75 in (4.4 cm) per side, about 2.5 in (6.4 cm) tip to tip
To measure, pin the motif flat without stretching it.
If the motif is too big: Switch to a 2.0 mm hook, or tighten your chains. Filet mesh grows fast when the ch-2 spaces are loose.
If the motif is too small: Switch to a 2.5 mm hook. Pull each dc up to its full height so the open squares stay open.
Stitch counts are more important than exact size. The border needs exactly 15 sts on each motif side.
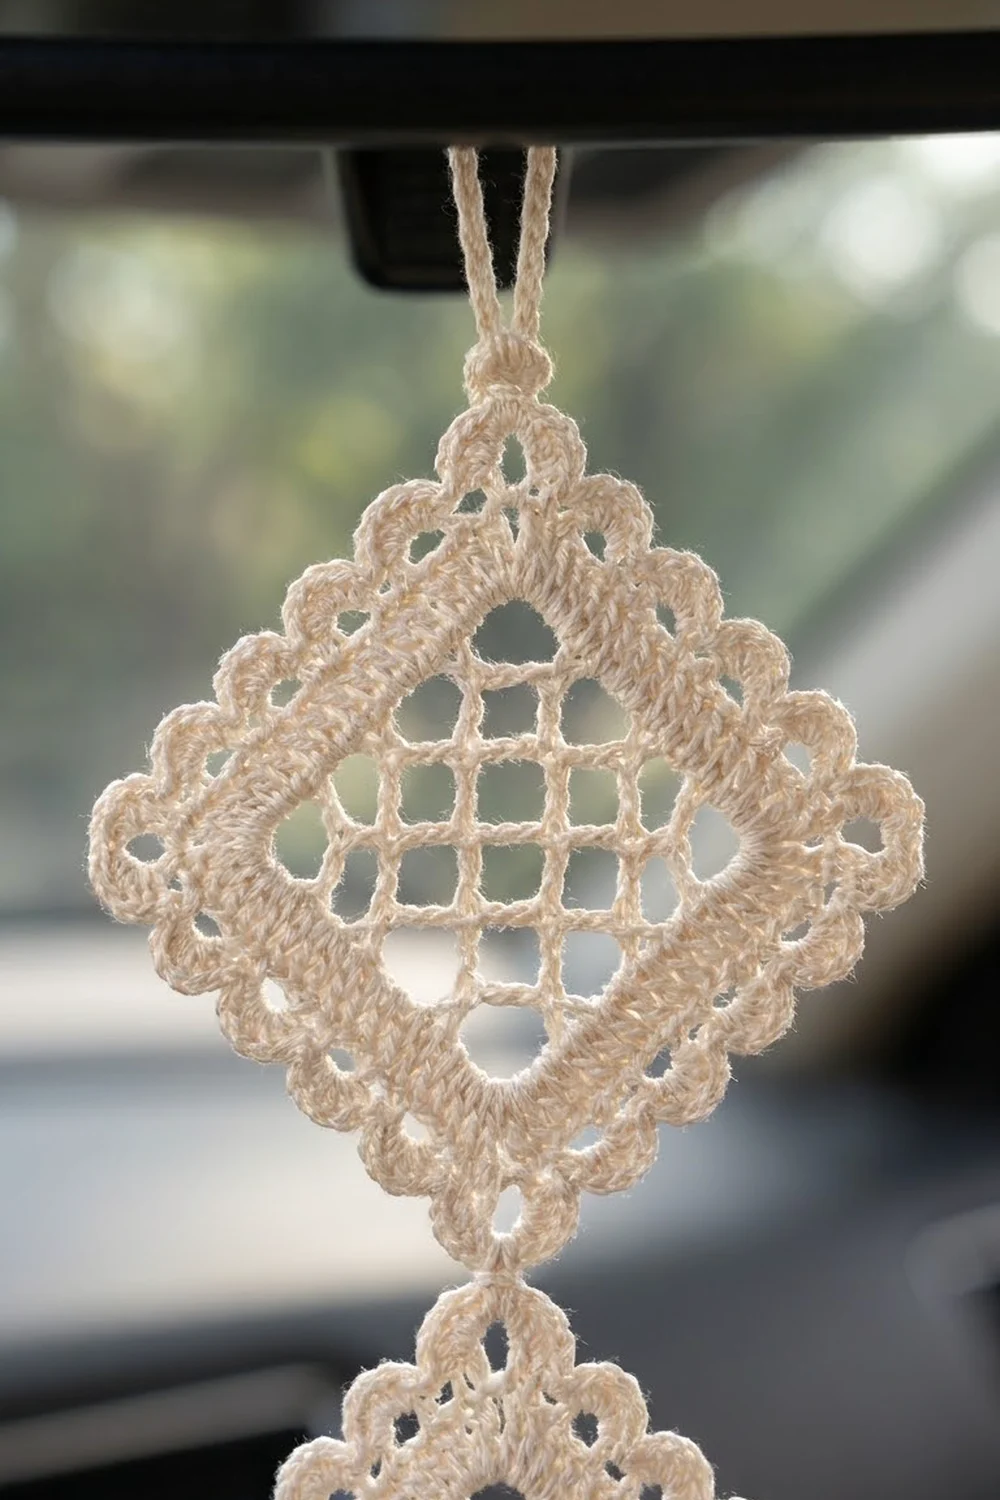
Diamond Motif (Make 3)
Use cream. Each motif starts as a square worked in rows and is turned on point at the end.
Filet Center
Ch 17.
Row 1 (RS): Dc in 8th ch from hook. The 7 skipped chains count as the first dc, a ch-2 sp, and 2 skipped base ch. [Ch 2, sk 2 ch, dc in next ch] 3 times. Turn. (5 dc, 4 ch-2 sps = 4 mesh)
Rows 2–4: Ch 5 (counts as dc and ch 2), sk first dc and ch-2 sp, dc in next dc, [ch 2, dc in next dc] 2 times, ch 2, dc in 3rd ch of turning ch. Turn after Rows 2 and 3 only. (5 dc, 4 ch-2 sps per row)
Do not turn after Row 4. You now have a grid of 4 x 4 open squares.
Checkpoint: 1.25 in (3.2 cm) square.
Frame
Round 1 (conversion round): Ch 1. Keep the RS facing and work around the square.
- Corner: (Sc, ch 2, sc) in the last dc made.
- First row-end side: Work 11 sc evenly down the row ends: 3 sc around each of the next 3 row-end posts, then 2 sc around the last one.
- Corner: (Sc, ch 2, sc) in the corner foundation ch.
- Bottom edge: Working into the foundation ch, [2 sc in next ch-2 sp, sc in base of next dc] 3 times, 2 sc in next ch-2 sp.
- Corner: (Sc, ch 2, sc) in the corner foundation ch.
- Second row-end side: Work 11 sc evenly up the row ends, as before.
- Corner: (Sc, ch 2, sc) in the 3rd ch of Row 4’s beginning ch-5.
- Top edge: [2 sc in next ch-2 sp, sc in next dc] 3 times, 2 sc in next ch-2 sp.
- Sl st to first sc.
Count: 44 sc between corners (11 per side) + 8 corner sc = 52 sc, plus 4 corner ch-2 sps. Each side has 13 sc, counting the 2 corner sc.
Checkpoint: 1.5 in (3.8 cm) per side.
Round 2 (conversion round): Ch 2 (does not count as a st). Hdc in each sc around, and work (hdc, ch 2, hdc) in each corner ch-2 sp. Sl st to first hdc.
Count: 52 hdc (1 per existing sc) + 8 hdc added at corners = 60 hdc, plus 4 corner ch-2 sps. Each side has 15 hdc, counting the 2 corner hdc.
Fasten off Motif 1 and weave in the ends. Motifs 2 and 3 are joined while you work their Round 2 (see Joining below).
Checkpoint: 1.75 in (4.4 cm) per side, about 2.5 in (6.4 cm) tip to tip. The solid frame should be about 0.25 in (0.6 cm) wide around the grid.
Make All Pieces
- Cream: 3 diamond motifs. Motif 1 is finished on its own; Motifs 2 and 3 are joined during Round 2.
- Tan: 1 tassel, made after the border.
Layout (turned on point, 1 wide x 3 tall):
        | hanging loop
        ◇   Motif 1
        ◇   Motif 2
        ◇   Motif 3
        ¥   tan tassel
Pick any corner of Motif 1 as its bottom tip. The opposite corner is its top tip.
Joining
This pattern uses join-as-you-go at one corner per seam. Each pair of motifs touches at a single point, which gives the strip its open, stacked-diamond look.
Joining Motif 2 to Motif 1: Work Motif 2 through Round 1, then begin Round 2 as written. At the corner you pick as Motif 2’s top tip, work: hdc in corner sp, ch 1, sl st in Motif 1’s bottom corner ch-2 sp, ch 1, hdc in the same corner sp of Motif 2. Finish Round 2 and fasten off.
Joining Motif 3 to Motif 2: Work the same join from Motif 3’s top tip into Motif 2’s bottom corner sp. That is the corner opposite Motif 2’s join to Motif 1.
Stitch-to-stitch logic: The join only changes the ch 2 in one corner to ch 1, sl st, ch 1. No hdc are added or removed. Every motif still has 60 hdc and 15 per side counting corners, so the border math is the same for all three.
Tension advice: Make the join sl st snug but not tight. If it’s too tight, it pulls both tips in and makes a kink. If it’s too loose, the motifs twist when the charm hangs. When the strip lies flat, the two tips should just touch.
Size checkpoint: The joined strip measures 7.5 in (19.1 cm) from top tip to bottom tip (3 motifs x 2.5 in / 6.4 cm). It is 2.5 in (6.4 cm) across at the widest point.
Border
Border gauge: The sc adds about 0.125 in (0.3 cm) and the picots add another 0.125 in (0.3 cm), so the border is about 0.25 in (0.6 cm) deep all around. On point, that brings the width to about 3 in (7.6 cm) across the side tips.
The border is one continuous round around the whole strip. Start at Motif 1’s top tip, go down the left side, around Motif 3’s bottom tip, and back up the right side.
Side repeat (worked on each motif side’s 15 hdc): [Sc in next 3 sts, picot] 4 times, sc in last 3 sts. (15 sc, 4 picots)
Border round: With RS facing, join cream with a standing sc in Motif 1’s top corner sp. Picot, then sc in the same sp.
Left side, working down:
- Motif 1: side repeat on the upper-left side; (sc, picot, sc) in the left corner sp; side repeat on the lower-left side.
- Bridge sc2tog across the Motif 1/Motif 2 join.
- Motif 2: side repeat; (sc, picot, sc) in the left corner sp; side repeat.
- Bridge sc2tog across the Motif 2/Motif 3 join.
- Motif 3: side repeat; (sc, picot, sc) in the left corner sp; side repeat.
Bottom tip: (Sc, picot, sc) in Motif 3’s bottom corner sp.
Right side, working up: Mirror the left side. Work Motif 3’s lower-right side, right corner, and upper-right side. Bridge sc2tog into the same two join corner sps from this side. Repeat for Motif 2, work another bridge sc2tog, then finish with Motif 1. Sl st to the first sc and fasten off.
Counts per side of the strip:
- Left side: 3 motifs x 2 sides x 15 sts = 90 sc, worked 1 per hdc. Plus 3 corner groups (6 sc, 3 picots), 2 bridge sc2tog, and 24 side picots.
- Right side: the same as the left side: 90 sc + 6 corner sc + 2 bridge sc2tog, and 27 picots.
- Top and bottom tips: 2 sc and 1 picot each.
Round total: 180 sc into hdc + 16 corner sc + 4 bridge sc2tog = 200 sts, plus 56 picots.
Why the math works: Every motif side has exactly 15 hdc, and the 2 corner hdc are already part of that 15. The corner ch-2 sps are worked separately, so no stitch is counted twice. Since 15 = (3 x 4) + 3, the four picots fall after sts 3, 6, 9, and 12. That spaces them evenly and makes each side match itself end to end. The bridge sc2tog has no picot, so each neck between motifs stays narrow and firm.
Hanging loop: Join cream with a sl st in Motif 1’s top-tip picot. Ch 70, which is about 7 in (17.8 cm), then sl st in the same picot to make a loop. Sc in each of the 70 ch, sl st in the picot, and fasten off. Folded over the mirror arm, the loop drops about 3.5 in (8.9 cm).
Tassel: Wrap tan 30 times around the 2.25 in (5.7 cm) card. Slide a 10 in (25.4 cm) tan tie under the wraps at one edge and tie it tightly. Cut the loops at the other edge. Thread both ends of the tie through Motif 3’s bottom-tip picot and knot them. Wrap another tan strand around the tassel 0.375 in (1.0 cm) below the top, knot it, and hide the ends inside. Trim the tassel to 2 in (5.1 cm).
Final Blocking
- Wet the charm and press it gently in a towel. Keep the tassel dry if you can.
- Pin the strip flat on the mat with the diamonds on point and the tips touching.
- Pin each side corner first, so each motif measures 3 in (7.6 cm) across its side tips.
- Check that the strip is 8 in (20.3 cm) from top tip to bottom tip, not counting the loop.
- Pin each picot straight out with its own pin.
- Use the tip of a pin to open any filet squares that have closed up.
- For a crisp finish that holds up in heat, mist lightly with spray starch.
- Let it dry completely before unpinning. Comb out the tassel and trim it level.
Final Quality-Control Checklist
- Each motif has a 4 x 4 open grid.
- Each motif has 60 hdc in Round 2, with 15 per side counting corners.
- Each join is a single corner point that is snug without puckering.
- The border has 200 sts and 56 picots, with 4 picots on every motif side.
- After blocking, the strip measures 8 in (20.3 cm) x 3 in (7.6 cm).
- The hanging loop is firm and about 7 in (17.8 cm) around.
- The tassel is 2 in (5.1 cm) long, knotted securely, and trimmed level.
- All ends are woven into the solid frame, not the mesh.
Troubleshooting
The grid squares are tall rectangles. Your chains are tighter than your dc. Loosen the ch-2 spaces a little, or don’t pull the dc up as high.
The row-end sides of Round 1 are wavy. You worked too many sc. Rip back and work exactly 11 sc between the corners.
The motif cups instead of lying flat. Make sure each side has 15 hdc in Round 2 and that no corner ch-2 sp is missing.
The diamonds twist when hanging. The join is too loose. Redo it with a firmer sl st, or sew a few stitches of cream thread through both tips from the back.
The picots lean to one side. Work each picot sl st into the 3rd ch from the hook, and pin each one straight out when you block.
The border ruffles at the joins. You probably worked separate sc instead of a bridge sc2tog. Each neck should get only one stitch from each side.
Care
Hand wash in cool water with mild soap, press the water out in a towel, and dry flat, pinning the shape again if needed. Strong sun will slowly fade the tan, so bring the charm inside now and then.
Final Notes
Here is how the measurements add up. The filet grid is 1.25 in (3.2 cm) square. Round 1 brings the motif to 1.5 in (3.8 cm) per side, and Round 2 brings it to 1.75 in (4.4 cm) per side, or 2.5 in (6.4 cm) tip to tip. Three motifs joined at single points make a 7.5 in (19.1 cm) strip. The picot border brings it to 8 in (20.3 cm) x 3 in (7.6 cm). The loop and tassel make the full hanging length about 13.5 in (34.3 cm).
As long as every motif has 60 hdc with 15 on each side, the border will fit. Happy crocheting!