

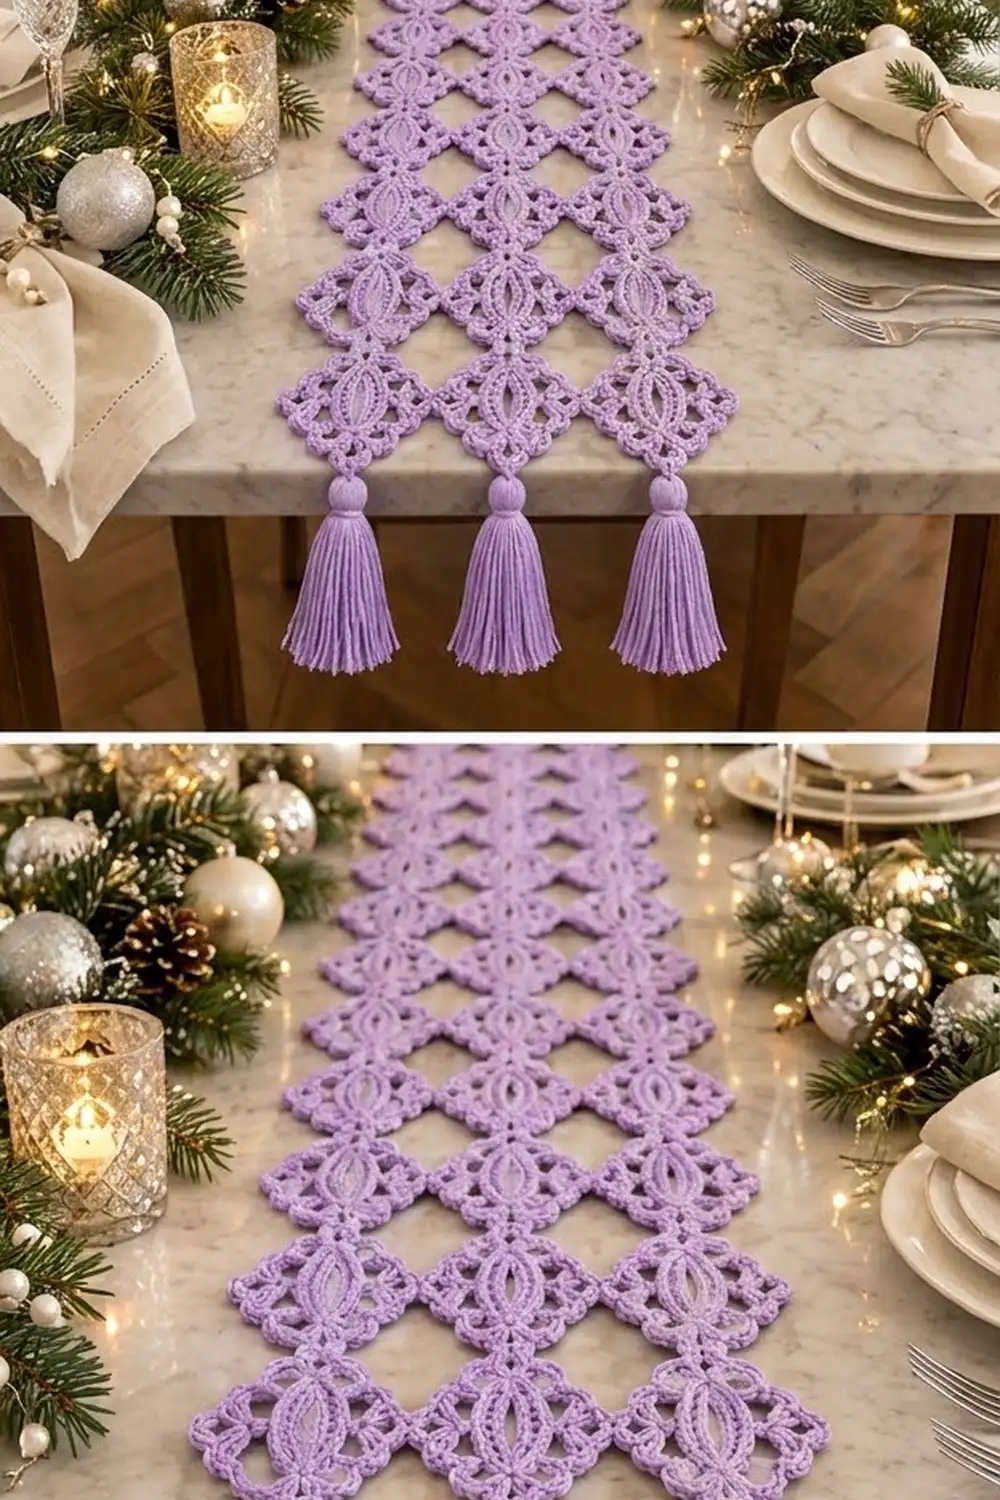
The Lavender Frost Diamond Table Runner is a lacy table runner made from diamond motifs joined point to point. Each motif has a tall lens shape in the center, a ring of petals around it and a scalloped edge with picots. Where four motifs meet, an open diamond space is left between them. The result is airy and elegant, and it shows off a dressed holiday table beautifully.
The runner uses a single lavender cotton. One color lets the lace texture stand out. It looks wintry next to silver and greenery, and it works just as well for spring tables or weddings.
This pattern uses US crochet terms. The finished runner measures 17.1 in (43.4 cm) wide and 68.4 in (173.7 cm) long. With the tassels, the total length is about 76.4 in (194.1 cm).
You start each motif on a ring of chains, work six rounds out to the diamond shape, and join each new motif to its neighbors at the corner points during the last round. Tassels finish both ends.
Finished Size and Construction
- Finished size: 17.1 in × 68.4 in (43.4 cm × 173.7 cm), plus 4 in (10.2 cm) tassels at each end
- Skill level: Intermediate
- Terminology: US crochet terms
- Yarn weight: Sport (#2) mercerized cotton
- Hook: 3.0 mm
- Number of pieces: 36 identical motifs, plus 6 tassels
- Layout: 3 motifs wide × 12 motifs long, set on point
- Piece size: 4 in (10.2 cm) per side; 5.7 in (14.5 cm) point to point
- Size before border: 17.1 in × 68.4 in (43.4 cm × 173.7 cm)
- Border depth: 0 in (0 cm). There is no added border round. The scalloped last round of each motif forms the edge.
Materials
Yarn: Use a smooth, mercerized sport-weight cotton, about 50 g = 155 m (170 yd) per ball. Mercerized cotton shows the stitches clearly and blocks crisply, which lace needs. Avoid fuzzy or very stretchy yarns, because they blur the lens shape.
- Lavender: 200 g, about 620 m (678 yd). That is four 50 g balls.
- Motifs: about 4 g / 12.4 m each × 36
- Tassels: about 4 g each × 6
These quantities include roughly a 15% margin for your gauge test and tension differences.
Tools:
– 3.0 mm crochet hook
– Tapestry needle
– Locking stitch markers (at least 4)
– Sharp scissors
– A piece of stiff cardboard 4.5 in (11.4 cm) tall, for the tassels
– Blocking mats and rustproof pins
– Spray bottle
– Measuring tape
Abbreviations (US Terms)
- ch: chain
- sl st: slip stitch
- sc: single crochet
- hdc: half double crochet
- dc: double crochet
- tr: treble crochet
- st(s): stitch(es)
- sp: space
- rnd: round
- rep: repeat
Special stitches:
- Picot: Ch 3, then sl st in the 3rd ch from the hook.
- Corner join (join-as-you-go): Use this in place of the “ch 3” at a corner point. Ch 1, take the hook out of the loop, and insert it from the front into the matching corner ch-3 sp of the finished neighboring motif. Put the dropped loop back on the hook and pull it through. Then ch 1.
Gauge and Checkpoints
Gauge: 6 sc = 1 in (2.5 cm), measured along the straight part of Rnd 6.
Make one complete motif first and wet-block it before you start the rest. Measure it at each stage:
- After Rnd 1: the lens is about 1.75 in (4.4 cm) tall when pinched flat.
- After Rnd 2: the lens is about 2.25 in (5.7 cm) tall, from ch-3 point to ch-3 point.
- After Rnd 3: about 3.5 in (8.9 cm) from point to point.
- After Rnd 5: about 5.2 in (13.2 cm) from point to point.
- After Rnd 6, blocked: 4 in (10.2 cm) per side and 5.7 in (14.5 cm) from point to point.
If your motif is too big (more than 0.2 in / 0.5 cm over), go down 0.25 mm in hook size. If it is too small, go up 0.25 mm. Even small errors add up: across 12 rows, each 0.2 in (0.5 cm) per motif changes the length by 2.4 in (6.1 cm).
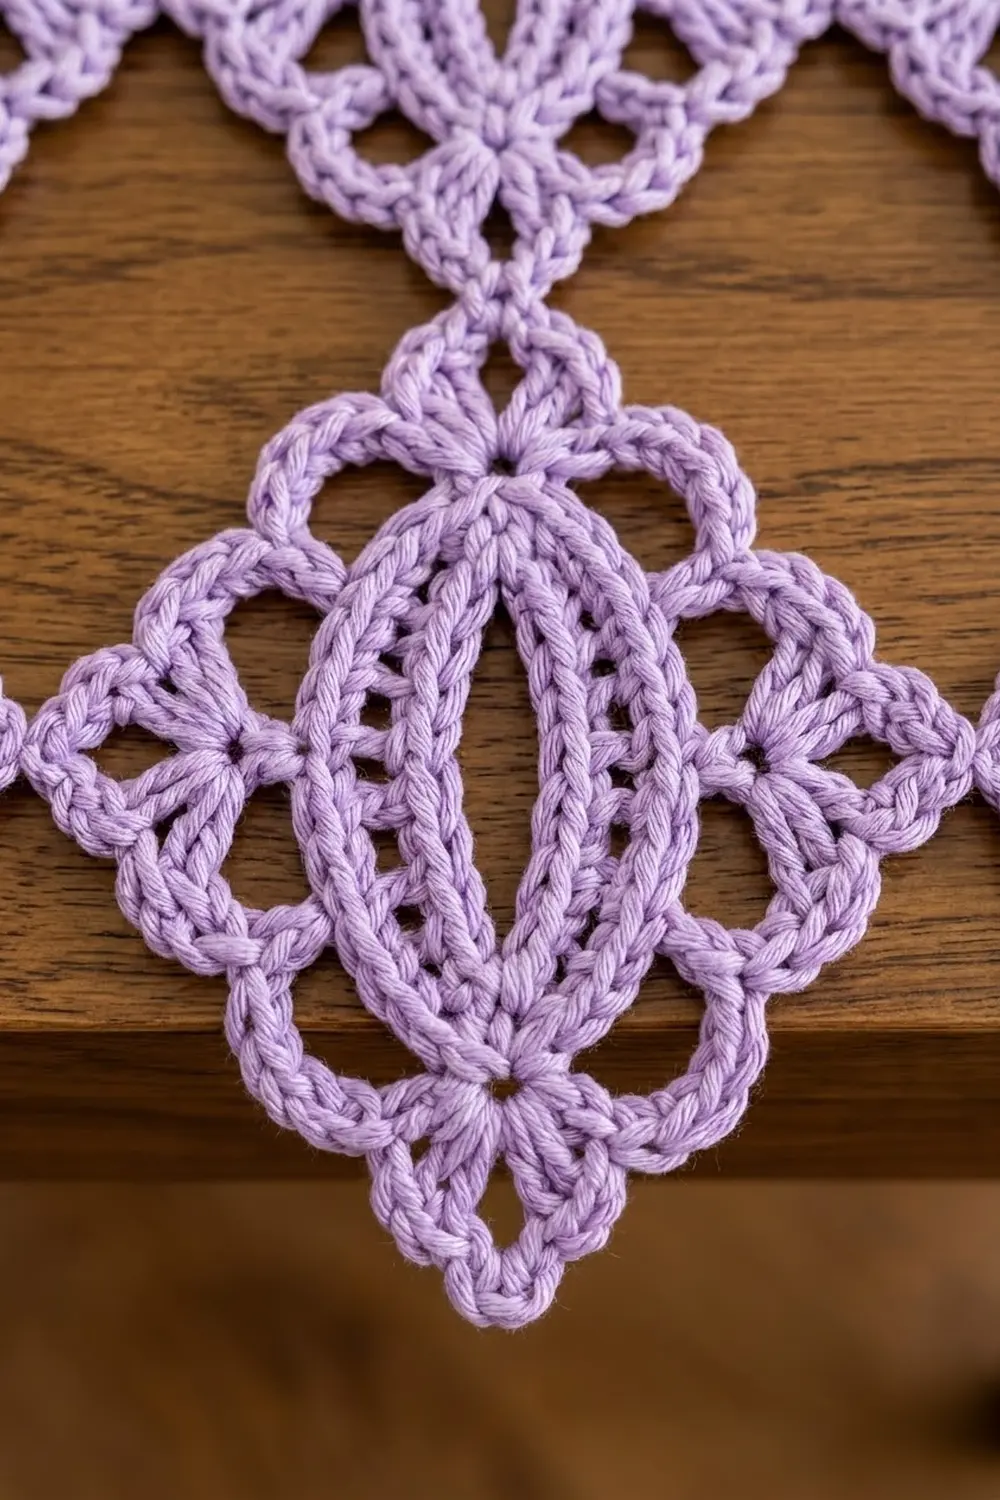
Motif Pattern (Make 36)
Center Ring
Ch 24 and join with a sl st to the first ch to form a ring. Keep the chains untwisted. Pinch the ring flat into a long oval. One fold is the top point and the opposite fold is the bottom point.
Rnd 1: Lens
Work into each chain of the ring.
Ch 1, sc in the first ch (top point). Hdc in the next ch, dc in each of the next 9 ch, then hdc in the next ch. Sc in the next ch (bottom point). Hdc in the next ch, dc in each of the next 9 ch, then hdc in the next ch. Join with a sl st to the first sc.
Count: 24 sts (2 sc, 4 hdc, 18 dc).
The tall stitches in the middle of each side push the ring into the lens shape. The short sc at each end keep the points sharp. Place a marker in each point sc.
Rnd 2: Lens Outline (Conversion Round)
Ch 3 (counts as dc). Work (dc, ch 3, 2 dc) in the same st (top point). Dc in each of the next 11 sts. Work (2 dc, ch 3, 2 dc) in the next st (bottom point). Dc in each of the next 11 sts. Join with a sl st to the top of the ch-3.
Count: 24 sts worked one per stitch + 6 extra dc at the points = 30 dc, plus 2 ch-3 points.
Each long side now has 15 dc from point to point: 2 + 11 + 2. This second line of tall stitches, around the first, gives the double outline and the slit-shaped center.
Rnd 3: Chain-Loop Frame
Sl st in the next dc and into the top ch-3 sp. Ch 1, sc in the sp. This is the top corner.
Ch 5, skip 3 dc, sc in the next dc (4th dc of the side). Ch 5, skip 3 dc, sc in the next dc (8th dc, the side corner). Ch 5, skip 3 dc, sc in the next dc (12th dc). Ch 5, skip the last 3 dc, sc in the next ch-3 sp (bottom corner). Rep from * to * once more, ending the last rep in the starting sc instead of a ch-3 sp. Join with a sl st.
Count: 8 sc and 8 ch-5 loops (4 per long side).
The 4 corner sc sit at the top point, the right-side middle, the bottom point and the left-side middle. Move your markers to these 4 sc. From now on, the motif works as a diamond.
Rnd 4: Petals
Sl st into the first ch-5 loop. In each ch-5 loop, work (sc, hdc, 3 dc, hdc, sc). Join with a sl st to the first sc.
Count: 8 petals of 7 sts each = 56 sts.
Number the petals 1–8 clockwise, starting just after the top corner. The corners fall between petals 8 & 1, 2 & 3, 4 & 5 and 6 & 7. The marked Rnd 3 sc shows at the bottom of each of these valleys.
Rnd 5: Diamond Points
Sl st in each of the next 3 sts (hdc, dc and the center dc of petal 1). Ch 1, sc in the same st.
Ch 7, sc in the center dc of the next petal. Ch 4, then work (tr, ch 4, tr) in the marked Rnd 3 corner sc, reaching down between the two petals. Ch 4, then sc in the center dc of the next petal. Rep from * to * 3 more times, leaving out the final sc on the last rep. Join with a sl st to the first sc.
Count: 8 sc, 8 tr, 4 ch-7 arches, 8 ch-4 side sps and 4 ch-4 corner sps.
The treble pairs pull each corner out into a true point, and the ch-7 arch spans the middle of each side. Together they turn the round motif into a diamond.
Rnd 6: Scalloped Edge
Sl st into the next ch-7 arch. Ch 1.
In the ch-7 arch, work (4 sc, picot, 4 sc). Sc in the next sc. Work 4 sc in the next ch-4 sp. Sc in the next tr. In the corner ch-4 sp, work (2 sc, ch 3, 2 sc). Sc in the next tr. Work 4 sc in the next ch-4 sp. Sc in the next sc. Rep from * to * 3 more times. Join with a sl st to the first sc and fasten off.
Count: 96 sc, 4 picots and 4 corner ch-3 sps.
Per side, from one corner ch-3 to the next: 2 + 1 + 4 + 1 + 4 + 4 + 1 + 4 + 1 + 2 = 24 sc. This count includes the 2 corner sc at each end. 24 sc × 4 sides = 96 sc. At 6 sc per in (2.5 cm), 24 sc measures 4 in (10.2 cm).
The first motif is complete. Weave in the ends on the wrong side, following the stitches.
Make All Pieces
Make 36 motifs, all in lavender. Make the first one completely, then join each following motif to its neighbors during Rnd 6.
Layout (each ◆ is one motif, set on point and touching its neighbors at the points):
Row 1:   ◆ ◆ ◆   (tassels below the end points)
Row 2:   ◆ ◆ ◆
Row 3:   ◆ ◆ ◆
  ...    (repeat)
Row 11:  ◆ ◆ ◆
Row 12:  ◆ ◆ ◆   (tassels below the end points)
That is 3 columns × 12 rows = 36 motifs.
Joining
Method: Join as you go at the corner points only, using the corner join in Rnd 6.
Order: Work from left to right across each row, then start the next row.
- The first motif in a row (except in Row 1) joins at 1 corner: its top point to the bottom point of the motif above.
- Middle and right motifs in Row 1 join at 1 corner: the left point to the right point of the previous motif.
- In Rows 2–12, middle and right motifs join at 2 corners: the left point and the top point.
Stitch logic: Each join replaces one corner’s ch 3 with ch 1, sl st, ch 1. The 2 sc on each side of the corner stay the same, so every side still has exactly 24 sc. Each point meets only one neighbor, so there are no crowded four-way joins. The open diamond between motifs forms on its own.
Tension: Pull the joining sl st snug but not tight. If it is too loose, the points gap. If it is too tight, the points pucker and the runner bows.
Size checkpoint: After Row 3 is finished, lay the work flat. It should measure 17.1 in (43.4 cm) wide and 17.1 in (43.4 cm) long (3 × 5.7 in / 14.5 cm).
Border (Edge Finish and Tassels)
Border gauge: 6 sc = 1 in (2.5 cm), the same as Rnd 6.
This design has no extra border round. The runner’s edge zigzags in and out with the diamonds, and a straight border would fill in the spaces and spoil the outline. The motifs’ own Rnd 6 is the finished edge.
Existing edge counts:
– Each long edge: 12 outer motifs × 2 exposed sides × 24 sc = 576 sc.
– Each short end: 3 motifs × 2 exposed sides × 24 sc = 144 sc.
No stitches are added at the seams. The joins sit only in corner ch-3 sps, which are not counted as sc.
Why the math works: The motifs touch only at their points, so the width is 3 × 5.7 in = 17.1 in (43.4 cm). The length is 12 × 5.7 in = 68.4 in (173.7 cm).
Tassels (Make 6)
- Wrap the yarn 40 times around the 4.5 in (11.4 cm) cardboard.
- Slide a 12 in (30.5 cm) strand under the wraps at the top and tie it tightly. Leave both tails long for attaching.
- Cut the wraps open at the bottom.
- About 0.5 in (1.3 cm) below the top, wrap a separate 9 in (22.9 cm) strand around the tassel 6–8 times to form the head. Knot it and bury the ends inside the tassel.
- Trim the tassel to 4 in (10.2 cm) long.
- Thread the top tails through the free corner ch-3 sp at the bottom point of each Row 12 motif. Tie them securely and hide the ends inside the tassel head.
- Repeat steps 1–6 for the top points of the three Row 1 motifs.
Final Blocking
- Weave in all remaining ends before blocking.
- Soak the runner in cool water for 10 minutes, then gently press the water out. Do not wring it.
- Roll it in a towel to remove the extra water.
- Lay it flat on blocking mats, right side up.
- Pin the outer points first to the full size: 17.1 in × 68.4 in (43.4 cm × 173.7 cm).
- Pin each motif’s points to 5.7 in (14.5 cm) apart. Use a tape measure along the columns.
- Pin out every picot and open up each lens slit with your fingertips.
- Leave it to dry completely. Keep the tassels off the mat so they hang straight, and lightly mist them if needed.
Final Quality-Control Checklist
- 36 motifs, each 4 in (10.2 cm) per side and 5.7 in (14.5 cm) point to point
- 24 sc per side on every motif
- Every lens is centered and points up and down
- Every interior corner joined; no edge corner joined by mistake
- Open diamond spaces are even all over
- Width 17.1 in (43.4 cm), length 68.4 in (173.7 cm)
- 6 tassels, each 4 in (10.2 cm) long, firmly tied
- All ends woven in and invisible from the right side
Troubleshooting
- Lens looks round instead of pointed: Check that Rnd 1 starts and ends each side with sc and hdc, not dc.
- Motif cups: Your Rnd 3 chains are too tight. Work them looser or chain 6 instead of 5, and check gauge again.
- Motif ruffles: Your Rnd 5 chains are too loose. Tighten your chains or drop to a smaller hook for that round.
- Corners aren’t sharp: Make sure the tr pair goes into the Rnd 3 corner sc, not into a petal.
- Runner bows sideways: At least one motif is a different size. Measure each one and re-block or remake it.
- Joined points gap: Pull the corner join sl st snugger.
- Tassels look messy: Steam them lightly and trim again.
Care
Hand wash in cool water with mild soap and dry flat, reshaping the points. Don’t tumble dry, and comb the tassels gently while they are damp.
Final Notes
The size of every piece depends on the one before it:
– 6 sc per in (2.5 cm) gives a 24 sc side of 4 in (10.2 cm).
– Each motif measures 5.7 in (14.5 cm) from point to point.
– 3 motifs across makes 17.1 in (43.4 cm).
– 12 motifs down makes 68.4 in (173.7 cm).
Check your first motif carefully, and the rest of the runner will follow. Enjoy watching your lavender lace grow one diamond at a time.
Happy crocheting!