

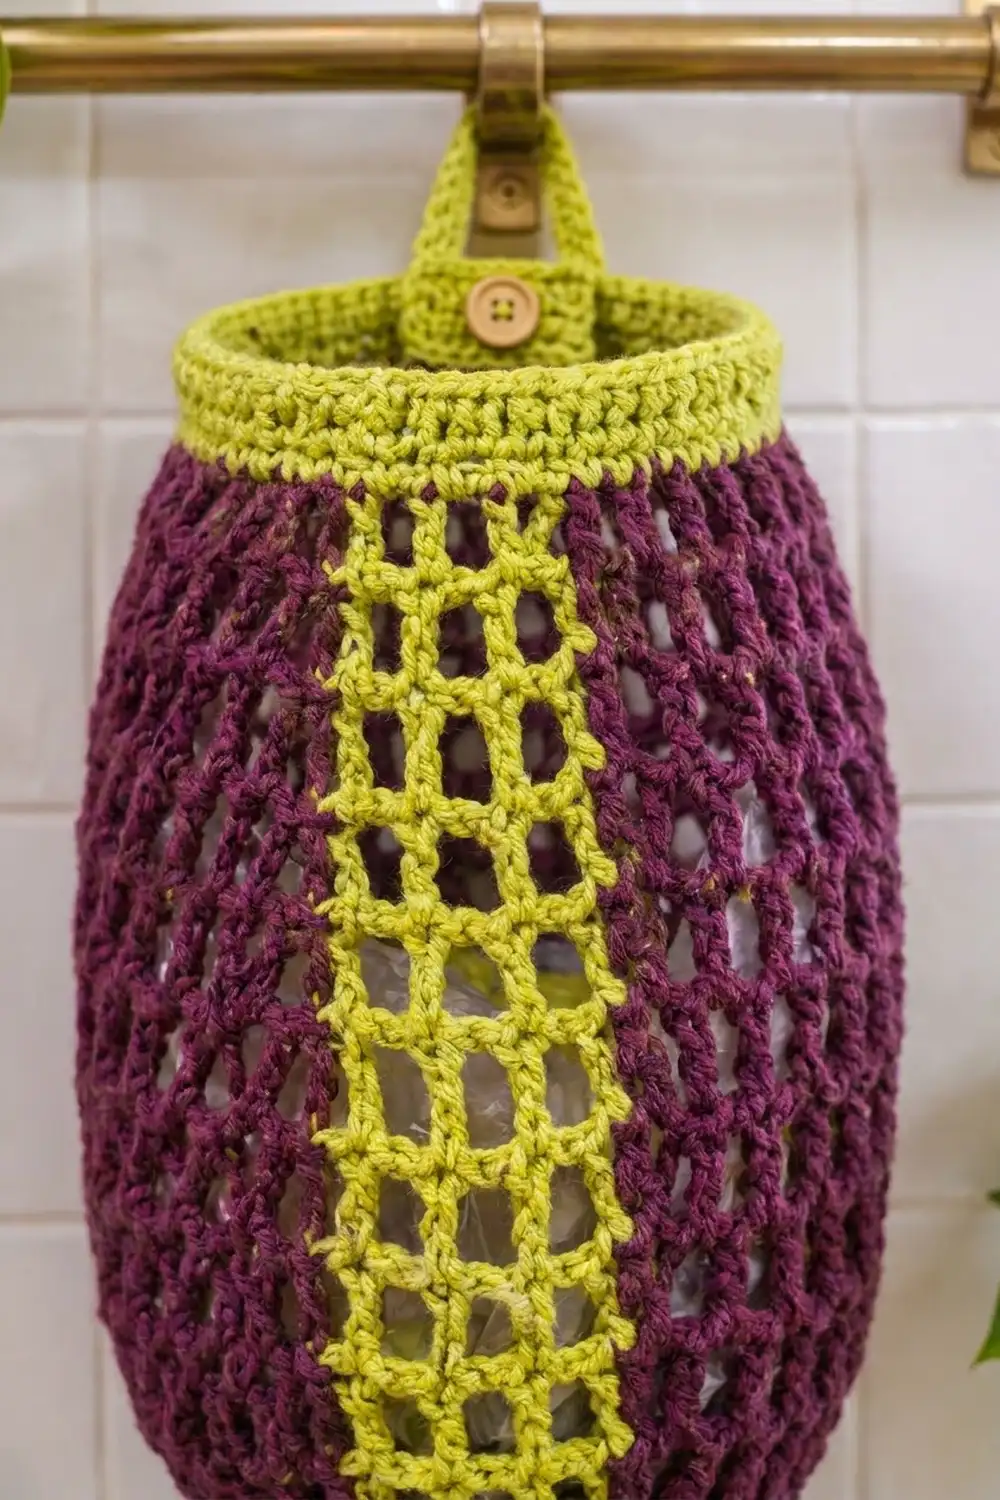
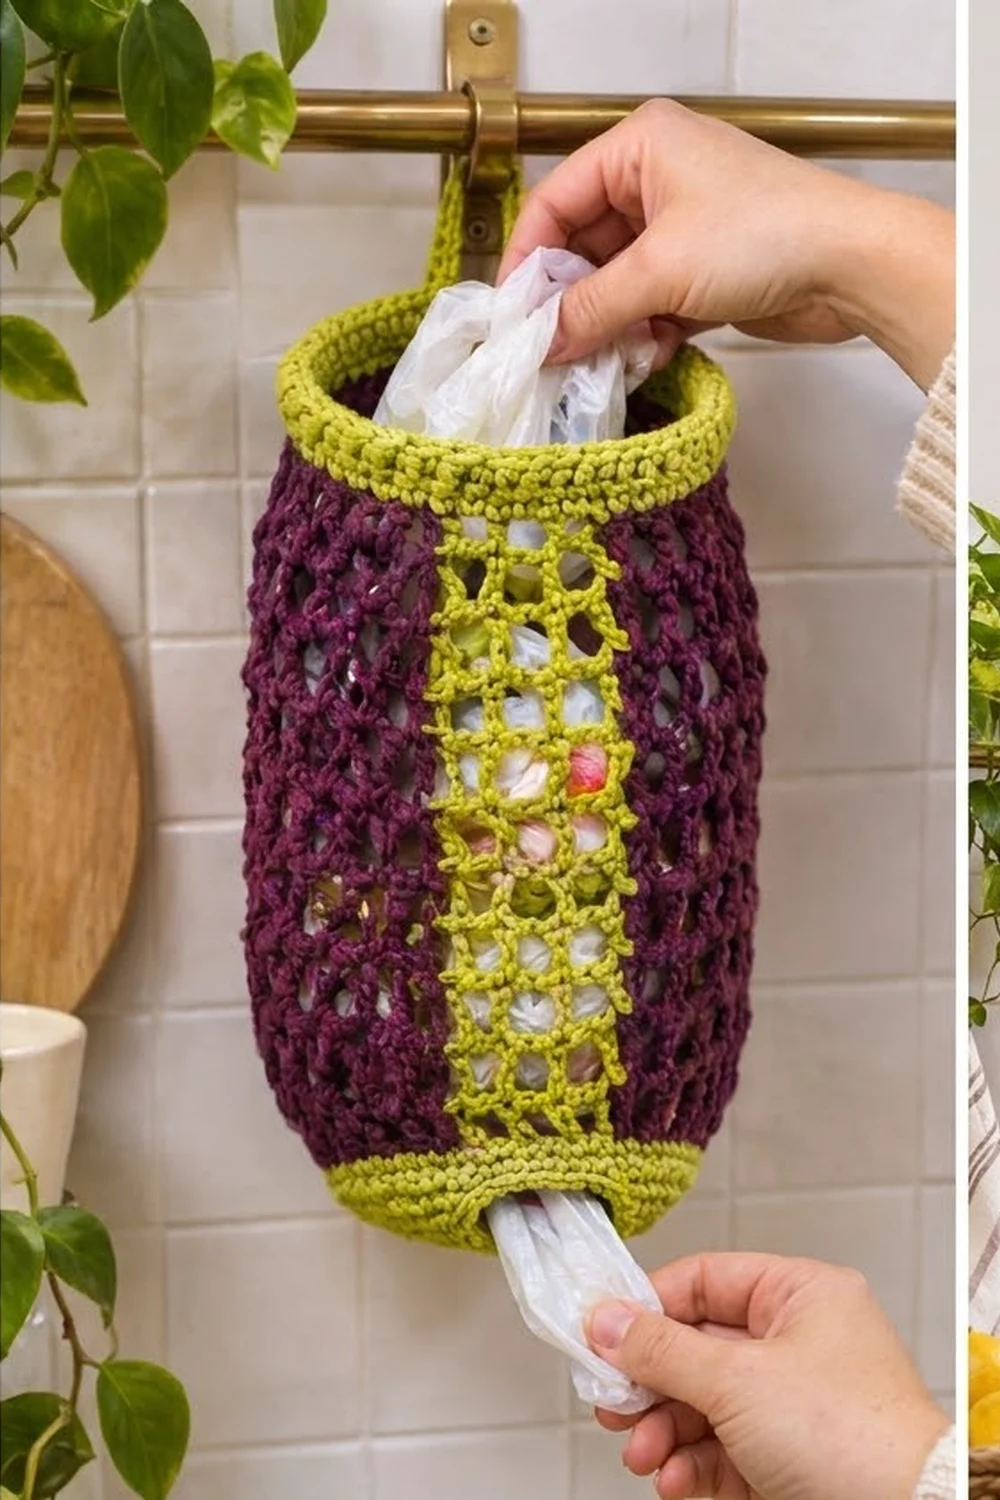
The Plum Lattice Bag Dispenser takes a kitchen chore and gives it some color. The body is deep plum open mesh with staggered holes, so it reads like a soft diamond net. A narrow lime grid panel runs up the front. Solid lime bands at the top and bottom pull the mesh in into a barrel shape.
You stuff bags in through the wide top cuff and pull them out one at a time through the small opening at the bottom. A lime strap with a button loops over a towel rail, hook, or cabinet knob, so you don’t need any hardware.
This pattern uses US crochet terms. The finished dispenser is about 16 in (40.6 cm) tall without the strap and about 9 in (22.9 cm) wide lying flat at its widest point.
Here’s how it’s built. You work the body flat in rows, using simple intarsia for the lime panel, then sew it into a tube. You then pick up the bottom band and top band in the round and work the strap straight off the rim. The result is one piece with one seam.
Finished Size and Construction
- Finished size: about 16 in (40.6 cm) tall without the strap; 9 in (22.9 cm) flat width at the widest point (18 in / 45.7 cm around)
- Skill level: Intermediate (easy stitches plus simple intarsia)
- Terminology: US
- Yarn weight: Worsted (#4), cotton or cotton blend
- Hook: 5.0 mm (H-8)
- Number of pieces: 1
- Layout: a single tube with a seam at center back and the lime panel at center front
- Body panel before seaming: 18 in (45.7 cm) wide × 12.75 in (32.4 cm) tall
- Size before bands: an 18 in (45.7 cm) tube, 12.75 in (32.4 cm) tall
- Band depth: top band 2.2 in (5.6 cm); bottom band 1.8 in (4.6 cm) measured along its curve, which adds about 1 in (2.5 cm) of height
Materials
Use a smooth worsted-weight cotton. Cotton holds its shape when the dispenser is full, can be washed, and shows the mesh clearly. Avoid fuzzy or very stretchy acrylic, because the mesh will sag under the weight of the bags.
- Plum (Color A): 120 g, about 198 m
- Lime (Color B): 100 g, about 165 m
These amounts include a safety margin of roughly 15%.
Tools:
– 5.0 mm (H-8) crochet hook
– Tapestry needle
– 4 locking stitch markers
– 1 button, 3/4 in (1.9 cm), wood or shank style
– Scissors
– Tape measure
– 3 small yarn bobbins, or three separate balls
Abbreviations (US Terms)
- ch: chain
- sc: single crochet
- dc: double crochet
- sc2tog: single crochet 2 together
- sk: skip
- sp(s): space(s)
- sl st: slip stitch
- RS / WS: right side / wrong side
- rnd: round
Special technique, intarsia color change: Work the dc that starts a new color section with the new color. Drop the old color on the WS of the work and leave it there for the next row. Chains always use the same color as the section they belong to.
Section names: In each row the stitches split into Plum A (10 mesh squares), Lime (4 squares), and Plum B (10 squares). The two dc at the edges of the lime panel are always lime and always land on top of each other. These are the “anchor” stitches.
Gauge and Checkpoints
- Single crochet: 16 sc and 18 rounds = 4 in (10.2 cm)
- Mesh: 4 squares = 3 in (7.6 cm), and 8 mesh rows = 4 in (10.2 cm)
Each mesh square takes 3 stitches and measures 0.75 in (1.9 cm) wide. Each mesh row is 0.5 in (1.3 cm) tall.
Test first: Work Row 0 and Rows 1–8 of the body before going further. That swatch is the full width of the piece, so you can check width and height on real work.
Checkpoints:
– After Row 1: the piece measures 18 in (45.7 cm) wide, lying relaxed.
– After Row 8: Rows 1–8 measure 4 in (10.2 cm) tall.
– After Row 25: the panel is 12.75 in (32.4 cm) tall, including the base row.
– After the top band: the top opening is 13.5 in (34.3 cm) around.
If your piece is too big, go down half a hook size. If it is too small, go up half a size. Measuring the width matters most, because it sets the circumference.
Body (Worked Flat)
Wind one bobbin of lime (about 15 g) for the panel. Plum A and Plum B each need their own ball or bobbin.
Row 0 (WS), lime: Ch 74. Sc in 2nd ch from hook and in each ch across. Fasten off. (73 sc)
Turn so the RS faces you. Join Plum A in the first sc.
Row 1 (RS):
– Plum A: Ch 3 (counts as dc). [Ch 2, sk 2 sc, dc in next sc] 9 times, ch 2, sk 2 sc.
– Lime: Dc in next sc (this is the first anchor). [Ch 2, sk 2 sc, dc in next sc] 4 times; the last dc is the second anchor.
– Plum B: [Ch 2, sk 2 sc, dc in next sc] 10 times.
Turn. (25 dc, 24 ch-2 sps, 73 sts: Plum A 10 dc, Lime 5 dc, Plum B 10 dc)
Row 2 (WS), offset row:
– Plum B: Ch 3 (counts as dc). Ch 1, dc in next ch-2 sp, [ch 2, dc in next ch-2 sp] 9 times, ch 1.
– Lime: Dc in anchor dc, [ch 2, dc in next dc] 4 times (ends in the other anchor).
– Plum A: Ch 1, dc in next ch-2 sp, [ch 2, dc in next ch-2 sp] 9 times, ch 1, dc in top of turning ch.
Turn. (27 dc: 1 edge dc + 10 offset dc in each plum section, 5 lime dc, 1 edge dc)
The plum dc now sit between the dc of the row below. This staggering is what creates the diamond-net look.
Row 3 (RS), square row:
– Plum A: Ch 3 (counts as dc), sk ch-1 sp and next dc. [Ch 2, dc in next ch-2 sp] 9 times, ch 2.
– Lime: Dc in anchor dc, [ch 2, dc in next dc] 4 times.
– Plum B: [Ch 2, dc in next ch-2 sp] 9 times, ch 2, sk last dc and ch-1 sp, dc in top of turning ch.
Turn. (25 dc, 24 ch-2 sps: Plum A 10 dc, Lime 5 dc, Plum B 10 dc)
Row 3 has the same counts as Row 1. In each plum section, the edge dc and the anchor dc surround 9 inner dc and 10 spaces.
Rows 4–25: Repeat Rows 2–3 eleven more times. You will end on Row 25, a RS square row. Fasten off all three colors.
Checkpoint: The panel is 18 in (45.7 cm) wide × 12.75 in (32.4 cm) tall. The lime panel is 3 in (7.6 cm) wide and each plum section is 7.5 in (19.1 cm) wide.
Seam
Fold the panel with the RS facing out, so the Plum A edge meets the Plum B edge. Using plum yarn and the tapestry needle, whipstitch the two edges together. Go through every turning chain and dc post, and through both Row 0 edge stitches. Keep the tension snug but not tight.
The two edge dc columns now form a single column at center back. You have a tube 18 in (45.7 cm) around with the lime panel exactly opposite the seam.
Bands and Strap (Border)
Band gauge: 16 sc = 4 in (10.2 cm), so each sc covers 0.25 in (0.6 cm).
Why the math works: Each mesh square is 3 stitches wide. In the top band’s first round, you work 1 sc per dc column and 2 sc per ch-2 space, which is 3 sc per square. With 24 squares around, that makes 24 + 48 = 72 sc, or 18 in (45.7 cm) at band gauge. That matches the tube exactly, so the band won’t flare or pucker. The bottom band works into the foundation chain, which also has 72 working positions once the seam is counted. The decrease rounds that follow pull the edges in to form the barrel.
Bottom Band (Lime)
Hold the tube upside down. Join lime at the seam in the free loops on the underside of the foundation chain. Join each round with a sl st to the first sc. Ch 1 at the start of each round does not count as a stitch.
- Rnd 1: Sc over the seam, then sc in each of the 71 free loops (the first and last loops are taken up by the seam). (72 sc)
- Rnd 2: [Sc 4, sc2tog] 12 times. (60 sc: 48 worked 1-per-stitch + 12 decreases)
- Rnd 3: [Sc 3, sc2tog] 12 times. (48 sc)
- Rnd 4: Sc in each st around. (48 sc)
- Rnd 5: [Sc 4, sc2tog] 8 times. (40 sc)
- Rnd 6: [Sc 3, sc2tog] 8 times. (32 sc)
- Rnds 7–8: Sc in each st around. (32 sc)
Fasten off.
Checkpoint: The opening is 8 in (20.3 cm) around, about 2.5 in (6.4 cm) across. The band measures 1.8 in (4.6 cm) along its curve.
Top Band (Lime)
Turn the tube right side up. Join lime at the seam column in Row 25. Join each round with a sl st, and ch 1 at the start of each round (the ch 1 doesn’t count). Place a marker on the first sc of each round so you can find the seam later.
- Rnd 1: Sc in each dc column (24 columns, counting the seamed pair as one) and 2 sc in each ch-2 sp (24 sps). (72 sc: 24 + 48)
- Rnd 2: Sc in each st around. (72 sc)
- Rnd 3: [Sc 4, sc2tog] 12 times. (60 sc)
- Rnd 4: [Sc 8, sc2tog] 6 times. (54 sc)
- Rnds 5–10: Sc in each st around. (54 sc)
Do not fasten off.
Checkpoint: The top opening is 13.5 in (34.3 cm) around, about 4.3 in (10.9 cm) across. The band is 2.2 in (5.6 cm) deep.
Strap (Lime)
Work in rows over 6 stitches centered on the seam: the last 3 sc of Rnd 10 plus the first 3 sc of Rnd 10. Sl st back 3 sts so you’re positioned to start.
- Rows 1–36: Ch 1, sc in each of next 6 sts, turn. (6 sc)
- Row 37 (buttonhole): Ch 1, sc 2, ch 2, sk 2, sc 2, turn. (4 sc + ch-2 sp)
- Row 38: Ch 1, sc 2, 2 sc in ch-2 sp, sc 2, turn. (6 sc)
- Rows 39–40: Ch 1, sc 6, turn. (6 sc)
Fasten off.
The strap is 1.5 in (3.8 cm) wide and 8.9 in (22.6 cm) long. Sew the button to the outside of the strap, centered, 1.25 in (3.2 cm) above the rim (about Row 6). The 2-stitch buttonhole is 0.5 in (1.3 cm) wide, which fits a 3/4 in (1.9 cm) button snugly.
Final Blocking
- Weave in all ends. Run intarsia tails along the dc posts of their own color.
- Soak the dispenser in cool water for 10 minutes and gently squeeze out the water. Do not wring it.
- Roll it in a towel to remove extra moisture.
- Stuff it firmly with a rolled dry towel or plastic bags to fill out the barrel shape.
- Line up the lime panel straight at center front, with the seam straight at center back.
- Pat the mesh squares into shape so the lime squares look square and the plum stagger is even.
- Lay the strap flat and pin it straight.
- Let it dry completely, standing upright, for 24–48 hours.
- Check that it measures 9 in (22.9 cm) flat width and about 16 in (40.6 cm) tall.
Final Quality-Control Checklist
- Body: 25 dc and 24 spaces in every square row.
- Lime panel: 4 squares wide, running straight from bottom band to top band.
- Plum mesh: the stagger alternates evenly on every row.
- Seam: flat, with no gaps, directly opposite the lime panel.
- Bottom band: 32 sc at the opening, which lies round and flat.
- Top band: 54 sc around, and the cuff stands up straight.
- Strap: centered over the seam; the button passes through the buttonhole with gentle pressure.
- All ends woven in on the inside.
Troubleshooting
- Gaps beside the lime panel: Pull the color change snug, and make sure you drop the old color on the WS before working the anchor dc.
- Lime panel drifts sideways: You missed an anchor dc. The anchor dc always goes into an anchor dc, never into a space.
- Body is wider than 18 in (45.7 cm): Your chains are too loose. Go down a hook size or tighten your ch-2s.
- Top band ruffles: You added extra sc in Rnd 1. Count exactly 72.
- Top band pinches the mesh: You skipped some sc. Recount Rnd 1.
- Bottom opening too loose for bags: Repeat Rnd 6 once more, decreasing to 24 sc.
- Strap stretches: Work it with a hook half a size smaller.
- Button slips out: Sew the button on with a short shank, or use a slightly larger button.
Care
Hand wash or machine wash cold on a gentle cycle inside a mesh laundry bag. Reshape while damp and dry flat or stuffed. Do not tumble dry.
Final Notes
The measurement chain is simple. Each 3-stitch mesh square is 0.75 in (1.9 cm) wide, and 24 squares make an 18 in (45.7 cm) tube. Three sc per square give the 72-stitch first band round, which matches the tube exactly. From there, the decreases shape the barrel: down to 32 sc at the bottom opening and 54 sc at the top cuff. If your Row 1 measures 18 in (45.7 cm) and your sc gauge is 16 sts = 4 in (10.2 cm), every later number will follow.
Happy crocheting!