

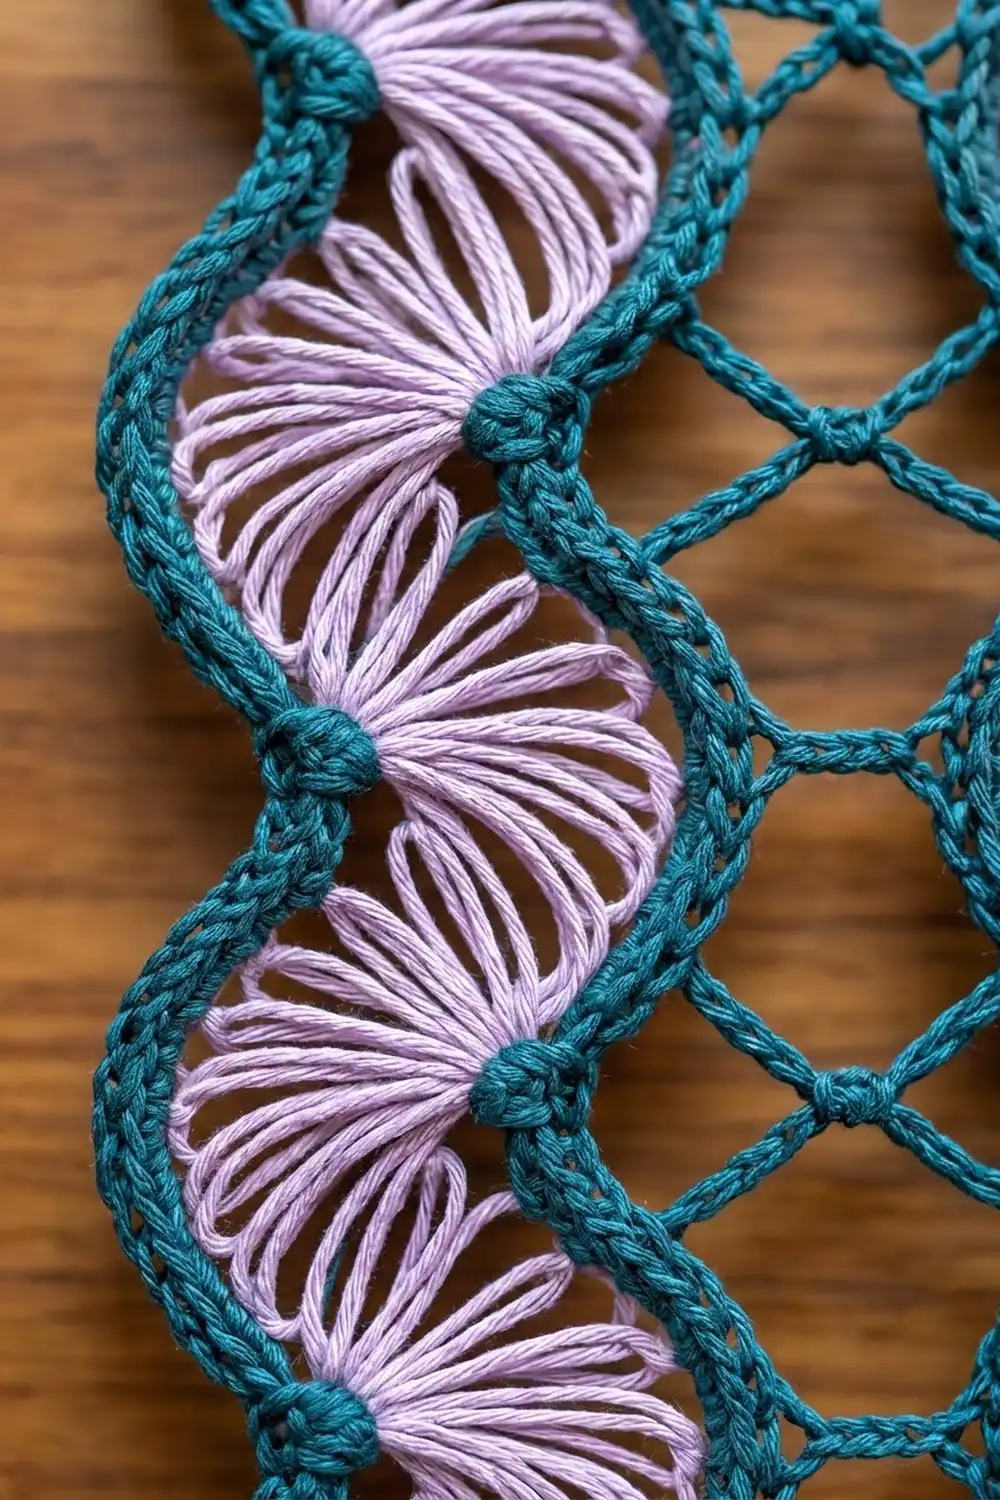
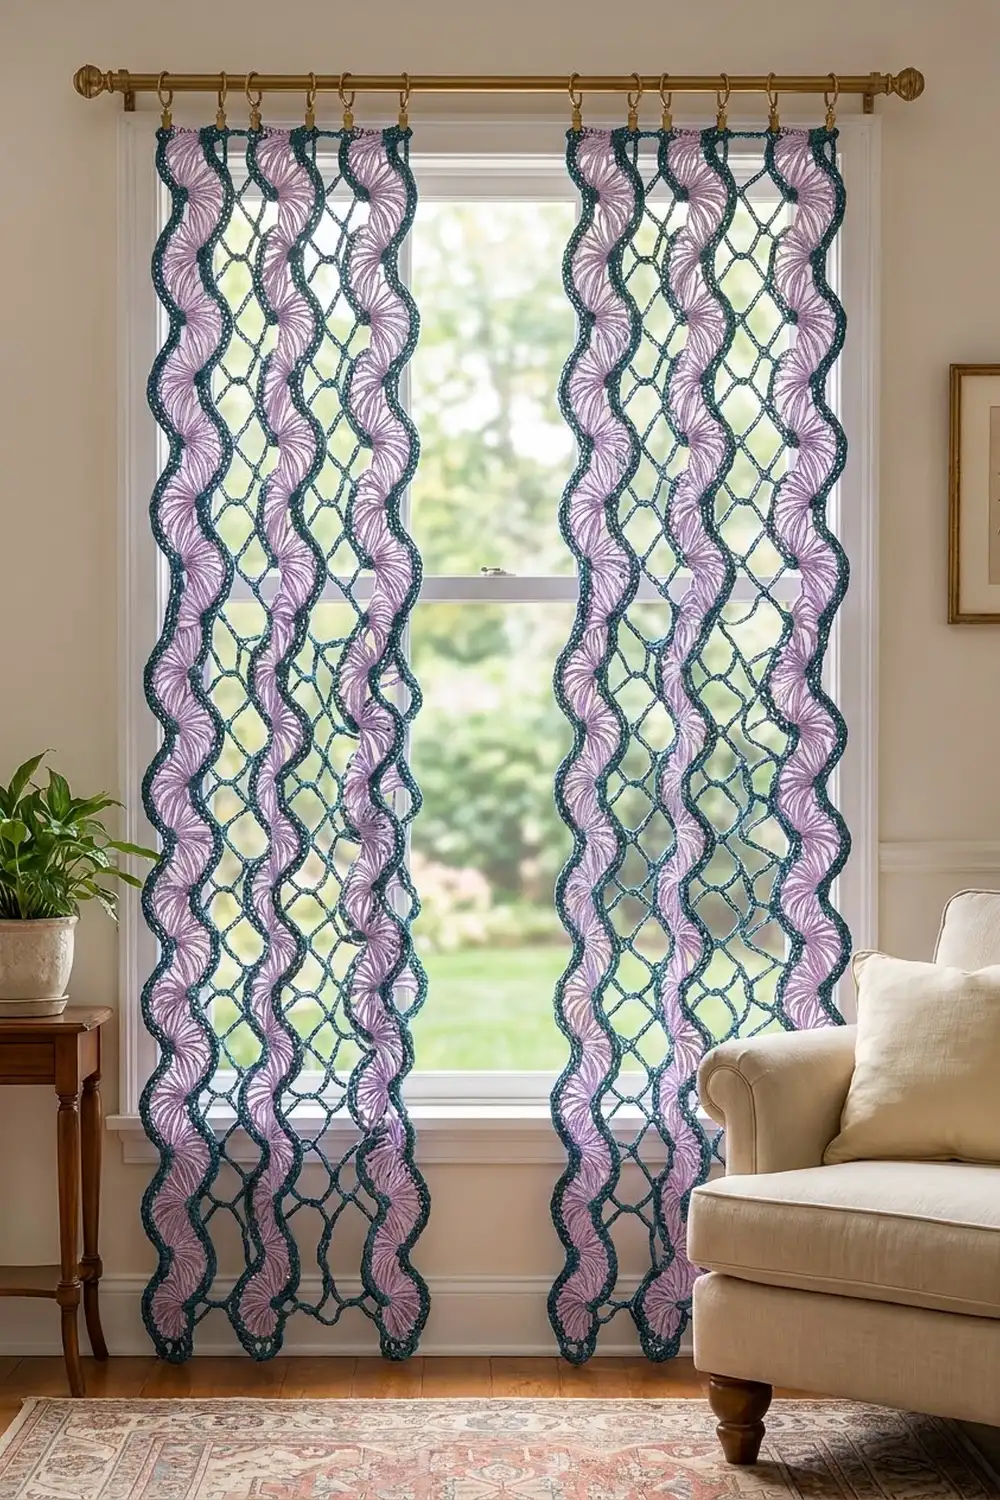
These curtain panels are made from long, wavy lace strips. Each strip is a chain of lilac fans that sway from side to side, held in place by a thick teal edging that bulges around each fan and pinches in at the knots between them. When the panels hang in a window, light comes through every loop.
The color pairing is calm and a little vintage: soft lilac loops with deep teal outlines. The teal edges meet at a knot between every fan, so each strip looks like a line of beads running through a ribbon of petals. A light teal chain lattice joins the strips, with small knots along its center line.
This pattern uses US crochet terms. One finished panel measures 16.5 in (41.9 cm) wide at its widest point and 81 in (205.7 cm) long, including the top band. The photo shows a pair, so make two panels to dress one window.
Construction is simple. Each strip starts as a lilac “spine” of knots and fans. Two teal edging rounds then shape the waves. Four strips are joined with a chain lattice, and a 4-row teal band across the top finishes the panel and gives the clip rings something to grip.
Finished Size and Construction
- Finished panel size: 16.5 in (41.9 cm) wide × 81 in (205.7 cm) long
- Skill level: Intermediate
- Terminology: US
- Yarn weight: DK / light worsted (#3) cotton
- Hook: 4.5 mm (US 7)
- Number of pieces: 4 strips per panel (8 strips for a pair)
- Layout: 4 strips side by side, with 3 lattice gaps
- Strip size: 3 in (7.6 cm) wide × 80 in (203.2 cm) long
- Fans per strip: 32, alternating right and left
- Lattice gap: 1.5 in (3.8 cm)
- Size before border: 16.5 in (41.9 cm) × 80 in (203.2 cm)
- Border: a top band only, 1 in (2.5 cm) deep. The sides and bottom keep their wavy edges.
Materials
Use a smooth mercerized cotton or a cotton blend. Crisp yarn keeps the chain loops open and the edging firm. Avoid fuzzy or very stretchy yarn, because the long loops will droop.
Per panel:
– Lilac (MC): 160 g, about 350 m (383 yd)
– Teal (CC): 160 g, about 350 m (383 yd)
For the pair shown: 320 g / 700 m (766 yd) of each color.
These quantities include roughly a 15% margin for swatching and blocking.
Tools:
– 4.5 mm (US 7) hook
– Tapestry needle
– Locking stitch markers (at least 10)
– Measuring tape
– Blocking mats or a long padded surface, plus rust-proof pins
– Spray bottle
– Curtain rod with clip rings
Abbreviations (US Terms)
- ch: chain
- sl st: slip stitch
- sc: single crochet
- st(s): stitch(es)
- MC / CC: main color (lilac) / contrast color (teal)
- Knot: a ch-4 ring that anchors one fan
- Loop: ch 10, sl st in the current Knot
- sc in tip: sc worked around the top of a Loop, catching both strands of its chain
- Picot knot: ch 3, sl st in the 3rd ch from the hook
Gauge and Checkpoints
Base gauge: 16 sc and 16 rows = 4 in (10.2 cm) in sc. Chains run about 4 ch per inch (2.5 cm).
Test one piece first. Make a short sample strip with 4 fans (Knots 1 to 5) and work both edging rounds on it. The sample should have 108 sts after Round 1 and 112 sts after Round 2. It should measure 3 in (7.6 cm) wide and 10 in (25.4 cm) long.
Checkpoints:
– Single fan (before edging): about 1.25 in (3.2 cm) from the Knot to the loop tips
– After Edging Round 2: each pod (one fan plus its spine) measures 2.5 in (6.4 cm) long, and the strip is 3 in (7.6 cm) wide
– Finished strip: 80 in (203.2 cm)
– After joining: 16.5 in (41.9 cm) wide
– After the top band: 81 in (205.7 cm) long
If the sample is too big, go down 0.5 mm, or try ch 9 Loops. If it is too small, go up 0.5 mm. Change hook size before you change any stitch counts, because the edging counts depend on 10-ch Loops.
Strip (Make 4 per Panel)
Part 1: Lilac Spine and Fans
Hold the strip so you are working upward. “Right” and “left” mean your right and left as you look at the work.
Knot 1: With MC, ch 4 and sl st in the first ch to form a ring.
Fan 1 (right): Work (ch 10, sl st in Knot 1) 7 times. Place the sl sts around the right half of the ring so the Loops fan out to the right. You now have 7 Loops.
Spine to Knot 2: Ch 9, then sl st in the 4th ch from the hook to form Knot 2. This leaves 5 spine chains between the Knots.
Fan 2 (left): Work (ch 10, sl st in Knot 2) 7 times around the left half of the ring, so the Loops fan out to the left.
Spine to Knot 3: Ch 9, then sl st in the 4th ch from the hook.
Keep going: odd-numbered fans go right, and even-numbered fans go left. Stop after Fan 32 (left), which comes from Knot 32. Ch 9, then sl st in the 4th ch from the hook to form Knot 33. Knot 33 is the top end and has no fan. Fasten off.
Count: 33 Knots, 32 fans, 224 Loops.
Before you edge, lay the strip flat and spread every fan into a half circle.
Part 2: Teal Edging
Round 1: Join CC in Knot 1 and ch 1. Work 2 sc in Knot 1. These 2 sts plus the last sc of the round make the bottom end group of 3 sc.
Right edge, working upward:
– Right-fan pods (odd fans): (ch 1, sc in tip of next Loop) 7 times, ch 1, sc in the next Knot. That is 16 sts.
– Left-fan pods (even fans): ch 9, then sc in the next Knot. That is 10 sts. The ch 9 runs along the spine and forms the inward dip of the wave.
Repeat these two pod types up the strip. The final sc goes in Knot 33. Then work 2 more sc in Knot 33, which completes the top end group of 3 sc.
Left edge, working downward: Now the even (left) fans are the bulges.
– Left-fan pods: work the 16-st bulge sequence.
– Right-fan pods: work the 10-st dip sequence.
End with 1 sc in Knot 1 and sl st to the first sc.
Round 1 count:
– Right edge: 16 × (16 + 10) = 416 sts, minus the Knot 33 sc that belongs to the top group = 415 sts
– Left edge: 415 sts
– End groups: 2 × 3 = 6 sc
– Total: 836 sts
The teal edges meet at every center Knot, which makes the beaded center line.
Round 2: Ch 1. Sc in each st along the right edge (415 sc). At the top group, work sc in the first sc, 3 sc in the middle sc, and sc in the last sc. Sc in each st down the left edge (415 sc), then repeat the end-group sequence at the bottom. Sl st to join.
Round 2 count: 831 sts worked 1 per existing st, plus 4 extra sts at the two end centers = 840 sts. Each end group now has 5 sts. Fasten off.
Mark the peaks. On each fan bulge, the peak is the Round 2 sc above the 4th tip sc. Place markers on the right-edge peaks (odd fans, 16 per strip) and the left-edge peaks (even fans, 16 per strip).
Strip checkpoint: 3 in (7.6 cm) × 80 in (203.2 cm).
Make All Pieces
- Per panel: 4 strips. Each strip uses about 87.5 m of MC and 75 m of CC.
- Pair: 8 strips.
All strips are identical, so you never need a mirrored version.
Layout (one panel, viewed from the front):
[Strip A] ~lattice~ [Strip B] ~lattice~ [Strip C] ~lattice~ [Strip D]
   3 in     1.5 in     3 in     1.5 in     3 in     1.5 in     3 in
Line up all Knot 1 ends at the bottom and all Knot 33 ends at the top.
Joining
This works because every strip is the same. On Strip A, the right-edge peaks fall on odd fans. On Strip B, the left-edge peaks fall on even fans. The peaks therefore alternate across the gap, which is what a zigzag needs.
Pass 1 (zigzag), worked upward:
1. Join CC with sc in A’s peak on Fan 1.
2. Ch 5, picot knot, ch 5, sc in B’s peak on Fan 2.
3. Ch 5, picot knot, ch 5, sc in A’s peak on Fan 3.
4. Keep alternating until you reach B’s peak on Fan 32.
Pass 1 count: 32 peaks joined, 31 segments, and 31 picot knots. Each segment is 10 ch plus 1 picot. It spans the 1.5 in (3.8 cm) gap across and 2.5 in (6.4 cm) up. Fasten off.
Pass 2 (center line), worked downward:
1. Join CC with sl st in the top picot knot.
2. Ch 10, sl st in the next picot knot. Repeat to the bottom picot.
Pass 2 count: 30 ch-10 spaces. Each ch 10 matches the 2.5 in (6.4 cm) between picots, so the lattice stays flat. Fasten off.
Join B to C, then C to D, the same way.
Tension: Keep the lattice chains the same tension as your edging. If they are tight, the panel puckers. If they are loose, the strips sag apart.
Size checkpoint: The panel is 16.5 in (41.9 cm) at its widest (4 × 3 in + 3 × 1.5 in) and 80 in (203.2 cm) long.
Border (Top Band)
Band gauge: 4 sc per inch (2.5 cm) and 4 rows per inch (2.5 cm).
Each strip’s top end has a 5-st group from Edging Round 2, which is 1.25 in (3.2 cm) wide. The strips are 4.5 in (11.4 cm) apart center to center, so each space between end groups is 4.5 − 1.25 = 3.25 in (8.3 cm). At 4 ch per inch, that is 13 ch.
Row 1 (right side):
1. Join CC in the first st of A’s top group. Ch 1 and sc in each of the 5 sts.
2. Ch 13, then sc in the 5 sts of the next strip’s top group. Repeat 2 more times.
Row 1 count: (4 strips × 5 sts) + (3 bridges × 13 ch) = 20 + 39 = 59 sts
Rows 2–4: Ch 1 and turn. Sc in each st and each ch. Each row: 59 sts.
Why the math works: 59 sts ÷ 4 sts per inch = 14.75 in (37.5 cm). That is exactly the distance from the outer side of A’s top group to the outer side of D’s top group: 3 × 4.5 in + 1.25 in. 4 rows ÷ 4 rows per inch = 1 in (2.5 cm) of band depth, so the panel is 80 in + 1 in = 81 in (205.7 cm) long.
Fasten off and weave in all ends.
Final Blocking
- Wet the panel completely and press the water out gently. Do not wring it.
- Lay it flat on mats along a long surface.
- Pin the top band straight at 14.75 in (37.5 cm).
- Pin each strip’s center Knots in a straight vertical line, 4.5 in (11.4 cm) apart from strip to strip.
- Pin out each fan peak so the strip is 3 in (7.6 cm) wide and the lattice gap is 1.5 in (3.8 cm).
- Fan out the lilac Loops evenly inside each bulge.
- Check that the pod spacing is 2.5 in (6.4 cm) and the total length is 81 in (205.7 cm).
- Let it dry completely before you unpin it.
Final Quality-Control Checklist
- Every strip has 33 Knots, 32 fans, and 7 Loops per fan
- Edging is 836 sts after Round 1 and 840 sts after Round 2
- Fans alternate right and left without a break
- Teal edges meet at every center Knot
- Each lattice gap has 31 picot knots and 30 center-line spaces
- Top band is 59 sts across all 4 rows
- Panel measures 16.5 in (41.9 cm) × 81 in (205.7 cm)
- No loose ends show from the front
Troubleshooting
- Fans lean the wrong way: The sl sts went around the wrong half of the Knot. Rework that fan before you edge.
- The strip twists: The edging tension differs between the two sides. Rework the looser edge.
- The wave looks flat: Your dip chains are too long. Try ch 8 dips, and adjust the counts by −1 st per dip pod.
- Loops flop out of the bulge: You caught only one strand. Each sc in tip must go around both strands of the Loop.
- The lattice pulls the strips together: Use a hook 0.5 mm larger for the lattice chains.
- The band is narrower than the strips’ spacing: Add 1 ch to each bridge and block firmly.
Care
Hand wash cool with mild soap, roll in a towel to remove water, and dry flat, re-pinning the waves if needed. Do not tumble dry, because heat and agitation will stretch the long Loops.
Final Notes
The measurements build on each other:
– Each fan reaches 1.25 in (3.2 cm), which makes a 3 in (7.6 cm) strip with pods every 2.5 in (6.4 cm).
– 32 pods give a strip 80 in (203.2 cm) long.
– Four strips plus three 1.5 in (3.8 cm) gaps give a panel 16.5 in (41.9 cm) wide.
– A 59-st, 1 in (2.5 cm) band brings the panel to 81 in (205.7 cm).
If your sample strip matches, the full panel will too. Make two and hang them in good light.
Happy crocheting!