

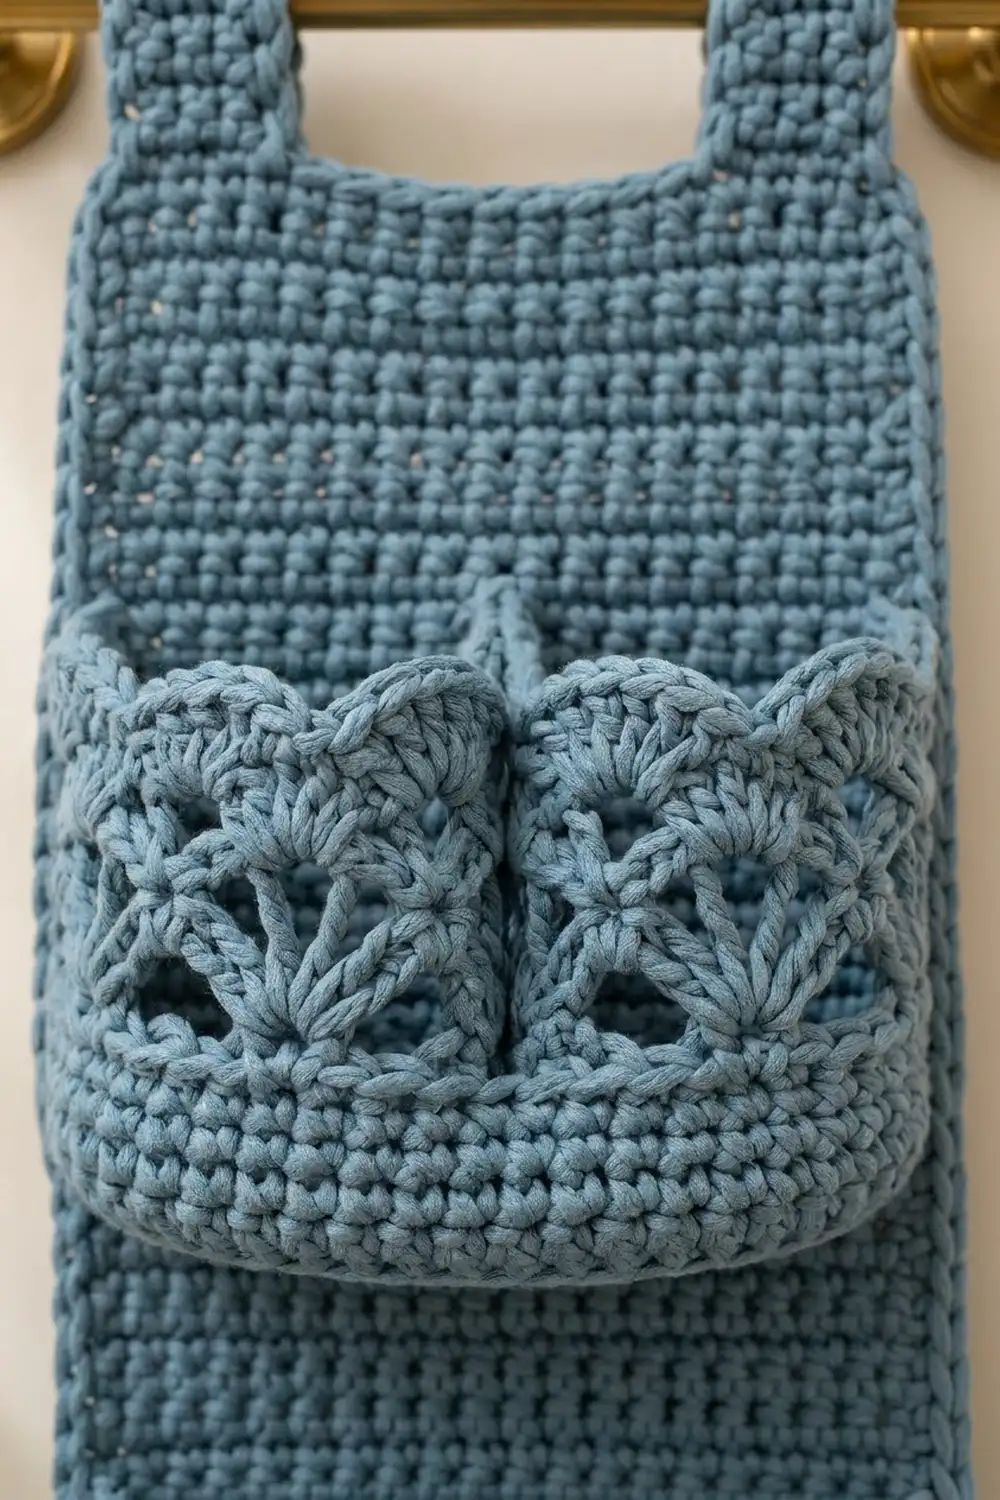
This hanging organizer keeps small bathroom things together on one tall, soft panel. A solid single crochet backing hangs from two tabs, and three lacy basket pockets are stacked down the front. Each pocket has a solid lower band and a top band of fans and chain arches that ends in a scalloped edge.
The sample uses one color, a dusty slate blue. It looks calm next to brass fixtures, white towels and plants. The fan lace is the decorative part, and the solid stitches underneath give the pockets enough structure to hold bottles.
This pattern uses US crochet terms. The finished organizer is 10 in wide by 25 in tall (25.4 × 63.5 cm), not counting the tab loops.
You’ll make four pieces: a backing panel worked in rows, and three pockets worked in the round from an oval base. Sew the pockets to the panel, add a two-round border, then work the tabs off the top edge.
Finished Size and Construction
- Finished size: 10 in × 25 in (25.4 × 63.5 cm), plus tab loops
- Skill level: Intermediate
- Terminology: US
- Yarn weight: #4 worsted, cotton or cotton blend
- Hook: 5.0 mm (H-8)
- Number of pieces: 4 (1 panel, 3 pockets)
- Layout: 1 panel with 3 pockets stacked vertically
- Pocket size: 8 in (20.3 cm) wide × 1.5 in (3.8 cm) deep; 6 in (15.2 cm), 5.5 in (14.0 cm) and 5 in (12.7 cm) tall
- Panel size before border: 9 in × 24 in (22.9 × 61.0 cm)
- Border depth: 0.5 in (1.3 cm) on each edge
Materials
Yarn: Use a smooth worsted-weight cotton or cotton blend. Cotton holds its shape when the pockets are full and handles bathroom humidity well. Avoid fuzzy yarns, which hide the fan lace.
- Dusty Blue: 300 g, about 570 m (approx. 190 m per 100 g)
This amount includes a margin of about 20% for your gauge swatch and small tension differences.
Tools:
– 5.0 mm (H-8) crochet hook
– Tapestry needle
– 6 locking stitch markers
– Straight pins
– Tape measure
– Blocking mat and spray bottle
Abbreviations (US Terms)
- ch – chain
- sl st – slip stitch
- sc – single crochet
- dc – double crochet
- BLO – back loop only
- sp(s) – space(s)
- st(s) – stitch(es)
- rnd – round
- RS – right side
Special stitches:
– V-st: (dc, ch 2, dc) in the same stitch.
– Fan: 7 dc in the same space.
Gauge and Checkpoints
Gauge: 16 sc and 18 rows = 4 in (10.2 cm) in sc worked in rows.
Make a 20-stitch swatch that is 20 rows tall and measure the center. Then make the top pocket first as your test piece. It’s the smallest piece, and it checks both your solid-stitch gauge and your lace tension.
Checkpoints:
– Panel Row 1: 9 in (22.9 cm) wide.
– Panel after 45 rows: 10 in (25.4 cm) tall.
– Pocket base after Rnd 3: about 8.5 in × 1.5 in (21.6 × 3.8 cm).
– Pocket circumference after Rnd 4: 19.5 in (49.5 cm).
– Lace band (Lace A through Edging E): about 2.75 in (7.0 cm) tall.
If your piece is too big, go down 0.5 mm in hook size. If it is too small, go up 0.5 mm. Don’t change the stitch counts, because the fan repeats depend on having exactly 78 stitches.
Backing Panel
Ch 37.
Row 1 (RS): Sc in 2nd ch from hook and in each ch across. (36 sc)
Rows 2–108: Ch 1, turn, sc in each st across. (36 sc)
Fasten off and weave in the ends. The panel measures 9 in × 24 in (22.9 × 61.0 cm).
Number the rows from the bottom and mark Rows 2, 38 and 72 with markers. These are the pocket base lines.
Pockets (Make 3)
All three pockets start with the same base and lace. Only the number of solid rounds changes.
Oval Base
Ch 33.
Rnd 1: Sc in 2nd ch from hook, sc in next 30 ch, 3 sc in last ch. Rotate and work along the opposite side of the foundation ch: sc in next 30 ch, 2 sc in last ch (the same ch as the first sc). Join with a sl st to the first sc. (66 sc: 30 on each side, 3 at each end)
Rnd 2: Ch 1, 2 sc in first st, sc in next 30 sts, 2 sc in each of next 3 sts, sc in next 30 sts, 2 sc in each of last 2 sts. Join. (72 sc: 30 on each side, 6 at each end)
Rnd 3: Ch 1, sc in first st, 2 sc in next st, sc in next 30 sts, [sc in next st, 2 sc in next st] 3 times, sc in next 30 sts, [sc in next st, 2 sc in next st] 2 times. Join. (78 sc: 30 on each side, 9 at each end)
Walls
Rnd 4: Ch 1, sc BLO in each st around. Join. (78 sc)
The unused front loops form a ridge, and the wall turns up from the base. Place markers in the 3rd and 34th stitches of this round. Stitches 3–34 (32 stitches) are the back wall, which gets sewn to the panel. Stitches 42–73 are the front wall.
Solid rounds: Ch 1, sc in each st around. Join. (78 sc)
Work the solid rounds until the walls have this many rounds, counting Rnd 4:
– Top pocket: 10 rounds (Rnds 4–13), about 2.25 in (5.7 cm)
– Middle pocket: 12 rounds (Rnds 4–15), about 2.75 in (7.0 cm)
– Bottom pocket: 15 rounds (Rnds 4–18), about 3.3 in (8.4 cm)
Lace Band
The lace uses 13 repeats of 6 stitches (13 × 6 = 78).
Lace A (V round): Ch 1, sc in same st as join, ch 2, skip 2 sts, V-st in next st, ch 2, skip 2 sts, sc in next st, ch 2, skip 2 sts, V-st in next st, ch 2, skip 2 sts; repeat from * 11 more times. Join to first sc. (13 sc, 13 V-sts)
Lace B (fan round): Ch 1, sc in first sc, ch 1, skip next ch-2 sp, fan in ch-2 sp of next V-st, ch 1, skip next ch-2 sp, sc in next sc; repeat from * 11 more times, then ch 1, skip ch-2 sp, fan in next V-st sp, ch 1, skip ch-2 sp. Join to first sc. (13 fans = 91 dc; 13 sc)
Lace C (staggered V round): Sl st in next ch-1 sp and in each of next 4 dc, so you’re in the center dc of the first fan. Ch 1, sc in same dc, ch 3, V-st in next sc, ch 3, sc in 4th dc of next fan, ch 3, V-st in next sc, ch 3; repeat from * 11 more times. Join. (13 sc, 13 V-sts, 26 ch-3 arches)
Lace D (fan round): Work as Lace B, skipping the ch-3 arches instead of ch-2 spaces. (13 fans = 91 dc; 13 sc)
The new fans sit above the gaps between the Lace B fans, which gives the lace its staggered look.
Edging E (scallops): Ch 1, sl st in next sc, skip ch-1 sp, sc in next 3 dc, 3 sc in next dc, sc in next 3 dc, skip ch-1 sp; repeat from * 12 more times. Join to first sl st. (117 sc, 13 sl sts)
Fasten off and leave a 12 in (30.5 cm) tail for sewing.
Pocket height check: about 5 in (12.7 cm) for the top pocket, 5.5 in (14.0 cm) for the middle and 6 in (15.2 cm) for the bottom.
Make All Pieces
Everything uses one color, Dusty Blue:
- Backing panel, with border and tabs: 125 g (238 m)
- Top pocket: 35 g (67 m)
- Middle pocket: 40 g (76 m)
- Bottom pocket: 45 g (86 m)
Layout (front view, rows counted from the panel bottom):
     [TAB]          [TAB]
 +--------------------------+
 |      (open, ~3.5 in)     |
 |  [ TOP  |  TOP ]  R72-94 |
 |      (gap ~1.75 in)      |
 |  [   MIDDLE    ]  R38-63 |
 |      (gap ~1.75 in)      |
 |  [   BOTTOM    ]  R2-29  |
 +--------------------------+
Joining
Method: Whipstitch with the yarn tail, working through one pocket stitch and one panel stitch at a time.
Base line: Flatten the pocket so the back wall (the marked stitches 3–34) lies flat. Line up the 32 free front loops of Rnd 3 under the back wall with stitches 3–34 of the marked panel row. That leaves 2 panel stitches free at each side. The pocket and panel both have 4 stitches per inch, so the seam is one loop to one stitch and nothing gets eased in. The pocket edges end up 1 in (2.5 cm) in from the finished side edges.
Side seams: Sew up both marked back-wall stitch columns. Work one pocket round to one panel row, since both are about 4.5 per inch. Sew through all the solid rounds. In the lace band, tack only at the Lace B sc, the Lace D sc and the Edging E sl st, so the fans stay open.
Sew the bottom pocket on Row 2, the middle pocket on Row 38 and the top pocket on Row 72.
Top pocket divider: Pinch the front wall at its center, between stitches 57 and 58. Bring it back to the panel center, between panel stitches 18 and 19. Stitch through all layers from Rnd 4 up to the last solid round. This makes two compartments.
Tension: Keep the stitches snug but not tight. If the panel puckers, take the seam out and resew it more loosely.
Size checkpoint: The panel should still measure 9 in × 24 in (22.9 × 61.0 cm) and lie flat.
Border and Tabs
Border gauge: Same as the body, 4 sc per inch. Each round adds about 0.25 in (0.6 cm) to every edge, and each ch-2 corner adds about 0.25 in (0.6 cm).
Corner ch-2 spaces are not included in the per-side counts below.
Rnd 1: With RS facing, join at the top right corner. Ch 1, sc in each of the 36 sts across the top, then ch 2 for the corner. Work 96 sc down the side, placing 8 sc in every 9 row ends (108 rows ÷ 9 × 8 = 96), then ch 2. Sc in each of the 36 free loops of the foundation ch, then ch 2. Work 96 sc up the second side, then ch 2. Join.
(Top and bottom 36 sc each; sides 96 sc each; 264 sc plus 4 ch-2 corners)
Rnd 2: Ch 1, sc in each sc around, working (sc, ch 2, sc) in each corner sp. Join.
(Top and bottom 38 sc each; sides 98 sc each; 272 sc plus 4 ch-2 corners)
Why the math works: In Rnd 1, each side count matches the body exactly: 36 sc = 9 in and 96 sc = 24 in. The corners add width: 36 sc (9 in) plus two corners of 0.25 in each gives 9.5 in (24.1 cm). Rnd 2 adds 2 sc per side: 38 sc = 9.5 in, plus two corners = 10 in (25.4 cm). The sides work the same way: 98 sc = 24.5 in (62.2 cm), plus two corners = 25 in (63.5 cm).
Tabs (make 2): Work across the 38 top stitches of Rnd 2.
- Row 1: Skip the first 5 sc from the right corner. Join in the next sc, ch 1, sc in the same st and the next 7 sts. (8 sc)
- Rows 2–27: Ch 1, turn, sc across. (8 sc)
Each tab is 2 in (5.1 cm) wide and 6 in (15.2 cm) long.
For the second tab, skip 12 sc after the first tab and repeat. The last 5 sc stay unworked (5 + 8 + 12 + 8 + 5 = 38).
Fold each tab to the back and whipstitch the last row to the back of the panel, 1 in (2.5 cm) below the top edge. The loops fit a rod up to 1.25 in (3.2 cm) in diameter.
Final Blocking
- Spray the organizer until it’s evenly damp. Don’t soak it.
- Lay it RS up on the blocking mat.
- Pin the outer edges to 10 in × 25 in (25.4 × 63.5 cm).
- Pin the pockets square, 8 in (20.3 cm) wide.
- Open each fan and pin the tip of every scallop.
- Stuff each pocket lightly with a rolled towel so the 1.5 in (3.8 cm) depth holds its shape.
- Let it dry completely before unpinning.
Final Quality-Control Checklist
- Panel is 10 in × 25 in (25.4 × 63.5 cm) and the edges are straight.
- Border counts are 38 sc on top and bottom and 98 sc on each side.
- Every pocket has 13 fans in both lace rounds.
- Pockets sit 1 in (2.5 cm) in from each side edge.
- Base seams are flat and don’t pucker.
- The top pocket divider is centered.
- Tabs are sewn securely at the same height.
- All ends are woven in through solid stitches.
Troubleshooting
- Fans won’t line up: You don’t have exactly 78 stitches. Recount Rnd 4.
- Side edges ruffle: Too many sc went into the row ends. Use exactly 8 sc per 9 rows.
- Pocket flares open at the top: Your lace tension is loose. Go down 0.5 mm for the lace band only.
- Pockets sag forward: Add tack stitches at each Lace B sc.
- Panel puckers behind a pocket: The seam is too tight. Resew it loosely.
- Tabs twist: Sew both tabs at the same depth on the back.
Care
Hand wash in cool water and lay flat to dry. Reshape the pockets while they’re damp.

Final Notes
Your gauge of 16 sc = 4 in (10.2 cm) gives you a 36-stitch panel that’s 9 in (22.9 cm) wide and 24 in (61.0 cm) tall. Each pocket has 78 stitches, which is 13 fan repeats and an 8 in (20.3 cm) wide front. The pockets sew on one to one. The border takes the sides from 96 to 98 stitches per side and brings the organizer to 10 in × 25 in (25.4 × 63.5 cm). If you check each measurement as you go, the finished piece will come out to size.
Happy crocheting!