

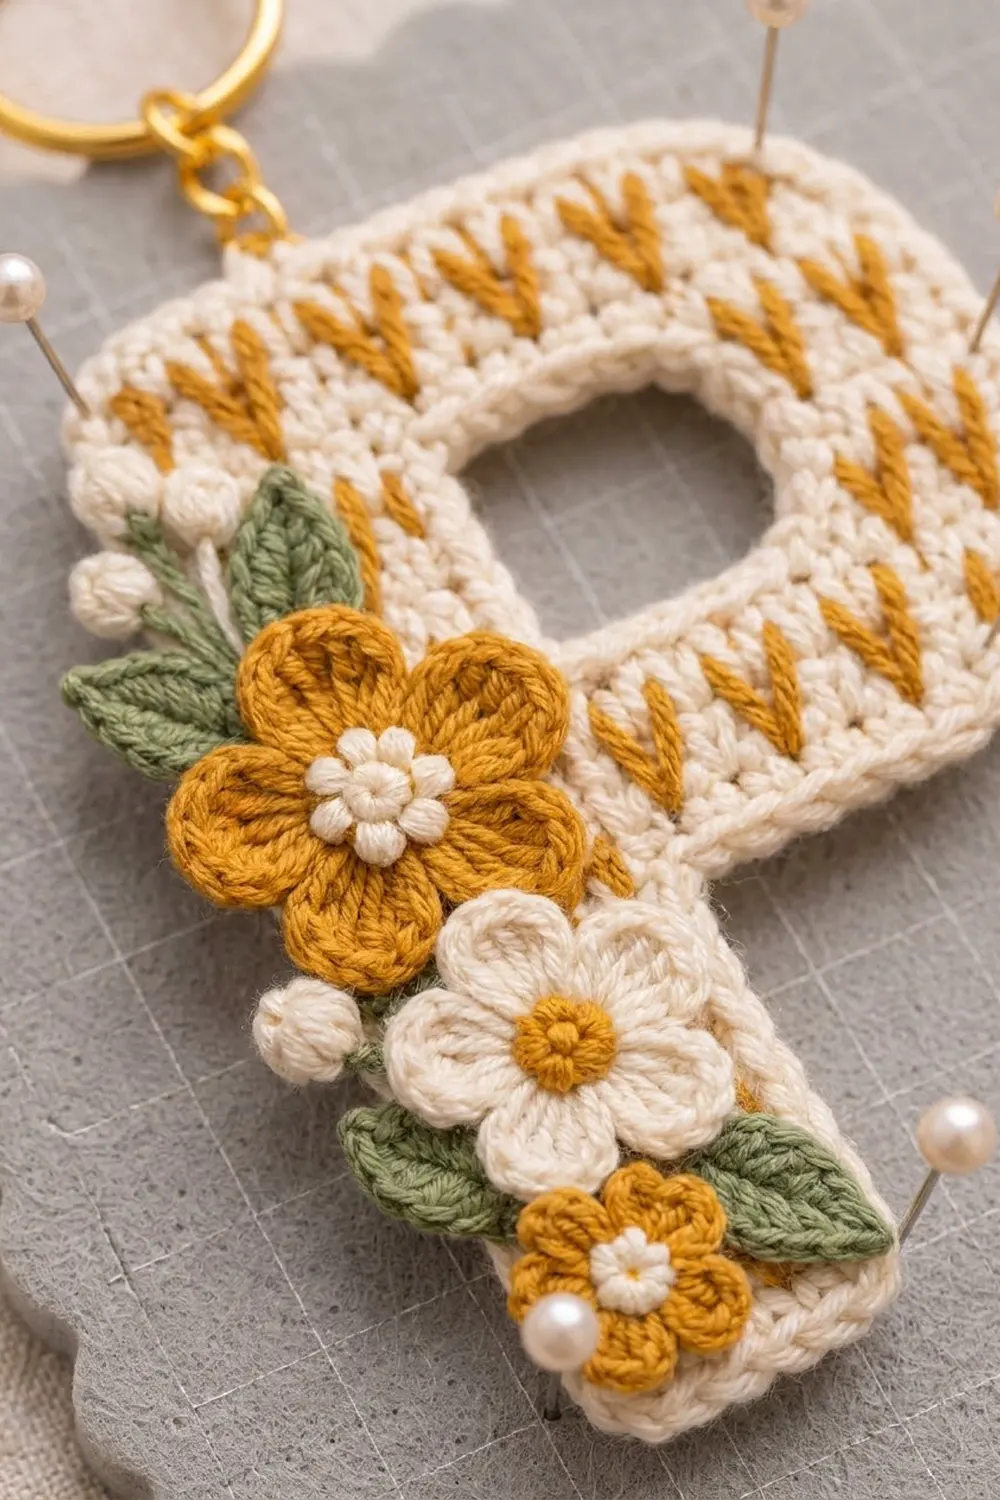
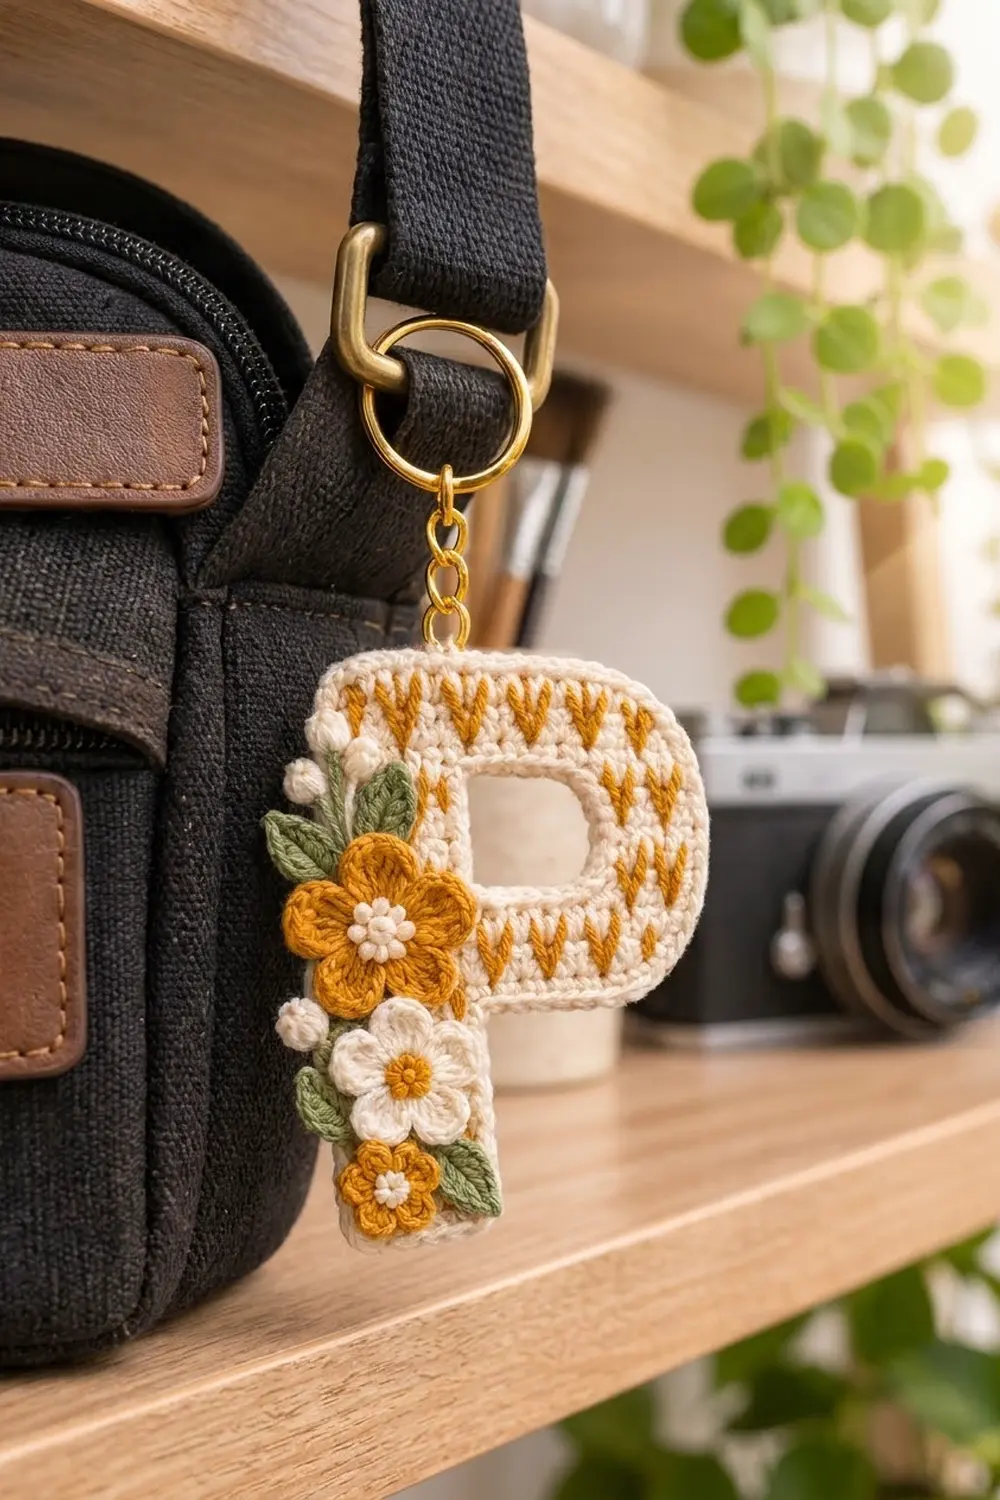
The Marigold Meadow Letter P Keychain is a small, flat initial worked in cream cotton. Rows of mustard V-stitches cross the letter, and a cluster of flowers and leaves runs down the left side of the stem. A gold key ring lets it clip onto a bag strap or a set of keys.
The palette is soft and warm. Cream is used for the letter and border, mustard for the V-stitch bands and two of the flowers, and sage green for the leaves. Because the V-stitches look like knit stitches, the letter has a cozy, sweater-like texture, and the flowers give it some dimension.
This pattern uses US crochet terms. The finished letter measures 2.75 in (7.0 cm) wide by 3.25 in (8.3 cm) tall, not including the key ring.
You crochet the letter in rows of single crochet, starting at the bottom of the stem, and split the work to leave the hole in the bowl. Then you embroider the V-stitches, add the border, and block the piece. Last, you make three flowers, four leaves, and three buds, sew them on, and attach the key ring.
Finished Size and Construction
- Finished size: 2.75 in (7.0 cm) wide x 3.25 in (8.3 cm) tall
- Skill level: Easy-Intermediate
- Terminology: US crochet terms
- Yarn weight: Sport weight (#2) cotton
- Hook: 2.5 mm
- Number of pieces: 1 letter panel plus 10 small appliqué pieces (3 flowers, 4 leaves, 3 buds)
- Layout: One letter P, with the flowers stacked down the left edge of the stem
- Panel size before border: 2.5 in (6.4 cm) wide x 3 in (7.6 cm) tall
- Border depth: about 1/8 in (0.3 cm) on every side
Materials
Choose a smooth mercerized cotton or a cotton blend in sport weight. Cotton keeps the letter crisp and shows the V-stitches clearly. Fuzzy yarn blurs the small details, so avoid it.
- Cream: 8 g, about 25 m (letter, border, cream petals, flower centers, buds)
- Mustard: 4 g, about 12 m (V-stitches, mustard petals, cream flower center)
- Sage green: 2 g, about 6 m (leaves)
Tools:
- 2.5 mm crochet hook
- Blunt tapestry needle
- 1 in (2.5 cm) gold split key ring with a short chain and jump ring
- Small pliers
- Blocking mat and rust-proof pins
- Spray bottle with water
- 1 stitch marker
Every quantity includes a margin for a gauge swatch and for weaving in ends.
Abbreviations (US Terms)
- ch – chain
- sl st – slip stitch
- sc – single crochet
- hdc – half double crochet
- dc – double crochet
- sc2tog – single crochet 2 together
- mr – magic ring
- st(s) – stitch(es)
- RS / WS – right side / wrong side
Special stitch – Embroidered V-stitch: Thread mustard on a tapestry needle. Bring the needle up from the back at the bottom center of a stitch in the lower row of a band. Take it down at the top right of the same stitch column in the upper row. Bring it up again at the bottom center, then take it down at the top left. Each V is 1 stitch wide and 2 rows tall. Keep the tension relaxed so the fabric doesn’t pucker.
Gauge and Checkpoints
Gauge: 6 sc and 7 rows = 1 in (2.5 cm) in sc rows.
To test, ch 13 and work 14 rows of 12 sc. The swatch should measure 2 in (5.1 cm) square. The project is small, so you can also use the letter panel itself as your test piece and measure it at each checkpoint.
- After Row 10: the stem is 1 in (2.5 cm) wide x about 1.4 in (3.6 cm) tall.
- After Row 13: the piece is 2.5 in (6.4 cm) wide x about 1.9 in (4.8 cm) tall.
- After Row 21: the piece is 2.5 in (6.4 cm) wide x 3 in (7.6 cm) tall.
- After the border: the piece is 2.75 in (7.0 cm) wide x 3.25 in (8.3 cm) tall.
If the piece comes out too big, switch to a 2.25 mm hook. If it comes out too small, switch to a 2.75 mm hook. Keep the stitch counts the same, because the hole and the border both depend on the 15-stitch width and 21-row height.
Letter Panel
Use cream. Row 1 is the RS. The ch 1 at the start of each row does not count as a stitch.
Stem
Foundation: Ch 7.
Row 1 (RS): Sc in 2nd ch from hook and in each ch across, turn. (6 sc)
Rows 2–10: Ch 1, sc in each st across, turn. (6 sc)
Don’t turn at the end of Row 10. With the RS facing you, your hook is now at the right edge of the stem.
Bowl Bottom Band
Extension chain: Ch 10, turn.
Row 11 (RS): Sc in 2nd ch from hook and in next 8 ch (9 sc on the chain), sc in each of the 6 stem sts, turn. (15 sc)
The 9 new stitches sit to the right of the stem and make the underside of the bowl.
Rows 12–13: Ch 1, sc in each st across, turn. (15 sc)
Checkpoint: the piece is 2.5 in (6.4 cm) wide.
Hole Section – Left Column
Row 14 (WS): Ch 1, sc in first 6 sts, turn. (6 sc) The other 9 sts of Row 13 stay unworked for now.
Rows 15–17: Ch 1, sc in each st across, turn. (6 sc)
Your hook ends at the outer left edge after Row 17. Put a marker in the live loop, pull it a little larger, and set the work aside. Don’t fasten off.
Hole Section – Right Column
Hold the piece with the WS facing you. Skip the 5 unworked sts of Row 13 next to the left column. These form the bottom of the hole.
Row 14: Join cream with a standing sc in the next st, sc in last 3 sts, turn. (4 sc)
Rows 15–17: Ch 1, sc in each st across, turn. (4 sc)
Fasten off the right column and weave in the tail.
Bowl Top Band
Put the live loop of the left column back on your hook. Work Row 18 with the WS facing, from the outer left edge toward the right.
Row 18 (WS): Ch 1, sc in each of the 6 left-column sts, ch 5, sc in each of the 4 right-column sts of Row 17, turn. (10 sc + 5 ch = 15 sts)
Row 19 (RS): Ch 1, sc in each of the 4 sc, sc in each of the 5 ch, sc in each of the 6 sc, turn. (15 sc)
Rows 20–21: Ch 1, sc in each st across, turn. (15 sc) Fasten off.
The hole is 5 sts wide and 4 rows tall.
Checkpoint: the piece is 2.5 in (6.4 cm) wide x 3 in (7.6 cm) tall.
Hole Trim
Join cream in any st at the bottom of the hole. Work sc around the hole: 5 sc in the 5 skipped sts of Row 13, 4 sc in the row-ends of the right column, 5 sc in the free loops of the Row 18 chain, and 4 sc in the row-ends of the left column. Sl st to first sc. (18 sc) Fasten off. The hole’s corners turn inward, so they don’t need extra stitches.
Embroidered V-Stitch Bands
Lay the panel RS up with the stem at the bottom. Count stitches from the left edge.
Using mustard, work one Embroidered V-stitch over each even-numbered stitch in these 2-row bands:
- Rows 3–4: sts 2, 4, 6 (3 Vs)
- Rows 7–8: sts 2, 4, 6 (3 Vs)
- Rows 11–12: sts 2, 4, 6, 8, 10, 12, 14 (7 Vs)
- Rows 15–16: sts 2, 4, 6 on the left column; sts 12, 14 on the right column (5 Vs)
- Rows 19–20: sts 2, 4, 6, 8, 10, 12, 14 (7 Vs)
That makes 25 Vs in all. Two cream rows separate the bands, so the Vs read as horizontal stripes. Use a new length of mustard for each band and carry it across the back only inside that band.
Border
Border gauge: one sc round adds about 1/8 in (0.3 cm) on every side, so it adds 1/4 in (0.6 cm) to both the width and the height.
The outer edge has 72 places to work into: 15 sts along the top, 11 row-ends on the right edge of the bowl, 9 free chain loops under the bowl, 10 row-ends on the right edge of the stem, 6 free chain loops along the bottom of the stem, and 21 row-ends on the left edge.
Rnd 1 (RS): With cream, start at the top-left corner and work around:
- Top edge: 3 sc in first st (corner), sc in next 13 sts, 3 sc in last st (corner). (19 sc)
- Right edge of bowl: sc in each of the 11 row-ends of Rows 21–11. (11 sc)
- Bowl underside: 3 sc in the first free chain loop (corner), sc in next 7 loops. (10 sc)
- Inner corner: sc2tog over the last underside loop and the row-end of Row 10. (1 st)
- Right edge of stem: sc in each row-end of Rows 9–1. (9 sc)
- Stem bottom: 3 sc in first free chain loop (corner), sc in next 4 loops, 3 sc in last loop (corner). (10 sc)
- Left edge: sc in each of the 21 row-ends. (21 sc)
Sl st to first sc. (81 sts)
Rnd 2: Sl st loosely in each st around. (81 sl st) Fasten off and weave in.
Why the math works: each of the 72 edge places gets one stitch. The 5 outer corners each add 2 extra sc (+10), and the inner sc2tog takes away 1 (−1). So 72 + 10 − 1 = 81. The side counts give the same total: 19 + 11 + 10 + 1 + 9 + 10 + 21 = 81. The extra corner stitches let the border turn without cupping, and the sc2tog keeps the inner corner from rippling. The slip stitch round neatens the edge without adding measurable width.
Flowers, Leaves, and Buds
Leave a 10 in (25.4 cm) tail on every piece for sewing.
Large Mustard Flower (make 1)
Rnd 1: With cream, mr, 10 sc in ring, pull closed, sl st to first sc. (10 sc) Fasten off cream.
Rnd 2: Join mustard in any st. *(Hdc, 3 dc, hdc) in next st, sl st in next st; rep from * 4 more times. (5 petals)
The flower is about 1.25 in (3.2 cm) across and has a cream center.
Cream Flower (make 1)
Rnd 1: With mustard, mr, 10 sc, pull closed, sl st to first sc. (10 sc) Fasten off mustard.
Rnd 2: Join cream in any st. *(Hdc, 2 dc, hdc) in next st, sl st in next st; rep from * 4 more times. (5 petals)
The flower is about 1 in (2.5 cm) across and has a mustard center.
Small Mustard Flower (make 1)
Rnd 1: With cream, mr, 5 sc, pull closed, sl st to first sc. (5 sc) Fasten off cream.
Rnd 2: Join mustard in any st. *(Hdc, dc, hdc) in next st; rep from * 4 more times, sl st to first hdc. (5 petals)
The flower is about 0.75 in (1.9 cm) across.
Leaf (make 4)
With sage green, ch 8.
Rnd 1: Sc in 2nd ch from hook, hdc in next ch, dc in next 2 ch, hdc in next ch, sc in next ch, 3 sc in last ch. Rotate the leaf and work along the free loops on the other side: sc in next loop, hdc in next, dc in next 2, hdc in next, sc in last loop, sl st into the skipped tip ch. (15 sts)
The leaf is about 1 in (2.5 cm) long and comes to a point.
Bud (make 3)
Rnd 1: With cream, mr, 6 sc, pull closed. (6 sc)
Rnd 2: Sc2tog 3 times. (3 sts)
Fasten off. Tuck the tails inside to make a small ball about 3/8 in (1.0 cm) across.
Assembly
Lay the panel RS up. Arrange the pieces down the left edge of the stem, with the flowers hanging about 0.2 in (0.5 cm) past the edge:
- A bud at the top-left corner, with a leaf just below it.
- The large mustard flower over Rows 10–15, with a leaf peeking out above its left side and a bud tucked under its lower left.
- The cream flower directly below, over Rows 5–9.
- The small mustard flower over Rows 1–4, with the last leaf to its right and the third bud at its upper left.
Use small stitches to sew through the back of each flower center and the base of each leaf. Tack the petal tips lightly so they lie flat but still lift a little.
Open the jump ring with pliers, slide it through the border at the 3rd stitch from the top-left corner, and close it fully.
Final Blocking
- Weave in all remaining ends.
- Pin the panel RS up on the mat, keeping pins away from the flowers.
- Pin the outer corners first, to 2.75 in (7.0 cm) wide x 3.25 in (8.3 cm) tall.
- Pin the stem edges straight. Including the border, the stem should be about 1.25 in (3.2 cm) wide.
- Square the hole gently with a pin.
- Mist the letter until it’s damp but not soaked.
- Leave it to dry fully, for at least 4 hours, before you take out the pins.
- Shape the flower petals lightly with your fingers.
Final Quality-Control Checklist
- Panel has 21 rows, with 15 sts on each full-width row
- Hole is 5 sts wide and 4 rows tall, trimmed with 18 sc
- 25 mustard Vs in 5 even bands
- Border Rnd 1 has 81 sts; Rnd 2 has 81 sl st
- Finished size is 2.75 in (7.0 cm) x 3.25 in (8.3 cm)
- Flowers are secure and the petals don’t wobble
- Jump ring is fully closed
- All ends are woven in and hidden
Troubleshooting
The bowl leans or the hole is crooked. Make sure you skipped exactly 5 sts and that both columns have 4 rows.
The border ripples. Your tension is loose. Redo Rnd 1 with a hook one size smaller.
The corners cup. Check that each outer corner has 3 sc in one place.
The V-stitches pucker. Loosen the embroidery tension and steam lightly.
The inner corner bulges. Check that you worked the sc2tog there.
The piece is floppy. Block it again with a light spray starch.
Care
Hand wash in cool water with mild soap and lay flat to dry. Reshape the flowers while they’re still damp.
Final Notes
Here is the measurement chain. At 6 sc and 7 rows per inch, a 15-stitch, 21-row panel measures 2.5 in (6.4 cm) by 3 in (7.6 cm). The 81-stitch border adds 1/8 in (0.3 cm) on each side, so the finished letter is 2.75 in (7.0 cm) by 3.25 in (8.3 cm). If you check each stage, the flowers and V-stitches will fall into place.
Happy crocheting!