

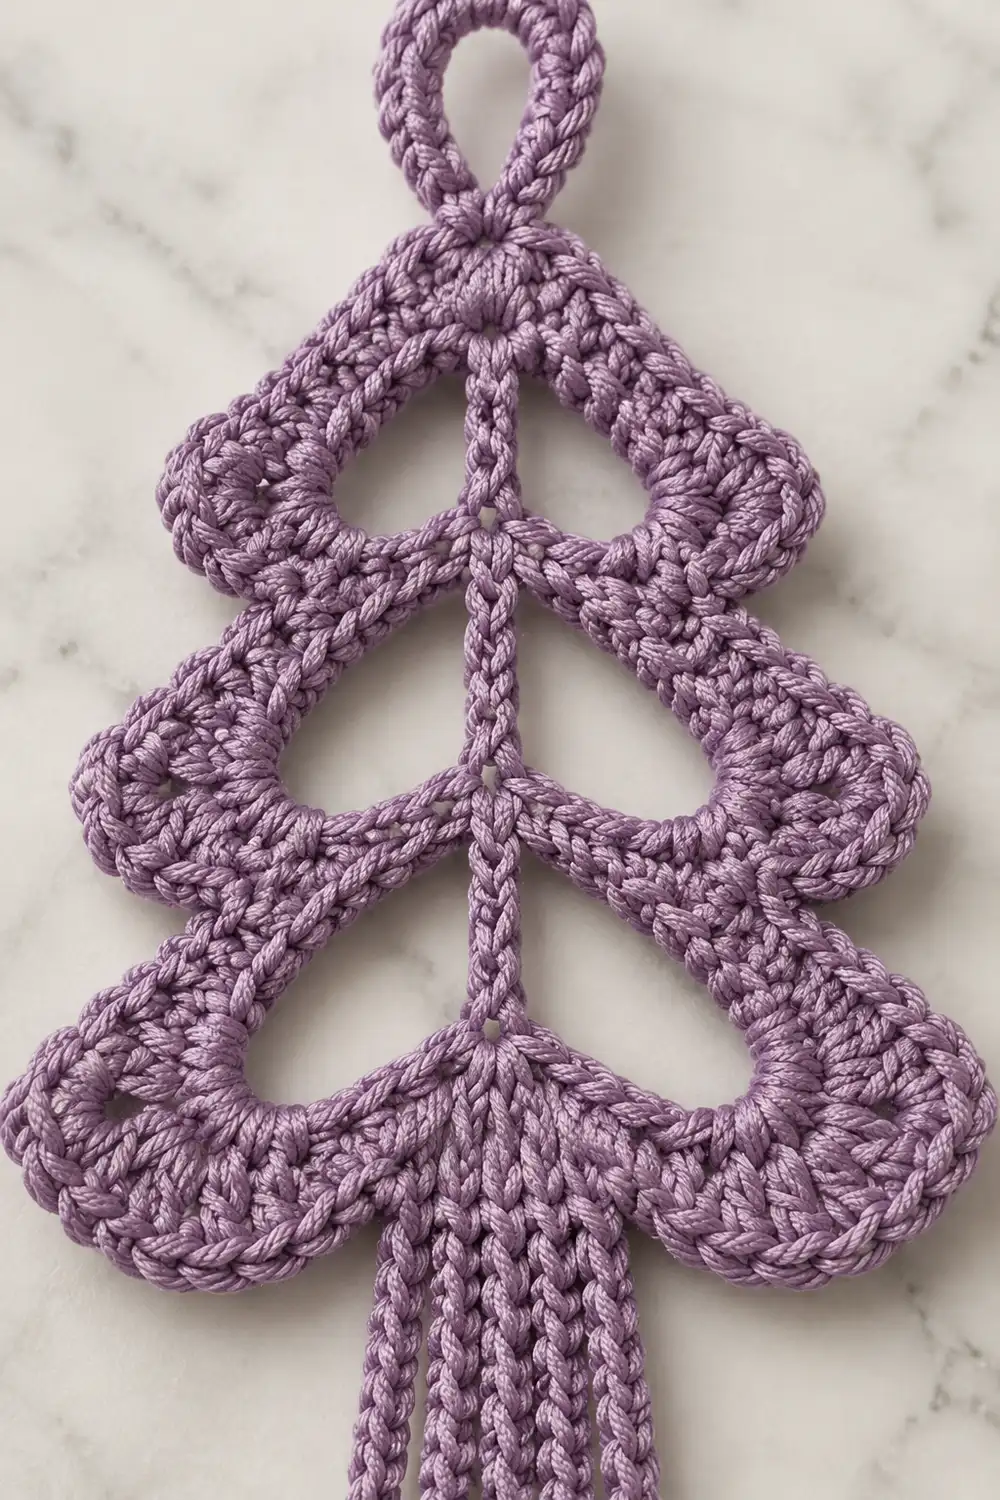
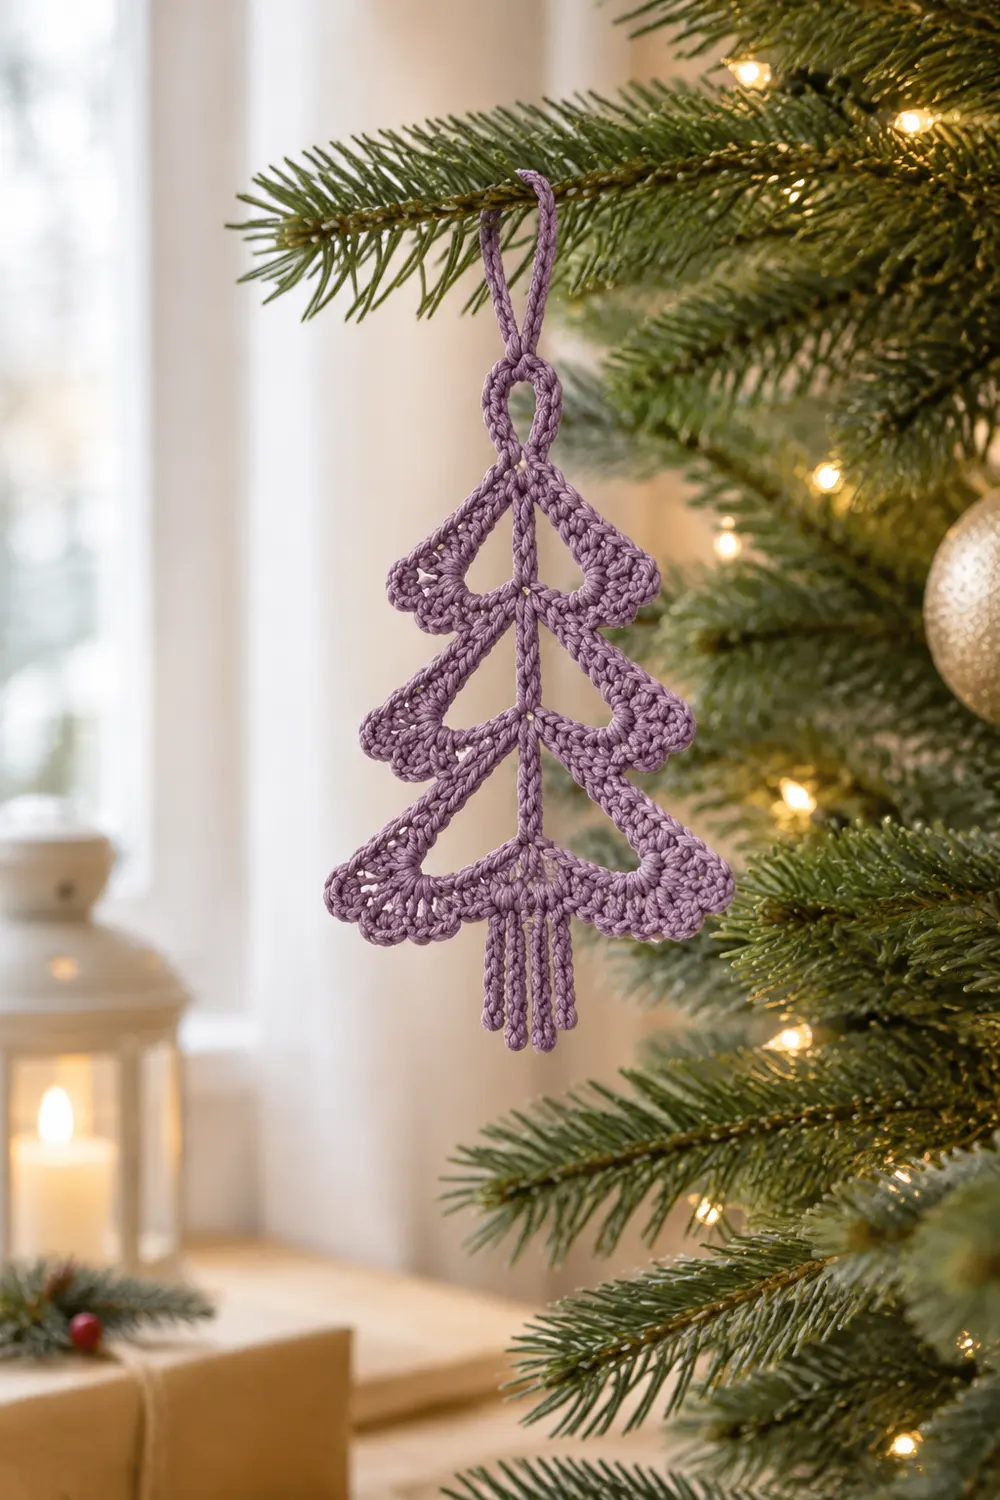
This lacy little ornament has a tapered, diamond-like tree silhouette. A rounded bulb sits at the top, three scalloped tiers hang below it, and a tassel of vertical chains finishes the bottom. The whole piece is worked in one muted purple-mauve yarn, which gives it a soft, vintage feel.
Each tier is an open chain loop edged with shell stitches. This creates airy openwork with curved scallop edges. The tiers decrease in width from top to bottom. The widest tier sits just below the bulb, and the narrowest sits just above the fringe. The result is a tree shape that reads beautifully against a plain background.
The pattern uses US crochet terms. The finished ornament measures about 4.5 in (11.4 cm) tall and 3.75 in (9.5 cm) wide across the widest tier.
Construction is simple and continuous. You crochet a chain frame first: bulb, spine, six chain loops, and fringe. Then you work one scalloped edging pass that travels down the spine and covers every loop with shells. Blocking sets the shape.
Finished Size and Construction
- Finished size: about 4.5 in (11.4 cm) tall x 3.75 in (9.5 cm) wide
- Skill level: Easy-intermediate
- Terminology: US crochet terms
- Yarn weight: DK (light worsted, #3)
- Hook: 3.5 mm (E-4)
- Number of pieces: 1, worked in one continuous frame plus one edging pass
- Layout: Bulb on top, central chain spine, three paired tiers (left and right lobes), chain fringe at the bottom
- Tier widths (after border): Tier 1 about 3.75 in (9.5 cm), Tier 2 about 3 in (7.6 cm), Tier 3 about 2.4 in (6.1 cm)
- Size before border: about 3 in (7.6 cm) wide at Tier 1 x 4.5 in (11.4 cm) tall
- Border depth: about 3/8 in (1.0 cm) added to each lobe edge
Materials
Yarn: Use a smooth DK cotton or cotton blend in muted purple or mauve. Cotton shows stitch definition clearly and holds a blocked shape well. Avoid fuzzy or very splitty yarn, because the shells need crisp edges.
- Mauve (only color): 5 g, about 12 m (13 yd)
Tools:
- 3.5 mm (E-4) crochet hook
- Tapestry needle
- Scissors
- Stitch marker
- Blocking mat or foam board
- Rust-proof pins
- Spray bottle with water
- Optional: fabric stiffener
- Optional: 6 in (15.2 cm) ribbon or thread for hanging
The yarn quantity includes a margin of about 25% for swatching and weaving in ends.
Abbreviations (US Terms)
- ch – chain
- sl st – slip stitch
- sc – single crochet
- dc – double crochet
- sk – skip
- st(s) – stitch(es)
- rep – repeat
- sp – space
Special stitch:
- Shell: Work 5 dc in the same stitch.
Spine point: This is the last chain of a spine segment, where a tier’s two loops are anchored.
Gauge and Checkpoints
Gauge: 20 sc = 4 in (10.2 cm) with a 3.5 mm hook. In this yarn, 17 ch lie at about 3 in (7.6 cm) when laid flat without stretching.
Because this is a single small piece, your test piece is the start of the ornament itself. Make the bulb and the Tier 1 frame, then measure before you continue.
Checkpoints:
- Bulb: about 0.9 in (2.3 cm) across.
- Tier 1 loop (17 ch): about 3 in (7.6 cm) when laid straight, or about 1.5 in (3.8 cm) when folded into a lobe.
- Tier 2 loop (13 ch): about 2.25 in (5.7 cm) when laid straight.
- Tier 3 loop (9 ch): about 1.6 in (4.1 cm) when laid straight.
- Top of bulb to end of spine stub: about 3.25 in (8.3 cm).
- Fringe strands: about 1.25 in (3.2 cm) long.
- After border: Tier 1 measures about 3.75 in (9.5 cm) tip to tip.
If your piece is too big, switch to a 3.25 mm hook or chain more firmly.
If your piece is too small, switch to a 3.75 mm or 4 mm hook.
Loose chains are the most common cause of oversized lobes. Keep every chain the same snug size.
Pattern: The Bulb
The bulb is the rounded section at the top. Its open center can also hold a hanging ribbon.
Ring: Ch 12, then sl st in the first ch to form a ring.
Rnd 1: Ch 1 (does not count as a st). Work 20 sc into the ring. Sl st in the first sc to join. (20 sc)
Rotate the bulb so the join sits at the bottom. The spine grows downward from this point.
Pattern: Spine and Tier 1 Frame
Spine segment 1: Ch 3. (3 spine ch) The 3rd ch is Spine Point 1.
Tier 1 left loop: Ch 17. Sl st in Spine Point 1, which is the 18th ch from the hook. (17-ch loop)
Tier 1 right loop: Ch 17. Sl st in Spine Point 1 again. (17-ch loop)
Arrange the first loop to the left and the second loop to the right.
Checkpoint: Fold one loop flat. It should reach about 1.5 in (3.8 cm) out from the spine.
Pattern: Tier 2 Frame
Spine segment 2: Ch 4. (4 spine ch) The 4th ch is Spine Point 2.
Tier 2 left loop: Ch 13. Sl st in Spine Point 2, which is the 14th ch from the hook. (13-ch loop)
Tier 2 right loop: Ch 13. Sl st in Spine Point 2 again. (13-ch loop)
Pattern: Tier 3 Frame
Spine segment 3: Ch 4. (4 spine ch) The 4th ch is Spine Point 3.
Tier 3 left loop: Ch 9. Sl st in Spine Point 3, which is the 10th ch from the hook. (9-ch loop)
Tier 3 right loop: Ch 9. Sl st in Spine Point 3 again. (9-ch loop)
Pattern: Fringe
Spine stub: Ch 2. (2 stub ch) The 2nd ch is the stub end.
Strand: Ch 10. Sl st in the 2nd ch from the hook and in each of the next 8 ch. (9 sl st) Sl st in the stub end.
Rep the strand 4 more times. (5 strands, 45 sl st total)
Fasten off and weave in the tail.
Checkpoint: The frame should measure about 3 in (7.6 cm) across Tier 1 and about 4.5 in (11.4 cm) from the top of the bulb to the fringe tips.
Border: Scalloped Edging Pass
The border is a single continuous pass. It outlines the bulb, travels down the spine with sl sts, and covers each loop with shells. The fringe is not edged.
For a sturdier edge, work each loop stitch under the top loop and back bump of the chain (2 strands).
Border gauge: One shell repeat (sk 1, shell, sk 1, sc) uses 4 ch. In this yarn, that is about 0.7 in (1.8 cm) of loop.
Shell edging for one loop: Start with the loop ch next to the spine and work around the loop in order. Sc in the 1st ch. Sk 1 ch, shell in next ch, sk 1 ch, sc in next ch. Rep from * to the end of the loop. Sl st in the spine point.
Step 1 – Bulb outline: Join yarn with a sl st in the first sc of the bulb, next to the spine. Sl st in each of the next 19 sc. Sl st in the first sc again. (21 sl st)
Step 2 – Travel: Sl st in each of the 3 ch of spine segment 1. You end in Spine Point 1. (3 sl st)
Step 3 – Tier 1: Work the shell edging on the left loop. Rep the – 4 times. (4 shells: 20 dc + 5 sc = 25 sts) Sl st in Spine Point 1.
Work the right loop the same way. (25 sts) Sl st in Spine Point 1.
Step 4 – Travel: Sl st in each of the 4 ch of spine segment 2. (4 sl st)
Step 5 – Tier 2: Work the shell edging on the left loop. Rep the – 3 times. (3 shells: 15 dc + 4 sc = 19 sts) Sl st in Spine Point 2.
Work the right loop the same way. (19 sts) Sl st in Spine Point 2.
Step 6 – Travel: Sl st in each of the 4 ch of spine segment 3. (4 sl st)
Step 7 – Tier 3: Work the shell edging on the left loop. Rep the – 2 times. (2 shells: 10 dc + 3 sc = 13 sts) Sl st in Spine Point 3.
Work the right loop the same way. (13 sts) Sl st in Spine Point 3.
Step 8 – Finish: Sl st in each of the 2 stub ch. (2 sl st) Fasten off and weave in the ends.
Counts per side:
- Left side: 4 + 3 + 2 = 9 shells; 45 dc + 12 sc = 57 sts
- Right side: 9 shells; 57 sts
- Both sides: 114 edging sts
Why the math works: Each shell repeat uses exactly 4 ch, and each loop starts with 1 sc. Every loop length therefore follows the formula (4 x shells) + 1:
- 17 = (4 x 4) + 1
- 13 = (4 x 3) + 1
- 9 = (4 x 2) + 1
The final sc of each loop lands on the last chain beside the spine, so the sl st back into the spine point closes cleanly. No stitches are left over and none are crowded.
Each shell places 5 dc into a single chain on the outside of a curve. This makes the outer edge longer than the chain beneath it, so the shells fan into scallops instead of cupping. Every lobe gains about 3/8 in (1.0 cm) at the tip. Tier 1 grows from 3 in (7.6 cm) to 3.75 in (9.5 cm) wide.
Final Blocking
- Soak the ornament in cool water for 5 minutes. Gently press out the water in a towel. Do not wring it.
- Lay the ornament on the blocking mat, right side up.
- Pin the top of the bulb. Shape the bulb into a smooth circle about 0.9 in (2.3 cm) across.
- Pin the spine in a straight vertical line.
- Angle each lobe slightly downward from the spine, like branches. Pin the lobe tips so Tier 1 measures 3.75 in (9.5 cm), Tier 2 measures 3 in (7.6 cm), and Tier 3 measures 2.4 in (6.1 cm).
- Pin the center of each shell so the scallops sit evenly. Each lobe should match its mirror on the other side.
- Comb the fringe strands straight down. Pin the tips so the fringe measures 1.25 in (3.2 cm).
- Optional: brush or spray fabric stiffener over the piece.
- Let the ornament dry completely, then unpin it.
Final Quality-Control Checklist
- [ ] The bulb is round and about 0.9 in (2.3 cm) across.
- [ ] The tiers measure 3.75 in (9.5 cm), 3 in (7.6 cm), and 2.4 in (6.1 cm), narrowing from top to bottom.
- [ ] Each side has 9 shells: 4, 3, and 2 per tier.
- [ ] Left and right lobes mirror each other.
- [ ] The scallops lie flat with no cupping.
- [ ] The spine is straight and the sl sts are even.
- [ ] There are 5 fringe strands, each about 1.25 in (3.2 cm) long.
- [ ] The total height is about 4.5 in (11.4 cm).
- [ ] All ends are woven in securely.
Troubleshooting
Shells don’t fit the loop: Recount the loop chains. Each loop must be 4 x shells + 1.
Lobes cup or curl: Your dc are too tight. Loosen your tension slightly or go up 0.25 mm.
Lobes ruffle: Your shells are too loose. Go down 0.25 mm.
The spine twists: Check that no chain is twisted before each sl st. Pin the spine firmly when blocking.
Left and right lobes don’t match: Your chain tension varied. Redo the shorter loop, keeping the chains even.
Fringe strands curl: Block them straight and use a little stiffener.
Bulb is too small to hang: Thread the ribbon through the 20 sc instead of the center.
Care
Hand wash in cool water and lay flat to dry. If you used stiffener, re-block after washing.
Final Notes
The measurement chain is simple. A 0.9 in (2.3 cm) bulb leads to a spine about 3.25 in (8.3 cm) long, finished with a 1.25 in (3.2 cm) fringe, for a total height of 4.5 in (11.4 cm).
The tier loops of 17, 13, and 9 chains each follow the 4 x shells + 1 rule. They give a frame 3 in (7.6 cm) wide, and the 3/8 in (1.0 cm) scalloped border brings the widest tier to 3.75 in (9.5 cm).
If you check each stage against these numbers, your ornament will come out crisp and symmetrical.
Optional: make several in different shades for a coordinated tree display.
Happy crocheting!