

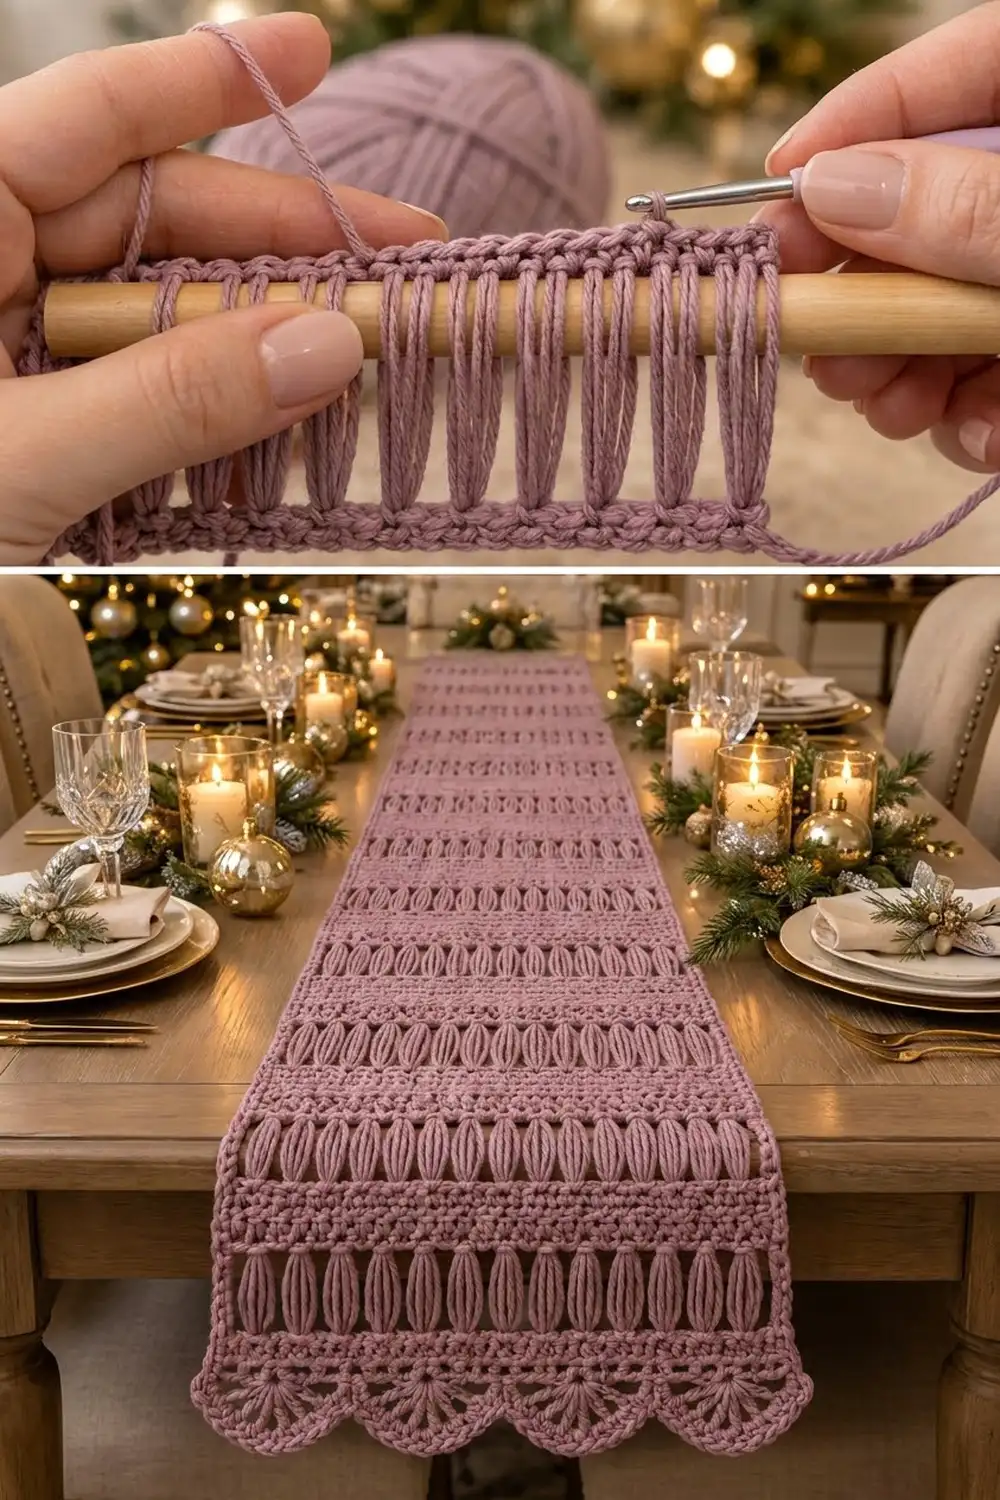
The Mauve Mist Table Runner is a single long strip of broomstick lace in a soft dusty mauve. Bands of tall, almond-shaped loop clusters alternate with neat single crochet stripes, and each short end finishes in four rounded fan scallops.
The color is quiet and warm. It works with gold candlelight, greenery, and white dishes, and it also suits an everyday table. Because the runner uses one color, the texture does all the work.
This pattern uses US crochet terms. The finished runner measures 14 in (35.6 cm) wide by 70 in (177.8 cm) long, including the scalloped edging at both ends.
You work the runner in rows from one short end to the other. A starting single crochet band comes first, then 26 repeats of one broomstick lace band followed by one single crochet band. After the body is done, you work a scalloped fan edging across each short end. That’s it: one piece, no joining.
Finished Size and Construction
- Finished size: 14 in (35.6 cm) wide x 70 in (177.8 cm) long
- Skill level: Intermediate (broomstick lace)
- Terminology: US crochet terms
- Yarn weight: Worsted (#4)
- Hook: 5.0 mm (H-8)
- Broomstick: 25 mm (US 50) knitting needle or a 1 in (2.5 cm) wooden dowel
- Number of pieces: 1
- Layout: single strip; 26 broomstick lace bands, 27 single crochet bands
- Piece size (body): 14 in (35.6 cm) x 66 in (167.6 cm)
- Size before border: 14 in (35.6 cm) x 66 in (167.6 cm)
- Border depth: 2 in (5.1 cm) scalloped edging on each short end; the long sides have no border
Materials
Yarn: Choose a smooth worsted-weight yarn, ideally cotton or a cotton blend. Smooth yarn shows each broomstick loop clearly, and cotton blocks flat and holds up on a table. Fuzzy or very splitty yarn blurs the “eye” shapes.
- Dusty Mauve: 350 g, approximately 640 m (700 yd)
These quantities include a margin of about 15% for your swatch, tension differences, and weaving in ends.
Tools:
- 5.0 mm (H-8) crochet hook
- 25 mm (US 50) knitting needle or a 1 in (2.5 cm) dowel, at least 16 in (40.6 cm) long
- Tapestry needle
- 4 locking stitch markers
- Scissors
- Measuring tape
- Rust-proof pins and blocking mats (or a clean towel on a large flat surface)
Abbreviations (US Terms)
- ch – chain
- sc – single crochet
- dc – double crochet
- sl st – slip stitch
- st(s) – stitch(es)
- sp – space
- sk – skip
- rep – repeat
- RS / WS – right side / wrong side
Special stitch: Broomstick Lace Band (BLB). A BLB is two rows: a loop row and a closing row.
Loop row: Do not turn. Pull the loop on your hook up long and slip it onto the broomstick; this is loop 1. Working back along the row from left to right, insert the hook into the next st, pull up a loop, stretch it, and slip it onto the stick. Rep in each st across. You’ll have 56 loops on the stick.
Closing row: Working right to left, insert the hook under the first 4 loops together and slide them off the stick. Yo, pull through, ch 1, and work 4 sc into the center of the group. For each remaining group, insert the hook under the next 4 loops, yo, pull up a loop, yo, pull through both loops on the hook (this is the first sc), then work 3 more sc in the same group. That makes 4 sc per group. 14 groups x 4 sc = 56 sc.
Gauge and Checkpoints
Gauge: 16 sc and 16 rows = 4 in (10.2 cm) in single crochet. One BLB (loop row plus closing row) = 1.5 in (3.8 cm) tall.
Test one piece first. Ch 21. Starting in the 2nd ch from the hook, work 20 sc. Work 3 more rows of sc. Then work one BLB over 20 sts (5 groups of 4) and 4 rows of sc.
Your swatch should measure 5 in (12.7 cm) wide x 3.5 in (8.9 cm) tall.
- Swatch too big: go down 0.5 mm in hook size.
- Swatch too small: go up 0.5 mm in hook size.
- BLB too tall or too short: pull the loops tighter or looser, or change stick size. A 19 mm stick gives shorter bands, and a 30 mm stick gives taller ones. The goal is 1.5 in (3.8 cm).
Measurement checkpoints:
- After Rows 1–4: 14 in (35.6 cm) wide x 1 in (2.5 cm) tall.
- After the first repeat: 3.5 in (8.9 cm) tall.
- After 4 repeats: 11 in (27.9 cm) tall.
- After 13 repeats (halfway): 33.5 in (85.1 cm) tall.
- Finished body: 66 in (167.6 cm) long.
- After both edgings: 70 in (177.8 cm) long.
Each repeat adds 2.5 in (6.4 cm). If you’re off by more than 1 in (2.5 cm) at checkpoint 3, adjust now rather than later.
Main Pattern: Runner Body
The stitch count stays at 56 for the whole body. That equals 14 broomstick groups of 4 sts each.
Starting Single Crochet Band
Row 1: Ch 57. Sc in the 2nd ch from the hook and in each ch across, ch 1, turn. (56 sc)
Rows 2–4: Sc in each st across, ch 1, turn. Do not ch or turn at the end of Row 4. (56 sc)
Row 4 faces you as the RS. Every loop row is worked with this side facing.
Checkpoint: 14 in (35.6 cm) wide x 1 in (2.5 cm) tall.
Repeat Section (work 26 times)
Row A (loop row): Without turning, work the BLB loop row back across the last sc row. (56 loops on stick)
Row B (closing row): Work the BLB closing row. (14 groups; 56 sc)
At the end of Row B, ch 1, turn.
Rows C–F (single crochet band): Sc in each st across, ch 1, turn. Don’t ch or turn at the end of Row F. (56 sc each row)
These four rows make the solid stripe between lace bands. They measure 1 in (2.5 cm). Since the sc band has an even number of rows, you finish with the RS facing, ready for the next loop row.
Stitch counts per repeat: Row A has 56 loops. Rows B, C, D, E, and F have 56 sc each.
Work the Repeat Section 26 times in total. Finish with Row F of the 26th repeat. Fasten off and weave in the end.
Body math: The starting band is 1 in (2.5 cm). Each repeat is 1.5 in (3.8 cm) + 1 in (2.5 cm) = 2.5 in (6.4 cm), and 26 repeats come to 65 in. Adding the starting band, 1 in + 65 in = 66 in (167.6 cm). There are 27 solid bands: 1 starting band + 26 in the repeats. The body starts and ends on a solid band, so both short ends match.
Tips for neat loops:
- Keep each loop pulled snugly against the stick so all 56 loops are the same height.
- Hold the stick under your arm or brace it against your leg for control.
- Before closing a group, count 4 loops. Twisted loops look fine, but miscounted groups will make the band slant.
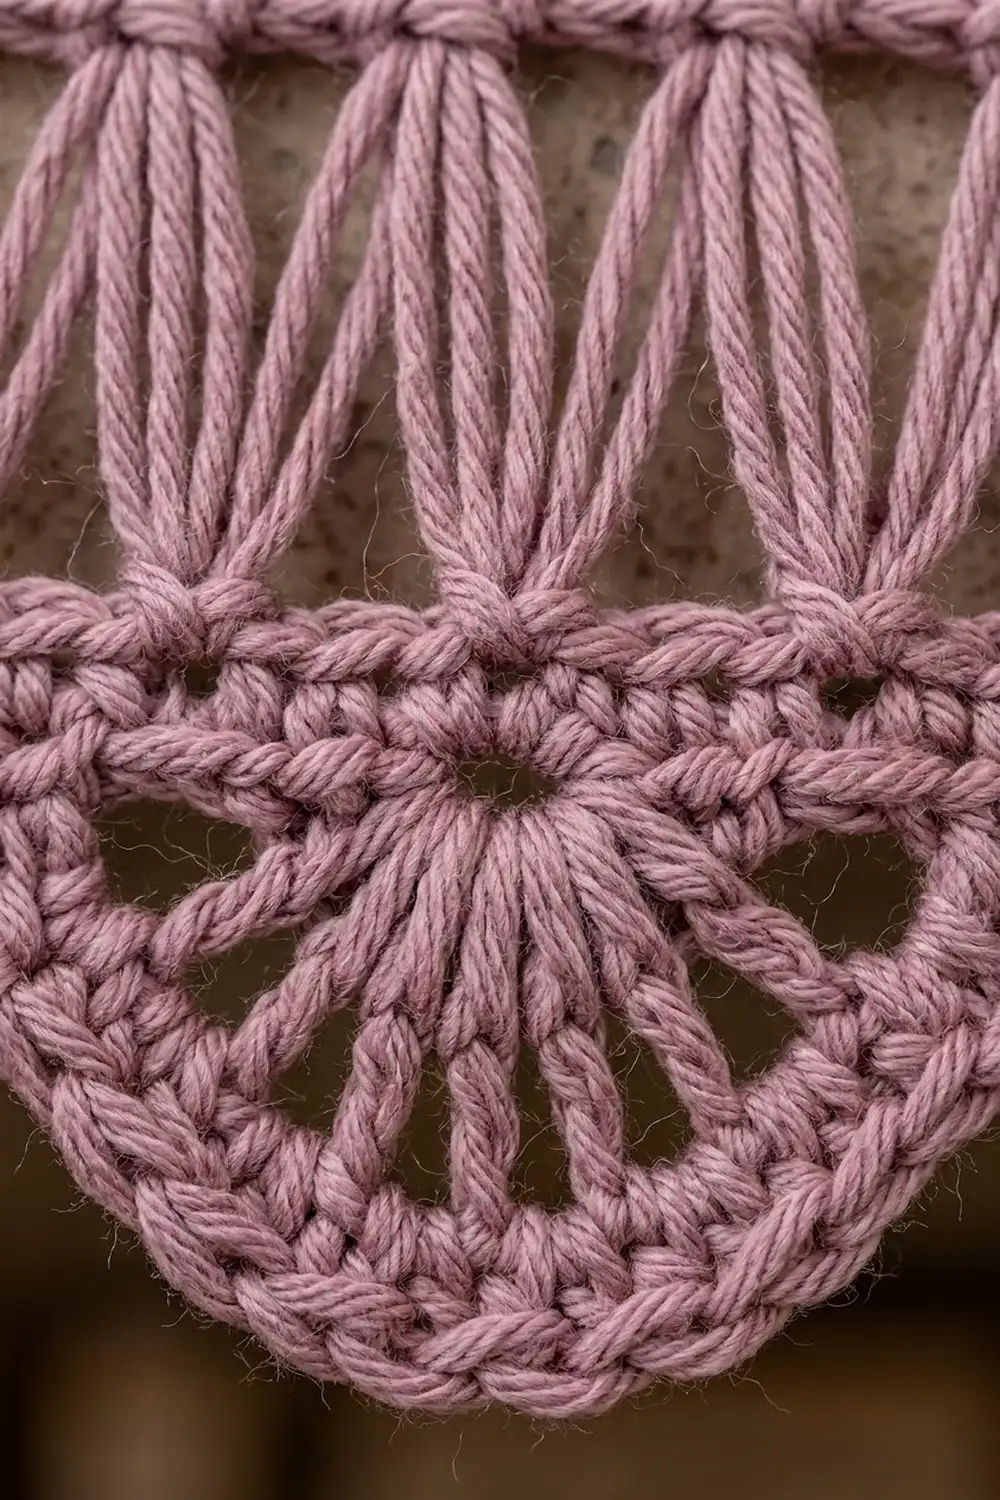
Border: Scalloped Fan Edging
The border is worked on each short end only. The long sides stay plain, just as in the finished runner.
Border gauge: One fan scallop is 3.5 in (8.9 cm) wide and 2 in (5.1 cm) deep at its center. Four scallops fill the 14 in (35.6 cm) width.
Edging 1 (finishing end)
With the RS facing, join yarn in the first st of the last sc row (Row F of the 26th repeat).
Edging Row 1 (conversion row): Ch 1, 2 sc in the first st, sc in each of the next 55 sts, ch 1, turn.
(56 sc worked 1 per st + 1 extra = 57 sc)
The one extra st gives the scallop repeat its required multiple of 14 + 1.
Edging Row 2 (fan base): Sc in the first st, sk 6 sts, 9 dc in the next st, sk 6 sts, sc in the next st; rep from * 3 more times, ch 1, turn.
(4 fans of 9 dc + 5 sc = 41 sts)*
Placement check: you’ll place a sc in sts 1, 15, 29, 43, and 57, and a fan in sts 8, 22, 36, and 50. The fan base uses all 57 sts exactly.
Edging Row 3 (spokes): Sc in the first sc, ch 2, (dc in the next dc, ch 1) 8 times, dc in the next dc, ch 2, sc in the next sc; rep from * 3 more times, ch 1, turn.
(Per fan: 9 dc, 8 ch-1 sps, 2 ch-2 sps. Total: 36 dc, 32 ch-1 sps, 8 ch-2 sps, 5 sc)*
The ch-1 sps fan the dc out into spokes around each hub.
Edging Row 4 (scallop rim): Sc in the first sc, 2 sc in the ch-2 sp, sc in the next dc, (2 sc in the next ch-1 sp, sc in the next dc) 8 times, 2 sc in the next ch-2 sp, sc in the next sc; rep from * 3 more times.
(Per fan: 2 + 1 + 24 + 2 = 29 sc. Total: 4 x 29 + 5 = 121 sc)*
Fasten off and weave in the end.
Edging 2 (starting end)
Turn the runner so the foundation chain is at the top, with the RS facing. Join yarn in the first free loop of the foundation chain. There are 56 free loops, one under each Row 1 st.
Work Edging Rows 1–4 exactly as for Edging 1. You’ll get the same counts: 57, 41, the Row 3 counts above, and 121.
Why the math works:
- The scallop repeat needs a multiple of 14 + 1 sts. The body width is 56 sts (14 x 4), so adding 1 st in Edging Row 1 gives 57 = 14 x 4 + 1.
- Each 14-st repeat covers 3.5 in (8.9 cm) at 4 sts per inch, and 4 x 3.5 in = 14 in (35.6 cm). The fans line up with the body edge.
- The 6 skipped sts on each side of a fan, plus the 9 dc packed into one st, are what curve each scallop into a semicircle.
- In Row 4, 2 sc in every space keeps the rim firm without ruffling.
Size check: each edging adds 2 in (5.1 cm), so the total length is 66 in + 2 in + 2 in = 70 in (177.8 cm).
Final Blocking
- Weave in all remaining ends along the sc bands, never through the lace loops.
- Soak the runner in cool water with a little wool or cotton wash for 15 minutes.
- Press the water out gently. Don’t wring. Roll the runner in a towel to remove the extra water.
- Lay it flat on blocking mats with the RS facing up.
- Pin the long edges straight at 14 in (35.6 cm) wide, placing a pin every 6 in (15.2 cm).
- Ease the length to 70 in (177.8 cm) and check that every sc band runs straight across.
- Pin each scallop into a smooth curve, with one pin at the center point of each fan.
- Finger-spread each broomstick group so the eye shapes open evenly.
- Let it dry completely, usually 24–48 hours, before unpinning.
Final Quality-Control Checklist
- [ ] The body is 56 sts wide throughout, and every closing row has 14 groups.
- [ ] There are 26 broomstick bands and 27 sc bands, with a solid band at both ends.
- [ ] Every sc band is exactly 4 rows.
- [ ] Each BLB measures 1.5 in (3.8 cm), and all bands look the same height.
- [ ] Each edging has 4 fans, and Row 4 has 121 sc.
- [ ] The scallops at both ends match in size and placement.
- [ ] After blocking, the runner measures 14 in (35.6 cm) x 70 in (177.8 cm).
- [ ] All ends are woven in securely and none show on the RS.
Troubleshooting
The runner is getting narrower or wider. Count the closing row. You need 14 groups of exactly 4 loops and 56 sc. Also check that your loop row puts a loop in every st, including the last one.
The loops are uneven heights. Pull each loop up firmly to the top of the stick before slipping it on. Don’t let loops slide down while you work.
The lace bands slant. A group has 3 or 5 loops. Rip back the closing row and recount.
The sc bands pull in at the edges. Make sure you work into the last st of every row and don’t skip the first st after the turning ch.
The scallops ruffle. Your dc may be loose. Go down 0.5 mm in hook size for the edging only.
The scallops cup or pull tight. Make sure you have 2 sc in every space in Row 4. If they still pull, go up 0.5 mm in hook size for the edging.
The ends don’t match. Use the same hook and tension for both edgings, and work Edging 2 into all 56 free loops of the foundation chain.
Care
Hand wash in cool water with a mild detergent and lay flat to dry, reshaping the scallops while damp. Don’t hang the runner, because the weight can stretch the lace bands.
Final Notes
The whole runner comes from one measurement chain. Your gauge of 16 sc and 16 rows to 4 in (10.2 cm) sets the 56-st width at 14 in (35.6 cm). The 1 in (2.5 cm) starting band plus 26 repeats of 2.5 in (6.4 cm) gives a 66 in (167.6 cm) body. Two 2 in (5.1 cm) scalloped edgings bring it to a finished 70 in (177.8 cm).
Check your swatch, count your groups of 4, and measure at each checkpoint. If you do, the lace bands will line up and both scalloped ends will match.
Happy crocheting!