
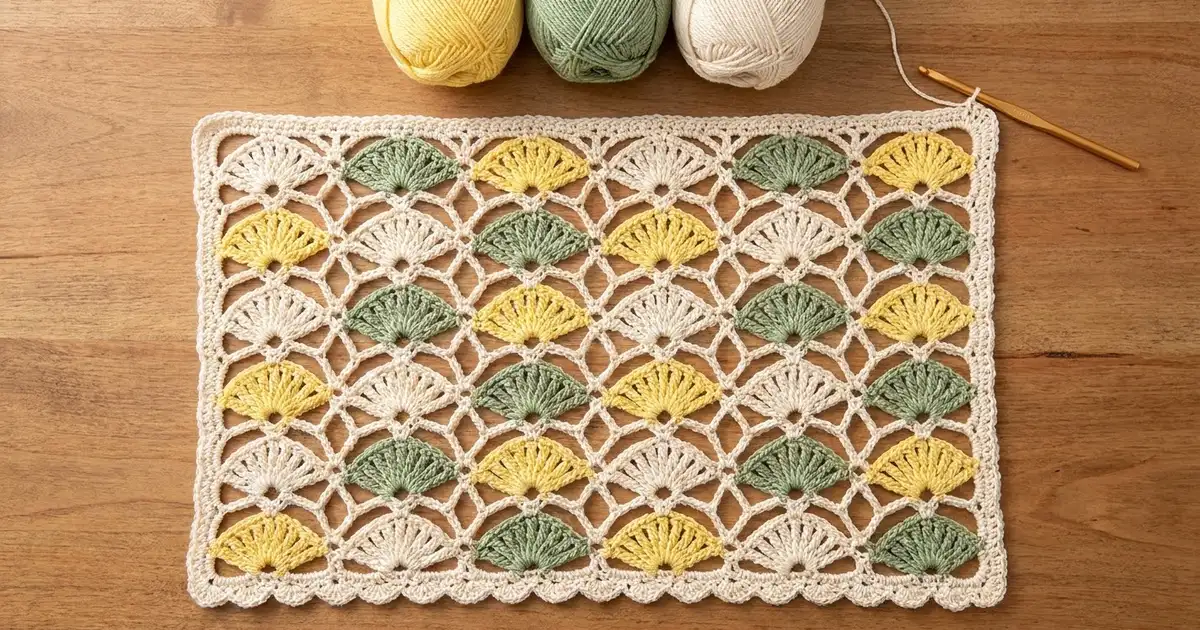
This Meadow Fan Lace Panel is a single rectangle of open cream lattice with small fans sitting in neat rows. Each fan has seven rays and a pinched base, and it sits in its own cream arch. The panel lies flat and has a soft scalloped bottom edge.
The palette is warm and fresh: buttery yellow, soft sage green and natural cream. The fans rotate through the three colors so the shades form gentle diagonal stripes across the lace. The look is cottage-style and summery without being busy.
The pattern uses US crochet terms. The finished, blocked panel measures 16 in (40.6 cm) wide by 10.5 in (26.7 cm) tall, including the border.
Construction is simple. You work the cream lattice flat in rows from the bottom up. After each arch row, you add the colored fans one at a time into the arch chains. Then a cream cap row anchors the fan tops. Six bands give 36 fans. A two-round border finishes the panel, with 12 scallops along the bottom edge.
Finished Size and Construction
- Finished size: 16 in x 10.5 in (40.6 cm x 26.7 cm), blocked
- Skill level: Easy-intermediate
- Terminology: US crochet terms
- Yarn weight: Worsted (#4)
- Hook: 5 mm (H-8)
- Number of pieces: 1 (single panel, worked flat)
- Layout: 6 rows of fans, 6 fans per row, 36 fans in total
- Piece size before border: 15 in x 9.25 in (38.1 cm x 23.5 cm)
- Fan size: about 2 in (5.1 cm) wide and 1.25 in (3.2 cm) tall
- Border depth: 0.5 in (1.3 cm) on top and sides, 0.75 in (1.9 cm) on the scalloped bottom
Materials
Choose a smooth worsted-weight yarn so the fan rays and lattice chains show clearly. Cotton or a cotton blend gives crisp stitch definition. Acrylic is softer and lighter. Use the same fiber for all three colors so they block the same way.
- Cream (main color): 50 g, about 100 m
- Yellow: 20 g, about 40 m
- Sage green: 20 g, about 40 m
These quantities include a margin for your swatch, yarn tails and small differences in tension.
Tools:
- 5 mm (H-8) crochet hook
- Tapestry needle
- 1 locking stitch marker
- Scissors
- Measuring tape
- Blocking mat, rust-proof pins and a spray bottle
Abbreviations (US Terms)
- ch – chain
- sl st – slip stitch
- sc – single crochet
- dc – double crochet
- tr – treble crochet
- st(s) – stitch(es)
- sp – space
- RS / WS – right side / wrong side
- rep – repeat
Special stitches
- Standing dc: Start with a slip knot on the hook. Yarn over, insert the hook into the stitch, and complete a dc as usual.
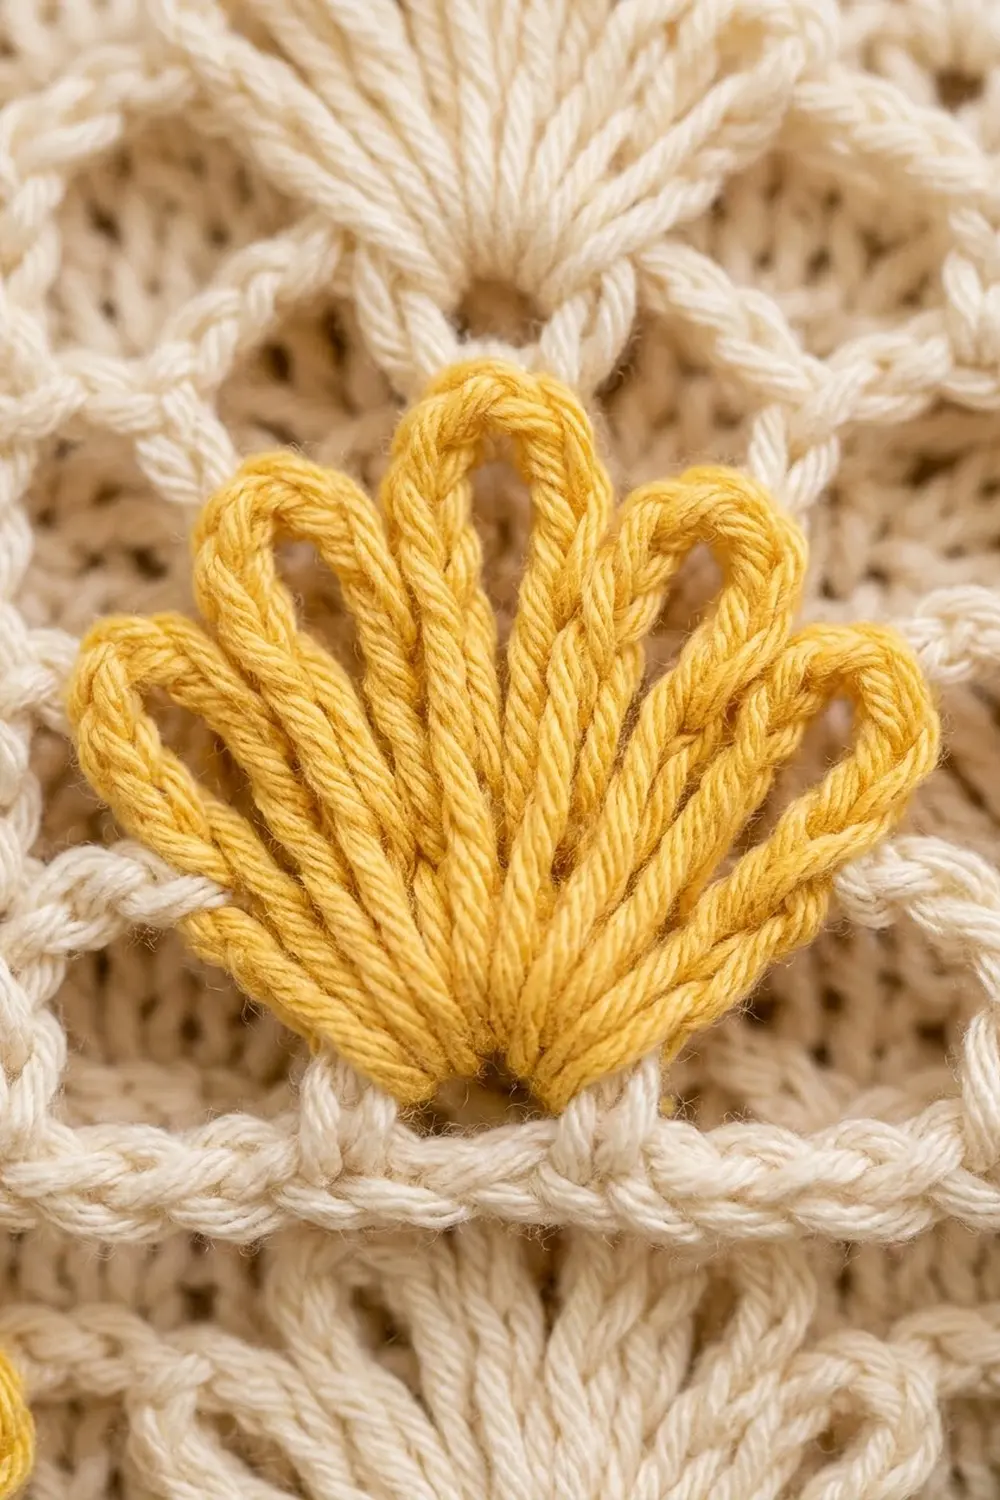
- Fan: Work all of this in the same chain: standing dc, (ch 1, dc) 6 times. That gives 7 dc and 6 ch-1 sps. Fasten off.
Gauge and Checkpoints
Gauge: One 8-stitch repeat = 2.5 in (6.4 cm) wide. One band (arch row, fans and cap row) = 1.5 in (3.8 cm) tall, blocked.
Test swatch: Make a small test piece before you start the full panel. With cream, ch 18. Work Row 1 (17 sc), then two full bands, using 2 arches per row instead of 6. Lightly block it. Measured from the first sc to the last sc, the swatch should be 5 in (12.7 cm) wide and 3.25 in (8.3 cm) tall.
Checkpoints in the main panel:
- After Row 1: 15 in (38.1 cm) wide
- After Band 1: 1.75 in (4.4 cm) tall
- After Band 3: 4.75 in (12.1 cm) tall
- After Band 6: 9.25 in (23.5 cm) tall
- After Border Round 1: 15.5 in x 9.75 in (39.4 cm x 24.8 cm)
- After Border Round 2: 16 in x 10.5 in (40.6 cm x 26.7 cm)
If your piece is too big: go down to a 4.5 mm hook, or tighten your chains. Long, loose arch chains are the usual cause.
If your piece is too small: go up to a 5.5 mm hook. If only the height is short, make your tr in the cap rows a little taller.
Being within 0.25 in (0.6 cm) of each checkpoint is fine. Blocking will even out small differences.
Pattern: The Lattice and Fans
Use cream for all numbered rows. Use the color map to place the fans.
Foundation: With cream, ch 50.
Row 1 (WS): Sc in 2nd ch from hook and in each ch across. Turn. (49 sc)
Band Structure
Each band has three steps: an arch row (RS), a set of 6 fans (RS), and a cap row (WS). Work 6 bands in total.
Row 2 (RS, arch row): Ch 1, sc in first sc, ch 7, skip next 7 sc, sc in next sc; rep from * 5 more times. Do not turn. (7 sc, 6 ch-7 arches; 1 + 6 x 8 = 49 sts)
Place the cream loop on the locking marker so it can’t unravel.
Fans (RS): With RS facing, find the 4th (center) ch of each ch-7 arch. Work 1 Fan into that center chain, using the color shown on the color map for this band. Each fan is a separate small piece of yarn: join, work the fan, and fasten off. (6 fans, each with 7 dc and 6 ch-1 sps)
The fan rays spread upward inside the arch. Because they all come from one chain, the base is pinched.
Row 3 (WS, cap row): Put the cream loop back on the hook and turn. Ch 4 (counts as tr), ch 3, sc in 4th (center) dc of next fan, ch 3, tr in next sc; rep from * 5 more times. Turn. (7 tr, 6 sc, 12 ch-3 sps; 7 + 6 + 36 = 49 sts)
The tr keeps the lattice level with the fan tops. The ch-3 sps form the small diamonds between fan columns.
Row 4 (RS, arch row): Ch 1, sc in first tr, ch 7, skip (ch-3 sp, sc, ch-3 sp), sc in next tr; rep from * 5 more times. Work the last sc into the top of the turning ch-4. Do not turn. (7 sc, 6 ch-7 arches)
Each new arch sits directly above a fan from the band below, so the fans stack in straight columns.
Continue: Work fans into Row 4, then Row 5 as a cap row. Repeat the arch row, fans and cap row until you have 6 bands, finishing with Row 13 (WS, cap row). Do not fasten off cream.
Row summary: Row 1 is the base. Even rows 2–12 are arch rows. Odd rows 3–13 are cap rows.
Fan Color Map
Read each line left to right with the RS facing you. C = cream, Y = yellow, G = sage green.
Band 6 (top):    C  G  Y  C  G  Y
Band 5:          Y  C  G  Y  C  G
Band 4:          C  G  Y  C  G  Y
Band 3:          Y  C  G  Y  C  G
Band 2:          C  G  Y  C  G  Y
Band 1 (bottom): Y  C  G  Y  C  G
Each band uses 2 fans of each color, so you’ll make 12 cream, 12 yellow and 12 green fans in total. If you work right to left, place fans by their position, not by the order you happen to work them.
Tails: Weave each fan’s tails into the back of that same fan, so cream never shows behind yellow or green. You can weave them in band by band, or all at the end. Doing them as you go keeps the work tidy.
Border
Border gauge: Work the border at the same tension as Row 1. Around the edges, aim for about 3.2 to 3.4 sc per inch (2.5 cm).
Round 1 (RS): Turn so the RS is facing. Use the live cream loop.
- Top edge: Ch 1, 3 sc in first tr (corner). 3 sc in next ch-3 sp, sc in next sc, 3 sc in next ch-3 sp, sc in next tr; rep from * 5 more times. On the last repeat, work 3 sc in the final tr (corner) instead of 1.
- Side edge: Rotate to work down the side. For each band, work 4 sc around the tr end of the cap row and 1 sc in the sc end of the arch row. Finish with 1 sc in the end of Row 1. (6 x 5 + 1 = 31 sc)
- Bottom edge: 3 sc in first free loop of foundation ch (corner). Sc in each of next 47 loops, then 3 sc in last loop (corner).
- Second side: 1 sc in the end of Row 1. For each band, work 1 sc in the arch row end and 4 sc around the cap row tr. (31 sc) Sl st to first sc.
Round 1 counts: Top 51 sts and bottom 51 sts (47 + 2 corner-group extras + 2 corners). Each side has 35 sts (31 + 2 + 2). Every side count includes its 2 corner sts. Total: 168 sts.
Round 2 (RS): Sl st into the center sc of the first corner. Ch 1, 3 sc in same st.
- Top: Sc in each of next 49 sts, 3 sc in corner.
- Side: Sc in each of next 33 sts, 3 sc in corner.
- Bottom: Sc in next st, skip 1 st, 5 dc in next st, skip 1 st, sc in next st; rep from * 11 more times (12 scallops; 1 + 12 x 4 = 49 sts used). 3 sc in corner.
- Side: Sc in each of next 33 sts. Sl st to first sc. Fasten off.
Round 2 counts: Top 53 sts. Sides 37 sts each. Bottom 77 sts (13 sc + 60 dc + 2 + 2). Total: 200 sts.
Why the math works: Each row in the body uses exactly 49 sts. Because 49 = 1 + 6 x 8, the top edge (cap row) and bottom edge (foundation) both give 47 middle sts plus 2 corners in Round 1. On Round 2, 49 sts between corners divide exactly into 12 scallop repeats of 4 sts plus 1 starting sc. On the sides, 31 sc over 9.25 in (23.5 cm) is about 3.35 sc per inch. That’s very close to the body gauge, so the edges neither ruffle nor pull in.
Final Blocking
- Weave in all remaining tails before blocking.
- Spray the panel until it’s evenly damp, or soak it and gently press out the water in a towel.
- Lay it RS up on the mat and pin the four corners to 16 in x 10.5 in (40.6 cm x 26.7 cm).
- Pin the straight edges every 1 in (2.5 cm) so they’re straight.
- Pin the tip of each scallop so all 12 scallops are evenly spaced.
- Using your fingers, spread each fan’s rays into an even half-circle about 2 in (5.1 cm) wide.
- Check that the fan columns run straight up the panel. Leave it pinned until it’s completely dry.
Final Quality-Control Checklist
- Each arch row has 7 sc and 6 ch-7 arches.
- Each cap row has 7 tr, 6 sc and 12 ch-3 sps.
- There are 36 fans, each with 7 dc and a pinched base.
- Every band follows the color map, so the colors form diagonals.
- The fans stack in 6 straight columns.
- Round 1 has 168 sts and Round 2 has 200 sts.
- There are 12 even scallops along the bottom edge.
- The blocked size is 16 in x 10.5 in (40.6 cm x 26.7 cm).
- No tails show on the RS.
Troubleshooting
Fans look cupped or crowded. Your ch-1 sps between the dc are too tight. Loosen them, or fasten off with a gentle tug only.
Lattice puckers between fans. The cap row tr are too short. Pull up the first loop a little taller.
Fans lean to one side. You worked into the 3rd or 5th ch instead of the center ch. Count from the sc each time, and redo that fan.
Panel is wider at the top. Your arch chains loosened as you went. Check the width against 15 in (38.1 cm) after every band.
Sides ruffle. Use 4 sc on cap row ends instead of 5. Don’t add extra sc.
Scallops are uneven. Recount: 49 sts between corners, with one sc between each 5-dc scallop.
Care
Hand wash in cool water with a mild soap. Press out the water gently and dry flat, reshaping the fans while damp.

Final Notes
The measurement chain is straightforward. Each 8-st repeat is 2.5 in (6.4 cm), so 6 repeats give a 15 in (38.1 cm) width. Each band is 1.5 in (3.8 cm), so Row 1 plus 6 bands gives 9.25 in (23.5 cm). The border adds 0.5 in (1.3 cm) on the top and sides and 0.75 in (1.9 cm) at the scalloped bottom. That brings the panel to 16 in x 10.5 in (40.6 cm x 26.7 cm). If you check your stitch counts at every row, the fans will line up perfectly.
Happy crocheting!